Reader small image

You're reading from  Building Smart Home Automation Solutions with Home Assistant

Product typeBook
Published inSep 2023
PublisherPackt
ISBN-139781801815291
Edition1st Edition
Right arrow
Author (1)
Marco Carvalho
Marco Carvalho
author image
Marco Carvalho

Marco Carvalho is an experienced home automation hobbyist engineer, electrical engineer, and technician. Pursuing his passion for electronics and embedded systems, he created an embedded home automation task scheduler using X10 Home Automation devices in 2006. Nowadays, he uses wireless electronic devices and the Home Assistant software to build different smart home automation applications. As an MSc in Computer Science, Marco has worked with several well-known companies such as IBM, Jabil, Phillips, and Hexagon where he extended his support in development and manufacturing of electronic products. At the time of this publication, he is the Director of Engineering for Apex Microtechnology, where he is involved in the development of high power, high precision analog components.
Read more about Marco Carvalho

Right arrow

Hands-On Project 2 – Creating an LED Strip Controller and Adding It to Home Assistant

This second hands-on project will teach you how to create an LED strip controller using a wireless microcontroller module and an application developed specifically to do it. The steps to create the controller, and later the software deployment, will be explained. You will be able to configure the LED strip controller using the application directly and also using Home Assistant.

Using what we learned in Chapter 5, we will create an automation that will be attached to the controller so that it will be very useful for ambient decoration, mainly on holidays such as Halloween and Christmas, which is the purpose I’m using it for in my home today.

In this chapter, we will be covering the following topics to build the project:

  • How an LED strip controller works
  • Grouping the materials and connecting the parts
  • Deploying the controller software
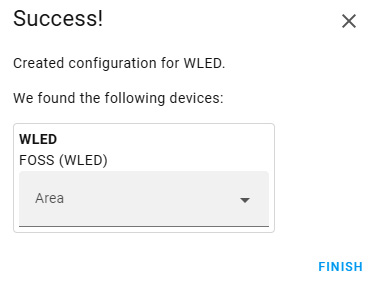
  • Configuring the LED strip...

Technical requirements

There are similar technical requirements to Chapter 3 and Chapter 4 to complete the project described in this chapter. You will also need to apply the knowledge learned in Chapter 5 to create a Home Assistant automation using the LED strip controller in a later section of this chapter. If you know any programming language, it will help to understand the automation example where you will be using templates for Home Assistant. All resources used in this book are available at https://github.com/PacktPublishing/Building-Smart-Home-Automation-Solutions-with-Home-Assistant/tree/main/Chapter%2009. Check out the following video to view the Code in Action: https://bit.ly/451EGiZ

How an LED strip controller works

Before understanding how an LED strip controller works, we will have to learn what an LED strip is. An LED strip, also known as LED tape or LED ribbon, is a flexible electronic circuit board with multiple light-emitting diodes (LEDs) mounted on it. It is a type of lighting solution that can be used in a variety of applications, such as accent lighting, task lighting, and decorative lighting. There is a variation of the LED strip that follows the same work principle but instead of the LED connection being set up using a flexible circuit, it is done using wires. This variation is called an LED string. I use LED strings to decorate my Christmas tree. Figure 9.1 shows a photo of an LED strip on the left and an LED string on the right.

Figure 9.1 – LED strip x LED string configuration

Figure 9.1 – LED strip x LED string configuration

LED strips come in a range of colors and color temperatures, and they are available in various lengths and densities. They are typically...

Grouping the materials and connecting the parts

In this section, we will group the materials required to build the LED strip controller. The specifications of these materials will also be discussed. In sequence, we will present how the circuit should be interconnected and the steps to assemble it.

Materials required to build the LED strip controller

Before we list all the materials required to build the LED strip controller, I would like to comment on the LED strip that will be used. In my projects, I prefer to use an LED strip with the following specification:

  • Supply voltage: 5V DC
  • Density: Min of 30 LEDs/meter
  • Color: At least RGB
  • Ingress Progression (IP): IP30 for indoor installations and IP67 for outdoor installations
  • Length: 5 meters
  • Addressable

For this project, we will build an LED strip controller to be placed outdoors at the front of my house so we will have to use IP67 as the IP rating. The LED strip we will use is based on the LED...

Deploying the controller software

I was grateful when I was building my LED strip for the first time. I thought I could develop one from scratch but I was running late to get it ready for Halloween. Then I started to look at some options on the internet, when I found the software I am using today to manage all the strip lights I built. This software is called WLED.

The WLED software was created by Christian Schwinne and made to run under Expressif Systems’ popular ESP8266 and ESP32 wireless microcontroller modules. It implements a web server in these devices and is intended to control some LED types, including the WS2812B we are using in this project. It has multiple features and configurations we will be exploring in this chapter. For example, it has over 100 integrated special effects and can control 3 different LED outputs independently if we are using EP8266, and 10 LED outputs if an ESP32 is used. It has everything we will need for this project and more. Another key...

Configuring the LED strip controller using the WLED software application

You should not face many issues configuring and testing the WLED application. The application offers a lot of configuration options and it is very intuitive. You need to have the ESP8266 Wi-Fi module connected to the power supply used to power the LED strip controller. We will first connect our project to the home Wi-Fi network, and after we will go over the main configurations to be done using the WLED application. We will cover these two subjects in the next subsections.

Configuring the Wifi network in the WLED application

Once the power is connected, you will need to use the WLED software application using your web browser. Follow these steps to configure the LED strip controller:

  1. Using your cell phone or your computer, check for the WLED-AP Wi-Fi network. Connect to it using the default password, wled1234.
  2. Once connected to the WLED-AP Wi-Fi network, if you are using a computer and the web...

Integrating the LED strip controller into Home Assistant

The WLED integration with Home Assistant is simple. After you execute the steps from the previous section, open the command palette using the C hotkey, type integrations, and select it (or use Settings | Devices & Services), as can be seen in Figure 9.13.

Figure 9.13 – Integrations configuration from the C hotkey

Figure 9.13 – Integrations configuration from the C hotkey

You will see the WLED integration ready to be configured as presented in Figure 9.14.

Figure 9.14 – WLED final configuration screen in Home Assistant

Figure 9.14 – WLED final configuration screen in Home Assistant

Click on the CONFIGURE button to configure the WLED integration within Home Assistant. A pop-up window will be presented asking you if you want to add the WLED to Home Assistant. Click on the SUBMIT button. The screen presented in Figure 9.15 will ask you to assign the WLED to an area. We will leave it blank for now and click on the FINISH button.

Figure 9.15 – WLED final configuration screen in Home Assistant

Figure 9.15 –...

Creating an automation using the LED strip controller

As mentioned, the advantage of having the LED strip controller integrated into Home Assistant is being able to use the WLED integration entities in coordination with other parameters to create an automation.

In the case of our LED strip controller, we will need to consider what we can associate to use the two playlists created for the Halloween and Christmas seasons. The first thing we can associate is daytime. We only need the LED strip controller to be turned on at night and not the entire night – maybe until midnight or for four hours after sunset. So I decided that we need both playlists to be executed after sunset for 4 hours. The second factor to associate and distinguish between the two playlists is the time of the year. The Halloween playlist should be executed in October (or month number 10) and the Christmas playlist should be executed in December (or month number 12). In summary, the automation to be created...

Installing the LED strip controller in your home

As you will have noticed from Figure 9.3 and the Ch9-1 and Ch9-2 videos, I installed the LED strip controller project at the front of my house as a decorative light for Halloween and Christmas. I found a perfect spot for the installation that perfectly fits my entire LED strip and with the possibility of attaching some hooks to it so I can easily remove the LED strip. I used some type of carton paper and put hot glue to attach it to the house. You can see one hook attached to the LED strip in Figure 9.23.

Figure 9.23 – LED strip installation

Figure 9.23 – LED strip installation

On the ESP8266 Wi-Fi module side, I have to make sure to install it to somehow protect it from rain and any type of severe weather. I always keep glasses cases so I can use them in small projects like this. They are usually made of plastic, so it is quite easy to make holes and manipulate them. I made three holes in the glasses case – two to install a cable...

Summary

In this chapter, you learned how to create an LED strip controller project. You first learned how an LED strip works and we moved on to explaining and grouping the materials to build the project. In the sequence, it was explained how to easily interconnect the parts to create the project. The electronics part of the project was concluded and we continued with the software integration part.

The software of the WLED application was deployed to the project and you were guided on how to do it. Once the software was deployed, a couple of configurations were explained in detail so you could start putting the project to use. You learned how to create some configurations using the application software and later learned how to integrate and use the project in Home Assistant.

We reviewed some previous content, from Chapter 5, by creating a new automation where a new Home Assistant resource called a template was explored. You also briefly learned how to use them in the project.

...
lock icon
The rest of the chapter is locked
You have been reading a chapter from
Building Smart Home Automation Solutions with Home Assistant
Published in: Sep 2023Publisher: PacktISBN-13: 9781801815291
Register for a free Packt account to unlock a world of extra content!
A free Packt account unlocks extra newsletters, articles, discounted offers, and much more. Start advancing your knowledge today.
undefined
Unlock this book and the full library FREE for 7 days
Get unlimited access to 7000+ expert-authored eBooks and videos courses covering every tech area you can think of
Renews at $15.99/month. Cancel anytime

Author (1)

author image
Marco Carvalho

Marco Carvalho is an experienced home automation hobbyist engineer, electrical engineer, and technician. Pursuing his passion for electronics and embedded systems, he created an embedded home automation task scheduler using X10 Home Automation devices in 2006. Nowadays, he uses wireless electronic devices and the Home Assistant software to build different smart home automation applications. As an MSc in Computer Science, Marco has worked with several well-known companies such as IBM, Jabil, Phillips, and Hexagon where he extended his support in development and manufacturing of electronic products. At the time of this publication, he is the Director of Engineering for Apex Microtechnology, where he is involved in the development of high power, high precision analog components.
Read more about Marco Carvalho