Search icon
Arrow left icon
All Products
Best Sellers
New Releases
Books
Videos
Audiobooks
Learning Hub
Newsletters
Free Learning
Arrow right icon
Arduino for Secret Agents

You're reading from  Arduino for Secret Agents

Product type Book
Published in Nov 2015
Publisher
ISBN-13 9781783986088
Pages 170 pages
Edition 1st Edition
Languages
Concepts
Author (1):
Marco Schwartz Marco Schwartz
Profile icon Marco Schwartz

Table of Contents (16) Chapters

Arduino for Secret Agents
Credits
About the Author
About the Reviewer
www.PacktPub.com
Preface
A Simple Alarm System with Arduino Creating a Spy Microphone Building an EMF Bug Detector Access Control with a Fingerprint Sensor Opening a Lock with an SMS Building a Cloud Spy Camera Monitoring Secret Data from Anywhere Creating a GPS Tracker with Arduino Building an Arduino Spy Robot Index

Chapter 2. Creating a Spy Microphone

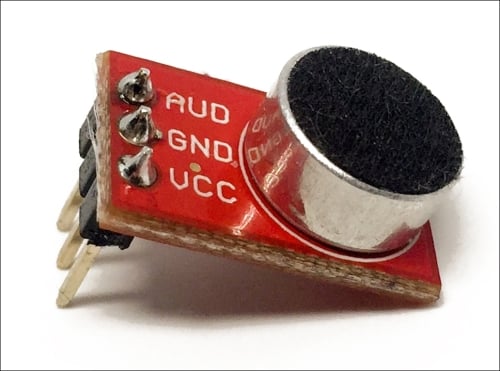
In this chapter, we are going to build a very useful device for any secret agent: a spy microphone. The project will be based on Arduino, with a simple amplified microphone and an SD card.

The following are the steps that we are going to take to build this project:

  • We will see how to configure the project in order to make sure that it is recording for a given amount of time that can be configured by the user

  • Then, the recorded audio file will be written on the SD card and be accessible from any computer

  • Before doing that, we will test all the components of the project individually

Let's dive in!

Hardware and software requirements


Let's first see what the required components for this project are. As usual, we will use an Arduino Uno board as the 'brain' of the project.

Then, we will need a microphone. I used a simple SparkFun electret microphone, which has an amplifier onboard, as shown in the following image:

The most important thing here is that the microphone is amplified. For example, SparkFun is amplified 100 times, making it possible for the Arduino Uno to record usual sound levels (such as voices).

Then, you will need a microSD card with an adapter:

You will also need a way to record data on the SD card. There are many ways to do so with Arduino. The easiest, which is the solution that I chose here, is to use a shield. I had an Ethernet Shield available, which is great because it also has an onboard microSD card reader.

You can, of course, use any shield with a microSD card reader or even a microSD reader breakout board.

You will also need a breadboard and some jumper wires to make...

Using the SD card


The first thing that we are going to do in this project is to test whether we can actually access the SD card. This will ensure that we don't run into SD card-related problems later in the project.

This is a picture of the Ethernet Shield that I used, with the microSD card mounted on the right:

Let's now see the code that we will use to test the SD card's functionalities. The following is the complete code for this section:

// Include the SD library
#include <SPI.h>
#include <SD.h>

// Set up variables using the SD utility library functions:
Sd2Card card;
SdVolume volume;
SdFile root;

// change this to match your SD shield or module;
// Arduino Ethernet shield: pin 4
// Adafruit SD shields and modules: pin 10
// Sparkfun SD shield: pin 8
const int chipSelect = 4;

void setup()
{
  // Open serial communications and wait for port to open:
  Serial.begin(115200);
  while (!Serial) {
    ; // wait for serial port to connect. Needed for Leonardo only
  }


  Serial...

Testing the microphone


We are now going to make sure that the microphone is working correctly and especially check whether it can record voice levels, for example. I had a problem when I was testing the prototype of this project with a microphone that wasn't amplified; I just couldn't hear anything on the recording.

The first step is to plug the microphone into the Arduino board. There are 3 pins to connect the microphone: VCC, GND, and AUD. Connect VCC to the Arduino 5V pin, GND to the Arduino GND pin, and AUD to the Arduino analog pin A5.

The following is a schematic to help you out:

Here is an image of the final result:

We are now going to use a very simple sketch to read out the signal from the microphone and print it on the serial monitor:

// Microphone test

void setup() {
 
  // Start Serial
  Serial.begin(115200);
}

void loop() {
 
  // Read the input on analog pin 5:
  int sensorValue = analogRead(A5);
 
  // Print out the value you read:
  Serial.println(sensorValue);
  delay(1); ...

Building the spy microphone


In this section, we are going to put everything together and actually build our spy microphone.

The hardware for the project is nearly ready if you followed the previous section. You just need to plug the SD card into the reader again.

I also added an LED on pin 7, just to know when the recording is on. If you want to do the same, you just need an LED and a 330 Ohm resistor. Of course, remove this LED when you actually want to use it as a spy microphone or your project might get noticed.

The schematic to help you out is as follows:

The following is the image of the completely assembled project:

We are now going to see the details of the code for the project. Basically, we want the device to record audio from the microphone for a given amount of time and then stop the recording.

As the code is long and complex, we are only going to see the most important parts here.

The first step is to include the SdFat library:

#include <SdFat.h>

Then, we will create the instances...

Recording on the SD card


In the last section of the chapter, we are actually going to test the project and record some audio.

First, copy all the code and paste it into the Arduino IDE. Compile it and upload it to the Arduino board. Note that, as soon as you do that, the project will start recording the audio. If you have connected the optional LED on pin 7, the LED should also be on during the recording phase.

You can now talk a bit or play your favorite song just to make sure that actual audio is being recorded by the microphone.

Then, after the amount of time defined in the code, stop the project by disconnecting the power. Then, remove the SD card and insert it into your computer.

On your computer, navigate to the SD card and you will see that one file was recorded:

You can now simply open this file with your favorite audio player and listen to what was just recorded.

I, for example, opened it with the free audio editing software, Audacity, to see how the waveform looked like:

Congratulations...

Summary


In this chapter, you learned how to build a spy microphone based on a simple amplified microphone, Arduino, and a microSD card. The spy microphone can be set up to record audio continuously for a given amount of time.

Of course, there are many things that you can now do in order to improve this project. You can, for example, use a battery to power the project to make it autonomous. Then, you just need to place it in a room in which you want to record a conversation and just come back later to retrieve the SD card with the recording.

You can also connect a motion sensor to the project and use that to automatically start a recording when motion is detected in a room in order to intercept conversations with total discretion.

Another interesting project would be to use the audio levels that are sensed by the project to actually start or stop the recording. For example, you could rewrite the software of the project to continuously monitor the microphone and automatically start a recording...

lock icon The rest of the chapter is locked
You have been reading a chapter from
Arduino for Secret Agents
Published in: Nov 2015 Publisher: ISBN-13: 9781783986088
Register for a free Packt account to unlock a world of extra content!
A free Packt account unlocks extra newsletters, articles, discounted offers, and much more. Start advancing your knowledge today.
Unlock this book and the full library FREE for 7 days
Get unlimited access to 7000+ expert-authored eBooks and videos courses covering every tech area you can think of
Renews at $15.99/month. Cancel anytime}