
Save Our Script
Now, let's start our navigation session.
- To do this, simply click the Start button on the HTTP(S) Test Script Recorder element:

Figure 1.11: HTTP(S) Test Script Recorder
Note
Note that the default listening port of JMeter proxy server is 8888.
Note the first time you start the recorder, it takes more time as it generates a Certificate Authority that you can use to intercept HTTPS traffic.
- This will open a Recorder: Transactions Control window, allowing us to set in real time the name of each recorded step transactions and their grouping based on time:

Figure 1.12: Recorder: Transactions Control
- In this chapter, we will use the Request Parameters example delivered with Apache Tomcat.
From the browser, navigate to the website:
http://server:8080/examples/servlets/
In our case, it will be:
http://localhost:8080/examples/servlets/
Here is the first page:

Figure 1.13: First page of our scenario
- Then, click on the Execute link of the Required test servlet:

Figure 1.14: Request Parameters Example with no entries
Enter first and last name and click on Submit Query:

Figure 1.15: Request Parameters Example before submitting query
When the result appears, we can stop our navigation session:

Figure 1.16: Request Parameters Example after submitting query
- In JMeter, the scenario tree is the following:

Figure 1.17: Result of our recording in JMeter
- Let us observe what has been recorded:

Figure 1.18: Observation table
- As we can see, thanks to the trick of filling the Server Name or IP and Port Number sections of the HTTP Request Defaults element, these fields remain empty in the HTTP Request elements.
This will allow us to change the URL and port of the tested site in only one location (HTTP Request Defaults) if necessary (for example, if the script was run on a development environment, and the final test will run on the pre-production environment):

Figure 1.19: Result of filling in the Server Name or IP and Port Number sections of the HTTP Request Defaults element
- Similarly, the waiting time between each action (Think time) was recorded:

Figure 1.20: Recorded think time
- To make it easier to read the results, it is preferable to rename HTTP requests. The automatically chosen name, by default, corresponds to the called URI, but you can control it in the little popup and give it a meaningful name before clicking on the button that will issue the request(s).
The result of the renaming:

Figure 1.21: Renaming result
- As the last step to the development of the scenario, we are going to add assertions to each HTTP request. These will make it possible to verify that the response received is indeed the expected one.
- To do this, select the HTTP request that will receive the assertion, then, via the context menu, choose Add > Assertions > Response Assertion:

Figure 1.22: Add assertion
- A new Response Assertion element has been added as a child to the SC01_1 Homepage request.
- Let's select the following options:
Field to Test: Text Response
Pattern Matching Rules: Substring (default)
Patterns to Test: Let's click on the Add button, then insert text contained in the answer:

Figure 1.23: Assertion configuration
- To find what data we need to check in response, the trick is to use the View Results Tree element, located under our HTTP(S) Test Script Recorder, by choosing the desired request and then by selecting the tab Response data > Response Body.
- We can then copy the text and use Add from clipboard button in the Response Assertion:

Figure 1.24: Result in Results Tree
- Repeat the operation for all the requests in the same way as you did for the home page.
In the end, we get this JMeter scenario tree:
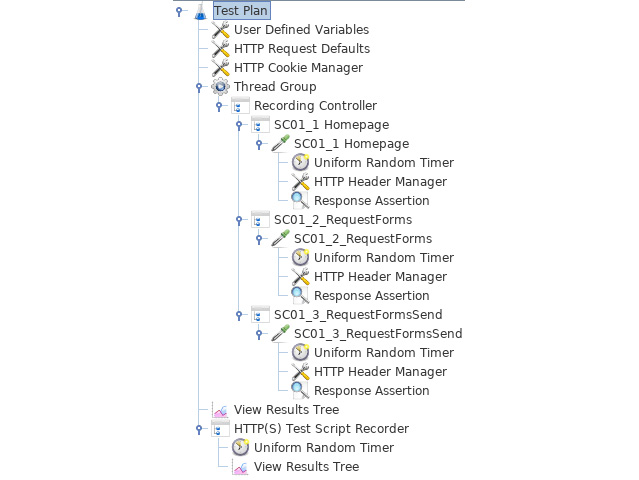
Figure 1.25: Our JMeter scenario
Now our scenario is ready, let's proceed to the validation of our script.