


Hands-on exercise – creating a dual-stack VNet in Azure
In this exercise, we will create a dual-stack network in Azure that supports both IPv4 and IPv6 for the fictional organization called CharisTech. The activities in this task will be completed using the Azure CLI to give you familiarity with the different Azure management tools. Here are the tasks that we will complete in this exercise:
- Task 1: Creating the dual-stack EngineeringVNet VNet and subnets
- Task 2: Verifying the creation of the dual-stack VNet and subnets
Figure 1.27 shows the outcome that we’ll get to at the end of the tasks:
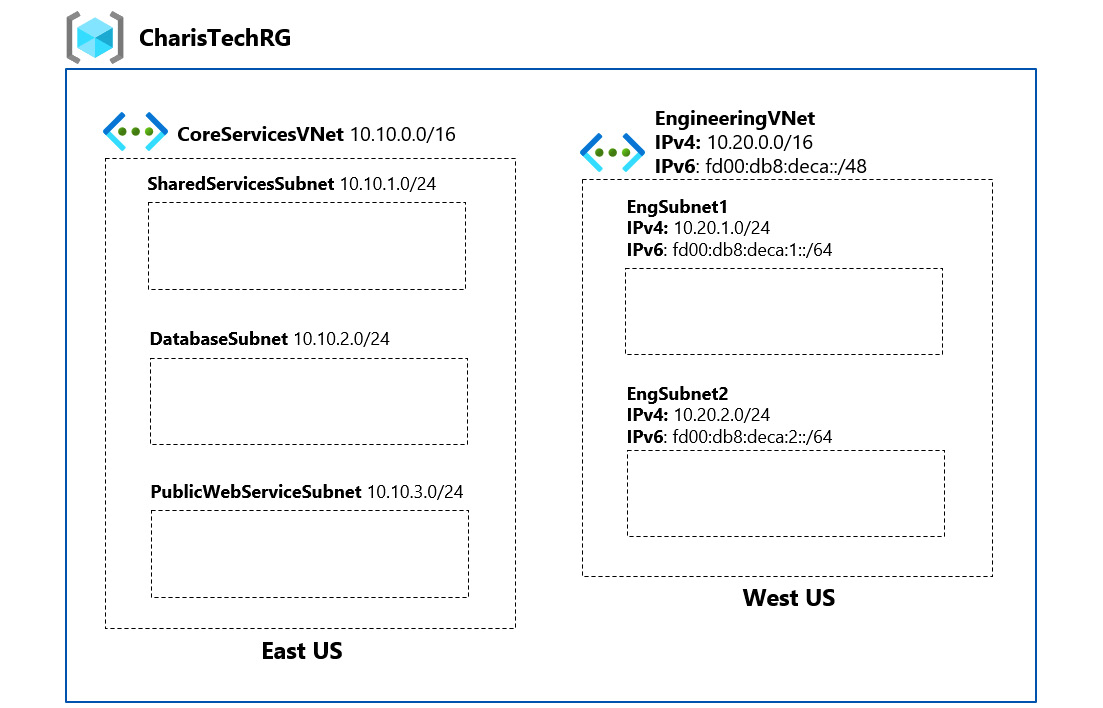
Figure 1.27 – CharisTech Azure VNets and subnets
Task 1 – creating the dual-stack EngineeringVNet VNet and subnets
- Open a web browser and go to the Azure Portal at https://portal.azure.com. Sign in with your admin user account credentials.
- In the Azure Portal, click on the Cloud Shell icon in the top right corner of the Azure Portal:

Figure 1.28 – Click the icon to open Cloud Shell
- (Optional) If this is your first time launching Cloud Shell, you will be prompted to select between the Bash and PowerShell environments. Select Bash. You will also be prompted to create a storage account that will be used by Cloud Shell. Select Create Storage.
- If this is not your first launch, ensure you have Bash selected for your environment:

Figure 1.29 – Select the Bash shell environment
- In Cloud Shell, enter the following commands to set the values that we will use for the following variables: resource group, location, and VNet:
group=CharisTechRG
location=westus
VNet=EngineeringVNet
- Create a VNet with the
az network VNet createcommand. The following command creates a VNet namedEngineeringVNetwith one subnet namedEngSubnet1. Both the VNet and the subnet are dual-stack:az network VNet create --name $VNet --resource-group $group --location $location --address-prefixes "10.20.0.0/16" "fd00:db8:deca::/48" --subnet-name EngSubnet1 --subnet-prefix "10.20.1.0/24" "fd00:db8:deca:1::/64"
- Add a second subnet with the
az network VNet subnet createcommand. The following command adds a dual-stack subnet namedEngSubnet2to theEngineeringVNetnetwork that we created earlier:az network VNet subnet create -n EngSubnet2 --address-prefixes "10.20.2.0/24" "fd00:db8:deca:2::/64" --resource-group $group --VNet-name $VNet
Now that the dual-stack VNets and subnets are created, let us verify them.
Task 2 – verifying the creation of the dual-stack VNet and subnets
- In the Cloud Shell environment, enter the following command to list the VNets in the subscription and output the result in a table format:
az network VNet list --resource-group CharisTechRG --output table
The output should be like the output shown in Figure 1.30:

Figure 1.30 – The VNet list output
As you can see, using command-line management tools such as the Azure CLI greatly streamlines resource management in Azure!


