Search icon
Arrow left icon
All Products
Best Sellers
New Releases
Books
Videos
Audiobooks
Learning Hub
Newsletters
Free Learning
Arrow right icon
Moodle Theme Development

You're reading from  Moodle Theme Development

Product type Book
Published in Dec 2016
Publisher
ISBN-13 9781786463210
Pages 302 pages
Edition 1st Edition
Languages
Author (1):
Silvina Paola Hillar Silvina Paola Hillar
Profile icon Silvina Paola Hillar

Table of Contents (19) Chapters

Moodle Theme Development
Credits
About the Author
Acknowledgements
About the Reviewer
www.PacktPub.com
Dedication
Preface
1. An Introduction to Moodle 3 and MoodleCloud 2. Themes in Moodle 3 on-premises and MoodleCloud 3. Setting Up Logos in Moodle Themes 4. Customizing the Header and the Footer 5. Customizing Elements with CSS 6. Locating, Editing, and Using New Icons 7. Optimizing Themes for Mobile Devices 8. Exploring Layouts 9. Course Formats 10. Extending Moodle Theming to Specific Sections Test Your Knowledge Answers

Chapter 6. Locating, Editing, and Using New Icons

In order to modify or completely customize the look and feel of our Moodle course, we also need to pay special attention to icons. We can edit them in order to personalize them and change the layout and see them differently.

Creating icons is more than just developing an image. Icons are saved as Scalable Vector Graphics (SVG), therefore this chapter explains how to work with different types of vector graphics formats. We will use diverse, free, and open source tools to edit, enhance, and convert the different vector graphics files.

Different types of vector graphics are involved in this chapter because they can enhance the look and feel of the Moodle course. We can not only use them but also modify them. We can change the vector graphic in order to use a part of it.

We will cover not just changing the icons (vector graphics) in our Moodle course, but also using them in other types of software in order to customize them and export them. We will...

Locating the icons in our Moodle on-premises course


The first step that we need to take to change the icons is to locate them. Therefore, we need to enter our Moodle on-premises course. The icons that we will change are the ones which indicate the activities or resources. We will not add an activity to the Moodle course, but we will pay attention to the icons below them. Thus, these are the steps that we have to follow:

  1. Enter Moodle on-premises course and log in.

  2. Click Turn editing on .

  3. Click Add an activity or resource, as shown in the following screenshot:

Different icons appear next to both activities and resources. What we will change, or customize, are the icons that appear next to each activity or resource. As we have already located the icons in Moodle on-premises, we need to locate the icons in the server.

Tip

We will change the icon of the Quiz.

Locating the icon file in the server


It is time to locate the icon file in the server in order to see the type of file, as well as where to save the new icon that we want to use afterwards. In order to use a new icon, we need to replace the one that is being used.

In the previous tip, we mentioned that we would change the quiz icon file therefore, we need to locate that icon file in our Moodle server. Follow these steps:

  1. Locate where Moodle is installed, as shown in the following screenshot:

  2. Within the server, click on Moodle\mod\quiz\pix.

  3. The following files appear within the pix folder, as shown in the following screenshot:

Tip

We have just located the file that we need to customize. There are two files showing the same image with a different file extension. We need to modify the .svg as well as the .png since some browsers work with .png files while others work with .svg ones. If we do not change both files, the icon will not change in the Moodle course.

Downloading Inkscape


In order to edit or customize .svg we need to work with Inkscape. Inkscape is a high-quality vector graphics software program which runs on Windows, Mac OS X, and GNU/Linux. We can use Inkscape to create a wide variety of graphics. It can import and export various file formats, including SVG and PNG. Furthermore, it is a free and open source.

We can modify the SVG file and afterwards export it as a PNG file because we need the same icon in a format usable by the software program. We can do it using Inkscape, as was mentioned before. PNG is an open image format that has lossless compression because the images are small in size.

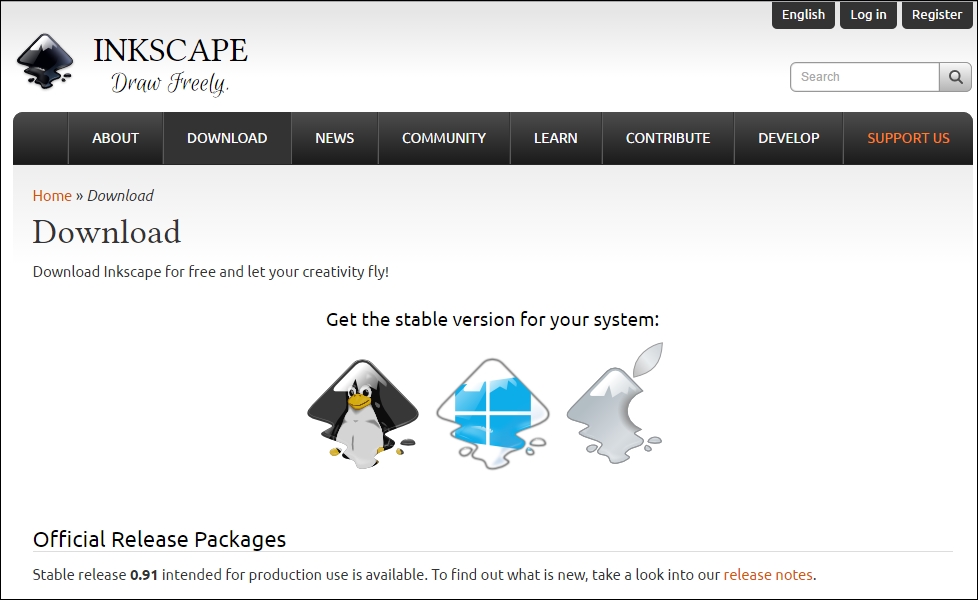
Furthermore, Inkscape is free and open source software and we can download it from the following website: https://inkscape.org/en/download/ . Depending on the OS that you work with, click on the desired icon, as shown in the following screenshot:

Tip

Follow the installation wizard to finish the installation of Inkscape.

Editing an SVG file


We will work with Inkscape, which we have previously mentioned. So we run said software and we can edit the SVG of the quiz which is the one that we will change in Moodle on-premises. We can also modify other icons. We will use the drawing options in Inkscape to create the desired icon.

Another possibility is to render some parts of it. When we think of rendering parts of vector graphics, we mean that we are going to use a part of a drawing that we have designed. Therefore, we will not use all the shapes in the file; we will save some of them and select them before exporting them. The aim is to transform the selection of a bitmap.

Run the Inkscape software and follow these steps:

  1. Click on File | Open.

  2. Look for the file to open (the quiz icon saved as .svg) and click on the file.

  3. Click on Open, as shown in the following screenshot:

  4. Before making any changes to the file, save the file with another name, in order to work with a copy of the original file.

  5. Click on File | Save...

Converting SVG files to PNG files


We have just edited an SVG file but there are two types of files in Moodle. The type of file that Moodle is going to display depends on the web browser or the device that we use. That is to say, it will show either the PNG or the SVG. Thus, what we need to do is to have two identical files with different file extensions.

This transformation process has to be done with Inkscape software and we will convert the SVG to a bitmap image, in other words, we will convert the SVG file to PNG. Follow these steps in order to do it:

  1. Click on File | Export PNG Image..., as shown in the following screenshot:

  2. An information block appears on the right-hand side of the margin displaying information for the file, as shown in the following screenshot:

    Tip

    Within the block, the image size appears which reads: Width 24 pixels and Height 24 pixels. We need to check the number of pixels of the original PNG file in order to compare them to check that they are the same size. We cannot...

Checking the properties of the PNG file


We have edited the SVG file and we have exported it as a PNG. Therefore, we have to check in order to be sure that the number of pixels is the same as the original file. In the example, the number of pixels has not changed since we have only changed the color.

We have to make sure that they are the same size, especially if you alter the file rendering or customize the vector graphic in a different way. We have to work with the original file and the new one; the one that we have edited. Follow these steps in order to do it:

  1. Look for the original file and right-click on it.

  2. Click on Properties.

  3. Click on Details, as shown in the following screenshot:

  4. The details show that the image has Width 24 pixels and Height 24 pixels.

  5. Click OK.

  6. Click on the file that we have just edited, even though it was checked in Inkscape for the same number of pixels.

  7. Right-click on the file.

  8. Click on Properties.

  9. Click on Details, as shown in the following screenshot:

  10. The details show...

Replacing the SVG file


It is time to start replacing the files in order to see how the icon changes in Moodle on-premises in further steps. We need to replace files to see this change. We will have to make copies of files and rename files. In this step, we will replace the SVG file.

We have already made a copy of the original file in order to keep it. What we have to do is to rename the edited file as the original so that Moodle changes the file.

Therefore, we will make another copy of the original file and rename the edited file as the original. In order to do it, follow these steps:

  1. Look for the original SVG file.

  2. Right-click on it and click on Copy, as shown in the following screenshot:

  3. Right-click and click on Paste. We have just made the copy of the original icon.

  4. The following icons appear, as shown in the following screenshot:

    Tip

    The screenshot shows three SVG files. From left to right the copies that we have just made of the original icon appear. The original icon and the edited icon...

Replacing the PNG file


We have just replaced the SVG file and it is time to replace the PNG. We need to change both of them because some web browsers use the PNG file while others use SVG. Therefore, we have to follow the steps that we have followed previously, but in this case with the PNG file. Follow these steps:

  1. Look for the original PNG file.

  2. Right-click on it and click on Copy.

  3. Right-click and click on Paste. We have just made the copy of the original icon.

  4. The following icons appear, as shown in the following screenshot:

    Tip

    The screenshot shows three PNG files. From left to right the copies that we have just made of the original icon appear. The original icon and the edited icon. We have to rename the edited icon as the original one because that one is the file that Moodle on-premises uses to display.

  5. Delete the original icon. Right-click on it and click on Delete.

  6. Right-click on the edited icon. Click on Rename.

  7. Write the name of the original icon, as shown in the following screenshot...

Testing the new icon in Moodle on-premises


We have followed several steps in order to modify an icon in Moodle on-premises, so it is time to test if all the steps that we have performed are correct and we can see the new icon when we add an activity or resource. Follow these steps:

  1. Log into Moodle on-premises.

  2. Enter the course to add an activity or resource.

  3. Click Turn editing on.

  4. Click Add an activity or resource and it looks as shown in the following screenshot:

    Tip

    The quiz icon is the one that we have already modified. It is shown in the following screenshots:

Locating Add an activity or resource icons in our Moodle on-premises


We have just modified a quiz icon and we need to find the other icons in our Moodle on-premises. We can also render parts of icons in order to modify them as we desire. Therefore, we need to find where they are so that we can edit them.

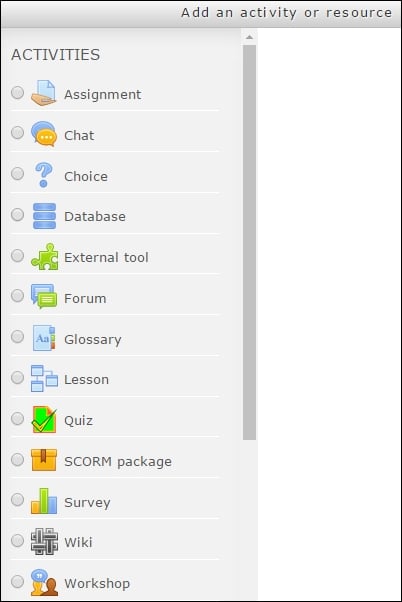
We enter our Moodle on-premises, and after logging in, we enter the desired course and click on Add an activity or resource. Under Activities, the following activities appear, as shown in the following screenshot:

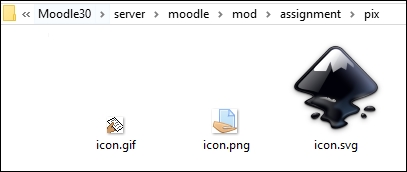
We can find the icon of the assignment in the following path: Moodle\server\moodle\mod\assignment\pix. The following icons appear, as shown in the following screenshot:

In this case, three different bitmap images appear, that is to say, we have the icons saved with three different extensions: .gif, .png, and .svg. Previously, we have converted the SVG into PNG using Inkscape. We can convert an SVG to a GIF using Inkscape, but we can use other software to do it, such as Paint for...

Rendering parts of icons


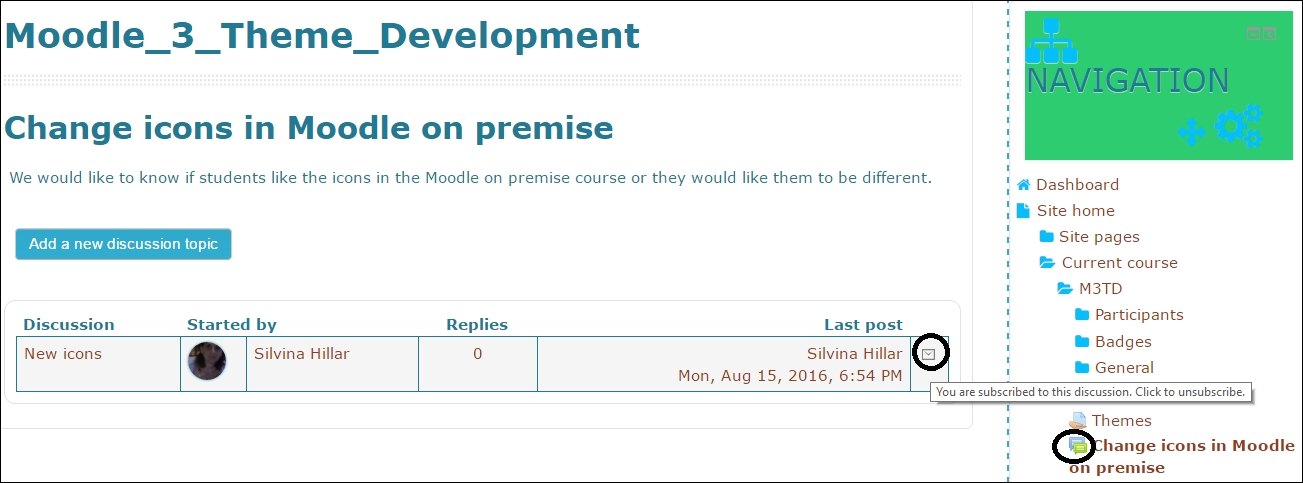
We have found where the icons of the Add an activity or resource are placed on the server. It is time to render part of an icon and to check how it changes in Moodle on-premises. We will work with the forum because in this example we will modify two icons. Therefore, in order to check which icons we are working with, we will add a forum activity in Moodle on-premises. After adding the activity, we will add a post to the forum and this is the result. We will focus on the icons that we will render, they are shown in the following screenshot:

The icons that are circled are the ones that we are going to change. Therefore, these are the steps that we have to follow:

  1. Locate the icons. They are in the following path: Moodle30\server\moodle\mod\forum\pix, as shown in the following screenshot:

  2. Click on the t folder. These are the icons that are in the folder and will be rendered, as shown in the following screenshot:

    Tip

    We have just located the icons that we will render...

Test your knowledge


A. We need to modify which file in order to see the changes in Moodle on-premises ...

  1. ...the .svg file.

  2. ...the .png file.

  3. ...both the .svg and .png files.

B. We have to work with Inkscape ...

  1. ...to edit a PNG file.

  2. ...to edit an SVG file.

  3. ...to edit both PNG and SVG files.

C. We need to check the number of pixels of which file that we have edited so that they match the same number of pixels of the original file/files ...

  1. ...an SVG file.

  2. ...a PNG file.

  3. ...the SVG and PNG files.

D. We have to rename ...

  1. ...the edited SVG file as the original only.

  2. ...the edited PNG file as the original only.

  3. ...both the edited SVG file and the edited PNG file as the original.

E. It is advisable to keep a copy of ...

  1. ...the edited SVG file.

  2. ...the edited PNG file.

  3. ...both the original PNG and SVG files.

Summary


In this chapter, we have worked with icons. We have learned how, when, and why we modify icons in order to make the learning experience more effective and achieve learning goals. We have also worked with vector graphics and bitmaps. We have modified an SVG file and exported it as a PNG. We have changed the look and feel of Moodle on-premises course and we personalized the icon. We can also add more images to the icons or edit them in a different way, but we always have to follow the steps that we have taken. We need to make copies of files and replace the edited files with the originals. We may not like how the new icon looks in the Moodle course. Let's keep on personalizing our Moodle on-premises course. The following chapter deals with Optimizing themes for Mobile devices.

lock icon The rest of the chapter is locked
You have been reading a chapter from
Moodle Theme Development
Published in: Dec 2016 Publisher: ISBN-13: 9781786463210
Register for a free Packt account to unlock a world of extra content!
A free Packt account unlocks extra newsletters, articles, discounted offers, and much more. Start advancing your knowledge today.
Unlock this book and the full library FREE for 7 days
Get unlimited access to 7000+ expert-authored eBooks and videos courses covering every tech area you can think of
Renews at $15.99/month. Cancel anytime}