


Creating a component
In this section, we will create a React project using an online tool called CodeSandbox. We will take time to understand the entry point of a React app and how components are structured in a project before creating a basic React component.
Creating a CodeSandbox project
The great thing about CodeSandbox is that we can create a React project at the click of a button in a web browser and then focus on how to create a React component. Note that we will learn how to create React projects in a code editor on your local computer in Chapter 3, Setting up React and TypeScript. Our focus is learning about the React fundamentals in this chapter.
For now, let’s carry out the following steps to create a React component in CodeSandbox:
- Go to https://codesandbox.io/ in a browser and click the Create Sandbox button found on the right hand side of the page.
Note
You can create a CodeSandbox account if you want, but you can also create a React project as an anonymous user.
- A list of project templates appears. Click the React template (don’t choose the React TypeScript template because we are focusing solely on React in this chapter).
In a few seconds, a React project will be created:
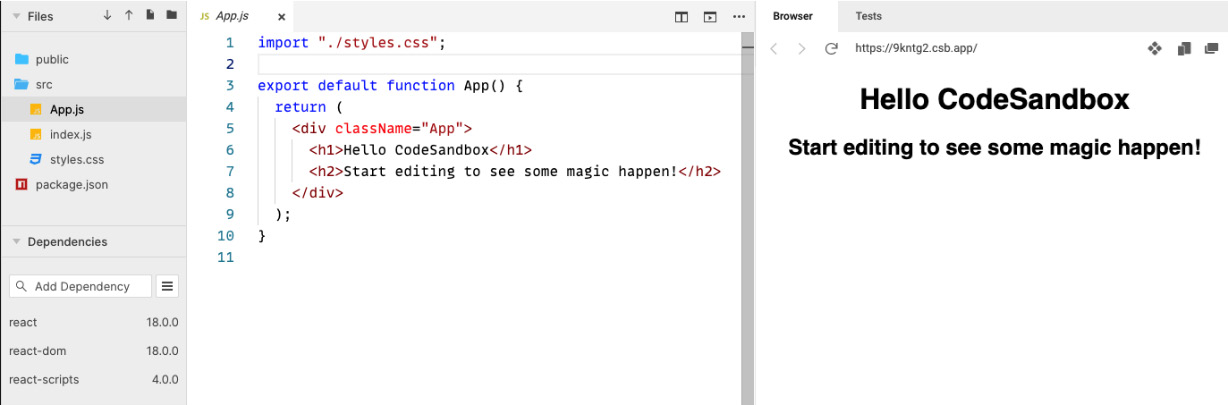
Figure 1.1 – React project in CodeSandbox
There are three main panels in the CodeSandbox editor:
- The Files panel: This is usually on the left-hand side and contains all the files in the project.
- The Code editor panel: This is usually the middle panel, and it contains the code. This is where we will write our React component code. Clicking a file in the Files panel will open it in the code editor panel.
- The Browser panel: This displays a preview of the running app and is usually on the right-hand side.
Now that we have created a React project, we will take some time to understand the app’s entry point.
Understanding the React entry point
The entry point of this React app is in the index.js file. Open this file by clicking on it in the Files panel and inspect its contents:
import { StrictMode } from 'react';
import { createRoot } from 'react-dom/client';
import App from './App';
const rootElement = document.getElementById('root');
const root = createRoot(rootElement);
root.render(
  <StrictMode>
    <App />
  </StrictMode>
);
There is quite a lot going on in this code. Here’s an explanation of each line of the code (don’t worry if you don’t fully understand it all at this point in the book, you will soon!):
- The first statement imports a
StrictModecomponent from React. This means that theStrictModecomponent from thereactlibrary will be used later in the code in this file. We will cover import statements in detail in the next section. - The second statement imports a
createRootfunction from React. - The third import statement imports an
Appcomponent from theApp.jsfile in our project. - A
rootElementvariable is then assigned to a DOM element with anidof"root". - React’s
createRootfunction takes in a DOM element and returns a variable that can be used to display a React component tree. TherootElementvariable is then passed intocreateRoot, and the result is assigned to arootvariable. - The
renderfunction is called on therootvariable, passing in JSX containing theStrictModecomponent with theAppcomponent nested inside. Therenderfunction displays the React components on the page. This process is often referred to as rendering.
Note
The StrictMode component will check the content inside it for potential problems and report them in the browser’s console. This is often referred to as React’s strict mode. The strict mode in React is different from the strict mode in JavaScript, but their purpose of eliminating bad code is the same.
In summary, the code in index.js renders the App component in React’s strict mode in a DOM element with an id of "root".
Next, we will take some time to understand the React component tree and the App component that is referenced in index.js.
Understanding the React component tree
A React app is structured in a tree of components and DOM elements. The root component is the component at the top of the tree. In our CodeSandbox project, the root component is the StrictMode component.
React components can be nested inside another React component. The App component is nested inside the StrictMode component in the CodeSandbox project. This is a powerful way of putting components together because any component can be placed inside StrictMode – it doesn’t necessarily need to be App.
React components can reference one or more other components, and even DOM elements, in their JSX. Open the App.js file and observe that it references DOM elements div, h1, and h2:
<div className="App">
  <h1>Hello CodeSandbox</h1>
  <h2>Start editing to see some magic happen!</h2>
</div>
The component tree in the CodeSandbox project is constructed as follows:
StrictMode
└── App
    └── div
         └── h1
           └── h2
In summary, a React app is structured in a tree of React components and DOM elements.
Next, it is time to create a React component.
Creating a basic alert component
Now, we are going to create a component that displays an alert, which we will simply call Alert. It will consist of an icon, a heading, and a message.
Important note
A React component name must start with a capital letter. If a component name starts with a lowercase letter, it is treated as a DOM element and won’t render properly. See the following link in the React documentation for more information: https://reactjs.org/docs/jsx-in-depth.html#user-defined-components-must-be-capitalized.
Carry out the following steps to create the component in the CodeSandbox project:
- In the Files panel, right-click on the
srcfolder and choose Create File in the menu that appears. - The cursor is placed in a new file, ready for you to enter the component filename. Enter
Alert.jsas the filename and press Enter.
Note
The filename for component files isn’t important to React or the React transpiler. It is common practice to use the same name as the component, either in Pascal or snake case. However, the file extension must be .js or .jsx for React transpilers to recognize these as React components.
- The
Alert.jsfile automatically opens in the code editor panel. Enter the following code into this file:function Alert() { return ( <div> <div> <span role="img" aria-label="Warning">⚠</span> <span>Oh no!</span> </div> <div>Something isn't quite right ...</div> </div> ); }
Remember that the code snippets are available online to copy. The link to the preceding snippet can be found at https://github.com/PacktPublishing/Learn-React-with-TypeScript-2nd-Edition/blob/main/Chapter1/Section3-Creating-a-component/Alert.js.
The component renders the following items:
- A warning icon (note that this is a warning emoji).
- A title, Oh no!.
- A message, Something isn’t quite right ….
Note
The role and aria-label attributes have been added to the span element containing the warning icons to help screen readers understand that this is an image with a title of warning.
For more information on the img role, see https://developer.mozilla.org/en-US/docs/Web/Accessibility/ARIA/Roles/img_role.
For more information on the aria-label attribute, see https://developer.mozilla.org/en-US/docs/Web/Accessibility/ARIA/Attributes/aria-label.
Alternatively, a React component can be implemented using arrow function syntax. The following code snippet is an arrow syntax version of the Alert component:
const Alert = () => {
  return (
    <div>
      <div>
        <span role="img" aria-label="Warning">
          ⚠
        </span>
        <span>Oh no!</span>
      </div>
      <div>Something isn't quite right ...</div>
    </div>
  );
};
Note
There aren’t any significant differences between arrow functions and normal functions in the context of React function components. So, it is down to personal preference which one you choose. This book generally uses regular function syntax because it has fewer characters to type, however, if you wish, you can find more information on JavaScript arrow functions here: https://developer.mozilla.org/en-US/docs/Web/JavaScript/Reference/Functions/Arrow_functions.
Congratulations, you have created your first React component. Let’s quickly recap the key points in this section:
- The entry point in a React app is usually
index.js. - React’s
createRootfunction allows a React component tree to be rendered inside a DOM element. - A React component is a JavaScript function whose name starts with a capital letter. The function returns what should be displayed using JSX syntax.
You may have noticed that the alert component doesn’t appear in the Browser panel. This is because it hasn’t been added to the React component tree yet. We will do this in the next section after we have learned about the import and export statements.


