Chapter 4. Controlling DC Motors
In Chapter 3, Adding Display Functionality, you learned how to connect to the outside world using jumper wires and specially designed hardware called shields. In this chapter, you'll learn the following:
How to use the Galileo to control small DC motors
How to take this to the next level, learning how to add more functionality using a shield to control the speed and direction of more powerful DC motors
Before we get started with connecting everything and making it all move, let's spend some time understanding some of the basics of DC motor control. Whether you choose a two or four wheeled mobile platform, or a tracked platform, the basic movement control is the same. The unit moves by engaging the motors. If the desired direction is straight, the motors are run at the same speed. If you want to turn the unit, the motors are run at different speeds. The unit can actually turn in a circle if you run one motor forward and one backwards.
DC motors are fairly straightforward devices. The speed and direction of the motor is controlled by the magnitude and polarity of the voltage applied to its terminals. The higher the voltage, the faster the motor will turn. If you reverse the polarity of the voltage, you can reverse the direction the motor is turning in.
However, the magnitude and polarity of the voltage are not the only factor that is important when it comes to controlling your...
Connecting a DC motor directly to the Galileo
The first step in connecting a DC motor to the Galileo is to actually obtain a DC motor. The motors that you will be dealing with here are simple, small DC motors. For this example, you can use a small 6V DC motor available at most electronics or hobby stores, or online at www.amazon.com. Here is a picture of one such motor:
In order to connect this motor to your Galileo, you'll need some additional parts. You'll need two male-to-male jumper cables and two alligator clip jumper cables. You'll also need a transistor, TIP120 to be specific. You'll also need a diode, the 1N4004 diode, a 1,000-ohm resistor, and a 1 µFarad ceramic capacitor. The last four parts should be available at almost any electronics store, or online. To control this motor, you'll connect one motor connector to digital pin 11, and the other connector to GND. You could use one of the voltage sources on the Galileo, but some DC motors can draw lots of current, more than your Galileo...
Galileo code for DC motor speed control
Open the IDE and then enter the following code:
This code sends basic commands to the Galileo to control the speed of the motor. Here are the details:
int motorPin = 11;:- This sets digital I/O pin 11 to the control pin you'll be using.
void setup():– The setup function executes once you set up your Galileo.
pinMode(motorPin, OUTPUT);:- This sets this pin to function as an output pin.
Serial.begin(9600);:- This starts the serial port with a baud rate of 9600.
Serial.println("Set Speed 0 - 255");:- This prints the line "Set Speed 0 – 255".
void loop():– This loop is performed over and over again on the Galileo.
if (Serial.available()):– If there is a serial input date on the serial port, then do the following statements.
int speed = Serial.parseInt();:- This brings in the data as an integer.
Serial.println("Speed");:- This prints the line "Speed".
Serial.print(speed);:- This prints the value input from the serial port.
Serial.println(" " );:- This finishes...
Connecting a DC motor using an H-bridge and the Galileo
The next step is to add a bit more functionality with a new type of chip, an H-bridge. An H-bridge is a fairly simple device; it basically consists of a set of switches and functionalities to allow the direction of the current to be reversed so that the motor can either be run in the forward, or in the reverse, direction.
Let's start this example by building the H-bridge circuit and controlling just one motor. To do this, you'll need to get an H-bridge. One of the most common ones is the L293 dual H-bridge chip. This chip will allow you to control the direction of the DC motors. These chips are available at most electronics stores or online. You'll also need a capacitor; you can use the 1 µFarad from the previous example, if you like. Once you have your H-bridge, build the following circuit with the Galileo, the motor, and breadboard:
Specifically, you'll want to connect these pins on the Galileo to the pins on the H-bridge. Here is the...
Galileo code for DC motor direction control
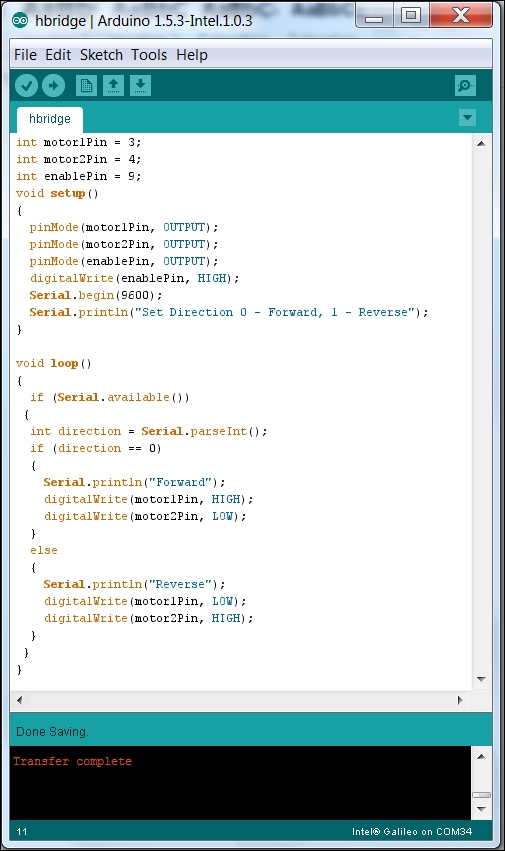
Open the IDE and type in the following code:
This code sets up pins 3, 4, and 9 to enable the chip and control the direction of the motor. As mentioned before, you can use the Tools | Serial Port to send data to the program. Sending a 0 sets pin 3 to HIGH and pin 4 to LOW, causing the motor to spin in one direction. Sending a 1 sets pin 3 to LOW and pin 4 to HIGH, causing the motor to spin in the other direction.
Now you know how to build circuits to control both the speed and the direction of DC motors. However, instead of procuring all the parts and building the circuits yourself, you can actually buy a DC motor control shield.
Controlling DC motors using a shield
For this final example, let's graduate from a simple DC motor to a wheeled platform. There are several simple, two-wheeled robotics platforms. In this example, you'll use one that is available on several online electronics stores. It is called the Magician Chassis, sourced by SparkFun. The following image shows this:
To make this wheeled robotic platform work, you're going to control the two DC motors connected directly to the two wheels. You'll want to control both the direction and the speed of the two wheels to control the direction of the robot.
You'll do this with an Arduino shield designed for this purpose. The Galileo is designed to accommodate many of these shields. The following image shows the shield:
Specifically, you'll be interested in the connections on the front corner of the shield, which is where you will connect the two DC motors. Here is a close-up of that part of the board:
It is these three connections that you will use in this example...
Galileo code for the DC motor shield
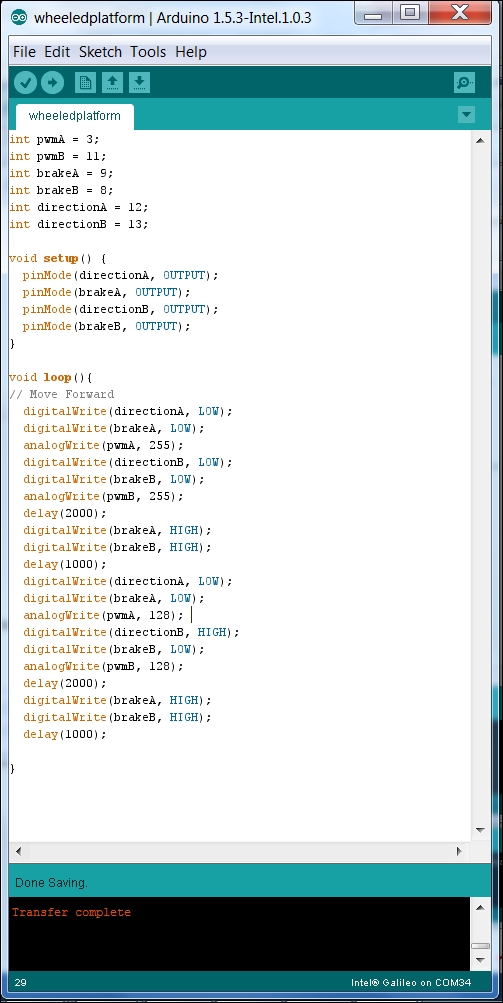
Now that the HW is in place, bring up the IDE, make sure that the proper port and device are selected, and enter the following code:
The code is straightforward. It consists of the following three blocks:
The declaration of the six variables that connect to the proper Galileo pins:
The setup() function, which sets the directionA, directionB, brakeA, and brakeB digital output pins:
The loop() function. This is an example of how to make the wheeled robot go forward, then turn to the right. At each of these steps, you use the brake to stop the robot:
By now, you should be feeling a bit more comfortable with configuring HW and writing code for the Galileo. This example is fun, and provides you with a moving platform. In the next chapter, you'll change this platform from one based on DC motors to one based on servos, and you'll build a robot that can walk.