


Testing database interaction (Advanced)
A large part of many applications written in PHP revolve around database interaction. While it largely falls outside the realm of the official definition of unit testing, testing database interaction is very important. If the integration between the code of your application and the database that stores your application's data is important then it should be tested. This is another case where you can use PHPUnit to do more than simple unit tests.
There are a few different options for testing database interaction with PHPUnit. PHPUnit has an extension that you can load that is based on the Java DBUnit library. There is also a newer package called Machinist that takes a different but, in most cases, a much simpler approach to database testing. You can find out more information on Machinist at https://github.com/stephans/phpmachinist.
Database testing is centered on making sure that you are inserting, deleting, and updating data in your database properly and making sure your application is pulling the appropriate data out of the database. You are able to test cases where you are modifying the database by comparing the contents of a database to an expected result set. You are able to test queries against the database by comparing the output of various queries to an expected result set. You will often need to have data in the database at the beginning of your test for this functionality to work properly.
Getting ready
The database extension for PHPUnit comes as a separate PEAR package. In order to run the tests in the following examples you will need to install this extension. You can do so with the following command:
sudo pear install pear.phpunit.de/DbUnit
The examples will be based on a SQLite install. So, make sure you have the SQLite extension and client installed. The method of installing this depends on your operating system and distribution. The examples in this recipe are going to be based on the following schema definition:
CREATE TABLE game (
  id INTEGER PRIMARY KEY AUTOINCREMENT,
  date_created DATETIME,
  current_player_id INTEGER
);

CREATE TABLE player (
  id INTEGER PRIMARY KEY AUTOINCREMENT,
  game_id INTEGER,
  name VARCHAR,
  hand VARCHAR
);
The schema will be loaded into the data/game-test.db file.
How to do it...
Place the following code in
src/SqliteManager.php.<?php class SqliteManager { private $sqliteConnection; public function __construct(PDO $sqliteConnection) { $this->sqliteConnection = $sqliteConnection; } public function updateGame($gameId, $currentPlayerName) { $gameUpdateQuery = " UPDATE game SET current_player_id = ( SELECT id FROM player WHERE game_id = ? AND name = ? ) WHERE id = ? "; $stm = $this->sqliteConnection->prepare($gameUpdateQuery); $stm->execute(array($gameId, $currentPlayerName, $gameId)); } // ... }Update your configuration in
phpunit.xml.distto include the highlighted line.<phpunit bootstrap="test-bootstrap.php" colors="false" strict="true" > <!-- other content --> <php> <includePath>src</includePath> <const name="DB_DSN" value="sqlite:data/game-test.db" /> </php> <!-- other content --> </phpunit>Create the following file in
test/BaseDatabaseTest.php.<?php abstract class BaseDatabaseTest extends PHPUnit_Extensions_Database_TestCase { protected static $testPdo; protected static $systemPdo; public static function setUpBeforeClass() { self::$testPdo = new PDO(DB_DSN); self::$testPdo->setAttribute(PDO::ATTR_ERRMODE, PDO::ERRMODE_EXCEPTION); self::$systemPdo = new PDO(DB_DSN); self::$systemPdo->setAttribute(PDO::ATTR_ERRMODE, PDO::ERRMODE_EXCEPTION); } public static function tearDownAfterClass() { self::$testPdo = null; self::$systemPdo = null; } protected function getConnection() { return $this->createDefaultDBConnection(self::$testPdo); } }Create your PHPUnit test in
test/SqliteManagerTest.php.<?php class SqliteManagerTest extends BaseDatabaseTest { private $sqliteManager; public function setUp() { parent::setUp(); $this->sqliteManager = new SqliteManager(self::$systemPdo); } /** * @group db */ public function testUpdateGame() { $this->sqliteManager->updateGame(1, 'Player2'); $expectedDataSet = $this->createXMLDataSet(__DIR__ . '/expected/SqliteManagerTestUpdateGame.xml'); $this->assertDataSetsEqual($expectedDataSet, $this->getConnection()->createDataSet(array('game'))); } // More tests … protected function getDataSet() { return $this->createXMLDataSet(__DIR__ . '/fixtures/SqliteManagerTest.xml'); } }Create an XML data set fixture in
test/fixtures/SqliteManagerTest.xml.<?xml version="1.0" ?> <dataset> <table name="game"> <column>id</column> <column>date_created</column> <column>current_player_id</column> <row> <value>1</value> <value>2013-03-01 00:00:00</value> <value>1</value> </row> </table> <table name="player"> <column>id</column> <column>game_id</column> <column>name</column> <column>hand</column> <row> <value>1</value> <value>1</value> <value>Player1</value> <value>A Hearts,2 Clubs,3 Diamonds,4 Spades,5 Hearts</value> </row> <row> <value>2</value> <value>1</value> <value>Player2</value> <value>6 Hearts,7 Clubs,8 Diamonds,9 Spades,10 Hearts</value> </row> </table> </dataset>Create an XML data set expectation in
test/expected/SqliteManagerTestUpdateGame.xml.<?xml version="1.0" ?> <dataset> <table name="game"> <column>id</column> <column>date_created</column> <column>current_player_id</column> <row> <value>1</value> <value>2013-03-01 00:00:00</value> <value>2</value> </row> </table> </dataset>
How it works...
There are a lot of moving parts involved with database testing. You have to set up your connection to the database, create the fixtures for the database, and create the expected data that you will compare the database against. There are many ways that these steps can be done. The preceding files show how this can be done for almost any scenario.
The first change that you need to make is to allow the database that you are using to be configurable. This isn't absolutely necessary, but it will make future changes significantly easier should you ever decide to alter your data source. Earlier we discussed PHPUnit configuration and discovered the power you have in the phpunit.xml file. One of the items in the PHP environment that can be configured from here are PHP constants.
Here we used the <const /> element to define the DB_DSN constant to point to our test SQLite database. Constants are a great way to configure test cases. They are easy to access from within the test and they can be very simple to override when using the phpunit.xml.dist model. You just redefine them in a new phpunit.xml file or in an alternate config file.
Once you have defined your connection information you should create a base database test case that sets up your connections for you. This will provide a place for the global database test configuration. This class should be used for any kind of convenience method to help you reduce code duplication in your tests. For this example, we are just using this class to set up our database connections. There were two database PDO connections defined: BaseDatabaseTest::$testPdo and BaseDatabaseTest::$systemPdo. You don't have to define two different connections for tests. However, it is recommended that you do so to isolate the database used by the system under testing from the database used to run the test. This helps to ensure that you aren't polluting any kind of connection-based data such as the result of MySQL's LAST_INSERT_ID() function. This can also be very important when testing transactions. If you have code that uses transactions to ensure data integrity but it does not properly commit the transaction and you use the same connection to load the data for assertions that was used in the actual test, everything will pass just fine. In that case, it is not until you use a separate testing connection that cannot see unclosed transactions that you will realize the data was never committed.
It is important to note that the setUpBeforeClass() method was used to set up the connections. This can save a significant amount of time as the database connection will only need to be established once per database test case class as opposed to once per method. This does not strictly adhere to the principal of isolating your tests from each other as much as possible, but the speed benefit of reusing a connection almost always outweighs the isolation benefit. If setUpBeforeClass() is used to establish your database connections, you must use tearDownAfterClass(). This is necessary because the PDO connections are being assigned to class statics. These will never fall out of scope by themselves, which is necessary for PDO connections to close. To ensure this does not happen, the tearDownAfterClass() method is used to set the connections to null.
Once the PDO connections are established the getConnection() method is used to wrap your PDO connection into DBUnit's connection format. The value returned from getConnection() will be used to set up your data fixtures as well as to pull data to validate again at the end of your tests.
With the BaseDatabaseTest test case, each of our test cases can be specifically focused on the unique system targeted for testing. In this example, the system being tested is the SqliteManager class. Each test case that focuses on database interaction will require a small amount of data to be present in the database at the beginning of each test. The getDataSet() method can be used to identify this initial data set, which will be populated in your database at the beginning of each test.
There are several formats that can be used to define the data set. Each of these formats has a method in PHPUnit_Extensions_Database_TestCase to allow you to easily instantiate the data set. In this example, createXMLDataSet() is used. It takes a path to an XML file as its only parameter. It is good practice to keep these files all in a single directory relative to the PHPUnit test case class. This makes it very easy to understand which files go with which tests without having to look at code. You can see the SqliteManagerTestUpdateGame.xml being loaded as our data set fixture.
The SqliteManagerTestUpdateGame.xml file uses the standard XML format for PHPUnit's database extension. The structure of this format is pretty simple. The root element <dataset> will contain one or more <table> elements. The <table> element has a name attribute that defines the name of the table. It will then have one or more <column> elements that will define the columns in each table. Finally, there will be one or more <row> elements each containing a number of <value> elements equal to the number of columns defined for that table. To define a null value in any one of the columns you can instead use an empty <null /> element.
A very common mistake in creating database tests happens when the setUp() method is overwritten. In this test case, it was overwritten to instantiate the SqliteManager class. It is important to ensure the parent is called whenever this method is overwritten. If parent::setUp() method is not called, then your initial data set will never be loaded. Unfortunately, there is not a great indication in the test that this is what happened.
Now is a good time to go through the life cycle of a database test. When a database test is run, at the time that setUp() is run, getConnection() is called. The connection returned is then used to delete all data in the tables specified by the getDataSet() method. Then the data set itself is reinserted. At that point the individual test is run. Finally, the tear down methods are invoked. So in this example, during setUp() the tables defined in the data set are game and player. Both of these tables will be completely deleted. Then the three rows specified in the data set will be inserted. Then the test itself will be run. The test in testUpdateGame() is very simple. It just invokes the SqliteManager::updateGame() method and then validates the content in the database.
When testing functionality that updates your data you will need to validate the resultant data in the database. To establish your expected data set you can use createXMLDataSet() just like you used it in getDataSet(). You will be passing in a different data set than what was used in getDataSet(). In this example, the SqliteManagerTestUpdateGame.xml data set was used. If part of your test is to ensure that nothing in your data was changed you can just as easily re-use the data set returned by getDataSet(). To keep your data sets organized, I would recommend you keep your fixture data sets separate from your expected data sets. One exception of course is those cases where you re-use your fixture as your expectation. This will help you keep your test cases organized as your suite grows.
The assertDataSetsEqual() can be used to compare the actual data in your database with the expected data set. Your expected data set should be passed as the first parameter. The actual data set can be retrieved directly from the connection returned by getConnection(). The connection object has a createDataSet() method that will create a data set containing all of the rows in all of the tables in the database. You can narrow the data set down to the tables that you are concerned with by specifying an array of table names as the first argument to createDataSet().
When one of your database tests fail, PHPUnit does its best to format the failure in an easily readable format. If we broke the previous test by failing to execute the update query, the test would fail as shown in the following screenshot:
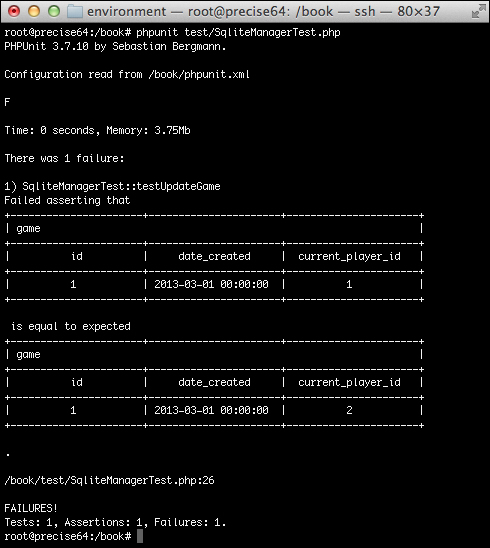
The table containing the differences will be printed out with the data contained. If there are multiple tables involved you will see the differences in all of the tables. This can be a lot of information if there are large data sets involved. This is one really good reason to keep the size of your data sets as small as possible for expectations.
There's more...
Only the surface of database testing has been scratched with this example. There are many other functions and features available to help make this testing easier for you. We will cover a few of the these functions now but I would encourage you to take a look at PHPUnit's online database testing chapter to get more details about database testing: http://www.phpunit.de/manual/3.7/en/database.html.
Alternate data sets
You have seen how you can use PHPUnit's XML format to define your data set; however, there are several other data set formats that you will find useful.
Flat XML data set
There are several other data set formats that can be used for your fixtures other than the standard XML format. You can also use a simpler (though less flexible) flat XML format where a single element defines a single row. The name of each element corresponds to the name of the table the row will be inserted in and the attribute names correspond to column names. The SqliteManagerTest.xml file could be rewritten using the flat format shown as follows:
<?xml version="1.0" ?>
<dataset>
  <game
      id="1"
      date_created="2013-03-01 00:00:00"
      current_player_id="1"
      />
  <player
      id="1"
      game_id="1"
      name="Player1"
      hand="A Hearts,2 Clubs,3 Diamonds,4 Spades,5 Hearts"
      />
  <player
      id="2"
      game_id="1"
      name="Player2"
      hand="6 Hearts,7 Clubs,8 Diamonds,9 Spades,10 Hearts"
      />
</dataset>
This format is much more concise but you lose the flexibility to specify things such as null values. If you want to use this format, instead of using the createXMLDataSet()method you can use createFlatXMLDataSet().
MySQL XML data set
The MySQL XML data set can be very useful if you are using the MySQL database engine. This data set type allows you to use mysqldump to generate data sets. The key is using the --xml argument for mysqldump.
mysqldump --xml -t -u [username] --password=[password] [database] > /path/to/file.xml
You can then pass the path of the resultant file to the createMySQLXMLDataSet() method to convert this file to a PHPUnit data set.
$this->createMySQLXMLDataSet('/path/to/file.xml');YAML data set
The last data set we will talk about here is the YAML data set. This can provide a nice compromise of the conciseness of the flat XML data set with the flexibility of the standard XML data set. The SqliteManagerTest.xml data set can be redefined as a YAML data set as follows:
game:
  -
    id: 1
    date_created: "2013-03-01 00:00:00"
    current_player_id: 1

player:
  -
    id: 1
    game_id: 1
    name: Player1
    hand: A Hearts,2 Clubs,3 Diamonds,4 Spades,5 Hearts
  -
    id: 2
    game_id: 1
    name: Player2
    hand: 6 Hearts,7 Clubs,8 Diamonds,9 Spades,10 Hearts
The convenience of this format over the flat XML format is that you can specify a null by simply excluding the value just as you would in a typical YAML file. The unfortunate part of YAML is that there is no convenience method to create a data set in this format. You must instantiate it directly.
protected function getDataSet()
{
  return new PHPUnit_Extensions_Database_DataSet_YamlDataSet(
      __DIR__ . '/fixtures/SqliteManagerTestYaml.yaml'
  );
}
Validating your data with queries
Sometimes it can be somewhat tedious to create expected data sets for full tables. For instance, you may have a lot of columns that aren't germane to the application but are just used for book keeping such as creation time or modified time types of columns. If you would like to assert against a portion of your data, a great strategy can be to use a query to generate the actual data set.
The database connection object returned by getConnection() has a createQueryTable() method that can be used to create a table object based on the result of a select query. When using this method to validate the results of your table you will have to use the assertTablesEqual() method instead of assertDataSetsEqual(). The createQueryTable() method takes two parameters. The first parameter is the name you want to use for the table. This name should match the name of the table in your expected data set. The second parameter is the query to populate the table.
The testUpdateGame() method could be rewritten to take advantage of query tables.
public function testUpdateGame()
{
  $this->sqliteManager->updateGame(1, 'Player2');

  $expectedDataSet = $this->createXMLDataSet(__DIR__ . '/expected/SqliteManagerTestUpdateGame.xml');
  $actualTable = $this->getConnection()->createQueryTable("game", "SELECT * FROM game");
  $this->assertTablesEqual($expectedDataSet->getTable('game'), $actualTable);
}


