Vue Directives
Vue's templating language allows you to interpolate the HTML code with JavaScript expressions and Vue directives. This templating pattern is often referred to as syntax sugar because it does not change how the code itself works, just how you use it. Syntax sugar allows you to clearly define template-specific logic inside of your HTML without the need to abstract this logic elsewhere in your project or return copious amounts of HTML directly from your JavaScript code. All Vue based directives are prefixed with v-*, which indicates that it is a Vue specific attribute:
v-text: Thev-textdirective has the same reactivity interpolation does, except you reference the same piece of data inside of a directive. Interpolation (curly braces){{ }}is more performant than thev-textdirective; however, you may find yourself in situations where you have pre-rendered text from a server and want to override it once your Vue application has loaded. For example, you can predefine static placeholder text while the DOM waits for thedataandv-textattributes to eventually replace it.v-once: As a directive, this is unique in that you pair it with other directives to augment how they function. Passing data viav-textor interpolated curly braces into the HTML element this attribute is added to will stop the Vue instance from reloading the element with new data, removing the reactivity of the element. This is handy for situations where you want to render decorative elements using data, but do not want them to update when the data changes after the initial render.v-html: This directive will render valid HTML in your data string inside of the HTML element it has been bound to. This directive is a heavier operation than the other directives, so limited usage is recommended when other options are not otherwise available.Note
<script>tags can be run in this directive. Only render content originating from secure or trusted sources.v-bind: This directive is one of the most widely used directives in Vue. Throughout Vue, you will be binding reactive data to HTML attributes and passing data into props using this directive's:attrshortcut instead ofv-bind:attr.v-if: To control the display state of HTML elements inside the template, you will often usev-ifto completely remove elements from the DOM tree. So far, you have seen how to interpolate conditionals like this{{ isTrue ? 'Show this': 'Not this' }}. With thev-ifdirective, you can control entire blocks of HTML syntax.v-else-ifcan be used likeelse ifstatements and finish withv-else, which is the equivalent to thecatch { ... }declaration of anelse { ... }statement in traditional JavaScript.v-show: You can control the visible state of HTML elements by usingv-show, which, instead of removing the element from the DOM tree, will apply adisplay: nonestyle. The difference between av-ifandv-showis thatv-showwill remain as a block element in the DOM tree but will be hidden withcssinstead of being removed from the DOM tree. You also cannot chainv-showwithv-elseorv-else-if.v-for: Apply this to an element you want to repeat or iterate on. This directive requires an additional prop called:keyto allow it to properly reactively render; it can be as simple as a unique number.Consider an example where we iterate over the list element five times. Each list item will render its count (1, 2… 5):
<ul><!-- do not apply v-for to this <ul> element -->
    <li v-for="n in 5" :key="n">{{ n }}</li>
</ul>
Now let's look at how some of the basic directives work.
Exercise 1.06: Basic Directives (v-text, v-once, v-html, v-bind, v-if, v-show)
More complicated components will use multiple directives to achieve the desired outcome. In this exercise, we will construct a component that uses several directives to bind, manipulate, and output data to a template view.
To access the code files for this exercise, refer to https://packt.live/3fdCNqa.
- Open a command-line terminal, navigate into the
Exercise1.06folder, and run the following commands in order:> cd Exercise1.06/ > code . > yarn > yarn serve
Go to
https://localhost:8080. - Compose the following syntax inside of
Exercise1-06.vue. This uses the interpolation method that we have used in previous exercises and that will be very familiar by this point:<template> <div> <h1>{{ text }}</h1> </div> </template> <script> export default { data() { return { // v-text text: 'Directive text', } }, } </script> <style lang="scss" scoped> h2 { margin: 40px 0 0; font-weight: normal; } </style> - Replace the interpolation with the
v-textattribute. You will notice the output will not change:<template> <div> <h1 v-text="text">Loading...</h1> </div> </template> <script> export default { data() { return { // v-text text: 'Directive text', } }, } </script>Figure 1.17 displays the output of the preceding code:

Figure 1.17: The v-text directive output works very similarly to the interpolation method
- Add the
v-oncedirective on the same element. This will force this DOM element to only load thev-textdata once for as long as it exists in the page:<template> <div> <h1 v-once v-text="text">Loading...</h1> </div> </template> <script> export default { data() { return { // v-text text: 'Directive text', } }, } </script> ... - Underneath the
h1element, include a newh2element, which uses thev-htmlattribute. Add a new data key calledhtml, which contains a string with HTML formatting in it like the following:<template> <div> <h1 v-once v-text="text">Loading...</h1> <h2 v-html="html" /> </div> </template> <script> export default { data() { return { // v-text text: 'Directive text', // v-html html: 'Stylise</br>HTML in<br/><b>your data</b>', } }, } </script> ...Running the preceding code will generate an output as follows:

Figure 1.18: Output on rendering the HTML elements
- Add a new
linkobject to thedataobject that contains a bunch of information such as URL, target, title, and tab index. Inside the template, add a new anchor HTML element and bind thelink dataobject to the HTML element using the colon syntax, for example,:href="link.url":<template> <div> <h1 v-once v-text="text">Loading...</h1> <h2 v-html="html" /> </div> </template> <script> export default { data() { return { // v-text text: 'Directive text', // v-html html: 'Stylise</br>HTML in<br/><b>your data</b>', } }, } </script> ...The following screenshot displays the output:

Figure 1.19: Output on binding the reactive data from the Vue instance to any HTML attribute
- Apply
v-if="false"to theh1element,v-else-if="false"toh2, andv-elseto theatag like this:<template> <div> <h1 v-if="false" v-once v-text="text">Loading...</h1> <h2 v-else-if="false" v-html="html" /> <a v-else :href="link.url" :target="link.target" :tabindex="link.tabindex" v-text="link.title" /> </div> </template>
You should only see the
<a>tag in the page since we have set the conditional statements tofalse.The
v-elsecondition will display as follows:
Figure 1.20: False v-if statements hiding the whole HTML element from the DOM
- Change the template to use
v-showinstead of thev-ifstatements:<template> <div> <h1 v-show="true" v-once v-text="text">Loading...</h1> <h2 v-show="false" v-html="html" /> <a :href="link.url" :target="link.target" :tabindex="link.tabindex" v-text="link.title" /> </div> </template>
The output of the preceding code will be as follows:

Figure 1.21: Changing v-show to true will display the element
When you open the Elements tab of your browser dev tools, you should be able to observe the h2 display state set to none, as follows:
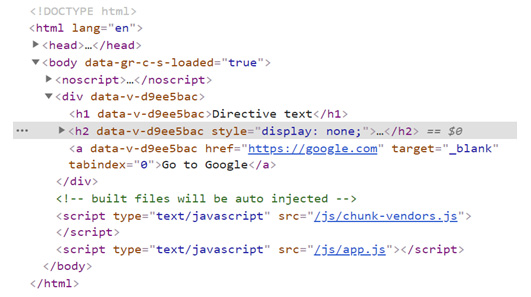
Figure 1.22: h2 displaying "display: none" for false condition
If v-show results in a true Boolean, it will leave the DOM element as is. If it resolves as false, it will apply display: none styling to the element.
In this exercise, we learned about the core Vue directives to control, bind, show, and hide HTML template elements without requiring any JavaScript outside of adding new data objects to your local state.
In the next section, we will learn how to achieve a two-way binding with the help of Vue's v-model.