Search icon
Arrow left icon
All Products
Best Sellers
New Releases
Books
Videos
Audiobooks
Learning Hub
Newsletters
Free Learning
Arrow right icon
Making Your CAM Journey Easier with Fusion 360

You're reading from  Making Your CAM Journey Easier with Fusion 360

Product type Book
Published in Mar 2023
Publisher Packt
ISBN-13 9781804612576
Pages 464 pages
Edition 1st Edition
Languages
Concepts
Author (1):
Fabrizio Cimò Fabrizio Cimò
Profile icon Fabrizio Cimò

Table of Contents (26) Chapters

Preface 1. Part 1 – Implementing Turning Operations in Fusion 360
2. Chapter 1: Getting Started with Turning and Its Tools 3. Chapter 2: Handling Part Setup for Turning 4. Chapter 3: Discovering the Tool Library and Custom Tools 5. Chapter 4: Implementing Our First Turning Operation 6. Chapter 5: Discovering More Turning Strategies 7. Part 2 – Milling with Fusion 360
8. Chapter 6: Getting Started with Milling and Its Tools 9. Chapter 7: Optimizing the Shape of Milled Parts to Avoid Design Flaws 10. Chapter 8: Part Handling and Part Setup for Milling 11. Chapter 9: Implementing Our First Milling Operations 12. Chapter 10: Machining the Second Placement 13. Part 3 – Laser Cutting Using Fusion 360
14. Chapter 11: Getting Started with Laser Cutting 15. Chapter 12: Nesting Parts for Laser Cutting 16. Chapter 13: Creating Our First Laser Cutting Operation 17. Part 4 – Using Fusion 360 for Additive Manufacturing
18. Chapter 14: Getting Started with Additive Manufacturing 19. Chapter 15: Managing the Limitations of FDM Printers 20. Chapter 16: Printing Our First Part 21. Chapter 17: Understanding Advanced Printing Settings 22. Part 5 – Testing Our Knowledge
23. Chapter 18: Quiz 24. Index 25. Other Books You May Enjoy

Face milling

The first milling operation we should set up is, once again, face milling; in this case, we have to remove a layer of 1.5 mm on the top of the stock. We won’t cover this operation here since it is identical to the first one we introduced in Chapter 9; therefore, we may keep using the same tool and the same cutting parameters.

After the first facing, we should find something similar to this:
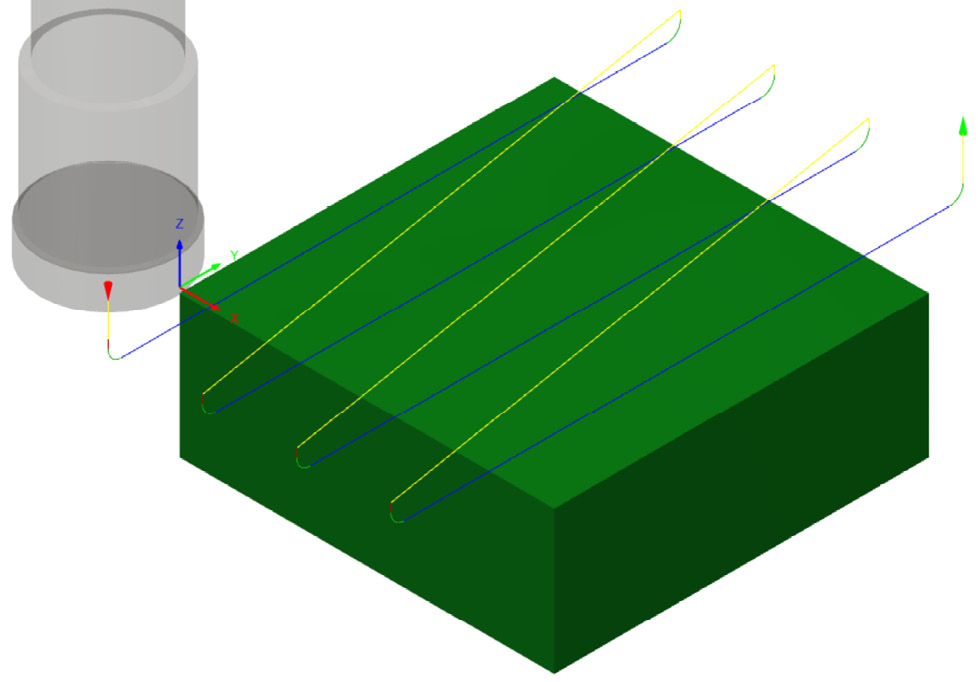
Figure 10.2: Face milling

Figure 10.2: Face milling

As we can see, the diagram displays both the cutting tool and the generated toolpath for the first face milling I implemented. We already know every setting from Chapter 9; therefore, I won’t bother you with a recap of what we did last time. However, this time I changed something in the settings. Let’s try to discover what I changed just by looking at the toolpath:

  • First of all, we can find an entry point close to the origin of the coordinate system, highlighted by the red cone pointed downward ...
lock icon The rest of the chapter is locked
Register for a free Packt account to unlock a world of extra content!
A free Packt account unlocks extra newsletters, articles, discounted offers, and much more. Start advancing your knowledge today.
Unlock this book and the full library FREE for 7 days
Get unlimited access to 7000+ expert-authored eBooks and videos courses covering every tech area you can think of
Renews at $15.99/month. Cancel anytime}