A drone is an IoT device that interacts with many sensors and actuators, including digital electronic speed controllers linked to engines, propellers and servomotors. A drone is also known as an Unnamed Aerial Vehicle (UAV). Let's imagine that we have to monitor many drones. Specifically, we have to display their altitude and the speed for each of their servomotors. Not all of the drones have the same number of engines, propellers and servomotors. We have to monitor quadcopters (4 propellers), hexacopters (6 propellers) and octocopters (8 propellers).
Each drone will publish its altitude every two seconds to the following topic: sensors/dronename/altitude, where dronename must be replaced by the name assigned to each drone. For example, the drone named drone01 will publish its altitude values to the sensors/drone01/altitude topic and the drone named drone20 will use the sensors/drone20/altitude topic.
In addition, each drone will publish the speed for each of its rotors every two seconds to the following topic: sensors/dronename/speed/rotor/rotornumber, where dronename must be replaced by the name assigned to each drone and rotornumber must be replaced by the rotor number for which the speed is going to be published. For example, the drone named drone01 will publish its speed values for its rotor number 1 to the sensors/drone01/speed/rotor/1 topic.
We will use the mosquitto_sub command-line utility included in Mosquitto to generate a simple MQTT client that subscribes to a topic and print all the messages it receives. Open a Terminal in macOS or Linux, or a Command Prompt in Windows, go to the directory in which Mosquitto is installed and run the following command:
mosquitto_sub -V mqttv311 -t sensors/drone01/altitude -d
The previous command will create an MQTT client that will establish a connection with the local MQTT server and then will make the client subscribe to the topic specified after the -t option: sensors/drone01/altitude. We specify the version of the MQTT protocol that we want to use when the client establishes the connection with -V mqttv311. This way, we indicate the MQTT server that we want to use MQTT version 3.1.1. We specify the -d option to enable debug messages that will allow us to understand what happens under the hoods. We will analyze additional options for the connection and the subscription later.
The Terminal or Command Prompt window will display debug messages similar to the following lines. Take into account that the generated ClientId will be different from the one shown after Client: mosqpub/5449-Gastons-Ma.
Client mosqsub/5449-Gastons-Ma sending CONNECT
Client mosqsub/5449-Gastons-Ma received CONNACK
Client mosqsub/5449-Gastons-Ma sending SUBSCRIBE (Mid: 1, Topic: sensors/drone01/altitude, QoS: 0)
Client mosqsub/5449-Gastons-Ma received SUBACK
Subscribed (mid: 1): 0
The Terminal or Command Prompt window will display the messages published to the topic to which we subscribed as they arrive from the MQTT server to the MQTT client. Keep the window opened. You will see that that the client sends PINGREQ packets to the MQTT server and receives PINQRESP packets from the MQTT server. The following lines show examples of the messages displayed for these packets:
Client mosqsub/5449-Gastons-Ma sending PINGREQ
Client mosqsub/5449-Gastons-Ma received PINGRESP
MQTT.fx is a GUI utility implemented with JavaFX that is available for Windows, Linux and macOS. This tool allows us to connect with an MQTT server, subscribe to topic filters, see the received messages and publish messages to topics. You can download the appropriate version for your operating system from the downloads section of the main web page for this utility: http://www.mqttfx.org .
Now, we will use the MQTT.fx GUI utility to generate another MQTT client that subscribes to the same topic, sensors/drone01/altitude, and displays all the messages it receives. Follow the next steps:
Launch MQTT.fx, select local mosquitto in the dropdown located at the upper-left corner and click on the configuration icon at the right-hand side of this dropdown and at the left-hand side of the Connect button. MQTT.fx will display the Edit Connection Profiles dialog box with different options for the connection profile named local mosquitto. We analyzed many of these options when we learned about the data that the MQTT client sends to the MQTT server to establish a connection.
Make sure the General button is pressed and deactivate the MQTT Version Use Default checkbox. Make sure 3.1.1 is selected in the dropdown below MQTT Version. This way, we indicate to the MQTT server that we want to use MQTT version 3.1.1. Notice that the Client ID textbox specifies MQTT_FX_Client. This is the
ClientIdvalue that MQTT.fx will send to the MQTT server (Mosquitto) in theCONNECTcontrol packet. The following screenshot shows the dialog box with the selected options:
Click OK and then click on the Connect button. MQTT.fx will establish a connection with the local Mosquitto server. Notice that the Connect button is disabled and the Disconnect button is enabled because the client is connected to the MQTT server.
Click Subscribe and enter
sensors/drone01/altitudein the dropdown at the left-hand side of the Subscribe button. Then, click the Subscribe button. MQTT.fx will display a new panel at the left-hand side with the topic to which we have subscribed, as shown in the next screenshot.
In case you don't want to work with the MQTT.fx utility, you can run another mosquitto_sub command to generate another MQTT client that subscribes to the topic and print all the messages it receives. You just need to open another Terminal in macOS or Linux, or another Command Prompt in Windows, go to the directory in which Mosquitto is installed and run the following command again. In this case, it isn't necessary to specify the -d option.
mosquitto_sub -V mqttv311 -t sensors/drone01/altitude
Now, we have two MQTT clients subscribed to the same topic: sensors/drone01/altitude. Now, we will understand what happens under the hoods when a client subscribes to a topic.
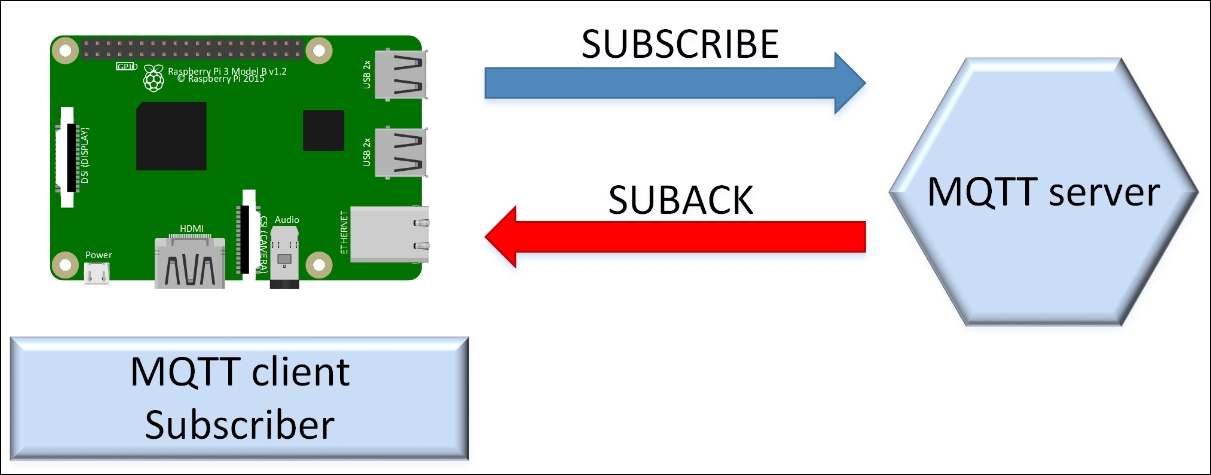
The MQTT client sends a SUBSCRIBE packet to the MQTT server with a packet identifier (PacketId) in the header and one or more pairs of a topic filter and the desired quality of service level in the payload.
Hence, a single SUBSCRIBE packet can request the MQTT server to subscribe a client to many topics. The SUBSCRIBE packet must include at least one topic filter and QoS pair to comply with the protocol.
In the two cases in which we requested a subscription, we used a specific topic name as the value for the topic filter, and therefore, we request the MQTT server to subscribe to a single topic. We will learn about the usage of wildcards in topic filters later.
We used the default options, and therefore, the quality of service requested is the default level of 0. We will dive deep on the QoS levels later. Now, we will stay focused on the simplest subscription cases. If the QoS level is equal to 0, the value for the PacketId field will be 0. In case the QoS level is equal to 1 or 2, the packet identifier will have a number value to identify the packet and make it possible to identify the responses related to this packet.
The MQTT server will process a valid SUBSCRIBE packet and it will respond with a SUBACK packet that indicates the subscribe acknowledgement and confirms the receipt and processing of the SUBSCRIBE packet. The SUBACK packet will include the same packet identifier (PacketId) in the header that was received in the SUBSCRIBE packet. The SUBACK packet will include one return code for each pair of a topic filter and the desired QoS level received in the SUBSCRIBE packet. The number of return codes will match the number of topic filters included in the SUBSCRIBE packet. The following table shows the possible values for these return codes. The first three return codes indicate a successful subscription and each value specifies the maximum QoS that can be delivered based on the requested QoS and the MQTT server possibilities to grant it.
|
ReturnCode value |
Description |
|
|
Successfully subscrib with a maxium QoS of |
|
|
Successfully subscrib with a maxium QoS of |
|
|
Successfully subscrib with a maxium QoS of |
|
|
Failed to subscribe |
If the subscription was successful, the MQTT server will start sending every published message that matches the topic filters specified in the subscription to the MQTT client with the QoS specified in the return code.
The following diagram shows the interaction between an MQTT client and an MQTT server to subscribe to one or many topic filters.