


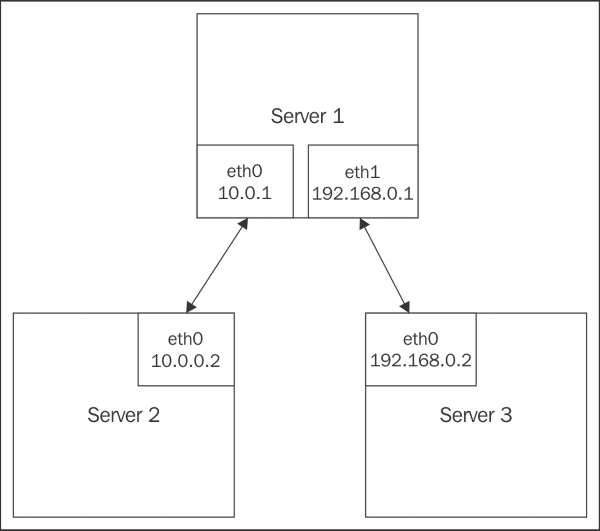
For our next step, we're going to add a second interface to server 1. In addition to 10.0.0.1/24 being configured on eth0, we're going to configure 192.168.0.1/24 on eth1. The second interface could just as easily be 10.0.1.1/24, but let's make sure that the networks are obviously different.
The systems should be configured similar to Figure 1:
Configure the network interface on
eth1on server 1:# ip link set dev eth1 up # ip addr add dev eth1 192.168.0.1/24 # ip addr list eth1 3: eth1: <BROADCAST,MULTICAST,UP,LOWER_UP> mtu 1500 qdisc pfifo_fast state UP group default qlen 1000 link/ether 00:0c:29:99:ff:c1 brd ff:ff:ff:ff:ff:ff inet 192.168.0.1/24 scope global eth1 valid_lft forever preferred_lft forever inet6 fe80::20c:29ff:fe99:ffc1/64 scope link valid_lft forever preferred_lft forever
Connect your third system to
eth1on server 1.Configure
eth0on server 3 with an IP address of 192.168.0.2:# ip link set dev eth0 up # ip addr add dev eth0 192.168.0.2/24 # ip addr list eth1 3: eth0: <BROADCAST,MULTICAST,UP,LOWER_UP> mtu 1500 qdisc pfifo_fast state UP group default qlen 1000 link/ether 00:0c:29:99:ff:c2 brd ff:ff:ff:ff:ff:ff inet 192.168.0.2/24 scope global eth1 valid_lft forever preferred_lft forever inet6 fe80::20c:29ff:fe99:ffc1/64 scope link valid_lft forever preferred_lft forever
Add a default route on server 3:
# ip route add default via 192.168.0.1Enable routing on server 1:
# echo net.ipv4.ip_forward=1 > /etc/sysctl.conf
# sysctl -p /etc/sysctl.conf
Add a default route on server 2:
# ip route add default via 10.0.0.1
When you configure an IP address on a Linux system, you automatically have a route defined, which states that in order to access another IP address in the same subnet, you should use 0.0.0.0 as your gateway. This tells the IP stack that the system, if it exists, will be on the same layer as the two network segments, and that it should use ARP to determine the MAC address it should communicate with.
If you want to talk to a machine outside of that subnet, the system will need to know how to communicate with it. This is done by defining a route with a gateway IP address that you forward the packet to. You then depend on the gateway system to forward the packet to the correct destination.
Most commonly, you'll deal with a default route, which is the route that the system uses for any packet that is not deemed to be local. In our configuration, we tell the system that the default route is 192.168.0.1, which asks us to forward any non-local packets to an IP address configured on our server 1 box. This means that server 1 will act as our router.
You can also define more specific routes where you can explicitly define an IP address to forward packets to a specific IP address or subnet. This can be useful in a network where one router provides access to the Internet and a second router provides access to a second internal network.
At this point server 3, configured as 192.168.0.2, knows that IP addresses on 192.168.0.0/24 are local and any other packet should be sent to 192.168.0.1 in order to be forwarded. However, if you attempt to ping a system that is outside your local network (for example 10.0.0.2), it will not arrive. This is because routing on Linux systems is disabled by default and needs to be enabled on server 1 before it can forward packets. Enabling routing can be done by setting /proc/sys/net/ipv4/ip_forward to 1, or via sysctl, which is the manner in which we've chosen to set it.
Once routing is enabled, packets addressed from server 3 will be received by your router and forwarded to 10.0.0.2 (server 2) via eth0 on the router. 10.0.0.2 will receive the packet from your router and promptly attempt to respond. This response will fail, as server 2 does not have a defined route for accessing the 192.168.0.1/24 network. This is fixed by adding a default route on server 2 as well, but sending to the router's interface on the 10.0.0.0/24 network.
Now server 3 knows how to address server 2, server 2 knows how to address server 3, and server 1 routes packets between the two as needed. Congratulations, you have connected two networks.


