


Using Spring Initializr
We will create our backend project using Spring Initializr, a web-based tool that’s used to create Spring Boot projects. Then, we will learn how to run our Spring Boot project using the Eclipse IDE. At the end of this section, we will also look at how you can use Spring Boot logging.
Creating a project
To create our project using Spring Initalizr, complete the following steps:
- Open Spring Initializr by navigating to https://start.spring.io using your web browser. You should see the following page:
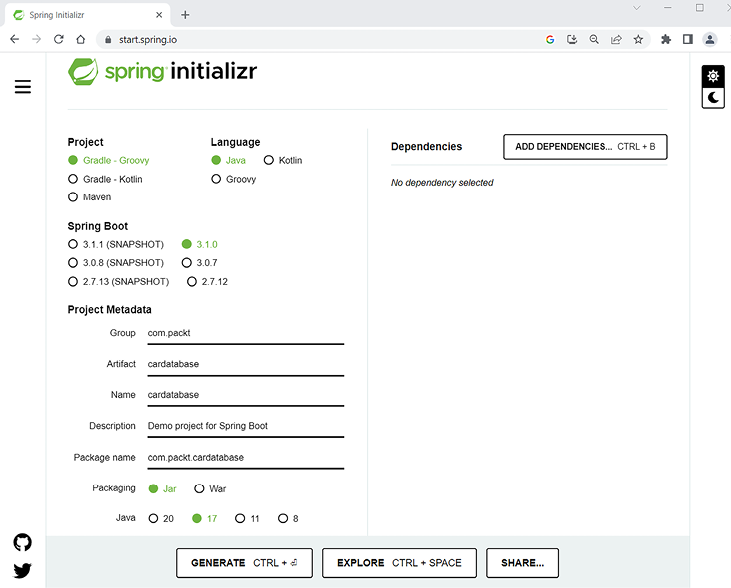
Figure 1.3: Spring Initializr
- We will generate a Gradle - Groovy project with Java and the latest stable Spring Boot 3.1.x version. If you are using a newer major or minor version, you should check the release notes about what’s changed. In the Group field, we will define our group ID (com.packt), which will also become a base package in our Java project. In the Artifact field, we will define an artifact ID (cardatabase), which will also be the name of our project in Eclipse.
IMPORTANT NOTE
Select the correct Java version in Spring Initializr. In this book, we are using Java version 17. In Spring Boot 3, the Java baseline is Java 17.
- By clicking the ADD DEPENDENCIES… button, we will select the starters and dependencies that are needed in our project. Spring Boot provides starter packages that simplify your Gradle configuration. Spring Boot starters are actually a set of dependencies that you can include in your project. We will start our project by selecting two dependencies: Spring Web and Spring Boot DevTools. You can type the dependencies into the search field or select from a list that appears, as illustrated in the following screenshot:

Figure 1.4: Adding dependencies
The Spring Boot DevTools dependency gives us the Spring Boot developer tools, which provide an automatic restart functionality. This makes development much faster because the application is automatically restarted when changes have been saved.
The Spring Web starter pack is a base for full stack development and provides an embedded Tomcat server. After you have added dependencies, your Dependencies section in Spring Initializr should look like this:

Figure 1.5: Spring Initializr dependencies
Next, we will learn how to run our project using the Eclipse IDE.
Running the project
Perform the following steps to run the Gradle project in the Eclipse IDE:
- Extract the project ZIP package that we created in the previous section and open Eclipse.
- We are going to import our project into the Eclipse IDE. To start the import process, select the File | Import menu and the import wizard will be opened. The following screenshot shows the first page of the wizard:
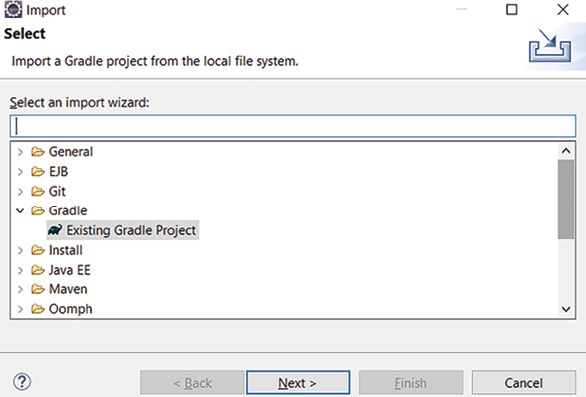
Figure 1.6: Import wizard (step 1)
- In the first phase, you should select Existing Gradle Project from the list under the Gradle folder, and then click the Next > button. The following screenshot shows the second step of the import wizard:
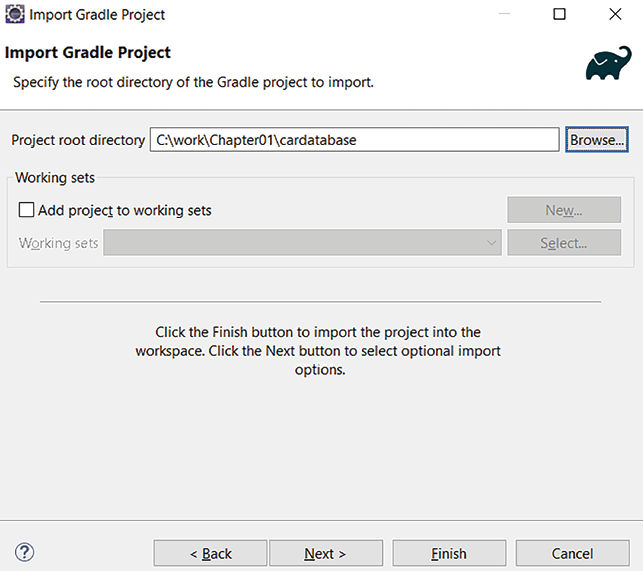
Figure 1.7: Import wizard (step 2)
- In this phase, click the Browse... button and select the extracted project folder.
- Click the Finish button to finalize the import. If everything ran correctly, you should see the
cardatabaseproject in the Eclipse IDE Project Explorer. It takes a while before the project is ready because all the dependencies will be downloaded by Gradle after importing them. You can see the progress of the dependency download in the bottom-right corner of Eclipse. The following screenshot shows the Eclipse IDE Project Explorer after a successful import:
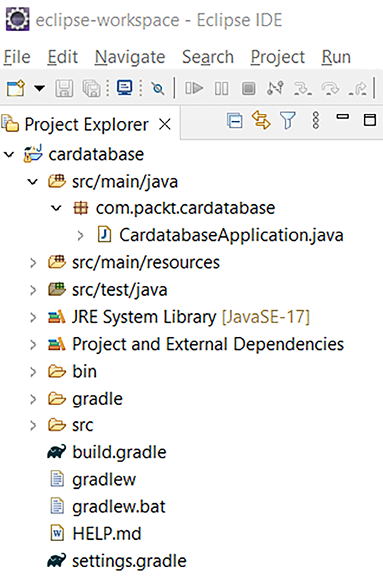
Figure 1.8: Project Explorer
- The Project Explorer also shows the package structure of our project. In the beginning, there is only one package called
com.packt.cardatabase. Under that package is our main application class, calledCardatabaseApplication.java. - Now, we don’t have any functionality in our application, but we can run it and see whether everything has started successfully. To run the project, open the main class by double-clicking on it, as shown in the following screenshot, and then click the Run button (the play icon) in the Eclipse toolbar. Alternatively, you can select the Run menu and click Run as | Java Application:

Figure 1.9: The Cardatabase project
You can see the Console view open in Eclipse, which contains important information about the execution of the project. As we discussed before, this is the view where all log text and error messages appear, so it is really important to check the content of the view when something goes wrong.
If the project was executed correctly, you should see the started
CardatabaseApplicationclass in the text at the end of the console. The following screenshot shows the content of the Eclipse console after our Spring Boot project has been started:
Figure 1.10: Eclipse console
You can also run your Spring Boot Gradle project from the command prompt or terminal using the following command (in your project folder):
gradlew bootRun
In the root of our project, there is the build.gradle file, which is the Gradle configuration file for our project. If you look at the dependencies inside the file, you can see that there are now dependencies that we selected on the Spring Initializr page. There is also a test dependency included automatically, as illustrated in the following code snippet:
dependencies {
    implementation 'org.springframework.boot:spring-boot-starter-
    web'
    developmentOnly 'org.springframework.boot:spring-boot-
    devtools'
    testImplementation 'org.springframework.boot:spring-boot-
    starter-test'
}
In the following chapters, we are going to add more functionality to our application, and then we will add more dependencies manually to the build.gradle file.
Let’s look at the Spring Boot main class more carefully:
package com.packt.cardatabase;
import org.springframework.boot.SpringApplication;
import org.springframework.boot.autoconfigure.SpringBootApplication;
@SpringBootApplication
public class CardatabaseApplication {
    public static void main(String[] args) {
        SpringApplication.run(CardatabaseApplication.class, args);
    }
}
At the beginning of the class, there is the @SpringBootApplication annotation, which is actually a combination of multiple annotations:
|
Annotation |
Description |
|
|
This enables Spring Boot’s automatic configuration, so your project will automatically be configured based on dependencies. For example, if you have the |
|
|
This enables the Spring Boot component scan to find all the components of your application. |
|
|
This defines a class that can be used as a source of bean definitions. |
Table 1.1: SpringBootApplication annotations
The execution of the application starts from the main() method, as in standard Java applications.
IMPORTANT NOTE
It is recommended that you locate the main application class in the root package above other classes. All packages under the package containing the application class will be covered by Spring Boot’s component scan. A common reason for an application not working correctly is due to Spring Boot being unable to find critical classes.
Spring Boot development tools
Spring Boot development tools make the application development process simpler. The most important feature of the development tools is automatic restart whenever files on the classpath are modified. Projects will include the developer tools if the following dependency is added to the Gradle build.gradle file:
developmentOnly 'org.springframework.boot:spring-boot-devtools'
Development tools are disabled when you create a fully packaged production version of your application. You can test automatic restart by adding one comment line to your main class, as follows:
package com.packt.cardatabase;
import org.springframework.boot.SpringApplication;
import org.springframework.boot.autoconfigure.SpringBootApplication;
@SpringBootApplication
public class CardatabaseApplication {
    public static void main(String[] args) {
        // After adding this comment the application is restarted
        SpringApplication.run(CardatabaseApplication.class, args);
    }
}
After saving the file, you can see in the console that the application has restarted.
Logs and problem-solving
Logging can be used to monitor your application flow, and it is a good way to capture unexpected errors in your program code. The Spring Boot starter package provides the Logback, which we can use for logging without any configuration. The following sample code shows how you can use logging. The Logback uses Simple Logging Façade for Java (SLF4J) as its native interface:
package com.packt.cardatabase;
import org.slf4j.Logger;
import org.slf4j.LoggerFactory;
import org.springframework.boot.SpringApplication;
import org.springframework.boot.autoconfigure.SpringBootApplication;
@SpringBootApplication
public class CardatabaseApplication {
    private static final Logger logger = LoggerFactory.getLogger(
        CardatabaseApplication.class
    );

    public static void main(String[] args) {
        SpringApplication.run(CardatabaseApplication.class, args);
        logger.info("Application started");
    }
}
The logger.info method prints a log message to the console. Log messages can be seen in the console after you run a project, as shown in the following screenshot:

Figure 1.11: Log message
There are seven different levels of logging: TRACE, DEBUG, INFO, WARN, ERROR, FATAL, and OFF. You can configure the level of logging in your Spring Boot application.properties file. The file can be found in the /resources folder inside your project, as illustrated in the following screenshot:
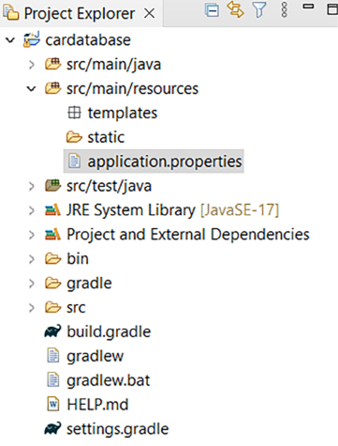
Figure 1.12: Application properties file
If we set the logging level to DEBUG, we can see log messages from levels that are log level DEBUG or higher (that is DEBUG, INFO, WARN, and ERROR). In the following example, we set the log level for the root, but you can also set it at the package level:
logging.level.root=DEBUG
Now, when you run the project, you can no longer see TRACE messages. The TRACE level contains all application behavior details, which is not needed unless you need full visibility of what is happening in your application. It might be a good setting for a development version of your application. The default logging level is INFO if you don’t define anything else.
There is one common failure that you might encounter when running a Spring Boot application. Spring Boot uses Apache Tomcat (http://tomcat.apache.org/) as an application server by default, which runs on port 8080 by default. You can change the port in the application.properties file. The following setting will start Tomcat on port 8081:
server.port=8081
If the port is occupied, the application won’t start, and you will see the following APPLICATION FAILED TO START message in the console:
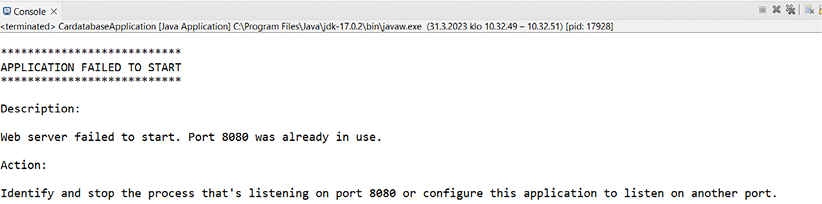
Figure 1.13: Port already in use
If this happens, you will have to stop the process that is listening on port 8080 or use another port in your Spring Boot application. You can avoid this by clicking the Terminate button (red square) in the Eclipse console before running the application.
In the next section, we will install a MariaDB database to use as a database in our backend.


