Reader small image

You're reading from  Eclipse Plug-in Development Beginner's Guide - Second Edition

Product typeBook
Published inAug 2016
Reading LevelExpert
Publisher
ISBN-139781783980697
Edition2nd Edition
Languages
Tools
Right arrow
Author (1)
Alex Blewitt
Alex Blewitt
author image
Alex Blewitt

contacted on 30 aug 16 _____________ Dr Alex Blewitt has over 20 years of experience in Objective-C and has been using Apple frameworks since NeXTstep 3.0. He upgraded his NeXTstation for a TiBook when Apple released Mac OS X in 2001 and has been developing on it ever since. Alex currently works for an investment bank in London, writes for the on-line technology news site InfoQ and has published two other books for Packt publishing. He also has a number of apps on the Apple AppStore through Bandlem Limited. When he's not working on technology, and if the weather is nice, he likes to go flying from the nearby Cranfield airport. Alex writes regularly at his blog, http://alblue.bandlem.com, as well tweeting regularly from Twitter as @alblue. Acknowledgements This book would not have been possible without the ongoing love and support of my wife Amy, who has helped me through both the highs and lows of life. She gave me the freedom to work during the many late nights and weekends that it takes to produce a book and its associated code repository. She truly is the Lem of my life. I'd also like to thank my parents, Ann and Derek, for their encouragement and support during my formative years. It was this work ethic that allowed me to start my technology career as a teenager and to incorporate my first company before I was 25. I'd also like to congratulate them on their 50th wedding anniversary in 2015, and I look forward to reaching that goal with Amy. Thanks are due especially to the reviewer of this version of the book: Antonio Bello, as well as the previous version of this book: Nate Cook, James Robert and Arvid Gerstmann, who provided excellent feedback on the contents of this book during development and caught many errors in both the text and code. Any remaining errors are my own. I'd also like to thank my children Sam and Holly for inspiring me and hope that they too can achieve anything that they set their minds to. Finally, I'd like to thank Ben Moseley and Eren Kotan, both of whom introduced me to NeXT in the first place and set my career going on a twenty year journey to this book.
Read more about Alex Blewitt

Right arrow

Chapter 10. Creating Features, Update Sites, Applications, and Products

Features, Update Sites, Applications and Products – putting it together

Eclipse is much more than just an application; its plug-in architecture allows additional functionality to be installed. Plug-ins can be grouped into features, and both can be hosted on an update site. These allow functionality to be installed into an existing application, but it's also possible to build your own applications and products.

In this chapter, we shall:

  • Create a feature that combines plug-ins

  • Generate an update site containing features and plug-ins

  • Categorize the update site

  • Create an application

  • Create and export a product

  • Use a target platform to compile against a specific version of Eclipse

Grouping plug-ins with features


Although functionality is provided in Eclipse through the use of plug-ins, typically individual plug-ins aren't installed separately. Historically, the Eclipse platform only dealt with features, a means of grouping a number of plug-ins together. Although the P2 update system is capable of installing plug-ins separately, almost all functionality used in Eclipse runtimes is installed through features.

Time for action – creating a feature


A feature project is used in Eclipse to create, test, and export features. Features are used to group many plug-ins together into a coherent unit. For example, the JDT feature consists of 25 separate plug-ins. Features are also used in the construction of update sites, which are covered later in this chapter.

  1. Create a feature project by going to File | New | Project... and then selecting Feature Project.

  2. Name the project com.packtpub.e4.feature, which will also be used as the default name for the Feature ID. As with plug-ins, they are named in reverse domain name format, though typically they end with feature to distinguish them from the plug-in that they represent. The version number defaults to 1.0.0.qualifier. The feature name is used for the text name shown to the user when it's installed, and will default to the last segment of the project name:

  3. Click on Next and it will prompt to choose plug-ins. Choose com.packtpub.e4.clock.ui from the list:

  4. Click...

Time for action – exporting a feature


Once a feature has been created and has one or more plug-ins added, they can be exported from the workbench. An exported feature can be installed into other Eclipse instances, as the next section will demonstrate. Note that exporting a feature also builds and exports all the associated plug-ins.

  1. To export a plug-in, go to File | Export | Deployable features. This will give a dialog with the option to select any features in the workspace.

  2. Choose the com.packtpub.e4.feature and give a suitable directory location:

  3. Click on Finish and the feature and all of its plug-ins will be exported.

  4. Open the destination location in a file explorer and see the files created:

    • artifacts.jar

    • content.jar

    • features/com.packtpub.e4.feature_1.0.0.201605260958.jar

    • plugins/com.packtpub.e4.clock.ui_1.0.0.201605260958.jar

What just happened?

The File | Export | Deployable features action performed a number of steps under the covers. First, it compiled the referenced plug-ins into...

Time for action – installing a feature


Now that the feature has been exported, it can be installed into Eclipse. Either the current Eclipse instance can be used for this, or a new instance of Eclipse can be created by running the eclipse executable with a different workspace. (On macOS, double-clicking on the Eclipse.app will show the current Eclipse instance again. To run a second instance on macOS, open up the application in the terminal and run eclipse from the home of the application folder.)

  1. To install the feature into Eclipse, go to Help | Install New Software....

  2. In the dialog that is prompted, type the directory's URL in the work with field. If the feature was exported on Linux into /tmp/exported, then enter file:///tmp/exported into the work with field. If the feature was exported on Windows into c:\temp\exported, then enter file:///c:/temp/exported into the work with field. Note that on Windows, the directory slashes are reversed in the URL.

  3. After the URL has been entered, press the...

Time for action – categorizing the update site


The Group items by category mechanism allows a small subset of features to be shown in the list, grouped by category. Eclipse is a highly modular application, and a regular install is likely to include over 400 features and over 600 plug-ins. A one-dimensional list of all of the features will take up a significant amount of UI space and not provide the best user experience; and in any case, many of the features are subsets of the core functionality (Mylyn alone can install over 150 features, depending on what combinations are selected in the install).

This categorization works by providing a category.xml file (also known as site.xml), which defines a category and a collection of features within that category. When the Group items by category checkbox is selected, only the groups and features defined in the category.xml file are shown, and the rest of the features and plug-ins are hidden. These are usually done via a separate Update Site Project...

Time for action – depending on other features


If a feature needs functionality provided by another feature, it can be declared via the feature.xml file of the feature itself. For example, installing the E4 feature may depend on some runtime components provided by JGit, so installing the JGit feature will mean that everything required is present.

To add JGit as a dependency to the E4 feature.

  1. Edit the feature.xml file and go to the Dependencies tab:

  2. Click on Add Feature and select org.eclipse.jgit from the list. It will fill in a version range using the exact version specified in the plug-in; invariably it is better to substitute that with a lower-bound version number since that will allow the feature to be installed with a dependency that is slightly lower. This will result in a feature.xml that looks like:

    <feature id="com.packtpub.e4.feature" label="Feature"
      version="1.0.0.qualifier" provider-name="PACKTPUB">
      <requires>
        <import feature="org.eclipse.jgit" version="4...

Time for action – branding features


Features generally don't show up in the About dialog of Eclipse, as there is only space for a handful of features to show there. Only top-level features which have branding information associated with them are shown in the dialog.

  1. Go to Help | About (or Eclipse | About Eclipse on macOS) and there will be a number of icons present, consisting of the top-level branded features that have been installed. These features have an associated branding plug-in, which contains a file called about.ini that supplies the information:

  2. First, set up an association between the feature and its branding plug-in, by re-using the com.packtpub.e4.clock.ui plug-in from before. Open the feature.xml file, go to the Overview tab, and add the name of the branding plug-in as com.packtpub.e4.clock.ui:

  3. Now, create a file in the com.packtpub.e4.clock.ui plug-in called about.ini with the following content:

    featureImage=icons/sample.gif
    aboutText=\
    Clock UI plug-in\n\
    \n\
    Example of how to...

Building applications and products


An Eclipse runtime consists of groups of features, which are themselves groups of plug-ins. The application that they all live within is referred to as the product. A product has top-level branding, dictates what the name of the application is, and co-ordinates what platforms the code will run on, including ensuring that any necessary operating-system-specific functionality is present. In the previous chapter, a product based on Eclipse 4 was created; but products work in the same way for both Eclipse 3.x and Eclipse 4.x.

Time for action – creating a headless application


A product hands the runtime off to an application, which can be thought of as a custom Eclipse Runnable class. This is the main entry point to the application, which is responsible for setting up and tearing down the content of the application.

  1. Create a new plug-in, called com.packtpub.e4.headless.application. Ensure that the This plug-in will make contributions to the UI is unselected and Would you like to create a rich client application is set to No:

  2. Click on Finish and the project will be created.

  3. Open the project, select Plug-in Tools | Open Manifest, and go to the Extensions tab. This is where Eclipse keeps its list of extensions to the system, and where an application is defined.

  4. Click on Add and then type applications into the box. Ensure that the Show only extension points from the required plug-ins is unchecked. Choose the org.eclipse.core.runtime.applications extension point and click on Finish:

  5. The editor will switch to a tree-based...

Time for action – creating a product


An Eclipse product is a branding and a reference to an application. The product also has control over what features or plug-ins will be available, and whether those plug-ins will be started or not (and if so, in what order).

Chapter 7, Understanding the Eclipse 4 Model and RCP Applications, created a product to bootstrap the E4 application (provided by the org.eclipse.e4.ui.workbench.swt.E4Application class), but this section will create a product that binds to the headless application created previously to demonstrate how the linkage works.

  1. Use File | New | Other | Plug-in Development | Product Configuration to bring up the product wizard.

  2. Select the com.packtpub.e4.headless.application project and put headless as the file name.

  3. Leave the Create a configuration file with the basic settings selected.

  4. Click on Finish and it will open up the headless.product file in an editor.

  5. Fill in the details as follows:

    1. ID: com.packtpub.e4.headless.application.product

    2. ...

Target platforms


When building a feature set, it is sometimes necessary to test against different versions of the platform. To support this, PDE allows target definitions to be created, which are curated sets of features that PDE will build against. In any one workspace, Eclipse PDE allows for a single target platform to be active at any time, which defaults to the current Eclipse installation.

Time for action – creating a target definition


A target definition is a set of features and plug-ins that will be used to build plug-in and feature projects against. The target definition is an XML file that is typically persisted in a project or top-level container that can be shared in a source code repository for other developers to use.

  1. Create a new project by navigating to the File | New | Project… menu and selecting General | Project with the name com.packtpub.e4.target.mars.

  2. Create a new Target Definition by navigating to the File | New | Other… menu and searching for target:

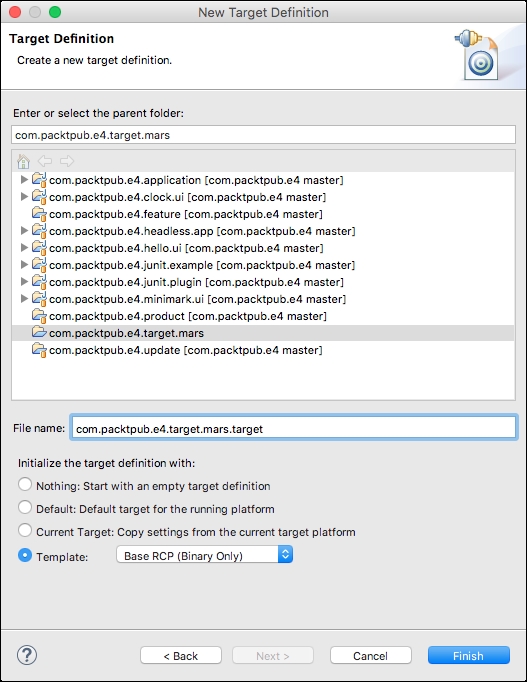
  3. After clicking on Next choose the com.packtpub.e4.target.mars project to store the target definition, and call it com.packtpub.e4.target.mars. This will allow anyone building the project to use that target platform to build the project. Select the Base RCP (Binary Only) template:

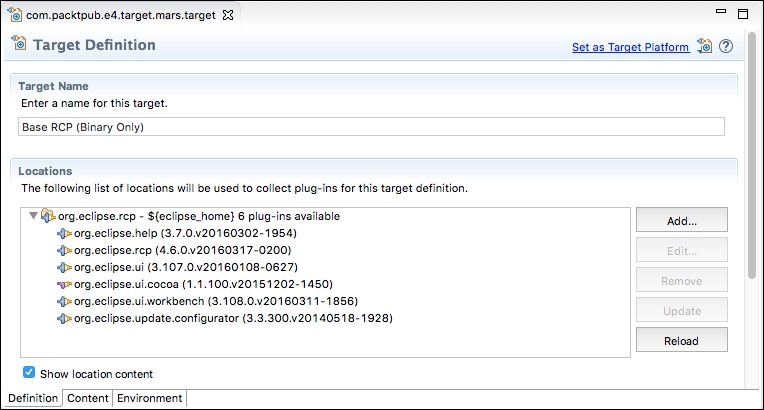
  4. Open the newly created com.packtpub.e4.target.mars.target file and the target definition editor will be shown:

  5. Clicking on Set as Target...

Time for action – switching to a specific version


The target platform created in the previous section is based on the Eclipse instance. It is much better to create a target platform for a specific version of Eclipse so that dependencies and testing can be performed against a specific version.

  1. Open the com.packtpub.e4.target.mars.target target definition file and remove the org.eclipse.e4.rcp, org.eclipse.platform and org.eclipse.rcp features, which correspond to the features in the current Eclipse instance.

  2. Click on Add and choose Software Site. In the Work with field, enter the update site for Eclipse Mars http://download.eclipse.org/releases/mars/ and then choose the Eclipse e4 Rich Client Platform (org.eclipse.e4.rcp), Eclipse Platform (org.eclipse.platform), and Eclipse RCP (org.eclipse.rcp) features from this list:

  3. After the update dialog has finished downloading the requirements, click on Set as Target Platform again to rebuild the projects with the Mars-specific version of Eclipse.

What...

Summary


In this chapter, we covered how to create features and update sites, which allows plug-ins to be exported and installed into different Eclipse instances. The contents of the update site can be published to a web server and registered with the Eclipse marketplace to gain wide visibility. We also covered how to create applications and products that can be used to export top-level applications, and to define how target platforms can be used to compile against different versions of Eclipse.

In the next chapter, we will look at how to write automated tests for Eclipse plug-ins.

lock icon
The rest of the chapter is locked
You have been reading a chapter from
Eclipse Plug-in Development Beginner's Guide - Second Edition
Published in: Aug 2016Publisher: ISBN-13: 9781783980697
Register for a free Packt account to unlock a world of extra content!
A free Packt account unlocks extra newsletters, articles, discounted offers, and much more. Start advancing your knowledge today.
undefined
Unlock this book and the full library FREE for 7 days
Get unlimited access to 7000+ expert-authored eBooks and videos courses covering every tech area you can think of
Renews at €14.99/month. Cancel anytime

Author (1)

author image
Alex Blewitt

contacted on 30 aug 16 _____________ Dr Alex Blewitt has over 20 years of experience in Objective-C and has been using Apple frameworks since NeXTstep 3.0. He upgraded his NeXTstation for a TiBook when Apple released Mac OS X in 2001 and has been developing on it ever since. Alex currently works for an investment bank in London, writes for the on-line technology news site InfoQ and has published two other books for Packt publishing. He also has a number of apps on the Apple AppStore through Bandlem Limited. When he's not working on technology, and if the weather is nice, he likes to go flying from the nearby Cranfield airport. Alex writes regularly at his blog, http://alblue.bandlem.com, as well tweeting regularly from Twitter as @alblue. Acknowledgements This book would not have been possible without the ongoing love and support of my wife Amy, who has helped me through both the highs and lows of life. She gave me the freedom to work during the many late nights and weekends that it takes to produce a book and its associated code repository. She truly is the Lem of my life. I'd also like to thank my parents, Ann and Derek, for their encouragement and support during my formative years. It was this work ethic that allowed me to start my technology career as a teenager and to incorporate my first company before I was 25. I'd also like to congratulate them on their 50th wedding anniversary in 2015, and I look forward to reaching that goal with Amy. Thanks are due especially to the reviewer of this version of the book: Antonio Bello, as well as the previous version of this book: Nate Cook, James Robert and Arvid Gerstmann, who provided excellent feedback on the contents of this book during development and caught many errors in both the text and code. Any remaining errors are my own. I'd also like to thank my children Sam and Holly for inspiring me and hope that they too can achieve anything that they set their minds to. Finally, I'd like to thank Ben Moseley and Eren Kotan, both of whom introduced me to NeXT in the first place and set my career going on a twenty year journey to this book.
Read more about Alex Blewitt