


Getting Started with Cisco IOS
Cisco enterprise devices, such as their routers and switches, have a networking operating system known as the Cisco Internetwork Operating System (IOS). Cisco IOS enables network professionals to easily manage and control the hardware components within Cisco IOS devices. Furthermore, Cisco IOS also provides the necessary software features to support a wide range of network functionalities, including routing, switching, and security. However, unlike most network operating systems and firmware that provide the user with a graphical user interface (GUI), Cisco IOS provides command-line interface (CLI) access only.
Additionally, the Cisco routers and switches have similar hardware components to computers, such as the following:
- Processor: A central processing unit (CPU) to execute network operations on the device
- Memory: Has limited random access memory (RAM) to temporarily store data and configurations while awaiting instructions from the CPU
- Storage: Uses either external or integrated flash memory
- Network adapters: Different models of routers and switches have various port densities (support for a number of ports)
- Power supply unit (PSU): The PSU is usually integrated into the motherboard of the device and is responsible for converting alternating current (AC) to direct current (DC)
- Motherboard: The motherboard interconnects all hardware components of the device and enables Cisco IOS to operate the hardware
Note
Cisco IOS is stored in flash memory. Using the show flash command will show all the contents in flash.
System administrators are required to understand each phase of the boot process of computers and servers, as this information is useful when troubleshooting any issues that may prevent the operating systems from loading properly. Similarly, both aspiring and seasoned network professionals are required to understand the boot process of Cisco IOS devices.
The following is the boot process of a Cisco IOS device:
- Power-on self-test (POST): POST performs a check on all the hardware components to ensure they’re all functioning correctly.
- Bootstrap: Bootstrap is a simple application that’s stored in read-only memory (ROM) that turns on the hardware components and locates Cisco IOS.
- Locating and loading Cisco IOS: The bootstrap checks the following locations for Cisco IOS in the following sequential order:
- Flash memory (default location for Cisco IOS) – once Cisco IOS is found, it’s loaded into RAM.
- Trivial File Transfer Protocol (TFTP) server – once Cisco IOS is found on a remote TFTP server, the Cisco device downloads it and runs it in RAM.
- If Cisco IOS is not found in flash memory or the TFTP server, then the bootstrap loads a scaled-down version of Cisco IOS into RAM, which provides the network professional with the capability to reload a full version of Cisco IOS into flash memory.
- Providing the bootstrap locates Cisco IOS either in flash memory or on the TFTP server, it loads it into RAM.
- Loading configurations: Once the full version of Cisco IOS is loaded into RAM, the device checks for the
startup-configfile that is stored in non-volatile RAM (NVRAM) and loads it intorunning-configin RAM. - If the
startup-configfile is not found, the device will enter the setup mode, which prompts the user to configure the device. - Initializing services and operations: Once Cisco IOS and the configuration files are loaded, the device will start various services and enable interfaces for operation.
Through these steps, you have learned how a Cisco IOS device boots into the operating system and loads its configurations into RAM.
Note
When configuring Cisco IOS, the configurations are stored within the running-config file in RAM. Since RAM is volatile and loses its contents when the device is powered off, it’s important to save the configurations in the startup-config files that are located in NVRAM. However, saving running-config in startup-config is a manual process, which you will learn about in a later section of this chapter.
Figure 2.1 shows the boot process of a Cisco IOS device:
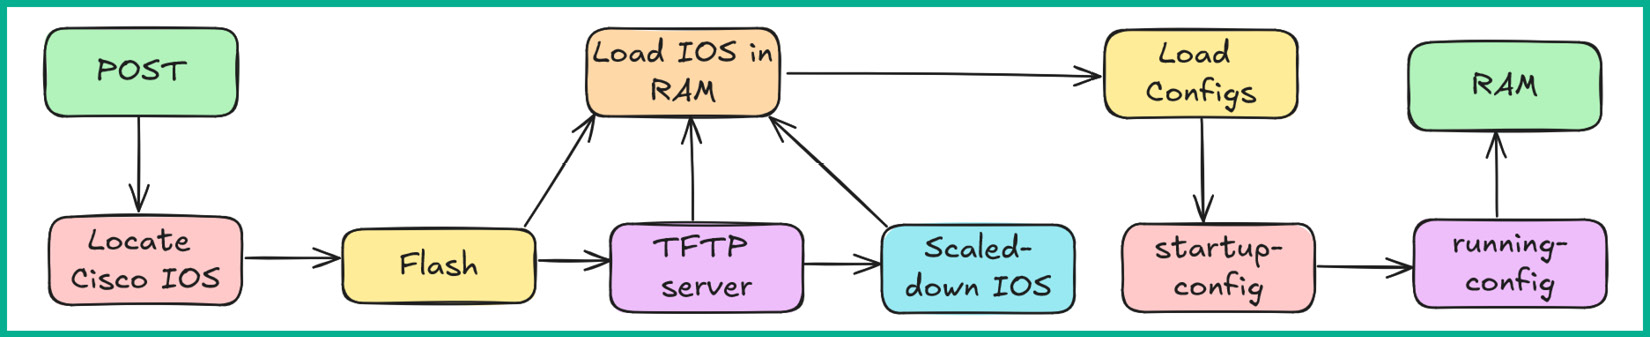
Figure 2.1: Boot process
Cisco IOS Modes and Levels of Access
Cisco IOS is a full-fledged network operating system that enables network professionals to control the hardware and other components of a Cisco device. In addition, Cisco IOS provides advanced security features to help network professionals improve their network security and prevent unauthorized access to Cisco routers and switches.
Cisco IOS has many modes or levels of access and each of these enables network professionals to execute specific commands. These levels of access/modes are as follows:
- User Exec: Upon accessing a Cisco device, Cisco IOS places the network professional into this mode. This mode has very limited capabilities and access to the device. With this mode, the network professional can execute commands such as
pingandtracerouteto troubleshoot connectivity issues. - User Exec mode can be easily identified by the
>prompt, as shown here:Router>
- Privilege Exec: This mode provides higher privileges and enables the network professional to view the device’s configurations and access the global configuration mode of Cisco IOS.
- The Privilege Exec mode can be easily identified by the
#prompt, as shown here:Router#
- Global Configuration: This mode enables network professionals to apply configurations and changes to the entire device and access interface, line, and router modes.
- The Global Configuration mode can be easily identified by the
(config)#prompt, as shown here:Router(config)#
- Interface mode: Interface mode enables network professionals to apply configurations on specific interfaces of the device, such as configuring the IP address and subnet mask on the interface.
- Interface mode is easily identified by the
(config-if)#prompt, as shown here:Router(config-if)#
- Line mode: This mode enables network professionals to apply configurations on the console port and the Virtual Teletype (VTY) lines for remote access.
- Line mode is easily identified by the
(config-line)#prompt, as shown here:Router(config-line)#
Figure 2.2 shows the various levels of access or modes of Cisco IOS:
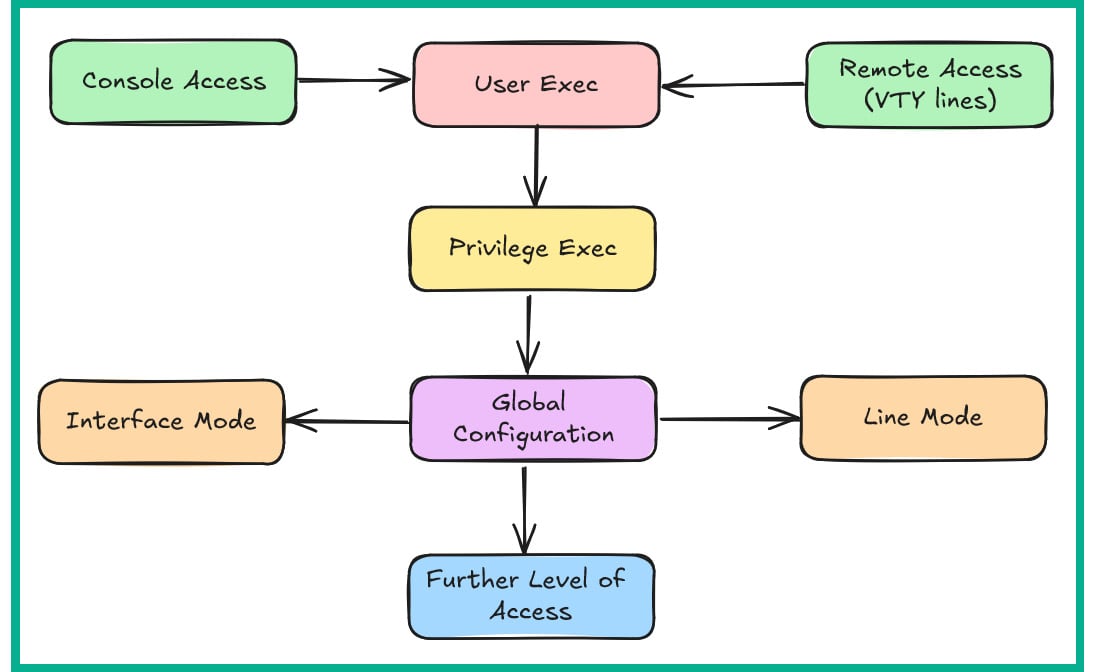
Figure 2.2: Cisco IOS modes
As shown in Figure 2.2, network professionals usually gain access to the User Exec mode via the console port or remote access through a VTY line using Secure Shell (SSH) or Telnet.
Note
SSH is a secure remote access protocol that enables network protocols to securely connect to a remote device over the network and obtain terminal access. By default, SSH encrypts the data between the SSH client on the network professional’s computer and the SSH service that’s running on the remote network device. Telnet is an unsecured remote access protocol that provides terminal access to networking devices. However, Telnet does not encrypt the data between the user and the Telnet service on the network device.
The following are examples of some common Cisco IOS commands for getting started with configuring a Cisco IOS device and moving around the different modes, such as User Exec, Privilege Exec, and even Global Configuration mode:
- To elevate or move from User Exec to Privilege Exec, use the
enablecommand and hitEnter, as shown here:Router> enable
- To move from Privilege Exec to Global Configuration mode, use the
configure terminalcommand and hitEnter, as shown here:Router# configure terminal
- While in Global Configuration mode, to access an interface, set an IP address and subnet mask, and enable the interface, use the commands shown here:
Router(config)# interface gigabitEthernet 0/1
Router(config-if)# ip address 192.168.1.1 255.255.255.0
Router(config-if)# no shutdown
Router(config-if)# exit
Note
The exit command will return you to the previous mode. Therefore, if you’re in Interface mode, you will return to Global Configuration mode. After typing a command, hit Enter on the keyboard to execute the command within Cisco IOS.
- If you’re in Global Configuration mode, use the
exitcommand to return to Privilege Exec mode, as shown here:Router(config)# exit
- Once you’re in Privilege Exec mode, use the
disablecommand to return to User Exec mode, as shown here:Router# disable
- To save
running-configintostartup-config, use the following command:Router# copy running-config startup-config
The following shows an example of using all the commands in the preceding steps:
Router> enable
Router# configure terminal
Router(config)# interface gigabitEthernet 0/1
Router(config-if)# ip address 192.168.1.1 255.255.255.0
Router(config-if)# no shutdown
Router(config-if)# exit
Router(config)# exit
Router# copy running-config startup-config
Router# disable
Router>
Note
If you are in Router, Interface, or Line mode, using the exit command will return you to Privilege Exec mode.
Having completed this section, you have learned about the boot process of Cisco IOS devices and the fundamentals of navigating between various modes of Cisco IOS. Next, you will learn how to perform initial device access on a new Cisco IOS router or switch.


