


Understanding modern databases
Two of the most common places to store data are in a Relational Database Management System (RDBMS) such as SQL Server, PostgreSQL, MySQL, and SQLite, or in a NoSQL database such as Azure Cosmos DB, MongoDB, Redis, and Apache Cassandra.
In this chapter, we will focus on the most popular RDBMS for Windows, which is SQL Server. This product is also available in a version for Linux. For cross-platform development, you can use either Azure SQL Database, which stores the data in the cloud, or Azure SQL Edge, which can run in a Docker container on Windows, macOS, or Linux, on both Intel and ARM architecture CPUs.
Using a sample relational database
To learn how to manage an RDBMS using .NET, it would be useful to have a sample one so that you can practice on a database that has a medium complexity and a decent number of sample records.
Microsoft offers several sample databases, most of which are too complex for our needs, so instead, we will use a database that was first created in the early 1990s known as Northwind.
Let’s take a minute to look at a diagram of the Northwind database and its eight most important tables. You can use the diagram in Figure 2.1 to refer to as we write code and queries throughout this book:
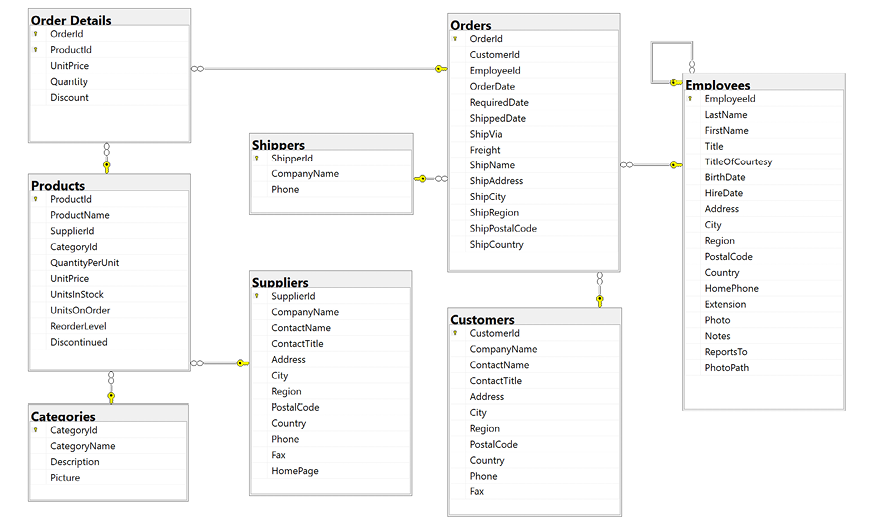
Figure 2.1: The Northwind database tables and relationships
Note that:
- Each category has a unique identifier, name, description, and picture. The picture is stored as a byte array in JPEG format.
- Each product has a unique identifier, name, unit price, number of units in stock, and other columns.
- Each product is associated with a category by storing the category’s unique identifier.
- The relationship between
CategoriesandProductsis one-to-many, meaning each category can have zero, one, or more products. - Each product is supplied by a supplier company indicated by storing the supplier’s unique identifier.
- The quantity and unit price of a product is stored for each detail of an order.
- Each order is made by a customer, taken by an employee, and shipped by a shipping company.
- Each employee has a name, address, contact details, birth, and hire dates, a reference to their manager (except for the boss, whose
ReportsTofield isnull), and a photo stored as a byte array in JPEG format. The table has a one-to-many relationship to itself because one employee can manage many other employees.
Connecting to a SQL Server database
To connect to a SQL Server database, we need to know multiple pieces of information, as shown in the following list:
- The name of the server (and the name of the instance if it has more than the default one). This can include the protocol, IP address, and port number if connecting over a network.
- The name of the database.
- Security information, such as the username and password, or if we should pass the currently logged-on user’s credentials automatically using Windows Authentication.
We specify this information in a connection string.
For backward compatibility, there are multiple possible keywords we can use in a SQL Server connection string for the various parameters, as shown in the following list:
Data Source,server, oraddr: These keywords are the name of the server (and an optional instance). You can use a dot (.) to mean the local server.Initial Catalogordatabase: These keywords are the name of the database that will be active initially. A SQL statement could change that using the command:USE <databasename>.Integrated Securityortrusted_connection: These keywords are set totrueorSSPIto pass the thread’s current user credentials using Windows Authentication.User IdandPassword: These keywords are used to authenticate with any edition of SQL Server. This is important for Azure SQL Database or Azure SQL Edge because they do not support Windows Authentication. The full edition of SQL Server on Windows supports both username with password and Windows Authentication.Authentication: This keyword is used to authenticate by using Azure AD identities that can enable password-less authentication. Values can beActive Directory Integrated,Active Directory Password, andSql Password.Persist Security Info: If set tofalse, this keyword tells the connection to remove thePasswordfrom the connection string after authenticating.Encrypt: If set totrue, this keyword tells the connections to use SSL to encrypt transmissions between client and server.TrustServerCertificate: Set totrueif hosting locally and you get the error “A connection was successfully established with the server, but then an error occurred during the login process. (provider: SSL Provider, error: 0 - The certificate chain was issued by an authority that is not trusted.)”.Connection Timeout: This keyword defaults to 30 seconds.MultipleActiveResultSets: This keyword is set totrueto enable a single connection to be used to work with multiple tables simultaneously to improve efficiency. It is used for lazy loading rows from related tables.
As described in the list above, when you write code to connect to a SQL Server database, you need to know its server name. The server name depends on the edition and version of SQL Server that you will connect to, as shown in Table 2.1:
|
SQL Server edition |
Server name \ Instance name |
|
LocalDB 2012 |
|
|
LocalDB 2016 or later |
|
|
Express |
|
|
Full/Developer (default instance) |
|
|
Full/Developer (named instance) |
|
|
Azure SQL Edge (local Docker) |
|
|
Azure SQL Database |
|
Table 2.1: Server name examples for various editions of SQL Server
Good Practice: Use a dot (.) as shorthand for the local computer name (localhost). Remember that server names for SQL Server can be made up of two parts: the name of the computer and the name of a SQL Server instance. You provide instance names during custom installation.
Installing and setting up SQL Server locally
Microsoft offers various editions of its popular and capable SQL Server product for Windows, Linux, and Docker containers. If you have Windows, then you can use a free version that runs standalone, known as SQL Server Developer Edition. You can also use the Express edition or the free SQL Server LocalDB edition that can be installed with Visual Studio 2022 for Windows.
If you do not have a Windows computer or if you want to use a cross-platform database system, then you can skip ahead to the topic Setting up Azure SQL Database, or the online-only section Installing Azure SQL Edge in Docker found at the following link:
https://github.com/markjprice/apps-services-net8/blob/main/docs/ch02-sql-edge.md
If you prefer to install SQL Server locally on Linux, then you will find instructions at the following link: https://learn.microsoft.com/en-us/sql/linux/sql-server-linux-setup.
Installing SQL Server Developer Edition for Windows
On Windows, if you want to use the full edition of SQL Server instead of the simplified LocalDB or Express editions, then you can find all SQL Server editions at the following link: https://www.microsoft.com/en-us/sql-server/sql-server-downloads.
Take the following steps:
- Download the Developer edition.
- Run the installer.
- Select the Custom installation type.
- Select a folder for the installation files and then click Install.
- Wait for the 1.5 GB of installer files to download.
- In SQL Server Installation Center, click Installation, and then click New SQL Server stand-alone installation or add features to an existing installation, as shown in Figure 2.2:
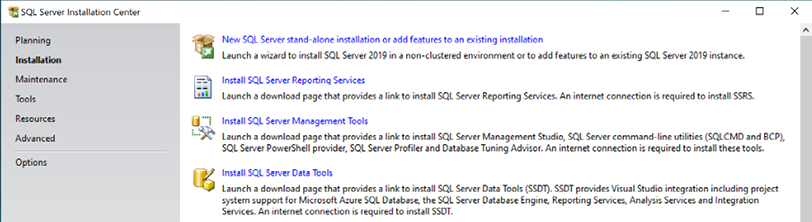
Figure 2.2: Installing a new instance of SQL Server
- Select Developer as the free edition and then click Next.
- Accept the license terms and then click Next.
- Review the Microsoft Update options and then click Next.
- Review the install rules, fix any issues although you might want to ignore any firewall warnings since you might not want to expose those ports anyway, and then click Next.
- In Feature Selection, select Database Engine Services, and then click Next.
- In Azure Extension for SQL Server, you can turn this off.
- In Instance Configuration, select Default instance, and then click Next. If you already have a default instance configured, then you could create a named instance, perhaps called
apps-services-book. - In Server Configuration, note the SQL Server Database Engine is configured to start automatically. If not already set by default, then set the SQL Server Browser to start automatically, and then click Next.
- In Database Engine Configuration, on the Server Configuration tab, set Authentication Mode to Mixed, set the sa account password to a strong password, click Add Current User, and then click Next.
- In Ready to Install, review the actions that will be taken, and then click Install.
- In Complete, note the successful actions taken, and then click Close.
- In SQL Server Installation Center, in Installation, click Install SQL Server Management Tools.
- In the browser window, click to download the latest version of SSMS, as shown in Figure 2.3:

Figure 2.3: Downloading SQL Server Management Studio (SSMS)
The direct link to download SSMS is as follows: https://learn.microsoft.com/en-us/sql/ssms/download-sql-server-management-studio-ssms.
- Run the SSMS installer and click Install.
- When the installer has finished, click Restart if needed or Close.
Azure Data Studio (ADS) is automatically installed alongside SSMS. ADS is cross-platform and open-source, so you can use it to work with SQL Server databases on any desktop operating system.
Visual Studio Code extension for working with SQL Server
There are many tools that make it easy to work with SQL Server. If you are using Visual Studio Code, then you can install the SQL Server (mssql) ms-mssql.mssql extension. If you install the extension, it adds a new view to the Primary Side Bar titled SQL Server, as shown in Figure 2.4:
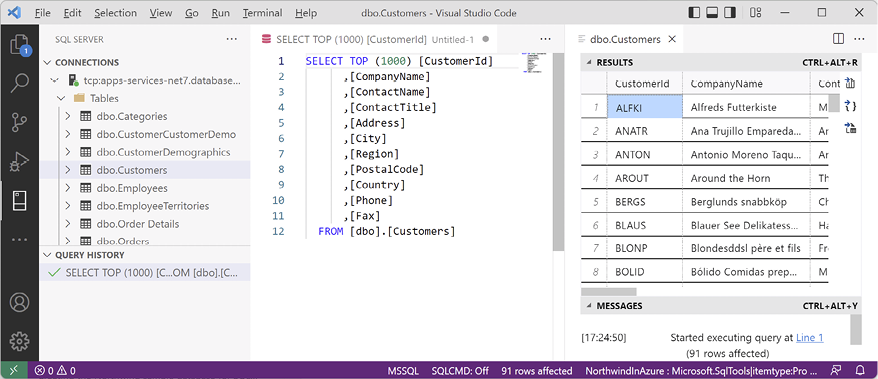
Figure 2.4: SQL Server (mssql) extension for Visual Studio Code
Creating the Northwind sample database locally
Now we can run a database script to create the Northwind sample database locally on Windows using SQL Server Management Studio (SSMS):
- If you have not previously downloaded or cloned the GitHub repository for this book, then do so now using the following link: https://github.com/markjprice/apps-services-net8/.
- In your
apps-services-net8folder, create a folder namedChapter02. - Copy the script to create the Northwind database for SQL Server from the following path in your local Git repository:
/scripts/sql-scripts/Northwind4SQLServer.sqlinto theChapter02folder. - Start SQL Server Management Studio.
- In the Connect to Server dialog, for Server name, enter
.(a dot), meaning the local computer name, and then click Connect.Warning! If you had to create a named instance, like
apps-services-book, then enter.\apps-services-book. If you see an error about the server certificate, then click the Options >> button and select the Trust server certificate check box.
- Navigate to File | Open | File....
- Browse to select the
Northwind4SQLServer.sqlfile and then click Open. - In the toolbar, click Execute, and note the Command(s) completed successfully message.
- In Object Explorer, expand the Northwind database, and then expand Tables.
- Right-click Products, click Select Top 1000 Rows, and note the returned results, as shown in Figure 2.5:
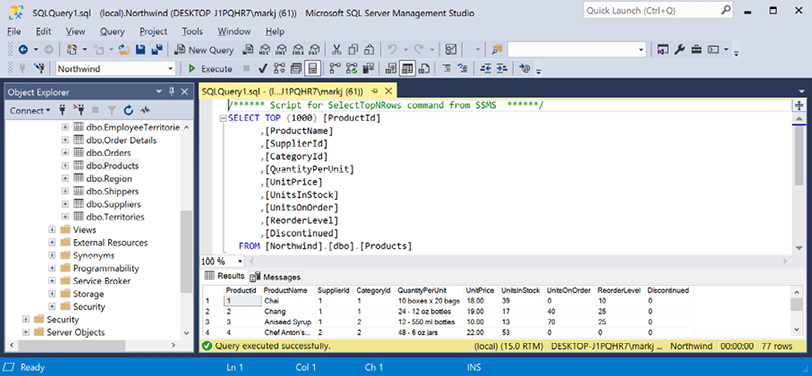
Figure 2.5: The Products table in SQL Server Management Studio
- In the Object Explorer toolbar, click the Disconnect button.
- Exit SQL Server Management Studio.
We did not have to use SQL Server Management Studio to execute the database script. We can also use tools in Visual Studio 2022, including the SQL Server Object Explorer and Server Explorer, or cross-platform tools like the Visual Studio Code extension for SQL Server, or Azure Data Studio, which you can download and install separately from the following link: https://aka.ms/getazuredatastudio.
Setting up Azure SQL Database
If you do not have a Windows computer, then you can create a cloud-hosted instance of SQL Server. You will need an Azure account. You can sign up at the following link: https://signup.azure.com. Next, you need to take the following steps:
- Log in to your Azure account: https://portal.azure.com/
- Navigate to https://portal.azure.com/#create/hub.
- Search for Resource group and then click the Create button.
- Enter a resource group name of
apps-services-bookand select a suitable region close to you, and then click the Review + create button, as shown in Figure 2.6:
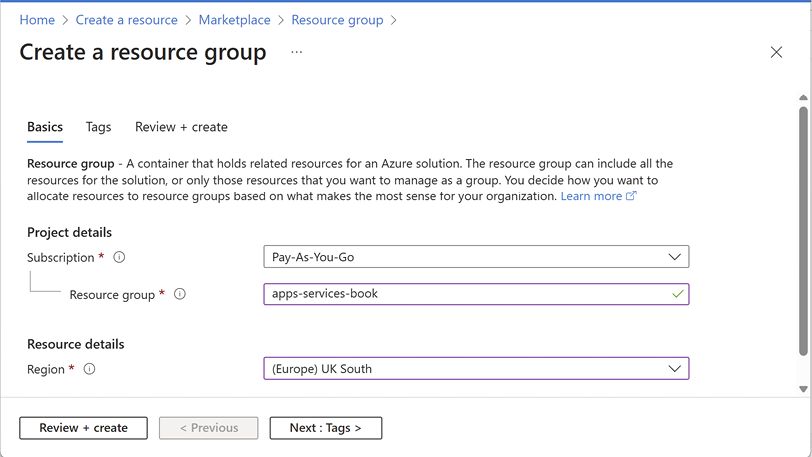
Figure 2.6: Creating a resource group in the Azure portal
- Review your choices and then click the Create button.
- Create another resource, search for SQL Database, and click Create.
- In the Create SQL Database page, in the Basics tab, for the Database name, enter
Northwind, and select the resource group that you created before. - In the Server section, click Create New.
- Enter the following details for the SQL Database server, as shown in Figure 2.7:
- Server name:
apps-services-book-[your initials]or something else entirely. The server name must be globally unique because it becomes part of a public URL. - Location: A region close to you. I chose (Europe) UK South. Not all regions support all types of resources. You will see an error if the region you select does not support SQL Database server resources.
- Authentication method: Use SQL authentication.
- Server admin login: [Your email or another username], for example, I entered
markjprice. - Password/Confirm password: [Enter a strong password].
- Server name:
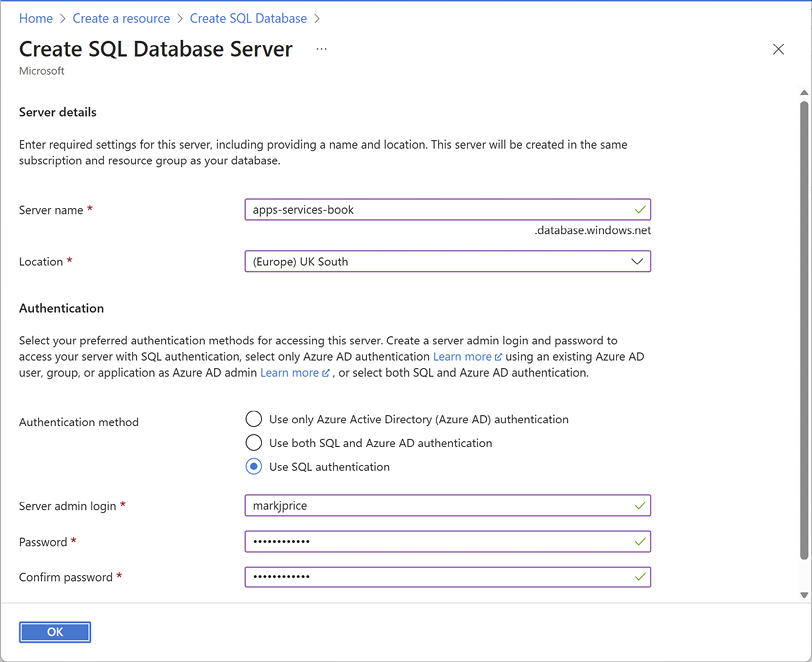
Figure 2.7: Entering the server details for a SQL Database instance
- Click OK.
- Leave Want to use SQL elastic pool set to No.
- For Workload environment, select Development (instead of Production).
- In the Create SQL Database page, in the Compute + storage section, click Configure database.
- For Service tier, select Basic (For less demanding workloads). Note the maximum database size is 2 GB and the estimated cost is about $5 per month (or less than 1 cent per hour). You can delete the resources as soon as you have completed this chapter to reduce the cost further.
- Click Apply.
- In the Create SQL Database page, set Backup storage redundancy to Locally-redundant backup storage.
- Click the Next : Networking button.
- In the Network connectivity section, select Public endpoint.
- In the Firewall rules section, set Add current client IP address to Yes.
- Click the Next : Security button.
- Review the options but leave them as the defaults.
- Click the Next : Additional settings button.
- Review the options but leave them as the defaults.
- Click the Review + create button.
- Click the Create button.
- Wait for the deployment to complete, as shown in Figure 2.8:
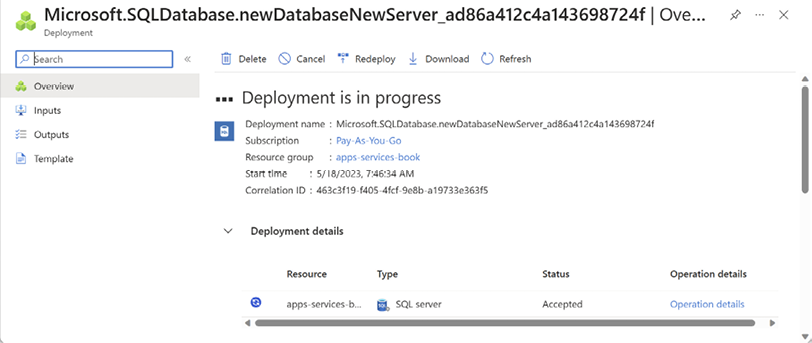
Figure 2.8: Deployment progress for SQL Database
- When deployment has completed, click Go to resource.
- Click Overview and note the database details, as shown in Figure 2.9:
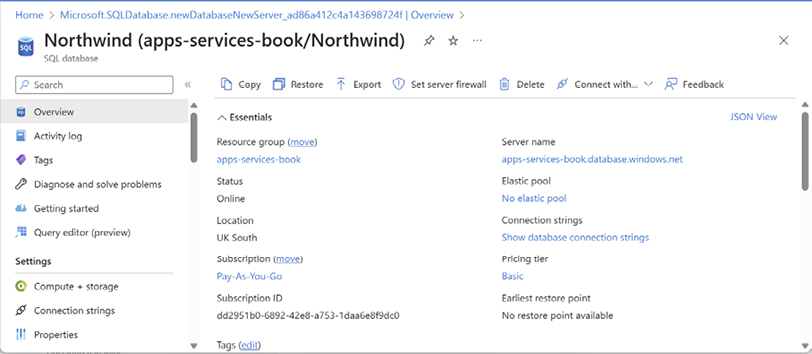
Figure 2.9: SQL Database details
- Click See connection strings (or click Connection strings in the left navigation).
- Copy the ADO.NET (SQL authentication) connection string to your clipboard.
- Start Notepad or your preferred plain text editor, paste the connection string, and add carriage returns after each semicolon to separate each part to make them easier to work with, as shown in the following text:
Server=tcp:apps-services-book.database.windows.net,1433;
Initial Catalog=Northwind;
Persist Security Info=False;
User ID=markjprice;
Password={your_password};
MultipleActiveResultSets=False;
Encrypt=True;
TrustServerCertificate=False;
Connection Timeout=30;
Your
Servervalue will be different because the custom server name part, for example,apps-services-book, is public and must be globally unique.
- Optionally, save the Notepad file for future reference.
JetBrains Rider tool window for working with SQL Server
If you use JetBrains Rider on any operating system, then you can use the following steps to connect with a SQL Server database:
- In JetBrains Rider, select View | Tool Windows | Database.
- In the Database tool window, click Connect to database....
- Select the Use connection string option button.
- Set the Database type to Microsoft SQL Server.
- In the String box, enter the database connection string.
- Change
{your_password}to the password you chose. - Optionally, click Test Connection and correct any errors if necessary. If you get an Inconsistent language error, then you can ignore it as we are using SQL Server as the dialect.
- Click Connect to Database.
Creating the Northwind sample database in the cloud
Now we can run a database script to create the Northwind sample database in the Azure SQL Database:
- Use your preferred database tool to connect to the SQL server in Azure:
- In Visual Studio 2022, view Server Explorer.
- On Windows, start SQL Server Management Studio.
- In Visual Studio Code, view the SQL Server tool.
- In JetBrains Rider, navigate to View | Tool Windows | Database, and then click Connect to database….
- Add a data connection, and fill in the dialog box with all the required connection string information, as shown in Figure 2.10:

Figure 2.10: Connecting to your Azure SQL database from Visual Studio
You might also be prompted to Choose Data Source. Choose Microsoft SQL Server. You can select a checkbox to always use this selection.
- Right-click the data connection and choose New Query.
If you are using JetBrains Rider, then right-click the SQL Server, in the popup menu, select SQL Scripts | Run SQL Script…, and then select the
Northwind4AzureSQLdatabase.sqlfile.
- Copy and paste the contents of the
Northwind4AzureSQLdatabase.sqlfile into the query window and execute it.The main difference between the
Northwind4SQLServer.sqlandNorthwind4AzureSQLdatabase.sqlscripts is that the local SQL Server script will delete and recreate the Northwind database. The Azure SQL database script will not because the database needs to be created as an Azure resource. You can download SQL script files from the following link: https://github.com/markjprice/apps-services-net8/tree/main/scripts/sql-scripts.
- Wait to see the Command completed successfully message. This can take a few minutes.
- In Server Explorer, right-click Tables and select Refresh, and note that 13 tables have been created, for example, Categories, Customers, and Products. Also note that dozens of views and stored procedures have also been created.
You now have a running Azure SQL database in the cloud that you can connect to from a .NET project.

