


Chapter 5. JavaScript Patterns
So far, we have looked at several fundamental building blocks necessary to write code in JavaScript. Once you start building larger systems using these fundamental constructs, you soon realize that there can be a standard way of doing a few things. While developing a large system, you will encounter repetitive problems; a pattern intends to provide a standardized solution to such known and identified problems. A pattern can be seen as a best practice, useful abstraction, or template to solve common problems. Writing maintainable code is difficult. The key to write modular, correct, and maintainable code is the ability to understand the repeating themes and use common templates to write optimized solutions to these. The most important text on design patterns was a book published in 1995 called Design Patterns: Elements Of Reusable Object-Oriented Software written by Erich Gamma, Richard Helm, Ralph Johnson, and John Vlissides—a group that became known as the Gang of Four (GOF for short). This seminal work gave a formal definition to various patterns and explained implementation details of most of the popular patterns that we use today. It is important to understand why patterns are important:
- Patterns offer proven solutions to common problems: Patterns provide templates that are optimized to solve a particular problem. These patterns are backed by solid engineering experience and tested for validity.
- Patterns are designed to be reused: They are generic enough to fit variations of a problem.
- Patterns define vocabulary: Patterns are well-defined structures and hence provide a generic vocabulary to the solution. This can be very expressive when communicating across a larger group.
Design patterns
In this chapter, we will take a look at some of the design patterns that make sense for JavaScript. However, coding patterns are very specific for JavaScript and are of great interest to us. While we spend a lot of time and effort trying to understand and master design patterns, it is important to understand anti-patterns and how to avoid pitfalls. In the usual software development cycle, there are several places where bad code is introduced, mainly around the time where the code is nearing a release or when the code is handed over to a different team for maintenance. If such bad design constructs are documented as anti-patterns, they can provide guidance to developers in knowing what pitfalls to avoid and how not to subscribe to bad design patterns. Most languages have their set of anti-patterns. Based on the kind of problems that they solve, design patterns were categorized into a few broad categories by the GOF:
- Creational design patterns: These patterns deal with various mechanisms of object creation. While most languages provide basic object creation methods, these patterns look at optimized or more controlled mechanisms of object creation.
- Structural design patterns: These patterns are all about the composition of objects and relationships among them. The idea is to have minimal impact on overall object relationships when something in the system changes.
- Behavioral design patterns: These patterns focus on the interdependency and communication between objects.
The following table is a useful ready reckoner to identify categories of patterns:
- Creational patterns:
- Factory method
- Abstract factory
- Builder
- Prototype
- Singleton
- Structural patterns:
- Adapter
- Bridge
- Composite
- Decorator
- Façade
- Flyweight
- Proxy
- Behavioral patterns
- Interpreter
- Template method
- Chain of responsibility
- Command
- Iterator
- Mediator
- Memento
- Observer
- State
- Strategy
- Visitor
Some patterns that we will discuss in this chapter may not be part of this list as they are more specific to JavaScript or a variation of these classical patterns. Similarly, we will not discuss patterns that do not fit into JavaScript or are not in popular use.
The namespace pattern
Excessive use of the global scope is almost a taboo in JavaScript. When you build larger programs, it is sometimes difficult to control how much the global scope is polluted. Namespace can reduce the number of globals created by the program and also helps in avoiding naming collisions or excessive name prefixing. The idea of using namespaces is creating a global object for your application or library and adding all these objects and functions to that object rather than polluting the global scope with objects. JavaScript doesn't have an explicit syntax for namespaces, but namespaces can be easily created. Let's consider the following example:
function Car() {}
function BMW() {}
var engines = 1;
var features = {
  seats: 6,
  airbags:6
};
We are creating all this in the global scope. This is an anti-pattern, and this is never a good idea. We can, however, refactor this code and create a single global object and make all the functions and objects part of this global object as follows:
// Single global object
var CARFACTORY = CARFACTORY || {};
CARFACTORY.Car = function () {};
CARFACTORY.BMW = function () {};
CARFACTORY.engines = 1;
CARFACTORY.features = {
  seats: 6,
  airbags:6
};
By convention, the global namespace object name is generally written in all caps. This pattern adds namespace to the application and prevents naming collisions in your code and between your code and external library that you use. Many projects use a distinct name after their company or project to create a unique name for their namespace.
Though this seems like an ideal way to restrict your globals and add a namespace to your code, it is a bit verbose; you need to prefix every variable and function with the namespace. You need to type more and the code becomes unnecessarily verbose. Additionally, a single global instance would mean that any part of the code can modify the global instance and the rest of the functionality gets the updated state—this can cause very nasty side-effects. A curious thing to observe in the earlier example is this line—var CARFACTORY = CARFACTORY || {};. When you are working on a large code base, you can't assume that you are creating this namespace (or assigning a property to it) for the first time. It is possible that the namespace may pre-exist. To make sure that you create the namespace only if it is not already created, it is safe to always rely on the quick defaulting via a short-circuit || operator.
The module pattern
As you build large applications, you will soon realize that it becomes increasingly difficult to keep the code base organized and modular. The module patterns help in keeping the code cleanly separated and organized.
Module separates bigger programs into smaller pieces and gives them a namespace. This is very important because once you separate code into modules, these modules can be reused in several places. Carefully designing interfaces for the modules will make your code very easy to reuse and extend.
JavaScript offers flexible functions and objects that make it easy to create robust module systems. Function scopes help create namespaces that are internal for the module, and objects can be used to store sets of exported values.
Before we start exploring the pattern itself, let's quickly brush up on a few concepts that we discussed earlier.
We discussed object literals in detail. Object literals allow you to create name-value pairs as follows:
var basicServerConfig = {
  environment: "production",
  startupParams: {
    cacheTimeout: 30,
    locale: "en_US"
  },
  init: function () {
    console.log( "Initializing the server" );
  },
  updateStartup: function( params ) {
      this.startupParams = params;
      console.log( this.startupParams.cacheTimeout );
      console.log( this.startupParams.locale );
  }
};
basicServerConfig.init(); //"Initializing the server"
basicServerConfig.updateStartup({cacheTimeout:60, locale:"en_UK"}); //60, en_UK
In this example, we are creating an object literal and defining key-value pairs to create properties and functions.
In JavaScript, the module pattern is used very heavily. Modules help in mimicking the concept of classes. Modules allow us to include both public/private methods and variables of an object, but most importantly, modules restrict these parts from the global scope. As the variables and functions are contained in the module scope, we automatically prevent naming conflict with other scripts using the same names.
Another beautiful aspect of the module pattern is that we expose only a public API. Everything else related to the internal implementation is held private within the module's closure.
Unlike other OO languages, JavaScript has no explicit access modifiers and, hence, there is no concept of privacy. You can't have public or private variables. As we discussed earlier, in JavaScript, the function scope can be used to enforce this concept. The module pattern uses closures to restrict variable and function access only within the module; however, variables and functions are defined in the object being returned, which is available to the public.
Let's consider the earlier example and turn this into a module. We are essentially using an IIFE and returning the interface of the module, namely, the init and updateStartup functions:
var basicServerConfig = (function () {
  var environment= "production";
  startupParams= {
    cacheTimeout: 30,
    locale: "en_US"
  };
  return {
    init: function () {
      console.log( "Initializing the server" );
    },
    updateStartup: function( params ) {
      this.startupParams = params;
      console.log( this.startupParams.cacheTimeout );
      console.log( this.startupParams.locale );
    }
  };
})();
basicServerConfig.init(); //"Initializing the server"
basicServerConfig.updateStartup({cacheTimeout:60, locale:"en_UK"}); //60, en_UK
In this example, basicServerConfig is created as a module in the global context. To make sure that we are not polluting the global context with modules, it is important to create namespaces for the modules. Moreover, as modules are inherently reused, it is important to make sure that we avoid naming conflicts using namespaces. For the basicServerConfig module, the following snippet shows you the way to create a namespace:
// Single global object
var SERVER = SERVER||{};
SERVER.basicServerConfig = (function () {
  Var environment= "production";
  startupParams= {
    cacheTimeout: 30,
    locale: "en_US"
  };
  return {
    init: function () {
      console.log( "Initializing the server" );
    },
    updateStartup: function( params ) {
      this.startupParams = params;
      console.log( this.startupParams.cacheTimeout );
      console.log( this.startupParams.locale );
    }
  };
})();
SERVER.basicServerConfig.init(); //"Initializing the server"
SERVER.basicServerConfig.updateStartup({cacheTimeout:60, locale:"en_UK"}); //60, en_UK
Using namespace with modules is generally a good idea; however, it is not required that a module must have a namespace associated.
A variation of the module pattern tries to overcome a few problems of the original module pattern. This improved variation of the module pattern is also known as the revealing module pattern (RMP). RMP was first popularized by Christian Heilmann. He disliked that it was necessary to use the module name while calling a public function from another function or accessing a public variable. Another small problem is that you have to use an object literal notation while returning the public interface. Consider the following example:
var modulePattern = function(){
  var privateOne = 1;
  function privateFn(){
    console.log('privateFn called');
  }
  return {
    publicTwo: 2,
    publicFn:function(){
      modulePattern.publicFnTwo();
    },
    publicFnTwo:function(){
      privateFn();
    }
  }
}();
modulePattern.publicFn(); "privateFn called"
You can see that we need to call publicFnTwo() via modulePattern in publicFn(). Additionally, the public interface is returned in an object literal. The improvement on the classic module pattern is what is known as the RMP. The primary idea behind this pattern is to define all of the members in the private scope and return an anonymous object with pointers to the private functionality that needs to be revealed as public.
Let's see how we can convert our previous example to an RMP. This example is heavily inspired from Christian's blog:
var revealingExample = function(){
  var privateOne = 1;
  function privateFn(){
    console.log('privateFn called');
  }
  var publicTwo = 2;
  function publicFn(){
    publicFnTwo();
  }
  function publicFnTwo(){
    privateFn();
  }
  function getCurrentState(){
    return 2;
  }
  // reveal private variables by assigning public pointers
  return {
    setup:publicFn,
    count:publicTwo,
    increaseCount:publicFnTwo,
    current:getCurrentState()
  };
}();
console.log(revealingExample.current); // 2
revealingExample.setup(); //privateFn called
An important distinction here is that you define functions and variables in the private scope and return an anonymous object with pointers to the private variables and functions that you want to reveal as public. This is a much cleaner variation and should be preferred over the classic module pattern.
In production code, however, you would want to use more a standardized approach to create modules. Currently, there are two main approaches to create modules. The first is known as CommonJS modules. CommonJS modules are usually more suited for server-side JavaScript environments such as Node.js. A CommonJS module contains a require() function that receives the name of the module and returns the module's interface. The format was proposed by the volunteer group of CommonJS; their aim was to design, prototype, and standardize JavaScript APIs. CommonJS modules consist of two parts. Firstly, list of variables and functions the module needs to expose; when you assign a variable or function to the module.exports variable, it is exposed from the module. Secondly, a require function that modules can use to import the exports of other modules:
//Add a dependency module
var crypto = require('crypto');
function randomString(length, chars) {
  var randomBytes = crypto.randomBytes(length);
  ...
  ...
}
//Export this module to be available for other modules
module.exports=randomString;
CommonJS modules are supported by Node.js on the server and curl.js in the browser.
The other flavor of JavaScript modules is called Asynchronous Module Definition (AMD). They are browser-first modules and opt for asynchronous behavior. AMD uses a define function to define the modules. This function takes an array of module names and a function. Once the modules are loaded, the define function executes the function with their interface as an argument. The AMD proposal is aimed at the asynchronous loading of both the module and dependencies. The define function is used to define named or unnamed modules based on the following signature:
define(
  module_id /*optional*/,
  [dependencies] /*optional*/,
  definition function /*function for instantiating the module or object*/
);
You can add a module without dependencies as follows:
define(
{
  add: function(x, y){
    return x + y;
  }
});
The following snippet shows you a module that depends on two other modules:
define( "math",
  //dependency on these two modules
  ["sum", "multiply"],
  // module definition function
  // dependencies (foo and bar) are mapped to function parameters
  function ( sum, multiply ) {
    // return a value that defines the module export
    // (that is, the functionality we want to expose for consumption)

    // create your module here
    var math = {
      demo : function () {
        console.log(sum.calculate(1,2));
        console.log(multiply.calculate(1,2));
      }
    };
  return math;
});
The require module is used as follows:
require(["math","draw"], function ( math,draw ) {
  draw.2DRender(math.pi);
});
RequireJS (http://requirejs.org/docs/whyamd.html) is one of the module loaders that implements AMD.
ES6 modules
Two separate module systems and different module loaders can be a bit intimidating. ES6 tries to solve this. ES6 has a proposed module specification that tries to keep the good aspects of both the CommonJS and AMD module patterns. The syntax of ES6 modules is similar to CommonJS and the ES6 modules support asynchronous loading and configurable module loading:
//json_processor.js
function processJSON(url) {
  ...
}
export function getSiteContent(url) {
  return processJSON(url);
}
//main.js
import { getSiteContent } from "json_processor.js";
content=getSiteContent("http://google.com/");
ES6 export lets you export a function or variable in a way similar to CommonJS. In the code where you want to use this imported function, you use the import keyword to specify from where you want the dependency to be imported. Once the dependency is imported, it can be used as a member of the program. We will discuss in later chapters how you can use ES6 in environments where ES6 is not supported.
The factory pattern
The factory pattern is another popular object creation pattern. It does not require the usage of constructors. This pattern provides an interface to create objects. Based on the type passed to the factory, that particular type of object is created by the factory. A common implementation of this pattern is usually using a class or static method of a class. The purposes of such a class or method are as follows:
- It abstracts out repetitive operations when creating similar objects
- It allows the consumers of the factory to create objects without knowing the internals of the object creation
Let's take a common example to understand the usage of a factory. Let's say that we have the following:
- A constructor,
CarFactory() - A static method in
CarFactorycalledmake()that knows how to create objects of thecartype - Specific
cartypes such asCarFactory.SUV,CarFactory.Sedan, and so on
We want to use CarFactory as follows:
var golf = CarFactory.make('Compact');
var vento = CarFactory.make('Sedan');
var touareg = CarFactory.make('SUV');
Here is how you would implement such a factory. The following implementation is fairly standard. We are programmatically calling the constructor function that creates an object of the specified type—CarFactory[const].prototype = new CarFactory();.
We are mapping object types to the constructors. There can be variations in how you can go about implementing this pattern:
// Factory Constructor
function CarFactory() {}
CarFactory.prototype.info = function() {
  console.log("This car has "+this.doors+" doors and a "+this.engine_capacity+" liter engine");
};
// the static factory method

CarFactory.make = function (type) {
  var constr = type;
  var car;
  CarFactory[constr].prototype = new CarFactory();
  // create a new instance
  car = new CarFactory[constr]();
  return car;
};

CarFactory.Compact = function () {
  this.doors = 4;
  this.engine_capacity = 2;
};
CarFactory.Sedan = function () {
  this.doors = 2;
  this.engine_capacity = 2;
};
CarFactory.SUV = function () {
  this.doors = 4;
  this.engine_capacity = 6;
};
  var golf = CarFactory.make('Compact');
  var vento = CarFactory.make('Sedan');
  var touareg = CarFactory.make('SUV');
  golf.info(); //"This car has 4 doors and a 2 liter engine"
We suggest that you try this example in JS Bin and understand the concept by actually writing its code.
The mixin pattern
Mixins help in significantly reducing functional repetition in our code and help in function reuse. We can move this shared functionality to a mixin and reduce duplication of shared behavior. You can then focus on building the actual functionality and not keep repeating the shared behavior. Let's consider the following example. We want to create a custom logger that can be used by any object instance. The logger will become a functionality shared across objects that want to use/extend the mixin:
var _ = require('underscore');
//Shared functionality encapsulated into a CustomLogger
var logger = (function () {
  var CustomLogger = {
    log: function (message) {
      console.log(message);
    }
  };
  return CustomLogger;
}());

//An object that will need the custom logger to log system specific logs
var Server = (function (Logger) {
  var CustomServer = function () {
    this.init = function () {
      this.log("Initializing Server...");
    };
  };

  // This copies/extends the members of the 'CustomLogger' into 'CustomServer'
  _.extend(CustomServer.prototype, Logger);
  return CustomServer;
}(logger));

(new Server()).init(); //Initializing Server...
In this example, we are using _.extend from Underscore.js—we discussed this function in the previous chapter. This function is used to copy all the properties from the source (Logger) to the destination (CustomServer.prototype). As you can observe in this example, we are creating a shared CustomLogger object that is intended to be used by any object instance needing its functionality. One such object is CustomServer—in its init() method, we call this custom logger's log() method. This method is available to
CustomServer because we are extending CustomLogger via Underscore's extend(). We are dynamically adding functionality of a mixin to the consumer object. It is important to understand the distinction between mixins and inheritance. When you have shared functionality across multiple objects and class hierarchies, you can use mixins. If you have shared functionality along a single class hierarchy, you can use inheritance. In prototypical inheritance, when you inherit from a prototype, any change to the prototype affects everything that inherits the prototype. If you do not want this to happen, you can use mixins.
The decorator pattern
The primary idea behind the decorator pattern is that you start your design with a plain object, which has some basic functionality. As the design evolves, you can use existing decorators to enhance your plain object. This is a very popular pattern in the OO world and especially in Java. Let's take an example of BasicServer—a server with very basic functionality. This basic functionality can be decorated to serve specific purposes. We can have two different cases where this server can serve both PHP and Node.js and serve them on different ports. These different functionality are decorated to the basic server:
var phpServer = new BasicServer();
phpServer = phpServer.decorate('reverseProxy');
phpServer = phpServer.decorate('servePHP');
phpServer = phpServer.decorate('80');
phpServer = phpServer.decorate('serveStaticAssets');
phpServer.init();
The Node.js server will have something as follows:
var nodeServer = new BasicServer();
nodeServer = nodeServer.decorate('serveNode');
nodeServer = nodeServer.decorate('3000');
nodeServer.init();
There are several ways in which the decorator pattern is implemented in JavaScript. We will discuss a method where the pattern is implemented by a list and does not rely on inheritance or method call chain:
//Implement BasicServer that does the bare minimum
function BasicServer() {
  this.pid = 1;
  console.log("Initializing basic Server");
  this.decorators_list = []; //Empty list of decorators
}
//List of all decorators
BasicServer.decorators = {};

//Add each decorator to the list of BasicServer's decorators
//Each decorator in this list will be applied on the BasicServer instance
BasicServer.decorators.reverseProxy = {
  init: function(pid) {
    console.log("Started Reverse Proxy");
    return pid + 1;
  }
};
BasicServer.decorators.servePHP = {
  init: function(pid) {
    console.log("Started serving PHP");
    return pid + 1;
  }
};
BasicServer.decorators.serveNode = {
  init: function(pid) {
    console.log("Started serving Node");
    return pid + 1;
  }
};

//Push the decorator to this list everytime decorate() is called
BasicServer.prototype.decorate = function(decorator) {
  this.decorators_list.push(decorator);
};
//init() method looks through all the applied decorators on BasicServer
//and executes init() method on all of them
BasicServer.prototype.init = function () {
  var running_processes = 0;
  var pid = this.pid;
  for (i = 0; i < this.decorators_list.length; i += 1) {
    decorator_name = this.decorators_list[i];
    running_processes = BasicServer.decorators[decorator_name].init(pid);
  }
  return running_processes;
};

//Create server to serve PHP
var phpServer = new BasicServer();
phpServer.decorate('reverseProxy');
phpServer.decorate('servePHP');
total_processes = phpServer.init();
console.log(total_processes);

//Create server to serve Node
var nodeServer = new BasicServer();
nodeServer.decorate('serveNode');
nodeServer.init();
total_processes = phpServer.init();
console.log(total_processes);
BasicServer.decorate() and BasicServer.init() are the two methods where the real stuff happens. We push all decorators being applied to the list of decorators for BasicServer. In the init() method, we execute or apply each decorator's init() method from this list of decorators. This is a cleaner approach to decorator patterns that does not use inheritance. This method was described by Stoyan Stefanov in his book, JavaScript Patterns, O'Reilly Media, and has gained prominence among JavaScript developers due to its simplicity.
The observer pattern
Let's first see the language-agnostic definition of the observer pattern. The GOF book, Design Patterns: Elements of Reusable Object-Oriented Software, defines the observer pattern as follows:
One or more observers are interested in the state of a subject and register their interest with the subject by attaching themselves. When something changes in our subject that the observer may be interested in, a notify message is sent which calls the update method in each observer. When the observer is no longer interested in the subject's state, they can simply detach themselves.
In the observer design pattern, the subject keeps a list of objects depending on it (called observers) and notifies them when the state changes. The subject uses a broadcast to the observers to inform them of the change. Observers can remove themselves from the list once they no longer wish to be notified. Based on this understanding, we can define the participants in this pattern:
- Subject: This keeps the list of observers and has methods to add, remove, and update observers
- Observer: This provides an interface for objects that need to be notified when the subject's state changes
Let's create a subject that can add, remove, and notify observers:
var Subject = ( function(  ) {
  function Subject() {
    this.observer_list = [];
  }
  // this method will handle adding observers to the internal list
  Subject.prototype.add_observer = function ( obj ) {
    console.log( 'Added observer' );
    this.observer_list.push( obj );
  };
  Subject.prototype.remove_observer = function ( obj ) {
    for( var i = 0; i < this.observer_list.length; i++ ) {
      if( this.observer_list[ i ] === obj ) {
        this.observer_list.splice( i, 1 );
        console.log( 'Removed Observer' );
      }
    }
  };
  Subject.prototype.notify = function () {
    var args = Array.prototype.slice.call( arguments, 0 );
    for( var i = 0; i<this.observer_list.length; i++ ) {
      this.observer_list[i].update(args);
    }
  };
  return Subject;
})();
This is a fairly straightforward implementation of a Subject. The important fact about the notify() method is the way in which all the observer objects' update() methods are called to broadcast the update.
Now let's define a simple object that creates random tweets. This object is providing an interface to add and remove observers to the Subject via addObserver() and removeObserver() methods. It also calls the notify() method of Subject with the newly fetched tweet. When this happens, all the observers will broadcast that the new tweet has been updated with the new tweet being passed as the parameter:
function Tweeter() {
  var subject = new Subject();
  this.addObserver = function ( observer ) {
    subject.add_observer( observer );
  };
  this.removeObserver = function (observer) {
    subject.remove_observer(observer);
  };
  this.fetchTweets = function fetchTweets() {
    // tweet
    var tweet = {
      tweet: "This is one nice observer"
    };
    // notify our observers of the stock change
    subject.notify( tweet );
  };
}
Let's now add two observers:
var TweetUpdater = {
  update : function() {
    console.log( 'Updated Tweet -  ', arguments );
  }
};
var TweetFollower = {
  update : function() {
    console.log( '"Following this tweet -  ', arguments );
  }
};
Both these observers will have one update() method that will be called by the Subject.notify() method. Now we can actually add these observers to the Subject via Tweeter's interface:
var tweetApp = new Tweeter();
tweetApp.addObserver( TweetUpdater );
tweetApp.addObserver( TweetFollower );
tweetApp.fetchTweets();
tweetApp.removeObserver(TweetUpdater);
tweetApp.removeObserver(TweetFollower);
This will result in the following output:
Added observer
Added observer
Updated Tweet -   { '0': [ { tweet: 'This is one nice observer' } ] }
"Following this tweet -   { '0': [ { tweet: 'This is one nice observer' } ] }
Removed Observer
Removed Observer
This is a basic implementation to illustrate the idea of the observer pattern.
JavaScript Model-View-* patterns
Model-View-Controller (MVC), Model-View-Presenter (MVP), and Model-View-ViewModel (MVVM) have been popular with server applications, but in recent years JavaScript applications are also using these patterns to structure and manage large projects. Many JavaScript frameworks have emerged that support MV* patterns. We will discuss a few examples using Backbone.js.
Model-View-Controller
MVC is a popular structural pattern where the idea is to divide an application into three parts so as to separate the internal representations of information from the presentation layer. MVC consists of components. The model is the application object, view is the presentation of the underlying model object, and controller handles the way in which the user interface behaves, depending on the user interactions.
Models
Models are constructs that represent data in the applications. They are agnostic of the user interface or routing logic. Changes to models are typically notified to the view layer by following the observer design pattern. Models may also contain code to validate, create, or delete data. The ability to automatically notify the views to react when the data is changed makes frameworks such as Backbone.js, Amber.js, and others very useful in building MV* applications. The following example shows you a typical Backbone model:
var EmployeeModel = Backbone.Model.extend({
  url: '/employee/1',
  defaults: {
    id: 1,
    name: 'John Doe',
    occupation: null
  }
  initialize: function() {
 }
}); var JohnDoe = new EmployeeModel();
This model structure may vary between different frameworks but they usually have certain commonalities in them. In most real-world applications, you would want your model to be persisted to an in-memory store or database.
Views
Views are the visual representations of your model. Usually, the state of the model is processed, filtered, or massaged before it is presented to the view layer. In JavaScript, views are responsible for rendering and manipulating DOM elements. Views observe models and get notified when there is a change in the model. When the user interacts with the view, certain attributes of the model are changed via the view layer (usually via controllers). In JavaScript frameworks such as Backbone, the views are created using template engines such as Handlebar.js (http://handlebarsjs.com/) or mustache.js (https://mustache.github.io/). These templates themselves are not views. They observe models and keep the view state updated based on these changes. Let's see an example of a view defined in Handlebar:
<li class="employee_photo">
  <h2>{{title}}</h2>
  <img class="emp_headshot_small" src="{{src}}"/>
  <div class="employee_details">
    {{employee_details}}
  </div>
</li>
Views such as the preceding example contain markup tags containing template variables. These variables are delimited via a custom syntax. For example, template variables are delimited using {{ }} in Handlebar.js. Frameworks typically transmit data in JSON format. How the view is populated from the model is handled transparently by the framework.
Controllers
Controllers act as a layer between models and views and are responsible for updating the model when the user changes the view attributes. Most JavaScript frameworks deviate from the classical definition of a controller. For example, Backbone does not have a concept called controller; they have something called a router that is responsible to handle routing logic. You can think of a combination of the view and router as a controller because a lot of the logic to synchronize models and views is done within the view itself. A typical Backbone router would look as follows:
var EmployeeRouter = Backbone.Router.extend({
  routes: { "employee/:id": "route" },
  route: function( id ) {
    ...view render logic...
  }
});
The Model-View-Presenter pattern
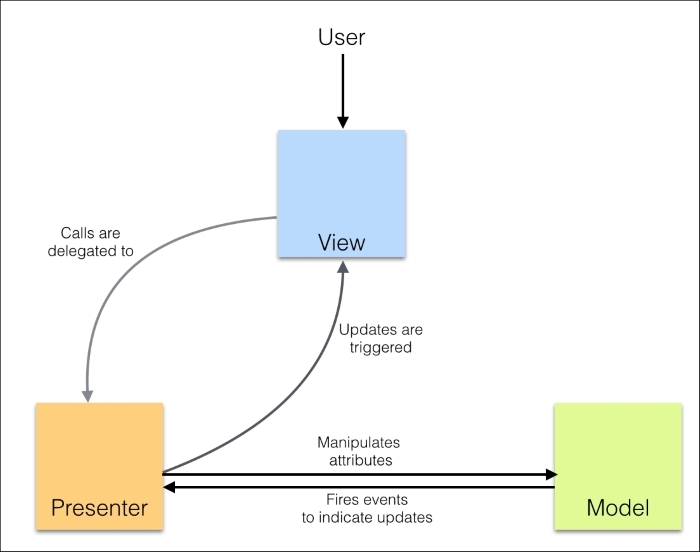
Model-View-Presenter is a variation of the original MVC pattern that we discussed previously. Both MVC and MVP target the separation of concerns but they are different on many fundamental aspects. The presenter in MVP has the necessary logic for the view. Any invocation from the view gets delegated to the presenter. The presenter also observes the model and updates the views when the model updates. Many authors take the view that because the presenter binds the model with views, it also performs the role of a traditional controller. There are various implementations of MVP and there are no frameworks that offer classical MVP out of the box. In implementations of MVP, the following are the primary differences that separate MVP from MVC:
- The view has no reference to the model
- The presenter has a reference to the model and is responsible for updating the view when the model changes
MVP is generally implemented in two flavors:
- Passive view: The view is as naïve as possible and all the business logic is within the presenter. For example, a plain Handlebars template can be seen as a passive view.
- Supervising controller: Views mostly contain declarative logic. A presenter takes over when the simple declarative logic in the view is insufficient.
The following figure depicts MVP architecture:
Model-View-ViewModel
MVVM was originally coined by Microsoft for use with Windows Presentation Foundation (WPF) and Silverlight. MVVM is a variation of MVC and MVP and further tries to separate the user interface (view) from the business model and application behavior. MVVM creates a new model layer in addition to the domain model that we discussed in MVC and MVP. This model layer adds properties as an interface for the view. Let's say that we have a checkbox on the UI. The state of the checkbox is captured in an IsChecked property. In MVP, the view will have this property and the presenter will set it. However, in MVVM, the presenter will have the IsChecked property and the view is responsible for syncing with it. Now that the presenter is not really doing the job of a classical presenter, it's renamed as ViewModel:

Implementation details of these approaches are dependent on the problem that we are trying to solve and the framework that we use.
Summary
While building large applications, we see certain problem patterns repeating over and over. These patterns have well-defined solutions that can be reused to build a robust solution. In this chapter, we discussed some of the important patterns and ideas around these patterns. Most modern JavaScript applications use these patterns. It is rare to see a large-scale system built without implementing modules, decorators, factories, or MV* patterns. These are foundational ideas that we discussed in this chapter. We will discuss various testing and debugging techniques in the next chapter.


