Chapter 10. Exploring External Layers
One of the most charming features of Poky is the flexibility of using external layers. In this chapter, we understand why this is a strong capability and how we can take advantage of this. We understand layer types and how their directory trees work. Finally, we learn how to include a new layer on our project or on a Hob configuration.
Powering flexibility with layers
Poky contains a great amount of metadata as machine definition files, classes, and recipes that cover everything from simple applications to full graphical stacks and frameworks. The main motivation to use layers is to organize the long list of providers better and still make sure users may be able to pick only the needed or desired provider. It is also a way to provide a customizable source code that can be used for any architecture or modified in the way the user needs.
We can choose the set of layers needed for each project. We can configure the provided source code for our needs because we want to configure how one package acts in our product or because we want the package built with our architecture flags. This means that using layers, we can provide additional features to Poky (represented by recipes from additional layers) that may be modified according to our needs (represented by the configuration appends we include for external recipes).
In addition...
Detailing the layer's source code
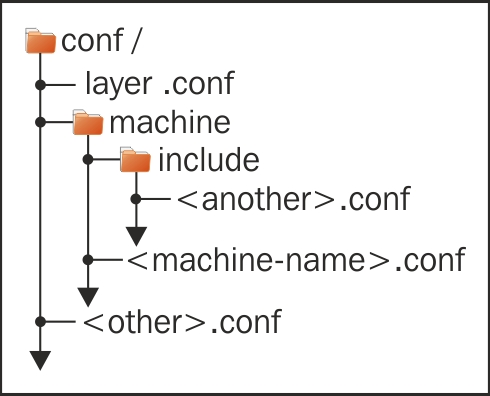
Usually, a layer has a directory tree, as shown in the following figure:
The layer name should start with meta-, it is not a requirement but the advised pattern. Inside this directory, there are two files, <layer>/COPYING and <layer>/README, a license, and a message to the user. In <layer>/README, we must specify any other dependency and information that the layer's users need to know.
The classes folder should hold the classes provided and specific to that layer (the .bbclass files). It is an optional directory.
The folder <layer>/conf is mandatory and should provide the configuration files (the .conf files). Primarily, the layer configuration file <layer>/conf/layer.conf, to be detailed in the next chapter, is the file with the layer definition.
When the <layer>/conf folder is from a BSP layer, the directory structure should look like the following figure:
If the <layer>/conf folder is from a distribution layer, the...
There are hundreds of meta layers from the Yocto Project, OpenEmbedded, communities, and companies that should be manually cloned inside the project source directory to be used. We can find them at http://git.yoctoproject.org/ or http://layers.openembedded.org.
In order to include, for example, meta-realtime in our project, we can change the content of configuration for Layers; click on Add layer, browse to the meta-realtime folder, and click on OK if we use Hob, as shown in the following screenshot:
We notice that the layers meta, meta-yocto, and meta-hob cannot be removed as they provide the core infrastructure and BSP for Hob. These layers are the Yocto Project definition, plus the Hob provider layer.
If we use the BitBake command lines, we can add a new layer by changing the file conf/bblayer.conf and add the absolute path to the new meta layer directory, as shown in the following source code. The line highlighted is the one to be added. The others are the default values...
In this chapter, we introduced the concept of layering. We learned in detail the directory structure and the content of each layer type. In addition, we saw how to add an external layer on our project manually or by using the Hob configuration.
In the next chapter, we will learn more about why we need to create new layers and what is the common metadata included in them (such as machine definition files, recipes, and images), and wrap it all up with an example of distribution customization.
 Argentina
 Australia
 Austria
 Belgium
 Brazil
 Bulgaria
 Canada
 Chile
Chile
 Colombia
 Cyprus
 Czechia
 Denmark
 Ecuador
 Egypt
Egypt
 Estonia
 Finland
 France
 Germany
 Great Britain
 Greece
 Hungary
 India
India
 Indonesia
 Ireland
 Italy
Italy
 Japan
Japan
 Latvia
 Lithuania
 Luxembourg
 Malaysia
 Malta
Malta
 Mexico
 Netherlands
 New Zealand
 Norway
 Philippines
 Poland
 Portugal
 Romania
 Russia
 Singapore
 Slovakia
 Slovenia
 South Africa
 South Korea
 Spain
Spain
 Sweden
 Switzerland
 Taiwan
 Thailand
 Turkey
 Ukraine
 United States