Search icon
Arrow left icon
All Products
Best Sellers
New Releases
Books
Videos
Audiobooks
Learning Hub
Newsletters
Free Learning
Arrow right icon
Robotic Process Automation Projects.

Robotic Process Automation Projects.: Build real-world RPA solutions using UiPath and Automation Anywhere

By Nandan Mullakara , Arun Kumar Asokan
€27.99 €18.99
Book May 2020 388 pages 1st Edition
eBook
€27.99 €18.99
Print
€35.99
Subscription
€14.99 Monthly
eBook
€27.99 €18.99
Print
€35.99
Subscription
€14.99 Monthly

What do you get with eBook?

Product feature icon Instant access to your Digital eBook purchase
Product feature icon Download this book in EPUB and PDF formats
Product feature icon Access this title in our online reader with advanced features
Product feature icon DRM FREE - Read whenever, wherever and however you want
Buy Now

Product Details


Publication date : May 26, 2020
Length 388 pages
Edition : 1st Edition
Language : English
ISBN-13 : 9781839217357
Category :
Table of content icon View table of contents Preview book icon Preview Book

Robotic Process Automation Projects.

Help Desk Ticket Generation

Let's get started with our first project – a simple help desk automation with UiPath.

Help desk agents get inputs from a variety of channels, including phone, email, and spreadsheets, to create and update support tickets. Support tickets are the requests that you raise by calling help desk agents to get your issues resolved; for example, your laptop is not working, or you have internet issues.

For this project, we will only be covering the automation of inputting tickets from spreadsheets that a requester places in a certain folder. We are assuming a very simple use case of ticket creation for this first project. All you have to do in this project is to input support ticket data in a spreadsheet and place it in a folder. The bot, once invoked, automatically creates a support ticket within the help desk system for you.

If you noticed, we are invoking this bot. This means that we will be building an attended automation that behaves like an assistant – an assistant that raises tickets automatically!

This project will help you understand the following topics:

  • Attended RPA concepts
  • UiPath Excel automation
  • UiPath automation for web-based apps
  • Creating automation workflows and invoking them
  • Using Try and Catch for exceptions

Technical requirements

The hardware and software that will be required for this project are as follows:

  • A PC with UiPath Community edition version 19+ installed (we covered the hardware relating to installation in Chapter 1
    Getting Started with RPA).
  • A Chrome browser with a UiPath add-on.
  • A Zoho Desk SaaS application. You can sign up for free at https://desk.zoho.com.
  • Microsoft Excel 2007 and later.
  • Check out the following video to see the Code in Action: https://bit.ly/36gX89C.

You can find the code files present in this chapter on GitHub at https://github.com/PacktPublishing/Robotic-Process-Automation-Projects/tree/master/HelpdeskAgentAttendedAutomation.

Project overview

We will automate the creation of help desk tickets using data from an Excel sheet. 

In this project, once the bot is invoked, it will check whether there are new request files available to process. If available, the bot will read the ticket data from this spreadsheet. The data is then used to create support tickets in the Zoho Desk application.

Here is the high-level workflow for the project:

We believe it should take you around 1 hour to build and run this first project. Obviously, the amount of time it will take will vary depending on your background. 

Now, let's dive into the details and step through the creation of the automation. 

Project detail

Let's now look at the overall flow for this project in terms of the components we will be building and their interaction.

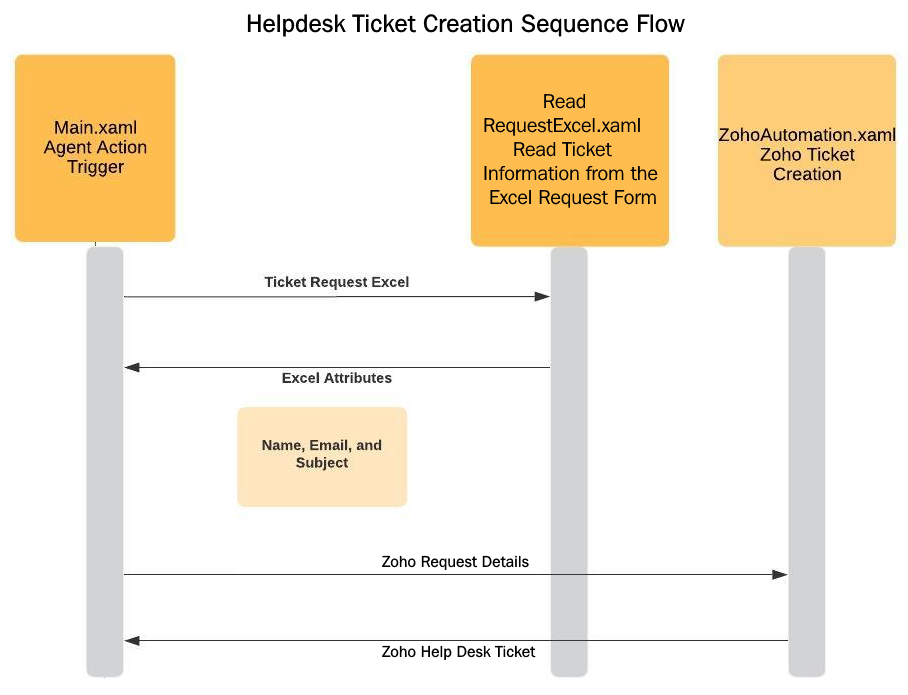
We will have a main workflow called Main.xaml, which will invoke other workflows and orchestrate the automation. Within this workflow, we will keep checking for the trigger Alt + S. Once triggered, we will check whether the Request.xlsx file is available. If the file is available, then we will invoke ReadRequestExcel.xaml from Main.xaml.

Within ReadRequestExcel.xaml, we will use the file path as an input argument to open the Excel file, read the content, and store it in three output arguments – Name, Email, and Subject.

Next, Main.xaml invokes ZohoAutomation.xaml with these three arguments (Name, Email, and Subject) to create the ticket in the Zoho desk. If all goes well, a Successful message is returned.

Finally, once the Successful message is received, request.xlsx is moved to the Processed folder and the bot is ready to process new requests:

This was an overall flow to give you a high-level view of what we will be doing to create this automation.

Before we configure our main workflow, let's undertake some groundwork that is required for the project. 

Project groundwork

As part of the project groundwork, we will create the project folders, along with a spreadsheet for the ticket data, and also log in to the Zoho SaaS application.

Creating project folders

Let's create two folders, one to accommodate the spreadsheet containing the data to process, and the other to accommodate the processed spreadsheets:

  1. Open Windows Explorer on your machine and create a folder for the project.
  2. Within this project folder, create two folders, called Requests and Processed, as shown in the following screenshot:

We will place the spreadsheet in Requests, and then the bot will move the processed sheets to the Processed folder.

Next, let's create the requests spreadsheet. 

Creating an Excel sheet with ticket data

Now, let's create a simple spreadsheet with ticket data:

  1. Open Excel and create a sheet with three rows and two columns, as shown in the following screenshot:

The first column contains the data labels, and the second column contains the data you like for your support ticket.

  1. Save this file as Request.xlsx in the Requests folder that we created in the previous section. 

Let's now log in to the Zoho application. 

Registering and logging in to Zoho Desk

Perform the following steps:

  1. Go to desk.zoho.com and choose the option to log in. You should be directed to a page to log in or sign up if you do not have an ID. Create a free desk account by filling in the details if you do not have one:

  1. Once you register with your details and company name, you will be walked through the steps to get started. You should eventually end up on the Zoho Desk view with the current tickets: 

Leave the tab open with the application logged in for the automation.

That was all the project groundwork we needed to implement.

Now, as mentioned in the Project detail section, we will create the workflows for the automation. Let's start with the main workflow.

Main workflow

Let's start by opening the UiPath Studio. This is one of the UiPath components we installed in Chapter 1, Getting Started with RPA. On your Windows machine, you can go to Start and then select UiPath Studio.

Project setup

Let's create a new project for our automation using the UiPath template:

  1. On the first UiPath studio screen that pops up, select the project called Trigger Based Attended Automation. This will use a predefined UiPath template to create an attended automation project:

  1. Next up, provide a name for your project and an optional description and click on Create:

  1. On the Studio main screen, click Open Main Workflow to get to the main workflow.
  2. Your initial workflow should look like the following. Go ahead and remove the five unwanted activities highlighted in the following screenshot by right-clicking and selecting Delete:

  1. Once done, ensure that you save the project and keep doing so periodically.

The project is now set up. We are now ready to configure the initial part of the automation.

Configuring the initial part of the main workflow

We will add a few UiPath activities to initiate the attended automation. 

UiPath activities are puzzle pieces that we use to create any UiPath automation. The activities are automation actions, such as clicking, typing, and message box. We can use these activities to create with Excel, email, and the web. 

Let's now look at the steps to add the activities:

  1. We'll start by adding a message box. To do this, go to the Activities panel and search for message box

You can then drag and drop the activity to where you want it in the workflow.

  1. Once added, click on the box for the message and type "Agent Ready. Please use ALT + s to trigger the Automation". Note that you must keep the quotes as you input the message. Please refer to the image in step 4.
  2. Next, let's tell UiPath which hotkey we will use to trigger the automation. Luckily, UiPath has provided the activity within the template to do just that. In the Hotkey Trigger activity, choose Alt and type in s for the key, as shown in the screenshot in Step 4.
  3. It is always a good idea to add adequate comments for people to facilitate understanding of your workflow "code". Within Event Handler, let's start by adding a Comment to say Create a Zoho desk Ticket from the Request excel file.:

  1. As the first activity in Event Handler, we will be checking the Requests folder to see whether there are any new requests. For that, we will use the Path Exists activity. Follow the same steps as before to find the activity in the left-hand panel and drag and drop to the main workflow.
  1. Now, for this and all activities, there are UiPath properties that are displayed on the right pane. Let's use the following Properties for the Path Exists activity we added:
    • Path: Environment.CurrentDirectory+"\Requests\Request.xlsx"
    • PathType: File
    • Exists: Create a boolean variable (use Ctrl + K or right-click) and create a new variable called boolFileExists.
UiPath properties are the parameters and settings for the selected activity. The properties pop up on the right panel of your Studio interface. You can go to the panel and add or update properties for the selected activity. 

Your sequence and properties should look like this:

  1. Next, let's display a message to let the user know whether the bot found a request and whether it will process this request. We will use an If activity from the activities panel to do that. Add the If activity below the Path Exists activity.
  2. Let's use boolFileExists, which we created in the earlier step as the condition to check. Within this If control, add two messages boxes with messages as per the following screenshot to display an appropriate message to the agent:

This is all for the main workflow for now. We will revisit the workflow later to call the ReadExcelRequest and ZOHOAutomation workflows, which we will create in the next two sections.

Reading from Excel

In this next workflow, we will pick up the Request Excel file from the folder we created, read the ticket data, and incorporate them in variables for the next workflow to process. This will help you get your feet wet with Excel-based automation:

  1. Let's start by creating a new Sequence in the project. This will create a new workflow for us to work on:

  1. Let's name it ReadExcelRequest and click Create. The studio will create a default sequence for you:

  1. Within the workflow, let's first add the arguments using the Arguments tab at the bottom of Studio (refer to the following information box). Arguments will enable us to input and output data from this workflow to the main workflow. Proceed and create four arguments, as shown in the following screenshot: 

Note Direction and Argument type.

The difference between a variable and an argument is that variables pass data to other activities, while arguments pass data to other workflows. The Arguments tab is next to the Variables tab at the bottom of the Studio screen.
  1. We will always use a Try-Catch block to handle any exceptions gracefully. So, let's add the Try Catch activity to this sequence. Then, within the Try block, add the Read Range activity under Workbook to read the specified Excel file. The Read Range activity reads the value of a specified Excel range and stores it in a DataTable variable.
  1. For the WorkbookPath, specify the RequestFilePath argument that we added in step 2. This argument should be populated with the path to Requests.xlsx when we invoke this workflow from Main. Your sequence and properties should look like this:

In the properties for the Read Range activities, perform the following steps:

    • Remove the range to cover the entire sheet. To do that, add “” to the Range property on the right pane.
    • While there, uncheck the AddHeaders property as we don’t have header in our input file.
    • Add an Output variable to store the data table. Use Ctrl + K to add the dtRequest variable within the DataTable property.
  1. Next, we will use three Assign activities in the workflow to read from Excel and store the data for ContactName, Email, and Subject in respective arguments.
  2. Use the arguments we just created on the left-hand side of the activity. You can start typing the argument names and the argument names should pop up for you to select:

  1. We will use the dtRequest.Rows(row)(column) data table to read Excel values and map them to the arguments. For example, dtRequest.Rows(0)(1) means the first row and second column value in Excel. Since the output variable only accepts the values of the String type, we have to add .tostring at the end of this formula; for example, dtRequest.Rows(0)(1).ToString:

  1. After the Assign activities, add a Log Message activity to update the Excel read options in the system logs. This will help us to debug the workflow if needed:

That completes our Try block sequence. We will now add exception handling to the Catches block.

Exception handling

Let's handle any exceptions for this Excel automation:

  1. For this, click on Add a new Catch in the Catches block beneath the Try block.
  2. Choose exception as System.Exception and click the box next to it.
  1. Also, add a Log Message activity to the catch block and add the following:
    • Error as the Log Level
    • "Error in Excel read operation with following exception: "+exception.Message" as the Message: 

  1. Finally, within the Catches block, add a Terminate Workflow activity to stop the automation if there are any exceptions:

Great! This completes the ReadExcelRequest workflow where we read the Excel and stored the request data as arguments. Now, we will invoke this from the main workflow. 

Invoking the Excel workflow from Main

Let's now go back to the Main sequence to invoke this newly created ReadExcelRequest workflow. If you recall, we added a message within the main workflow if there are requests available to process. Let's invoke the read Excel workflow right after that:

  1. Let's add the Invoke Workflow File UiPath activity in the Then block of the If control:

  1. Let's populate this new activity with the ReadExcelRequest workflow path. To do that, click on the three dots on the right of the first parameter. Select the ReadExcelRequest.xaml file in your project folder:

  1. Now, let's create three new variables to store the data that we would get from the ReadExcelRequest workflow. Go to the Variables pane at the bottom of Studio and add variables for contact name, email, and subject, as shown in the following screenshot:

Note Variable type and Scope and ensure that you match what is shown.

Naming convention: Please use descriptive names for variables and arguments to enable easy understanding. We recommend that variables follow camel case, with the standard prefixed with the type of variable, for example, boolFileExists. Arguments can follow Pascal case; for example, ContactName.
  1. If you recall, we had a few arguments in the ReadExcelRequest workflow to pass data back to Main. Let's now pass data by clicking on Import Arguments and mapping the data. For that, within the Invoked workflow's arguments window, let's perform the following steps: 
    • Populate RequestFilePath with the path to the file: Environment.CurrentDirectory+"\Requests\Request.xlsx":

    • Map the new variables we added previously to the respective argument value:

  1. Since this is a learning exercise, let's add a message box to display ContactName, Email, and Subject for us to establish whether the bot got it right:

  1. Let's now perform a quick test of the workflow so far. Click on Run to run this main workflow. Please ensure that your Excel file is closed before you run the workflow:

You should get the initial message that we added: Agent Ready. Press Alt + s to trigger Automation. Click OK on this message box to acknowledge and press Alt + S to start the bot. Next, you should get the second message that there is a Request file to process and so to proceed with ticket creation. Finally, when it runs successfully, we can expect the message box with the name, email, and subject content that we added in the steps we just completed

Automation will always continue to run by default. Therefore, please click on the Studio Stop button to stop the bot. 

We have now completed the part where we read the data from the Request spreadsheet and are now ready to take this data and create our support ticket. Let's go!

Creating a support ticket in the Zoho Desk ticketing system

In this final workflow that we will create for this project, we will use the data read from the Requests file to create the support ticket within Zoho Desk. This will help us understand how we can automatically input data into web applications through web application screens. Let's perform the following steps:

  1. We'll start by creating another sequence for Zoho web app automation. You can call it ZOHOAutomation:

  1. Within the UiPath default workflow, let's add a Try Catch activity. Let's also add four arguments, as shown in the following screenshot, to pass the data around: 

Ensure that you match Direction and Argument type.

  1. Next, we will use the UiPath web recorder to record the steps to enter the Ticket data in Zoho and create a new ticket. First, go to your Chrome browser and ensure that the Zoho Desk home page is open in one of the tabs. Also, ensure that you have installed the UiPath add-on for Chrome in your Chrome browser. It is available on the Chrome App store. 
UiPath has a recorder that allows you to record mouse clicks and keyboard sequences to automatically generate UiPath scripts. You can also add these activities by yourself, but the recorder is a much faster way to create these sequences. Hence, we like to show you how you can do it. 
  1. Click within the Try block and activate the web recorder by clicking on the Web recorder option within Recording:

  1. UiPath opens a web recording panel to control the recording. Click on the Record button with the Zoho Desk browser tab open:

Now that we have the recording set up and ready, let's record the actions to create a ticket in Zoho. 

Recording ticket creation activities

On the Zoho desk browser tab, perform the following actions to enable the UiPath recorder to record:

  1. Click on the + symbol to create a new ticket (at the top right of the Zoho desk screen):

  1. On the new TICKETS screen, type a contact name followed by the Enter key on your keyboard:

  1. Similarly, type an email followed by the Enter key.
  2. Type a subject followed by the Enter key.
  3. Click on the Submit button on the Zoho Add Ticket screen.
  4. Once you perform all the preceding steps, use the Windows Esc key to stop the recording. Then, click on Save & Exit on the UiPath web recording panel.
  1. You may occasionally find the recorded steps outside the Try block. Move the recorded activity into the Try block if that is the case. Your workflow should look like the following:

Now that we have the recorded activities, let's configure them for our automation.

Configuring the recorded activities

We will now update the recorded activities as required to complete the ticket data input. Let's start with the browser title name: 

  1. You can see that the recorder has created an Attach Browser activity. This uses the browser title to attach to the browser tab and perform the recorded actions. 

In our case here, the browser title is dynamic because there is a ticket number in it. So, we will need to use wildcards to attach to the browser tab. If your browser tab for the Zoho desk is "123zyx", we will just use "*xyz*" with wildcards on both sides.

Wild characters: It is good practice to use wild characters such as * (one or more characters) or ? (any single character) in the browser selectors if we know that the index, prefix, or postfix will dynamically change during execution.

Since we may need the browser title in other activities, let's define a variable called strBrowserTitle and add this as a default value, as shown in the following screenshot:

  1. Now, let's update the Attach Browser activity that the recorder added for us with the browser title variable. Click on the Attach Browser activity within the Try block. In the properties panel on the right, click on the option to update the Selector:

  1. In the Selector Editor window that pops up, click on title to update with the newly created strBrowserTitle variable, as shown in the following screenshot:

  1. Let's also add a new variable within the UiBrowser output property for the Attach Browser activity. We will call it ZohoBrowser and set its scope to ZOHOAutomation. We will use this variable to handle exceptions later in the workflow. You can use Ctrl + K to add the variable and set the scope, or you can add it directly to the variables pane in Studio:

It is best practice to use a Browser variable when you attach the browser, so as to pass the control around during web automation. In our case, we will use this variable in the error handling sequence, as we will use the same browser session to perform error handling.
  1. Next, let's activate the specific browser window by using the Activate UiPath activity. Add the Activate activity, click on Indicate element inside browser, and then click on the Chrome browser title. Let's also maximize the browser window if it's not already maximized. For that, let's use the Maximize Window UiPath activity:

  1. To pass the ticket data to the Zoho desk fields that we recorded, let's replace the recorded text here with argument variables for Contact Name, Email, and Subject:

  1. Let's also set the ContinueOnError flag to False in the Properties panel for these three activities so that we can stop execution and handle them if there are errors:

That is all the updates we require in order to make to the recording. Let's now check whether the ticket was created successfully.

Validating successful ticket creation

By way of a final step in this ticket creation automation, let's ensure that the ticket was added successfully:

  1. To do this, let's check whether Zoho Desk moved to the next page by checking whether the Close Ticket option is on screen.
  2. Since our ticket is already created (during our record sequence), go back to the Zoho ticket application in Chrome and click on the newly created ticket. You should now see the Close Ticket option at the bottom of the screen: 

  1. To check for the element, let's add an Element Exists activity within the ZohoAutomation workflow. Within the added activity, click on Indicate element in the browser and choose Close Ticket in the bottom-right corner of the Zoho ticket details screen:

  1. Also, go to the Properties window (on the right pane) of this Element Exists activity and add the Successful argument as output:

  1. Let's now check whether the ticket was added successfully. Let's add an If activity to check for the Close Ticket element.
  2. If the element exists, we will log a message to say Ticket was created in Zoho desk. Use the Log Message activity for that.
  3. If the element does not exist, this means that we have a functional error (for example, there was no data in the sheet) and the ticket could not be created. In this scenario, let's log an error message indicating that the ticket could not be created. For that, add a new Sequence activity within the Else part. Within Sequence, add a Log Message activity with the Log Level Error and a Message box with a "Ticket Not created in Zoho desk" message:

We checked for the successful creation of the ticket. Let's now handle any exception scenarios. 

Handling exceptions

If there is an unexpected exception or error, then the bot should ensure that we bring the target application to a stable state where it can proceed with the next transactions. The following few steps guarantee this:

  1. Within the Else block, to ensure that the target application is in a stable state, we will attach an element on the screen to the browser. Let's add a new Attach Browser activity to handle the error handling activity in the already opened Chrome browser:

  1. On the properties side of Attach Browser, update Browser with the ZohoBrowser variable and set the BrowserType as Chrome to continue to use the same browser session:

  1. Add a Mouse Click activity to the newly created sequence and click on Indicate element inside the browser. Then, go to the browser, and click on the TICKETS menu option in the top left-hand corner of the Zoho desk screen:

This step will enable automation to get control of the home page of the web application if a ticket has not been created.

This completes the Try block. Now, let's handle any system exceptions. 

  1. Moving out of the overall Try block, let's update the Catches block. Add a new catch of the System.exception type to the Catches block. Copy the error handling sequence that we added in the Else block and paste it into this Catches block:

So we have now completed the web (Zoho Desk) automation as well. Here, we took the request data and incorporated it into Zoho Desk. Finally, we will go to the main workflow, invoke this workflow, and finalize the automation.

Putting it all together

It is time to finish up the main workflow so that it reads the requests, creates the tickets, and then moves the Request spreadsheet out once processed. In order to do this, perform the following steps:

  1. Go back to Main.xaml, create a new variable called boolTicketCreated of the Boolean type, set the scope to Event Handler sequence, and set the default value as False:

We will use this to check whether the ticket was created successfully.

  1. To invoke the Zoho Desk workflow that we just added, let's add a new Invoke Workflow File activity and browse to the ZOHOAtuomation.xaml file:

Note that we are adding this to the Then part of the If control we last added in Main.

  1. Let's import the arguments by clicking on Import Arguments within the Invoke activity. On the popup, map the arguments to the strContactName, strEmail, strSubject, and boolTicketCreated variables:

  1. Next, let's use this last variable, boolTicketCreated, and add an If control:

  1. If the ticket was created, then we will move Request.xlsx from the Requests folder to the Processed folder. For that, let's add a Move File activity within the Then block with the following inputs:
    • From: Environment.CurrentDirectory+"\Requests\Request.xlsx".
    • To: Environment.CurrentDirectory+"\Processed\Request.xlsx".
    • Check the Overwrite checkbox.
  2. Finally, add a Message Box with the message "Zoho Ticket Created and File Moved to the Processed Folder. Use ALT+S to check for new requests to process.". Also, add a Log Message activity with the same message and a Log Level of Info.
  1. Next, in the Else branch, let's add a Message Box saying "Zoho Ticket not created and file is not processed yet. Please check the input request file and Use ALT+s to reprocess the same request". Also, add a Log Message activity with the same message and a Log Level of Error:

  1. Let's save the project. Go to Remove Unused Variables in Studio and click on Validate Project:

You should get a message from Studio saying No errors foundNow, we are ready to test the project.

Testing the automation

Let's now test the automation with all the workflows end to end:

  1. Go to the main workflow and click on Run, as shown in the following screenshot:

  1. Once you get the first message box, click OK and then use ALT + S to trigger the automation. Click OK on the next few message box prompts. Remember that we added these message boxes to bring visibility to the workflow execution:

  1. Go to the Processed folder and check whether the Request.xlsx file has been moved there:

If you encounter issues, you can use the Debug option to run through the steps and ascertain where the issues are. 

  1. Before you go, do not forget to stop the automation by clicking on the STOP button on UiPath Studio.

That's it! We have completed our first project in UiPath that automated the process of creating a support ticket.

We can implement a few enhancements and make things a little more interesting by trying out the following suggested enhancements. 

Project enhancements 

Here are a few simple, but interesting, things you can try out to enhance the project and learn more:

  1. After processing, try to rename the Request file as Request + Date Timestamp before moving it to the Requests folders.
  2. Try to capture all the fields (not just the mandatory three) to create the ticket in Zoho.
  3. Enhance attended automation to include the option to Stop Automation by using a hotkey.

Summary

We have completed an attended automation project with UiPath! We explored Excel and web app (Zoho Desk) automation. We broke the automation down into logical parts, including Excel, Zoho, and the main workflow, to keep it clean and separate. 

We used arguments to pass data around and variables to store them within a workflow. You also got a sense of how you can use Try-Catch blocks to handle exceptions and the If control to handle true-false conditions. 

While this project may have been a bit of an effort, this experience should give you a good foundation as we head into more complex projects. In the next chapter, we will automate customer data lookup and data entry in CRM applications. See you there!

Left arrow icon Right arrow icon
Download code icon Download Code

Key benefits

  • Use popular RPA tools Automation Anywhere A2019 and UiPath, for real-world task automation
  • Build automation solutions for domains such as System Administration, Finance, HR, Supply Chain, and Customer Relations
  • Extend your RPA capabilities by implementing Intelligent process automation with APIs and AI

Description

Robotic Process automation helps businesses to automate monotonous tasks that can be performed by machines. This project-based guide will help you progress through easy to more advanced RPA projects. You’ll learn the principles of RPA and how to architect solutions to meet the demands of business automation, along with exploring the most popular RPA tools - UiPath and Automation Anywhere. In the first part, you’ll learn how to use UiPath by building a simple helpdesk ticket system. You’ll then automate CRM systems by integrating Excel data with UiPath. After this, the book will guide you through building an AI-based social media moderator using Google Cloud Vision API. In the second part, you’ll learn about Automation Anywhere's latest Cloud RPA platform (A2019) by creating projects such as an automated ERP administration system, an AI bot for order and invoice processing, and an automated emergency notification system for employees. Later, you’ll get hands-on with advanced RPA tasks such as invoking APIs, before covering complex concepts such as Artificial Intelligence (AI) and machine learning in automation to take your understanding of RPA to the next level. By the end of the book, you’ll have a solid foundation in RPA with experience in building real-world projects.

What you will learn

Explore RPA principles, techniques, and tools using an example-driven approach Understand the basics of UiPath by building a helpdesk ticket generation system Automate read and write operations from Excel in a CRM system using UiPath Build an AI-based social media moderator platform using Google Cloud Vision API with UiPath Explore how to use Automation Anywhere by building a simple sales order processing system Build an automated employee emergency reporting system using Automation Anywhere Test your knowledge of building an automated workflow through fun exercises

What do you get with eBook?

Product feature icon Instant access to your Digital eBook purchase
Product feature icon Download this book in EPUB and PDF formats
Product feature icon Access this title in our online reader with advanced features
Product feature icon DRM FREE - Read whenever, wherever and however you want
Buy Now

Product Details


Publication date : May 26, 2020
Length 388 pages
Edition : 1st Edition
Language : English
ISBN-13 : 9781839217357
Category :

Table of Contents

14 Chapters
Preface Chevron down icon Chevron up icon
Getting Started with Robotic Process Automation Chevron down icon Chevron up icon
Help Desk Ticket Generation Chevron down icon Chevron up icon
CRM Automation Chevron down icon Chevron up icon
Moderating Social Media Using AI Chevron down icon Chevron up icon
Purchase Order Processing with UiPath ReFramework Chevron down icon Chevron up icon
Completing an RPA Challenge Chevron down icon Chevron up icon
Sales Order Processing Chevron down icon Chevron up icon
ERP User Administration Chevron down icon Chevron up icon
Employee Emergency Notifications Chevron down icon Chevron up icon
Using AI and RPA for Invoice Processing Chevron down icon Chevron up icon
Other Books You May Enjoy Chevron down icon Chevron up icon
Appendix A and B for UiPath Chevron down icon Chevron up icon
Appendix: Looking Forward and Next Steps Chevron down icon Chevron up icon

Customer reviews

Filter icon Filter
Top Reviews
Rating distribution
Empty star icon Empty star icon Empty star icon Empty star icon Empty star icon 0
(0 Ratings)
5 star 0%
4 star 0%
3 star 0%
2 star 0%
1 star 0%

Filter reviews by


No reviews found
Get free access to Packt library with over 7500+ books and video courses for 7 days!
Start Free Trial

FAQs

How do I buy and download an eBook? Chevron down icon Chevron up icon

Where there is an eBook version of a title available, you can buy it from the book details for that title. Add either the standalone eBook or the eBook and print book bundle to your shopping cart. Your eBook will show in your cart as a product on its own. After completing checkout and payment in the normal way, you will receive your receipt on the screen containing a link to a personalised PDF download file. This link will remain active for 30 days. You can download backup copies of the file by logging in to your account at any time.

If you already have Adobe reader installed, then clicking on the link will download and open the PDF file directly. If you don't, then save the PDF file on your machine and download the Reader to view it.

Please Note: Packt eBooks are non-returnable and non-refundable.

Packt eBook and Licensing When you buy an eBook from Packt Publishing, completing your purchase means you accept the terms of our licence agreement. Please read the full text of the agreement. In it we have tried to balance the need for the ebook to be usable for you the reader with our needs to protect the rights of us as Publishers and of our authors. In summary, the agreement says:

  • You may make copies of your eBook for your own use onto any machine
  • You may not pass copies of the eBook on to anyone else
How can I make a purchase on your website? Chevron down icon Chevron up icon

If you want to purchase a video course, eBook or Bundle (Print+eBook) please follow below steps:

  1. Register on our website using your email address and the password.
  2. Search for the title by name or ISBN using the search option.
  3. Select the title you want to purchase.
  4. Choose the format you wish to purchase the title in; if you order the Print Book, you get a free eBook copy of the same title. 
  5. Proceed with the checkout process (payment to be made using Credit Card, Debit Cart, or PayPal)
Where can I access support around an eBook? Chevron down icon Chevron up icon
  • If you experience a problem with using or installing Adobe Reader, the contact Adobe directly.
  • To view the errata for the book, see www.packtpub.com/support and view the pages for the title you have.
  • To view your account details or to download a new copy of the book go to www.packtpub.com/account
  • To contact us directly if a problem is not resolved, use www.packtpub.com/contact-us
What eBook formats do Packt support? Chevron down icon Chevron up icon

Our eBooks are currently available in a variety of formats such as PDF and ePubs. In the future, this may well change with trends and development in technology, but please note that our PDFs are not Adobe eBook Reader format, which has greater restrictions on security.

You will need to use Adobe Reader v9 or later in order to read Packt's PDF eBooks.

What are the benefits of eBooks? Chevron down icon Chevron up icon
  • You can get the information you need immediately
  • You can easily take them with you on a laptop
  • You can download them an unlimited number of times
  • You can print them out
  • They are copy-paste enabled
  • They are searchable
  • There is no password protection
  • They are lower price than print
  • They save resources and space
What is an eBook? Chevron down icon Chevron up icon

Packt eBooks are a complete electronic version of the print edition, available in PDF and ePub formats. Every piece of content down to the page numbering is the same. Because we save the costs of printing and shipping the book to you, we are able to offer eBooks at a lower cost than print editions.

When you have purchased an eBook, simply login to your account and click on the link in Your Download Area. We recommend you saving the file to your hard drive before opening it.

For optimal viewing of our eBooks, we recommend you download and install the free Adobe Reader version 9.