Chapter 12. ASP.NET Core Identity
Security is essential to all types of applications, including web applications. Would you use Facebook if anyone could update your status by impersonating you? If that were possible, then no one would come back to Facebook. From this example, we can see that security is not so much a feature as it is a necessity for all applications.
In this chapter, we are going to learn about the following topics:
When we talk about the security of an application, we primarily want to prevent any unauthorized access, meaning that only the people who have access to the information should be able to access it—nothing more, nothing less.
Before proceeding further, I would like to clarify some of the core concepts regarding security.
Authentication is the process of validating whether the user has access to the system. In any application, users will be authenticated first. This can be achieved by asking the user to enter their user ID and password.
Authorization is the process where we verify whether the user has access to the requested resource. They might have legitimate access to the system, but they might not have access to the requested resource as they do not have the required access. For example, only the admin user can access the configuration page of the application, whereas normal users should not be allowed to use this page.
ASP.NET Identity provides several features for securing the application.
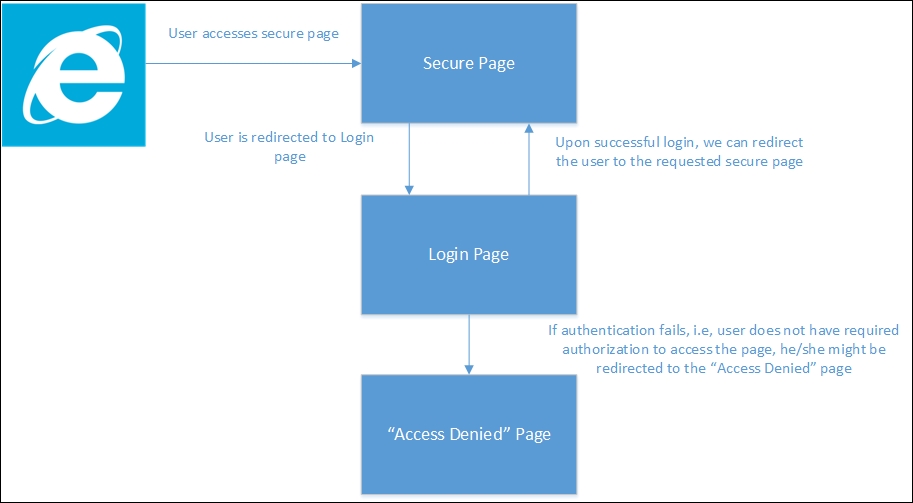
Let us consider the following simple scenario where the user tries to access the Secure Page, a page to which only authorized people should have access. As the user is not logged in, they will be redirected to the Login Page so that we can authenticate and authorize the user. Upon successful authentication, the user is redirected to the Secure Page. If for any reason, we can not authenticate and authorize the user, we can redirect them to the "Access denied" Page:
ASP.NET Core Identity is a membership system that enables...
Adding the relevant dependencies to the project.json file
If you want to use ASP.NET Identity with Entity Framework in your application, you need to add the following dependencies:
"EntityFramework.Commands": "7.0.0-rc1-final",
    "EntityFramework.MicrosoftSqlServer": "7.0.0-rc1-final",
    "Microsoft.AspNet.Authentication.Cookies": "1.0.0-rc1-final",
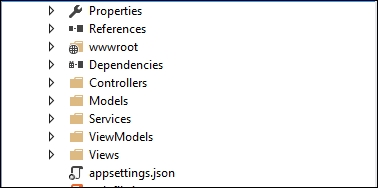
Create an appsettings.json file and store the database connection string.
Create a file with the name appsettings.json at the root level of the project, as shown in the following screenshot:
Store the following connection string in appsettings.json. This connection string will be used by ASP.NET Identity to store the data in relevant tables:
{
  "Data": {
    "DefaultConnection": {
      "ConnectionString": "Server=(localdb)\\mssqllocaldb;Database=aspnet_security;Trusted_Connection=True;MultipleActiveResultSets=true"
   }
  }
}
Adding ApplicationUser and ApplicationDbContext classes...
Configuring the application to use Identity
In order to use Identity, we just need to add the following line in the Configure method of the Startup class:
app.UseIdentity();
The complete Configure method is shown in the following code, along with the call of the UseIdentity method, which is app.UseIdentity():
public void Configure(IApplicationBuilder app, IHostingEnvironment env,  ILoggerFactory loggerFactory)
        {
            loggerFactory.AddConsole(Configuration.GetSection("Logging"));
            loggerFactory.AddDebug();

            if (env.IsDevelopment())
            {
                app.UseBrowserLink();
                app.UseDeveloperExceptionPage();
                app.UseDatabaseErrorPage();
            }
            else
            {
                app.UseExceptionHandler("/Home/Error");


            app.UseIISPlatformHandler(options => options...
Next, we will be creating several ViewModels that we will be using in our Views model.
To start with, we will create a RegisterViewModel class that contains three properties—Email, Password, and ConfirmPassword. We decorate the properties with appropriate attributes so that we can use client-side validation using an unobtrusive jQuery validation. We are making all the fields required as follows:
public class RegisterViewModel
    {
        [Required]
        [EmailAddress]
        [Display(Name = "Email")]
        public string Email { get; set; }

        [Required]
        [StringLength(100, ErrorMessage = "The {0} must be at least {2} characters long.", MinimumLength = 6)]
        [DataType(DataType.Password)]
        [Display(Name = "Password")]
        public string Password { get; set; }

        [DataType(DataType.Password)]
        [Display(Name = "Confirm password")]
    ...
Creating Controllers and associated action methods
Now we need to create an AccountController class, where we will define the action methods for authentication and authorization:
public class AccountController : Controller
    {
        private readonly UserManager<ApplicationUser> _userManager;
        private readonly SignInManager<ApplicationUser> _signInManager;
        private readonly IEmailSender _emailSender;
        private readonly ISmsSender _smsSender;
        private readonly ILogger _logger;

        public AccountController(
            UserManager<ApplicationUser> userManager,
            SignInManager<ApplicationUser> signInManager,
            IEmailSender emailSender,
            ISmsSender smsSender,
            ILoggerFactory loggerFactory)
        {
            _userManager = userManager;
            _signInManager = signInManager;
          ...
Now, we will create respective View page for the login. In this View page, we are just showing the following details:
@using System.Collections.Generic
@using Microsoft.AspNet.Http
@using Microsoft.AspNet.Http.Authentication
@using AspNet.Identity.EntityFramework6

@model LoginViewModel
@inject SignInManager<ApplicationUser> SignInManager

@{
    ViewData["Title"] = "Log in";
}

<h2>@ViewData["Title"].</h2>
<div class="row">
    <div class="col-md-8">
        <section>
            <form asp-controller="Account" asp-action="Login" asp-route-returnurl="@ViewData["ReturnUrl"]" method="post" class="form-horizontal" role="form">
                <h4>Use a local account to log in.</h4>
                <hr />
                <div asp-validation-summary="ValidationSummary.All" class="text-danger"></div...
If you want to add e-mail and SMS services to your application's authentication capabilities, you can do so by creating the interfaces and classes shown here:
public interface IEmailSender
{
        Task SendEmailAsync(string email, string subject, string message)
  }
  public interface ISmsSender
    {
        Task SendSmsAsync(string number, string message);
    }
public class AuthMessageSender : IEmailSender, ISmsSender
    {
        public Task SendEmailAsync(string email, string subject, string message)
        {
            // We can plug in our email service here to send an email.
            return Task.FromResult(0);
        }
        public Task SendSmsAsync(string number, string message)
        {
            // We can plug in our SMS service here to send a text message.
            return Task.FromResult(0);
        }
    }
Securing an action method in a Controller
For the sake of explanation, let us assume that the About page is a secure page and only authenticated users should be able to access it.
We just have to decorate the About action method in the Home controller with an[Authorize] attribute:
[Authorize]
        public IActionResult About()
        {
            ViewData["Message"] = "This is my about page";
            return View();
        }
Making the preceding change will redirect the user to the log-in page when the user tries to access the log-in page without logging in to the application:
In the following screenshot, you will notice an additional query parameter, ReturnURL, in the URL. This ReturnURL parameter will redirect the application to that specific page (the value passed in the ReturnURL parameter—Home/About in our case).
Once you log in, you'll be redirected to the page that you requested earlier:
When you register a new user, the details of the user...
In this chapter, we learned about authentication and authorization. We also learned how to implement ASP.NET Identity in an ASP.NET Core application by following a step-by-step process. We also discussed the tables involved in ASP.NET Identity and learned how to see the data created by ASP.NET Identity.