Reader small image

You're reading from  Learn React with TypeScript - Second Edition

Product typeBook
Published inMar 2023
Reading LevelBeginner
PublisherPackt
ISBN-139781804614204
Edition2nd Edition
Languages
Tools
Right arrow
Author (1)
Carl Rippon
Carl Rippon
author image
Carl Rippon

Carl Rippon has been in the software industry for over 20 years developing a complex lines of business applications in various sectors. He has spent the last 8 years building single-page applications using a wide range of JavaScript technologies including Angular, ReactJS, and TypeScript. Carl has also written over 100 blog posts on various technologies.
Read more about Carl Rippon

Right arrow

Routing with React Router

In this chapter, we will build a simple app implementing the following pages:

  • A home page that welcomes the user
  • A products list page that lists all the products
  • A product page that provides details about a particular product
  • An admin page for privileged users

This will all be managed using a library called React Router.

Through this, we will learn how to implement static links from the products list to the product page and implement route parameters on the product page for the product ID. We will also learn about form navigation and query parameters when it comes to the search feature of our app.

Finally, the chapter will end with how to lazily load code for a page to improve performance.

So, in this chapter, we will cover the following topics:

  • Introducing React Router
  • Declaring routes
  • Creating navigation
  • Using nested routes
  • Using route parameters
  • Creating an error page
  • Using index routes...

Technical requirements

We will use the following technologies in this chapter:

All the code snippets in this chapter can be found online at https://github.com/PacktPublishing/Learn-React-with-TypeScript-2nd-Edition/tree/main/Chapter6.

Introducing React Router

In this section, we start by creating a new React project for the app before understanding what React Router is and how to install it.

Creating the project

We will develop the app locally using Visual Studio Code, which requires a new Create React App-based project setup. We have covered this several times, so we will not cover the steps in this chapter – instead, see Chapter 3, Setting Up React and TypeScript. Create the project for the app with a name of your choice.

We will style the app with Tailwind CSS. We covered how to install and configure Tailwind in Create React App in Chapter 5, Approaches to Styling Frontends, so after you have created the React and TypeScript project for the app, install and configure Tailwind.

Understanding React Router

As the name suggests, React Router is a routing library for React apps. A router is responsible for selecting what to show in the app for a requested path. For example, React Router is responsible...

Declaring routes

We will start this section by creating a page component that lists the app’s products. We will then learn how to create a router and declare routes using React Router’s createBrowserRouter function.

Creating the products list page

The products list page component will contain the list of the React tools in the app. Carry out the following steps to create this:

  1. We will start by creating the data source for the page. First, create a folder called data in the src folder and then a file called products.ts within data.
  2. Add the following content into products.ts (you can copy and paste it from the GitHub repository at https://github.com/PacktPublishing/Learn-React-with-TypeScript-2nd-Edition/blob/main/Chapter6/src/data/products.ts):
    export type Product = {
      id: number,
      name: string,
      description: string,
      price: number,
    };
    export const products: Product[] = [
      {
        description...

Creating navigation

React Router comes with components called Link and NavLink, which provide navigation. In this section, we will create a navigation bar at the top of the app containing the Link component from React Router. We will then swap Link for the NavLink component and understand the difference between the two components.

Using the Link component

Carry out the following steps to create an app header containing React Router’s Link component:

  1. Start by creating a file for the app header called Header.tsx in the src folder containing the following import statements:
    import { Link } from 'react-router-dom';
    import logo from './logo.svg';

We have imported the Link component from React Router.

We have also imported the React logo because we will include this in the app header with the navigation options.

  1. Create the Header component as follows:
    export function Header() {
      return (
        <header className...

Using nested routes

In this section, we will cover nested routes and the situations in which they are useful, before using a nested route in our app. The nested route will also resolve the disappearing app header problem we experienced in the previous sections.

Understanding nested routes

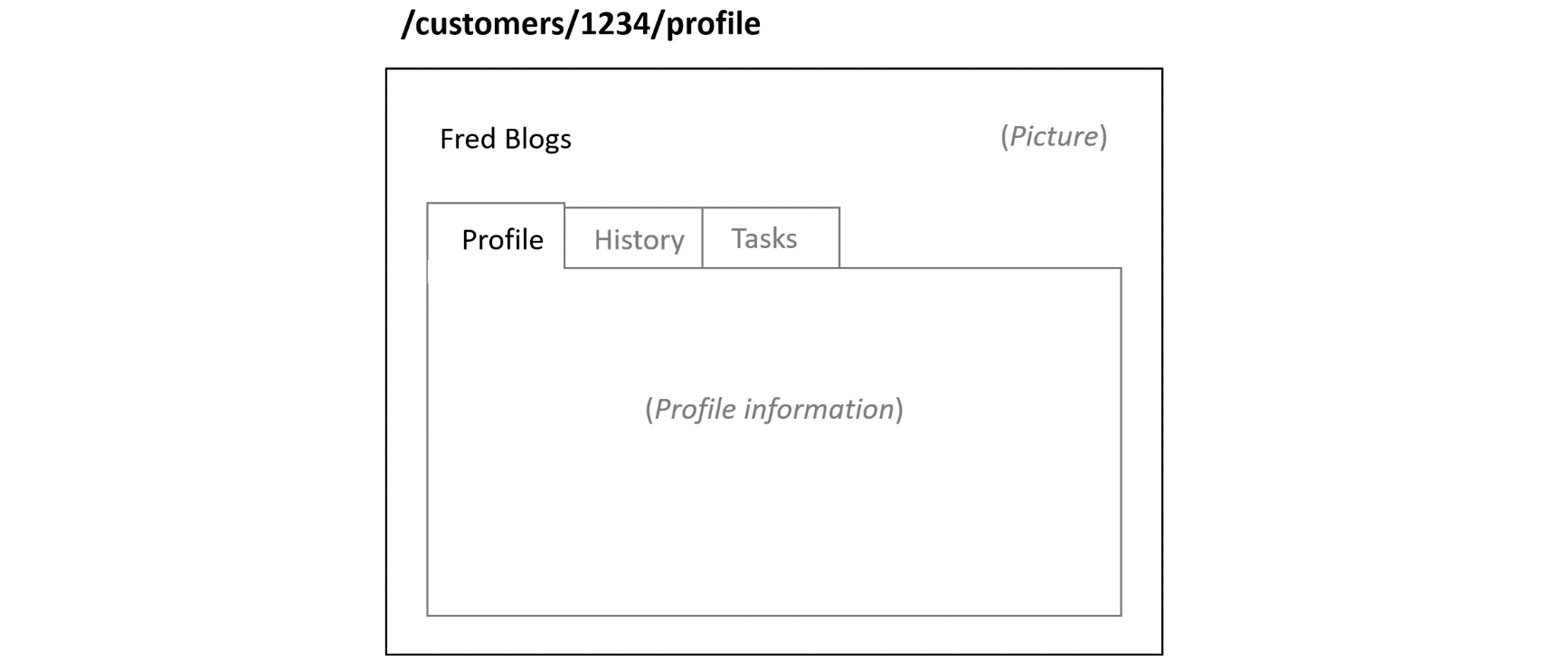
A nested route allows a segment of a route to render a component. For example, the following mock-up is commonly implemented using nested routes:

Figure 6.6 – Use case for nested routes

Figure 6.6 – Use case for nested routes

The mock-up displays information about a customer. The path determines the active tab – in the mockup, Profile is the active tab because that is the last segment in the path. If the user selects the History tab, the path would change to /customers/1234/history.

A Customer component could render the shell of this screen, including the customer’s name, picture, and tab headings. The component that renders the tab contents could be decoupled from the Customer...

Using route parameters

In this section, we will understand route parameters and how they are useful before using a route parameter in our app.

Understanding route parameters

A route parameter is a segment in the path that varies. The value of the variable segment is available to components so that they can render something conditionally.

In the following path, 1234 is the ID of a customer: /customers/1234/.

This can be defined as a route parameter in a route as follows:

{ path: '/customer/:id', element: <Customer /> }

A colon (:) followed by a name defines a route parameter. It is up to us to choose a parameter name that makes sense, so the :id segment in the path is the route parameter definition in the preceding route.

Multiple route parameters can be used in a path as follows:

{
  path: '/customer/:customerId/tasks/:taskId',
  element: <CustomerTask />,
}

Route parameter names obviously have to be unique...

Creating an error page

In this section, we will understand how error pages work in React Router before implementing one in our app.

Understanding error pages

Currently, a React Router built-in error page is shown when an error occurs. We can check this by entering an invalid path in the running app:

Figure 6.10 – Standard React Router error page

Figure 6.10 – Standard React Router error page

An error is raised because no matching routes are found in the router. The 404 Not Found message on the error page confirms this.

This standard error page isn’t ideal because the information is targeted at a developer rather than a real user. Also, the app header isn’t shown, so users can’t easily navigate to a page that does exist.

As the error message suggests, an errorElement prop can be used on a route to override the standard error page. The following is an example of a custom error page defined for a customer’s route; if any error occurs on this route, the CustomersErrorPage...

Using index routes

Currently, the app’s root path displays nothing other than the header. In this section, we will learn about index routes to display a nice welcome message in the root path.

Understanding index routes

An index route can be thought of as a default child route. In React Router, if no children match a parent route, it will display an index route if one is defined. An index route has no path and instead has an index Boolean property, as in the following example:

{
  path: "/",
  element: <App />,
  children: [
    {
      index: true,
      element: <HomePage />,
    },
    ...,
  ]
}

Next, we will add a home page using an index route in our app.

Using an index route in the app

Carry out the following steps to add a home page using an index route in our app:

    ...

Using search parameters

In this section, we will learn about search parameters in React Router and use them to implement a search feature in the app.

Understanding search parameters

Search parameters are part of a URL that comes after the ? character and separated by the & character. Search parameters are sometimes referred to as query parameters. In the following URL, type and when are search parameters: https://somewhere.com/?type=sometype&when=recent.

React Router has a hook that returns functions for getting and setting search parameters called useSearchParams:

const [searchParams, setSearchParams] = useSearchParams();

searchParams is a JavaScript URLSearchParams object. There is a get method on URLSearchParams, which can be used to get the value of a search parameter. The following example gets the value of a search parameter called type:

const type = searchParams.get('type');

setSearchParams is a function used to set search parameter values...

Using form navigation

In this section, we will use React Router’s Form component to navigate to the products list page when the search criteria are submitted. Form is a wrapper around the HTML form element that handles the form submission on the client side. This will replace the use of useNavigate and simplify the code. Carry out the following steps:

  1. In Header.tsx, start by removing useNavigate from import for the React Router and replace it with the Form component:
    import {
      NavLink,
      Link,
      useSearchParams,
      Form
    } from 'react-router-dom';
  2. In the JSX, replace the form element with React Router’s Form component:
    <Form
      className="relative text-right"
      onSubmit={handleSearchSubmit}
    >
      <input ... />
    </Form>
  3. In the Form element in the JSX, remove the onSubmit handler. Replace this with the following action attribute so that the form is sent to the products...

Implementing lazy loading

Currently, all the JavaScript for our app is loaded when the app first loads. This can be problematic in large apps. In this section, we will learn how to only load the JavaScript for components when their route becomes active. This pattern is often referred to as lazy loading. In our app, we will create a lazily loaded admin page.

Understanding React lazy loading

By default, all React components are bundled together and loaded when the app first loads. This is inefficient for large apps – particularly when a user does not use many components. Lazily loading React components addresses this issue because lazy components aren’t included in the initial bundle that is loaded; instead, their JavaScript is fetched and loaded when rendered.

There are two main steps to lazy loading React components. First, the component must be dynamically imported as follows:

const LazyPage = lazy(() => import('./LazyPage'));

In the code...

Summary

React Router gives us a comprehensive set of components and hooks for managing the navigation between pages in our app. We used createBrowserRouter to define all our web app’s routes. A route contains a path and a component to render when the path matches the browser URL. We used an errorElement prop for a route to render a custom error page in our app.

We used nested routes to allow the App component to render the app shell and page components within it. We used React Router’s Outlet component inside the App component to render page content. We also used an index route on the root route to render a welcome message.

We used React Router’s NavLink component to render navigation links that are highlighted when their route is active. The Link component is great for other links that have static styling requirements – we used this for product links on the product list. We used React Router’s Form component to navigate to the products list...

Questions

Let’s test our knowledge of React Router with the following questions:

  1. We have declared the following routes in an app:
    const router = createBrowserRouter([
      {
        path: "/",
        element: <App />,
        errorElement: <ErrorPage />,
        children: [
          { path: "customers", element: <CustomersPage /> }
        ]
      }
    ]);

What component will render when the path is /customers?

What component will render when the path is /products?

  1. What would the path be in a route that could handle a /customers/37 path? 37 is a customer ID and could vary.
  2. The routes for a settings page are defined as follows:
    {
      path: "/settings",
      element: <SettingsPage />,
      children: [
        { path: "general", element: <GeneralSettingsTab...

Answers

  1. CustomersPage will render when the path is /customers.

ErrorPage will render when the path is /products.

  1. The path could be path="customers/:customerId".
  2. It is likely that the Outlet component has not been added to SettingsPage.
  3. Both will work, but NavLink is better because it enables items to be styled when active.
  4. The route parameter referenced should be userId:
    const params = useParams<{userId: string}>();
    const id = params.userId;
  5. Hooks must be called at the top level of function components. Also, the useSearchParams hook doesn’t directly have a get method. Here’s the corrected code:
    const [searchParams] = useSearchParams();
    function getFilteredCustomers() {
      const criteria = searchParams.get('search');
      ...
    }
  6. The lazy component must be nested inside a Suspense component as follows:
    {
      path: '/special',
      element: (
        <Suspense...
lock icon
The rest of the chapter is locked
You have been reading a chapter from
Learn React with TypeScript - Second Edition
Published in: Mar 2023Publisher: PacktISBN-13: 9781804614204
Register for a free Packt account to unlock a world of extra content!
A free Packt account unlocks extra newsletters, articles, discounted offers, and much more. Start advancing your knowledge today.
undefined
Unlock this book and the full library FREE for 7 days
Get unlimited access to 7000+ expert-authored eBooks and videos courses covering every tech area you can think of
Renews at €14.99/month. Cancel anytime

Author (1)

author image
Carl Rippon

Carl Rippon has been in the software industry for over 20 years developing a complex lines of business applications in various sectors. He has spent the last 8 years building single-page applications using a wide range of JavaScript technologies including Angular, ReactJS, and TypeScript. Carl has also written over 100 blog posts on various technologies.
Read more about Carl Rippon