Search icon
Arrow left icon
All Products
Best Sellers
New Releases
Books
Videos
Audiobooks
Learning Hub
Newsletters
Free Learning
Arrow right icon
Learn Helm

You're reading from  Learn Helm

Product type Book
Published in Jun 2020
Publisher Packt
ISBN-13 9781839214295
Pages 344 pages
Edition 1st Edition
Languages
Authors (2):
Andrew Block Andrew Block
Profile icon Andrew Block
Austin Dewey Austin Dewey
Profile icon Austin Dewey
View More author details

Table of Contents (15) Chapters

Preface 1. Section 1: Introduction and Setup
2. Chapter 1: Understanding Kubernetes and Helm 3. Chapter 2: Preparing a Kubernetes and Helm Environment 4. Chapter 3: Installing your First Helm Chart 5. Section 2: Helm Chart Development
6. Chapter 4: Understanding Helm Charts 7. Chapter 5: Building Your First Helm Chart 8. Chapter 6: Testing Helm Charts 9. Section 3: Adanced Deployment Patterns
10. Chapter 7: Automating Helm Processes Using CI/CD and GitOps 11. Chapter 8: Using Helm with the Operator Framework 12. Chapter 9: Helm Security Considerations 13. ASSESSMENTS 14. Other Books You May Enjoy

Chapter 3: Installing your First Helm Chart

Earlier in this book, we referred to Helm as the "Kubernetes package manager" and compared it to an operating system's package manager. A package manager allows users to quickly and easily install applications of varying complexities and manages any dependencies that an application might have. Helm works in a similar fashion.

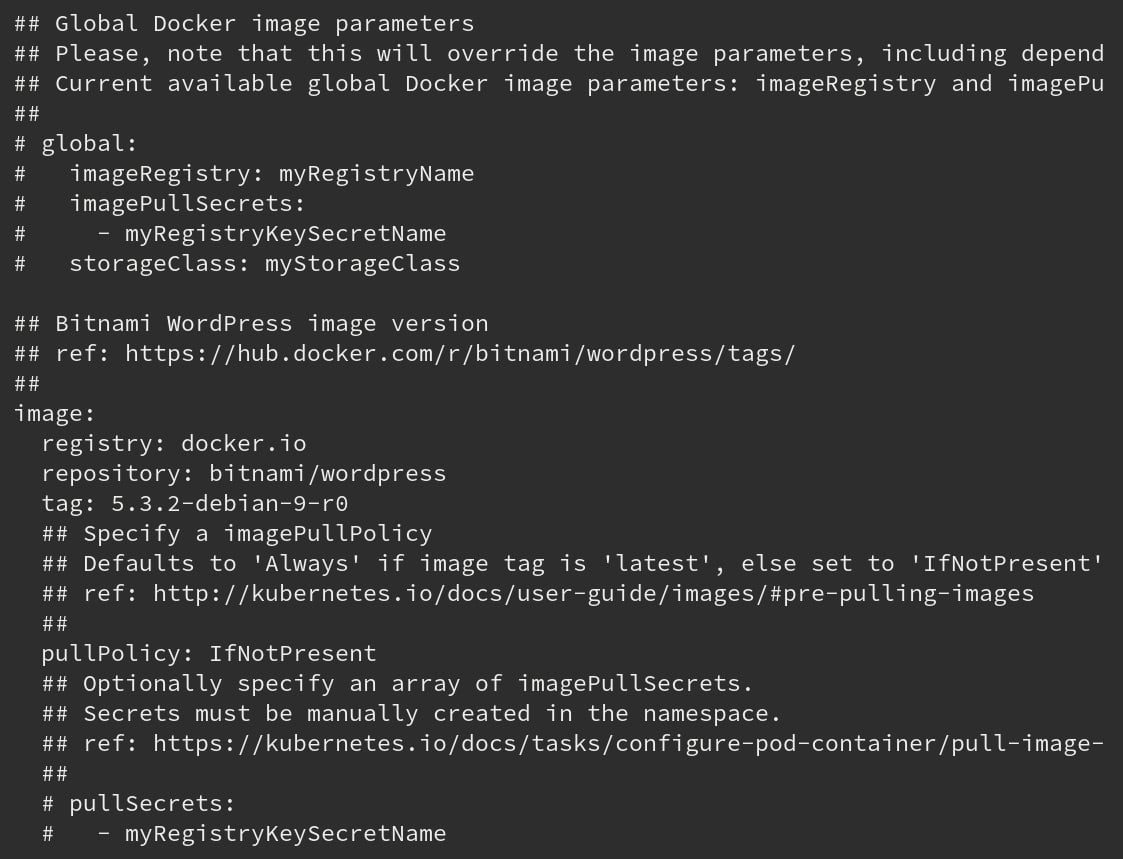
Users simply determine the application they want to deploy on Kubernetes and Helm does the rest of the work for them. A Helm chart—a packaging of Kubernetes resources—contains the logic and components required to install an application, allowing users to perform installations without needing to know the specific resources required. Users can also pass in parameters, called values, to a Helm chart to configure different aspects of the application without needing to know the specific details about the Kubernetes resources that are being configured. You will explore these features in this...

Technical requirements

This chapter will use the following software technologies:

  • minikube
  • kubectl
  • helm

We will assume that these components have already been installed on your system. For additional information on each of these tools, including installation and configuration, please refer to Chapter 2, Preparing a Kubernetes and Helm Environment.

Understanding the WordPress application

In this chapter, you will use Helm to deploy WordPress on Kubernetes. WordPress is an open source Content Management System (CMS) used to create websites and blogs. Two different variants are available—WordPress.com and WordPress.org. WordPress.com is a Software-As-A-Service (SaaS) version of the CMS, meaning the WordPress application and its components are already hosted and managed by WordPress. In this case, users do not need to worry about installing their own WordPress instance as they can simply access instances that are already available. WordPress.org, on the other hand, is the self-hosted option. It requires users to deploy their own WordPress instances and requires expertise to maintain.

Since WordPress.com is easier to start with, it may sound like the more desirable option. This SaaS version of WordPress, however, has many disadvantages over the self-hosted WordPress.org:

Finding a WordPress chart

Helm Charts can be made available for consumption by being published to a chart repository. A chart repository is a location where packaged charts can be stored and shared. A repository is simply hosted as an HTTP server and can take the form of various implementations, including GitHub pages, an Amazon S3 bucket, or a simple web server such as Apache HTTPD.

To be able to use existing charts that are stored in a repository, Helm needs to first be configured to a repository that it can use. This is accomplished by adding repositories using helm repo add. One challenge involved with adding repositories is that there are numerous different chart repositories available for consumption; it may be difficult to locate the particular repository that fits your use case. To make it easier to find chart repositories, the Helm community created a platform called Helm Hub.

Helm Hub is a centralized location for upstream chart repositories. Powered by a community...

Creating a Kubernetes environment

To create a Kubernetes environment in this chapter, we will use Minikube. We learned how to install Minikube in Chapter 2, Preparing a Kubernetes and Helm Environment.

Let's follow these steps to set up Kubernetes:

  1. Start your Kubernetes cluster by running the following command:
    $ minikube start
  2. After a short amount of time, you should see a line in the output that resembles the following:
     Done! kubectl is now configured to use 'minikube'
  3. Once the Minikube cluster is up and running, create a dedicated namespace for this chapter's exercise. Run the following command to create a namespace 
called chapter3:
    $ kubectl create namespace chapter3

Now that the cluster setup is complete, let's begin the process of installing the WordPress chart to your Kubernetes cluster.

Installing the WordPress chart

Installing a Helm chart is a simple process that can begin with the inspection of a chart's values. In the next section, we will inspect the values that are available on the WordPress chart and describe how to create a file that allows customizing the installation. Finally, we will install the chart and access the WordPress application.

Creating a values file for configuration

You can override the values defined in charts by providing a YAML-formatted values file. In order to properly create a values file, you need to inspect the supported values that the chart provides. This can be done by running the helm show values command, as explained earlier.

Run the following command to inspect the WordPress chart's values:

$ helm show values bitnami/wordpress --version 8.1.0

The result of this command should be a long list of possible values that you can set, many of which already have default values set:

Figure...

Additional installation notes

Soon, we will explore the WordPress application that we just installed. First, there are several areas of consideration that should be mentioned before leaving behind the topic of installation.

The -n flag

The -n flag can be used instead of the --namespace flag to reduce the typing effort when entering commands. This holds true for the upgrade and rollback commands, which we will describe later in this chapter. From here on, we will use the -n flag when we denote the namespace that Helm should interact with.

The HELM_NAMESPACE environment variable

You can also set an environment variable to denote the namespace that Helm should interact with.

Let's look at how we can set this environment variable on various operating systems:

  • You can set the variable on macOS and Linux as follows:
    $ export HELM_NAMESPACE=chapter3
  • Windows users can set this environment variable by running this command in PowerShell:
    > $env:HELM_NAMESPACE...

Accessing the WordPress application

The WordPress chart's release notes provide four commands that you can run to access your WordPress application. Run the four commands listed here:

  • For macOS or Linux, run the following:
    $ export NODE_PORT=$(kubectl get --namespace chapter3 -o jsonpath="{.spec.ports[0].nodePort}" services wordpress)
    $ export NODE_IP=$(kubectl get nodes --namespace chapter3 -o jsonpath="{.items[0].status.addresses[0].address}")
    $ echo "WordPress URL: http://$NODE_IP:$NODE_PORT/"
    $ echo "WordPress Admin URL: http://$NODE_IP:$NODE_PORT/admin"
  • For Windows PowerShell, run the following:
    > $NODE_PORT = kubectl get --namespace chapter3 -o jsonpath="{.spec.ports[0].nodePort}" services wordpress | Out-String
    > $NODE_IP = kubectl get nodes --namespace chapter3 -o jsonpath="{.items[0].status.addresses[0].address}" | Out-String
    > echo "WordPress URL: http://$NODE_IP:$NODE_PORT/"
    >...

Upgrading the WordPress release

Upgrading a release refers to the process of modifying the values that a release was installed with or upgrading to a newer version of the chart. In this section, we will upgrade the WordPress release by configuring additional values around the WordPress replica and resource requirements.

Modifying the Helm values

It is common for Helm charts to expose values to configure the number of instances of an application and their related set of resources. The following screenshots illustrate several portions of the helm show values command that relate to the values used for this purpose.

The first value, replicaCount, is straightforward to set. Since replica is a Kubernetes term that describes the number of Pods needed to deploy an application, it's implied that replicaCount is used to specify the number of application instances that are deployed as part of a release:

Figure 3.23 – replicaCount in the helm show values command

...

Rolling back the WordPress release

While moving forward is preferred, there are some occasions where it makes more sense to return to a previous version of the application. The helm rollback command exists to satisfy this use case. Let's roll back the WordPress release to a previous state.

Inspecting the WordPress history

Every Helm release has a history of revisions. A revision is used to track the values, Kubernetes resources, and chart version that were used in a particular release version. A new revision is created when a chart is installed, upgraded, or rolled back. Revision data is saved in Kubernetes secrets by default (other options are ConfigMap or local memory, determined by the HELM_DRIVER environment variable). This allows your Helm release to be managed and interacted with by different users on the Kubernetes cluster, provided they have the Role-Based Access Control (RBAC) that allows them to view or modify resources in your namespace.

The revision secrets...

Uninstalling the WordPress release

Uninstalling a Helm release means deleting the Kubernetes resources that it manages. In addition, the uninstall command deletes the release's history. While this is often what we want, specifying the --keep-history flag will instruct Helm to retain the release history.

The syntax for the uninstall command is very simple:

helm uninstall RELEASE_NAME [...] [flags]

Uninstall the WordPress release by running the helm uninstall command:

$ helm uninstall wordpress -n chapter3

Once uninstalled, you will see the following message:

release 'wordpress' uninstalled

You will also notice that the wordpress release no longer exists in the chapter3 namespace:

$ helm list -n chapter3

The output will be an empty table. You can also confirm that the release is no longer present by attempting to use kubectl to get the WordPress deployments:

$ kubectl get deployments -l app=wordpress -n chapter3
No resources found in chapter3...

Cleaning up your environment

To clean up your Kubernetes environment, you can remove this chapter's namespace by running the following command:

$ kubectl delete namespace chapter3

After the chapter3 namespace is deleted, you can also stop the Minikube VM:

$ minikube stop

This will shut down the VM but will retain its state so that you can quickly begin working again in the next exercise.

Summary

In this chapter, you learned how to install a Helm chart and manage its life cycle. We began by searching Helm Hub for a WordPress chart to install. After locating a chart, the repository containing the chart was added by following the instructions from its Helm Hub page. We then proceeded to inspect the WordPress chart to create a set of values that overrides their defaults. These values were saved to a values file, which was then provided during the installation.

After the chart was installed, we used helm upgrade to upgrade the release by providing additional values. We performed a rollback after this with helm rollback to restore the chart to a previous state. Finally, we removed the WordPress release at the end of the exercise with helm uninstall.

This chapter taught you how to leverage Helm as an end user and chart consumer. You used Helm as a package manager to install a Kubernetes application to your cluster. You also managed the life cycle of the application...

Further reading

To learn more about adding repositories locally, inspecting charts, and using the four life cycle commands used throughout this chapter (install, upgrade, rollback, and uninstall), go to https://helm.sh/docs/intro/using_helm/.

Questions

  1. What is Helm Hub? How can a user interact with it to find charts and chart repositories?
  2. What is the difference between the helm get and helm show sets of commands? When would you use one set of commands over the other?
  3. What is the difference between the --set and --values flags in the helm install and helm upgrade commands? What are the benefits of using one over the other?
  4. What command can be used to provide the list of revisions for a release?
  5. What happens by default when you upgrade a release without providing any values? How does this behavior differ to when you do provide values for an upgrade?
  6. Imagine you have five revisions of a release. What would the helm history command show after you roll back the release to revision 3?
  7. Imagine you want to view all of the releases deployed to a Kubernetes namespace. What command should you run?
  8. Imagine you run helm repo add to add a chart repository. What command can you run to list all of the...
lock icon The rest of the chapter is locked
You have been reading a chapter from
Learn Helm
Published in: Jun 2020 Publisher: Packt ISBN-13: 9781839214295
Register for a free Packt account to unlock a world of extra content!
A free Packt account unlocks extra newsletters, articles, discounted offers, and much more. Start advancing your knowledge today.
Unlock this book and the full library FREE for 7 days
Get unlimited access to 7000+ expert-authored eBooks and videos courses covering every tech area you can think of
Renews at $15.99/month. Cancel anytime}