


Configuring access control security
Odoo includes built-in access control mechanisms. A user will only be able to use the features they were granted access to. This means that the To-do Item model we created is not accessible by the users.
Changes in Odoo 12
The admin user is now subject to access control like any other user. In previous Odoo versions, the admin user was special and bypassed security rules. This is no longer true, and admin must be granted access privileges to be able to access model data.
Access security is defined using user groups. Groups, which are sometimes called access control lists (ACLs), define the access permissions for models. Users belong to groups. So, each user's access depends on the group they belong to.
For our project, we will create a to-do group to be assigned to the users that should have access to this feature.
Furthermore, we can also define record rules (sometimes called row-level security), restricting the records each user can access.
For our project, we want the to-do items to be private for each user, so users should only be able to access the records they created.
Security groups
Access control is based on groups. A security group is given access privileges on models, and this will determine the menu items available to the users belonging to that group. For more fine-grained control, we can also give access to specific menu items, views, fields, and even data records by using record rules, which we will explain in the next section.
Security groups are also organized around apps, and typically, each app provides at least two groups: User, with permissions for performing daily tasks, and Manager, with permissions for performing all configurations for that app.
We will now create a new security group for the to-do list app.
In the Settings top menu, navigate to Users & Companies | Groups and create a new record using the following values:
- Application: [leave empty] .
- Name:
To-Do User. - Inherited tab: Add a line and select User types / Internal User.
This is how it should look:
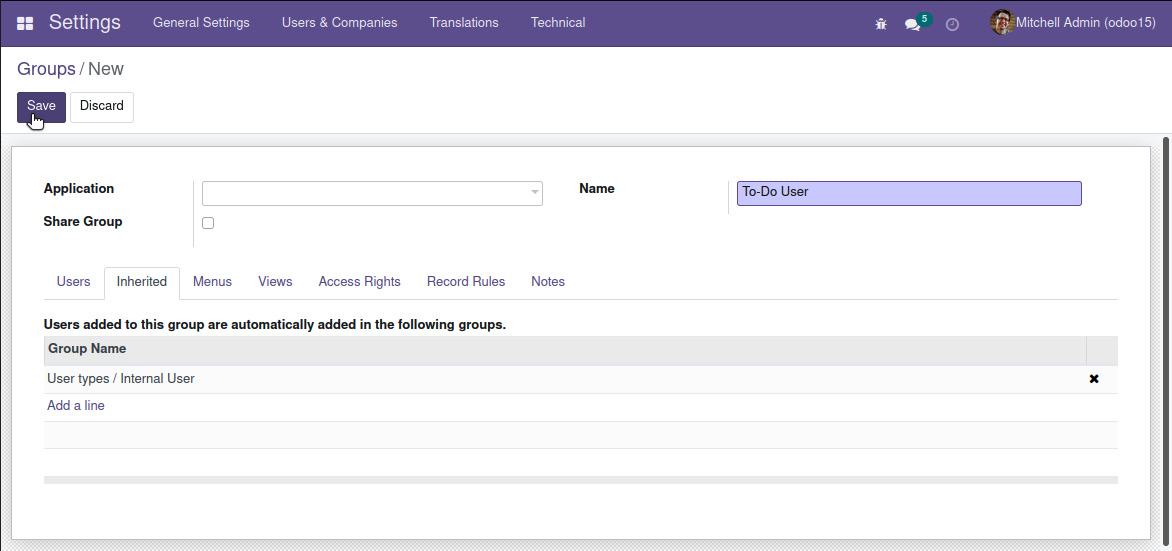
Figure 1.16 – The To-Do User security group
Our security group inherits the Internal User group. Group inheritance means that members of this group will also be members of the inherited groups and will accumulate the permissions granted to all of them. The Internal User group is the basic access group, and app security groups usually inherit it.
Changes in Odoo 12
Before Odoo 12, the Internal User group was called Employee. This was just a cosmetic change, and the technical identifier (that is, the XML ID) is still the same as in previous versions: base.group_user.
Security access control lists
Now, we can grant the group/to-do user access to specific models.
The simplest way to do this is to use the Access Rights tab in the Groups form. Add a line there using these values:
- Name:
To-do Item User Access. - Object: Select To-do Item from the list.
- Read Access, Write Access, Create Access, and Delete Access: Check all of these checkboxes to grant the respective privileges.
It is useful to know that these model ACLs can also be managed from the Technical | Security | Access Rights menu item.
Notice that we don't need to specifically add access to the Contact model since we are inheriting the Internal User group that already grants access to it.
Assigning security groups to users
Now, we can try these new security settings by adding the admin user to this new security group:
- Select the Users & Companies | Users menu item, open the Mitchell Admin user form, and click Edit.
- In the Other section in the Access Rights tab, we will see a To-do User checkbox to enable the security group for this user. Select it and save the form.
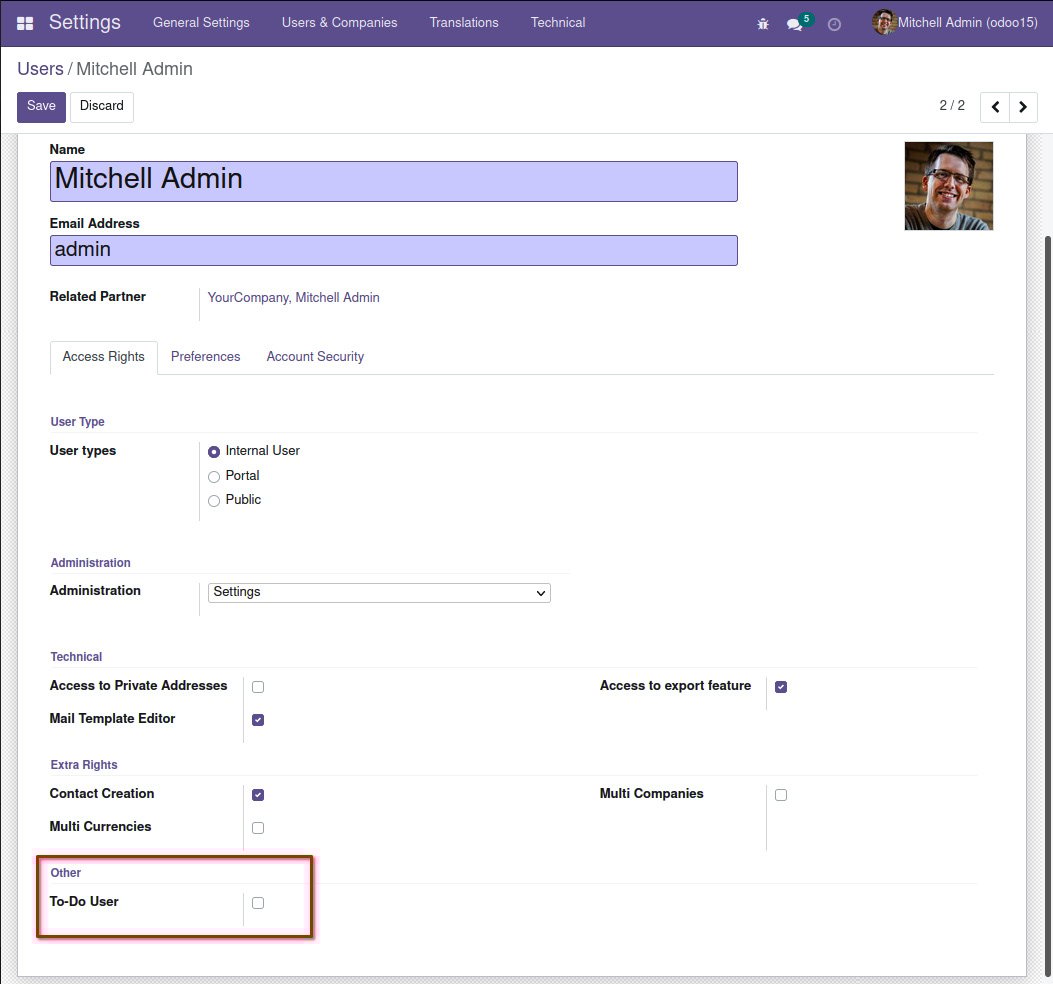
Figure 1.17 – The Mitchel Admin user form
If everything went as expected, you should be able to see the To-do app top menu. A browser page reload should be needed to force a refresh of the menu items.
We haven't created any views for it yet, but the Odoo framework is nice enough to automatically generate some basic views for us:
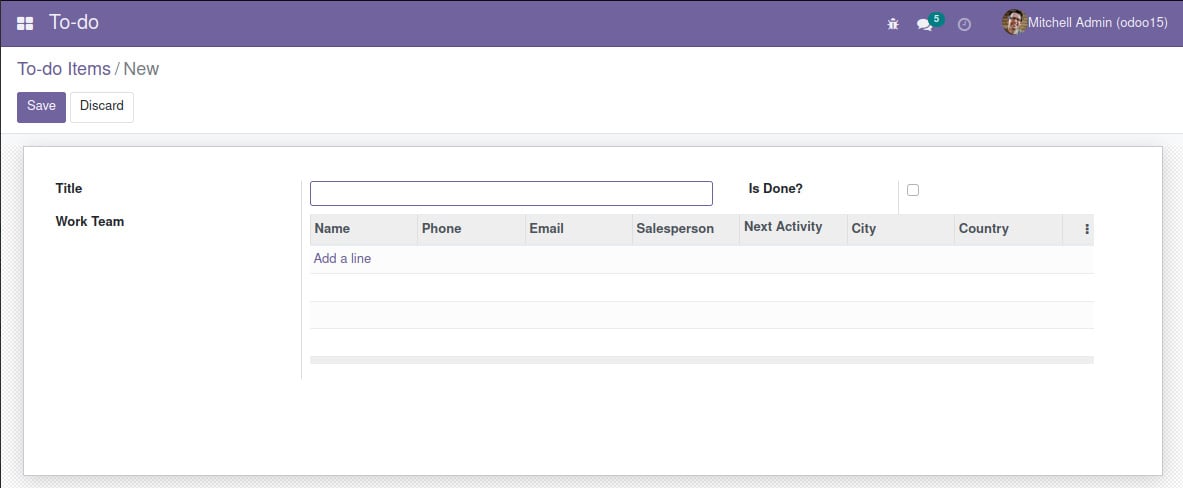
Figure 1.18 – The To-do Items default form view
Security record rules
When given access to a model, users will be able to access all of its records by default. But in some cases, we need to restrict what records each user can access. This can be done using record rules.
Record rules set domain filters on models that will be enforced when read or write operations are made on them.
For example, in our to-do list app, the to-do items are expected to be private to each user, so we want each user to only see their own items. So, we should create a record rule with a filter to show only the records created by the current user, taking the following into consideration:
- Records have a
create_uidfield – which is automatically added by the framework – that stores the user that created the record. So, we can use it to know who owns each record. - The domain evaluation context includes a
uservariable that contains a browser record for the current user. So, we can use dot notation on it to access its attributes, such as theuser.idvalue.
We can use this in a domain expression to achieve our goal:
[('create_uid', '=', user.id)]
Record rules are available in the Settings | Technical | Security | Record Rules menu, or in the View Record Rules option in the developer menu. Navigate there and create a new record rule with the following values:
- Name: Enter a descriptive title such as
To-do User Own Items. - Model: Select the model from the drop-down list (in our case, To-do Item).
- Access Rights: These checkboxes control the actions where the rule will be applied. Keep all of them checked.
- Rule Definition (Domain Filter): Enter
[('create_uid', '=', user.id)]. - Groups: This section contains the security groups the rule will apply to. Click Add a line and select the To-do User group option.
Now, this is what the record rules definition will look like:
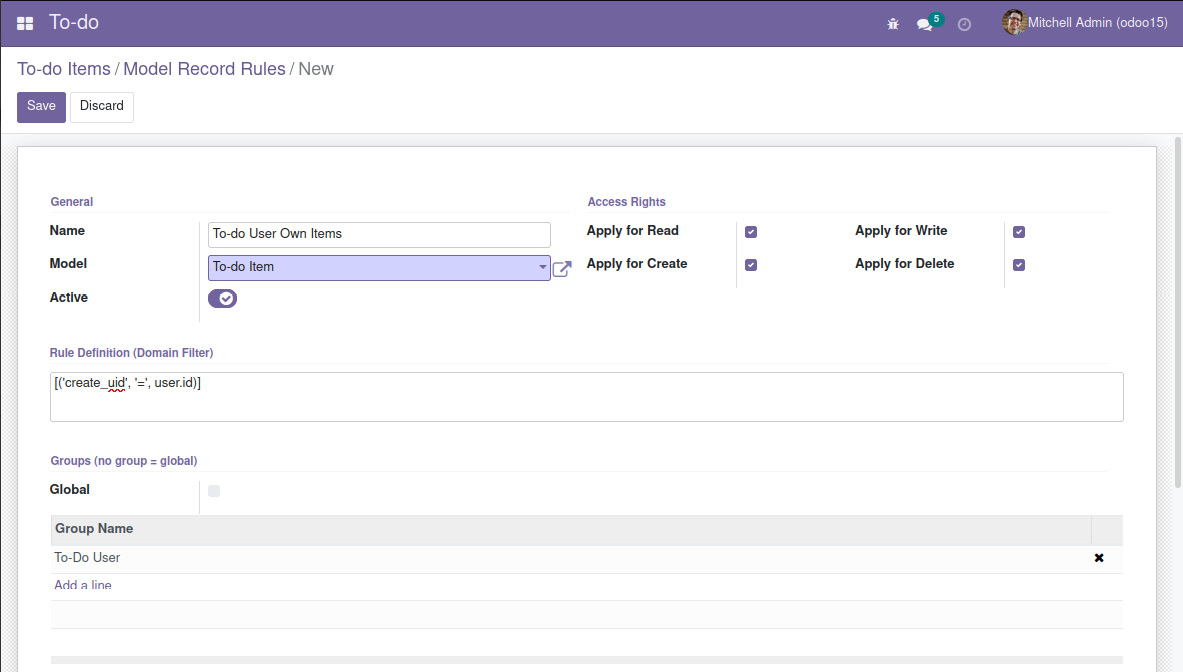
Figure 1.19 – The To-do User Own Items record rule
And we're done. You can now try this new rule by creating a couple of to-do items with both the Admin and Demo users. Each should be able to see only their own items.
Understanding the superuser account
Odoo includes an internal root-like superuser that has special privileges and bypasses security controls. It is used for internal operations or actions that need to ignore security controls. This superuser is named OdooBot – it is automatically created upon database creation and has the database ID 1.
Changes in Odoo 12
Before Odoo 12, the default admin user used for system setups was also the superuser. So, the admin user bypassed access controls by default. This is no longer the case since Odoo 12. Now, the default admin user is a regular user, but it is set as the manager on all Odoo apps by default.
The superuser has no login password, but it is possible to enable one. When logged in as a user with the Admin \ Setting group, the Become Superuser option is then available in the developer menu.
It is also possible to go directly into superuser mode from the login screen. For this, you need to enable the developer mode by editing the URL to add ?debug=1 (for example, http://localhost:8069/web/login?debug=1). Then, the Login as superuser option will be available below the Login button.
When the superuser is enabled, in the upper-right corner, the current user is shown as OdooBot, and the colors in the upper-right area change to yellow and black stripes to make it clear the superuser is enabled.
Caution
Using the superuser should be done only if absolutely necessary. The fact that the superuser bypasses access security can lead to data inconsistencies – for example, in a multi-company context – and should be avoided.


