Reader small image

You're reading from  BeagleBone Home Automation Blueprints

Product typeBook
Published inFeb 2016
Publisher
ISBN-139781783986026
Edition1st Edition
Right arrow
Author (1)
Rodolfo Giometti
Rodolfo Giometti
author image
Rodolfo Giometti

Rodolfo Giometti is an engineer, IT specialist, GNU/Linux expert and software libre evangelist. He is the author of the books BeagleBone Essentials, BeagleBone Home Automation Blueprints and GNU/Linux Rapid Embedded Programming by Packt Publishing and maintainer of the LinuxPPS projects. He still actively contributes to the Linux source code with several patches and new device drivers for industrial applications devices. During his 20+ years of experience, he has worked on the x86, ARM, MIPS, and PowerPC-based platforms. Now, he is the co-chief at HCE Engineering S.r.l., where he designs new hardware and software systems for the quick prototyping in industry environment, control automation, and remote monitoring.
Read more about Rodolfo Giometti

Right arrow

Chapter 2. Ultrasonic Parking Assistant

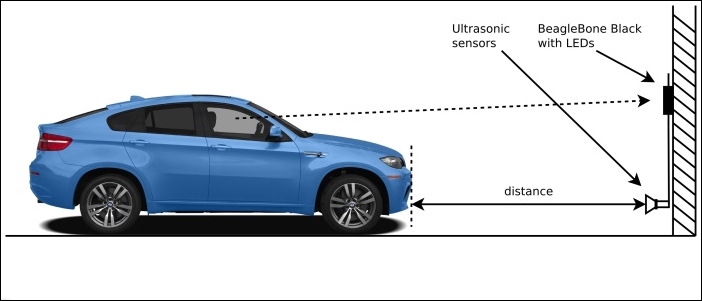
In this chapter, we'll learn how to use the BeagleBone Black to implement a park assistant. We're going to use an ultrasonic sensor to detect the distance between our car and the garage wall, and some LEDs to give a feedback of the car position to the driver in order to avoid collisions.

We'll see how to set up the ultrasonic range sensor in two different manners, using different interfaces to get the data in order to resolve a problem in two different ways and obtain two different system configurations.

The basic of functioning


The project is really simple, even if it needs some electronic skills in order to manage the sensor output. Basically, our BeagleBone Black just needs to periodically poll the ultrasonic sensor output and then turn on the LEDs according to the distance from the wall: as level indicator lower is the distance and more LEDs are turned on.

Setting up the hardware


As just stated, in this project we're trying to implement two different setups: the first one uses the analog output of the ultrasonic sensor and implements a circuitry, where all the devices are directly connected with the BeagleBone Black (all peripherals are near the board); on the other hand, the second setup allows us to remotely manage the ultrasonic sensor by using an USB connection, so we can mount the sensor far from the BeagleBone Black board.

Simply speaking, we can put the sensor in one place while the LEDs are in a different location, maybe in a more visible position, as shown in the following image:

As you can see, the dotted arrow, which represents the driver's point of view, is more clear if the LEDs are in a upper position with respect to the distance sensor that should be located near to the floor to better catch the car frontal.

First setup – all devices near the BeagleBone Black

In this setup, we're going to use an ADC pin of our BeagleBone Black...

Setting up the software


In this project, the software is really simple, since we just need a procedure that periodically reads the distance and then turn on and off the LEDs accordingly; however, some issues must be pointed out, especially about how to manage the LEDs and the differences between the two setups of the ultrasonic sensor.

Managing the LEDs

Despite of what was presented in the previous chapter about the GPIO's management, it's important to point out that the Linux kernel has several kinds of devices, each one dedicated to a well-defined usage, and one of these special devices are the led devices, which is a particular type of devices that can be used to manage an LED with different triggers. A trigger is a sort of manager of the LED that can be programmed to work in a specific manner. Ok, it's better doing an example instead of trying to explain it!

First of all, we have to define the led devices by using a dedicated device tree as reported in the chapter_02/BB-LEDS-C2-00A0.dts...

The distance monitor


Now it's time to see how our park assistant can work in practice. A possible implementation of the code is reported in the chapter_02/distance_mon.sh script in the book's example code repository. The following code snippet shows the main code:

# Ok, do the job
while sleep .1 ; do
   # Read the current distance from the sensor
   d=$($d_fun)
   dbg "d=$d"

   # Manage the LEDs
   leds_man $d
done

The functioning is simple—the code periodically reads the distance from the sensor by using the function pointed by the d_fun variable, and then turns the LEDs on and off, according to the value of the distance d (in cm) by using the leds_man function.

The d_fun variable holds the name of the function that should read the distance by using the ADC, that is, read_adc, or the name of the function that uses the serial port, that is, read_tty. The following are the two functions:

function read_adc () {
   n=$(cat $ADC_DEV)

   d=$(bc -l <<< "$k * 3.3 * $n/4095 / 0.00161")
 ...

Final test


To test the prototype, we must first select one setup and perform the needed connections, as stated before. Then we have to turn on the board.

After the login, we must setup the system by using the commands discussed before, or simply by using the chapter_02/SYSINIT.sh command in the book's example code repository. Then, we must execute the distance_mon.sh command accordingly.

Note

Note that looking into the SYSINIT.sh file, you can read:

# Uncomment the following in case of buggy kernel in USB host management
# cat /dev/bus/usb/001/001 > /dev/null ; sleep 1

This is if after plugging in the USB cable, you get an error in recognizing the /dev/ttyUSB0 device.

To test my prototype using the first setup, I used the following command:

root@beaglebone:~# ./distance_mon.sh -d -k 1.38 adc
distance_mon.sh: d_fun=read_adc k=1.38
distance_mon.sh: d=176
distance_mon.sh: d=175
...

On the other hand, to test the second one, I...

Summary


In this chapter, we discovered how to manage an ultrasonic sensor in two different manners, by using an ADC and by a serial connection over a USB cable, in order to have two different setups of the same device: one with all peripherals on the BeagleBone Black and one where a sensor is remotized by using a USB connection.

Also, we learned how to manage Linux's LED devices that allow us to have different usage of a simple GPIO line by kernel features.

In the next chapter, we'll see how to realize an aquarium monitor in which we'll be able to record all the environment data, and then we'll see how to control the life of our be loved fishes from a web panel.

lock icon
The rest of the chapter is locked
You have been reading a chapter from
BeagleBone Home Automation Blueprints
Published in: Feb 2016Publisher: ISBN-13: 9781783986026
Register for a free Packt account to unlock a world of extra content!
A free Packt account unlocks extra newsletters, articles, discounted offers, and much more. Start advancing your knowledge today.
undefined
Unlock this book and the full library FREE for 7 days
Get unlimited access to 7000+ expert-authored eBooks and videos courses covering every tech area you can think of
Renews at €14.99/month. Cancel anytime

Author (1)

author image
Rodolfo Giometti

Rodolfo Giometti is an engineer, IT specialist, GNU/Linux expert and software libre evangelist. He is the author of the books BeagleBone Essentials, BeagleBone Home Automation Blueprints and GNU/Linux Rapid Embedded Programming by Packt Publishing and maintainer of the LinuxPPS projects. He still actively contributes to the Linux source code with several patches and new device drivers for industrial applications devices. During his 20+ years of experience, he has worked on the x86, ARM, MIPS, and PowerPC-based platforms. Now, he is the co-chief at HCE Engineering S.r.l., where he designs new hardware and software systems for the quick prototyping in industry environment, control automation, and remote monitoring.
Read more about Rodolfo Giometti