Many methods exist for adding custom code throughout the document. Interactive
Reporting provides the flexibility to manipulate data and build custom applications
through using a JavaScript programming language throughout all sections of the
document except the Query section, where custom fields are defined using database
specific SQL.
JavaScript is commonly used in two ways within the document, including - building
computations in presentation sections and building logic to force specific
behaviours across the document or on a dashboard. When building computations in
sections, JavaScript and native functions are used in Computed Items to modify and
enhance a set of results. When driving behaviour across the documents or adding
interactivity, JavaScript code is used in the Document Scripts or on a Dashboard
section. In either approach, Interactive Reporting provides significant flexibility
and interactivity to model and solve complex business problems.
Query section Computed Items
Many users require the ability to provide further analysis on data returned
from a query. Computed Items can be added to a query to create custom Request
line items, which allow the user to modify and enhance the data elements in the
data model.
Building Computed Items in the Query section is very different than building
Computed Items throughout the rest of the document. The syntax for building
Computed Items in the Query section is database specific SQL, while Computed
Items throughout the rest of Interactive Reporting are created using JavaScript.
The differentiation in syntax is based on the design of the product, where the
Query section is the only section that builds a query string that is passed to
the database. The rest of the sections in an Interactive Reporting document
contain and display data that has already been returned from a data
source.
The syntax of the Computed Item in a query is included as a column in the
query string that is passed to the database. The following steps are methods to
add Computed Items to the Request line:
Upon adding the Computed Item to a query, a window opens as shown in the
following screenshot:
The logic for the blank Computed Item can be typed directly into the Computed
Item Definition box of the Properties window that appears. The Functions and
Reference buttons are included to aid the user in creating the
Computed Item definition by providing a selection option for referencing column
names and a list of predefined functions. The
Options button is used to set the
Datatype of the column, which is important in order to accurately
represent the data returned from the query for the column.
Note
In each Query Element, the Table or Topic name must be added as a
qualifier in front of the column name, that is,
Table_Name.Column_Name. This syntax is similar to qualifying a
database table with the table owner, where Interactive Reporting treats the
Table or Topic as the owner of the table.
Since the table needs to be qualified (referenced by table name), users
commonly add items to the Request line and then edit the item properties by
double-clicking on the item to view the
Properties of the item. By adding an item to the Request line
before editing, the item definition is populated in the
Definition section of the
Properties window. Upon the completion of editing the Computed
Item, the item is added to the Request line with the
Name specified after pressing
OK.
Note
Before completing the custom column definition, it is important to review
and adjust the Datatype of the column using the Options of the item. For
example, converting a Date field to a string requires the Data type of the
column to be set to a string to avoid incorrectly formatted data after
processing.
The following are examples of simple Query section Computed Items with Oracle
as a data source:
Concatenation: Products.Prod_Name||'
'||Products.Prod_Desc
String Manipulation:
SUBSTR(Customers.Cust_Postal_Code,1,5)
Value Replacement: NVL(Promotions.Promo_Name, 'No Product
Name').
Date/Time Functions:
TO_DATE('2009-02-01','YYYY-MM-DD')
When Computed Items are added to the Request line, the Computed Item element
will display at the end of the list of all of the elements in the Request line.
Upon processing, the computed column will appear in the data results in the
order of the columns in the Request line (if this is the first time the query is
processed) or the field will be added at the end of the data results (if the
query was previously processed). Computed Items are not differentiated in
appearance from any other element in the query, where the Computed Item elements
appear similar to the elements mapped from topics or tables. However, any
Computed Item or data element containing a function will display with the
function notation surrounding the data element name in the Request line. For
example, adding a SUM function to a data element in the Query section will
display the function name, as shown in the following screenshot:
Results section Computed Items
Computed Items are added to the Results section to modify contents and add
calculations to data returned from a query. Since the results set is data that
has already been processed, the Computed Items in the Results section are based
on data stored in the document. While the syntax used in Computed Items in the
Query section is the SQL syntax of the database, the syntax used in the Results
section to create custom computations is JavaScript. The following steps are
methods to add a Computed Item to the Results section:
Once the Add Computed Item menu item has
been selected, the Computed Item window
appears, as shown in the following figure:
The Name box is for specifying the name of
the Computed Item. The Definition text box is
used for entering the logic for the Computed Item.
Note
It is important to note that the column names are case sensitive. It is
also important to note that columns with a space in the column name must
contain underscores instead of spaces when referenced in Computed Items
(that is, Day of Week is referenced as Day_of_Week in the definition window)
and special characters are also replaced with underscores. If adding
computations to a column with a special character, it is helpful to use the
Reference feature to select the column.
The buttons below the Definition text box
are the different logic conditions and operators that can be used in the
Computed Item definition. These different conditions and operators can be typed
into the Definition box by the user or the
buttons on the screen can be used to populate the definition window with the
desired content. The buttons to the right of the text box are similar to the
buttons in the Query section, where predefined
Functions can be used to transform data elements in the section.
These predefined functions are specific to Interactive Reporting and provide the
ability to manipulate string, date, and text data. The
Reference button provides the ability to accurately reference
data elements in the section without the need to type in the name of the column.
The Options button is used to set
the Datatype of the column, which is
important in order to accurately represent the column of data after the
computation.
Upon the completion of editing the Computed Item, the item is added to the
Results section with the Name specified after
pressing OK. The column is added to the
end of the Results section and is displayed in the Data Layout window in blue
text and in italics. The column can be moved around to the desired location in
the Results section, and the column can be easily modified by following one of
the two steps:
The following are a few simple examples of Results section computed
items:
Concatenation: Products.Prod_Name+"
"+Products.Prod_Desc
String Manipulation:
Substr(Customers.Cust_Postal_Code,1,5)
Conditional Functions: Nvl(Promotions.Promo_Name, 'No
Product TTarName')
The examples provided are used to demonstrate simple programming operations
that can be performed in the Results section. Future chapters of this book will
discuss the different programming functionality and advanced operations that can
be added to Computed Items.
Table section Computed Items
Computed Items in a Table section are very similar to Computed Items in the
Results section. However, the main difference between the Table section and the
Results section is the ability to add multiple Table sections to a set of
results. The ability to add multiple Table sections to a set of results allows
the user to split Computed Items between the Tables and allows the user to
filter on a Computed Item that is created in a parent Results or Table section
leveraging the Prior, Next, Cume or any other
aggregating function.
Note
Filters cannot be placed on an aggregating function in the section it was
created.
The following steps are methods to add a Computed Item to the Table
section:
Once the Add Computed Item menu item has
been selected, the Computed Item window
appears, as shown in the following figure:
The functionality of the Computed Item box
is identical to the features provided in the Results Computed Item section and
no additional functionality exists that is different from the Results
section.
Pivot section Computed Items
Computed Items are common operations performed in the Pivot section, where
calculations are easily performed on aggregated sets of data. While items
are added to the Row and Column Labels, the Pivot section only provides
the ability to add a Computed Item to the pivot
Facts. While computations can be completed in the Results
section, it is more effective to compute percentages and other division
based calculations in the Pivot than the Results or Table sections to
accurately calculate totals. A Computed Item is added to a Pivot section by
following one of the two steps:
The syntax for a Computed Item is the same as that found in the Results
and Table sections and the Computed Item is highlighted in italics in
the Facts section of the Data Layout.
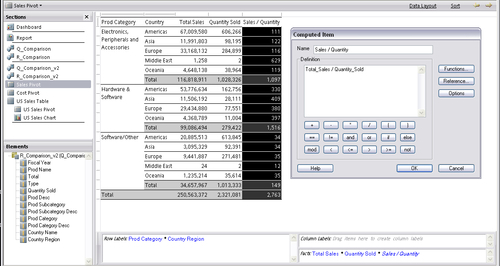
In the next example, a Computed Item has been created to show Total Sales over
Quantity Sold:
Notice the computation of the values in the
Total lines. Currently the
Total lines show the sum of the values displayed in the pivot
and not the division of the Total Sales
value by the Quantity Sold total
value.
Pivot Settings: True Totals and Surface Values
The Pivot section provides the flexibility of calculating the Computed
Items and total lines of the document by either the computation of the
values shown on the screen or by the values contained in the data results.
The settings can be easily configured in the Pivot
Options menu, where the Use Surface
Values or True Computed Item
Totals options checkboxes can be toggled.
When the True Computed Item Totals
option is selected, the pivot total lines will be calculated by totaling the
individual values of the columns that make up the total instead of
performing the computation operation on the total column.
When the Surface Values option is
selected, the pivot calculates the Computed Item from values displayed on
the pivot instead of the values in the parent Results or Table section for
all columns. The Surface Values setting is necessary when adding one or more
Computed Items together in the pivot where the values in the pivot must be
used in the calculation.
Editing Pivot Computed Items
Similar to the Results and Table sections, the Computed Item can be
modified by one of the following two steps:
Chart section Computed Items
Computed Items can be leveraged in a Chart to display constants or other
variations of data elements not contained in the data results. Computed
Items are added to a Chart by one of the following two steps:
The syntax for Computed Items in a Chart section is the same as found in
the Results and Table sections, where the Computed Item is highlighted in
italics in the Facts section of the Data Layout.
Note
Computed Items cannot be used in the Scatter or Bubble charts.
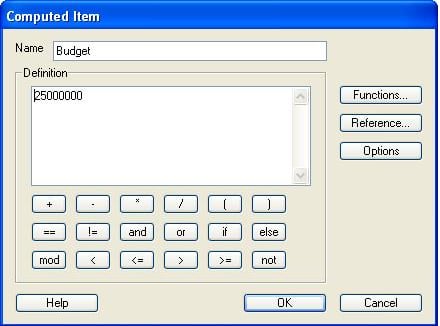
The chart in the following screenshot is a Bar Line chart, with a Computed
Item set to a line and configured to use the scale on the left axis:
In this example, the Computed Item,
Budget, is set to a constant value to display a threshold.
The following screenshot displays the syntax used to complete the Computed
Item. More advanced logic can be used as desired:
Computed Items in the Chart section are easily modified by one of the two
following steps:
Report section Computed Items
The Report section provides the ability to add two types of computations
in a report, where computations can be performed in
Field expressions as well as in the
Facts of Report Tables. Computed Items are added to Report
Tables through one of the two following methods:
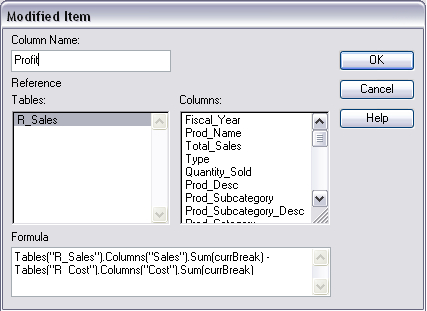
When a Computed Item is added, the Computed Item window appears as shown
in the following screenshot:
The text box at the top of the window is for adding the desired name for
the column. Below the Column Name field
is the configuration for selecting a field from a table. At the bottom of
the window is the Formula section for
adding the logic to the Computed Item. The following screenshot shows an
example of a Computed Item leveraging fields from two Table
sections:
Notice the difference in logic between the Report section Computed Items
and the logic for the other Computed Items in the document. Since the Report
section Computed Items can reference data from more than one section in the
document, Report section Computed Items require a reference back to the
section where the data element is contained. Additionally, a data function
is referenced at the end of each Computed Item. The function and the
term currBreak are added because the
Report sections contain grouping that can enforce different levels of
aggregation. Each item in a Report section is aggregated based on the area
that is placed in a report, whether it is added to the Body, Header, Footer, or one of the Report Groups. The
currBreak defines the aggregation to apply, where variations
of the currBreak logic can be utilized to
modify the aggregation performed.
In addition to editing Computed Items using the Computed Item window, the
Expression line in the Report section is also used to edit Computed Items as
well as Field items. The Expression line
is a feature that is specific to the Report section and logic is displayed
in the Expression line when an item is clicked by the user in a
report.
Each Interactive Reporting document contains the ability to have a predefined
set of steps occur when the document opens, before the document closes, before
processing, after processing, and upon update of session values. These document
level actions are referred to as Document
Scripts in Interactive Reporting.
Document Scripts are added to the document by clicking on the File menu and selecting the Document Scripts menu item. Upon selecting the Document Scripts
item, the scripting interface window called the Script Editor is displayed for
adding the logic for the Document Scripts. Chapter
5, Building the Dashboard Framework section,
provides details on configuring Document Scripts to support dashboards and
global operations.
The term dashboard is typically used to describe an
executive-level report displaying key business indicators in an effort to
capture the health of a business at a point in time. The Dashboard section in
Interactive Reporting provides users with the ability to create simple to
complex dashboards, as well as the flexibility to add controls and custom
JavaScript programming to add interactivity or to create a custom
interfaces.
 Argentina
 Australia
 Austria
 Belgium
 Brazil
 Bulgaria
 Canada
 Chile
Chile
 Colombia
 Cyprus
 Czechia
 Denmark
 Ecuador
 Egypt
Egypt
 Estonia
 Finland
 France
 Germany
 Great Britain
 Greece
 Hungary
 India
India
 Indonesia
 Ireland
 Italy
Italy
 Japan
Japan
 Latvia
 Lithuania
 Luxembourg
 Malaysia
 Malta
Malta
 Mexico
 Netherlands
 New Zealand
 Norway
 Philippines
 Poland
 Portugal
 Romania
 Russia
 Singapore
 Slovakia
 Slovenia
 South Africa
 South Korea
 Spain
Spain
 Sweden
 Switzerland
 Taiwan
 Thailand
 Turkey
 Ukraine
 United States