Mastering Linux Security and Hardening - Third Edition
Running Linux in a Virtual Environment
So, you may be asking yourself: Why do I need to study Linux security? Isn’t Linux already secure? After all, it’s not Windows. But the fact is, there are many reasons.
It’s true that Linux has certain advantages over Windows when it comes to security. These include the following:
Unlike Windows, Linux was designed from the ground up as a multiuser operating system. So, user security tends to be a bit better on a Linux system.
Linux offers a better separation between administrative users and unprivileged users. This makes it a bit harder for intruders, and it also makes it a bit harder for a user to accidentally infect a Linux machine with something nasty.
Linux is much more resistant to viruses and malware infections than Windows is. Certain Linux distributions come with built-in mechanisms, such as SELinux in Red Hat and its free-of-charge clones, and AppArmor in Ubuntu and SUSE, that help prevent intruders from taking control of a system.
Linux is free and open source software. This allows anyone who has the skill to audit Linux code to hunt for bugs or backdoors.
But even with those advantages, Linux is just like everything else that’s been created by mankind. That is, it isn’t perfect.
Here are the topics that we’ll cover in this chapter:
Looking at the threat landscape
Why every Linux administrator needs to learn about Linux security
A bit about the threat landscape, with some examples of how attackers have, at times, been able to breach Linux systems
Resources for keeping up with IT security news
Differences between physical, virtual, and cloud setups
Setting up Ubuntu Server and Red Hat-type virtual machines with VirtualBox, and installing the Extra Packages for Enterprise Linux (EPEL) repository in the Red Hat-type virtual machines
Creating virtual machine snapshots
Installing Cygwin on a Windows host so that Windows users can connect to a virtual machine from their Windows hosts
Using the Windows 10/11 Bash shell to access Linux systems
How to keep your Linux systems updated
Let’s begin by talking about threats.
Looking at the threat landscape
If you’ve kept up with IT technology news over the past few years, you’ll likely have seen at least a few articles about how attackers have compromised Linux servers. For example, while it’s true that Linux isn’t really susceptible to virus infections, there have been several cases where attackers have planted other types of malware on Linux servers. Here are some examples:
Botnet malware: This causes a server to join a botnet that is controlled by a remote attacker. One of the more famous cases involved joining Linux servers to a botnet that launched denial-of-service (DoS) attacks against other networks.
Ransomware: This is designed to encrypt user data until the server owner pays a ransom fee. But even after paying the fee, there’s no guarantee that the data can be recovered.
Cryptocoin mining software: This causes the CPUs of the server on which it’s planted to work extra hard and consume more energy. Cryptocoins that get mined go to the accounts of the attackers who planted the software.
And, of course, there have been plenty of breaches that don’t involve malware, such as where attackers have found a way to steal user credentials, credit card data, or other sensitive information.
Some security breaches come about because of plain carelessness. Here’s an example of where a careless Adobe administrator placed the company’s private security key on a public security blog: https://arstechnica.com/information-technology/2017/09/in-spectacular-fail-adobe-security-team-posts-private-pgp-key-on-blog/.
Now, let’s talk a bit more about security breaches.
Why do security breaches happen?
Regardless of whether you’re running Linux, Windows, or whatever else, the reasons for security breaches are usually the same. They could be security bugs in the operating system or security bugs in an application that’s running on that operating system. Often, a bug-related security breach could have been prevented had the administrators applied security updates in a timely manner.
Another big issue is poorly configured servers. A standard, out-of-the-box configuration of a Linux server is actually quite insecure and can cause a whole ton of problems. One cause of poorly configured servers is simply the lack of properly trained personnel to securely administer Linux servers. (Of course, that’s great news for the readers of this book, because—trust me—there’s no lack of well-paying IT security jobs.)
And now, in addition to Linux on servers and desktops, we have Linux on devices that are part of the Internet of Things (IoT). There have been many security problems with these devices, in large part because people just don’t know how to configure them securely.
As we journey through this book, we’ll see how to do business the right way, to make our servers as secure as possible. One thing we can do is to keep up with security-related news.
Keeping up with security news
If you’re in the IT business, even if you’re not a security administrator, you’ll want to keep up with the latest security news. In the age of the Internet, that’s easy to do.
First, there are quite a few websites that specialize in network security news. Examples include Packet Storm Security and The Hacker News. Regular tech news sites and Linux news websites, such as Ars Technica, Fudzilla, The Register, ZDNet, and LXer, also carry reports about network security breaches. And, if you’d rather watch videos than read, you’ll find plenty of good YouTube channels, such as BeginLinux Guru.
Finally, regardless of which Linux distro you’re using, be sure to keep up with the news and current documentation for your Linux distro. Distro maintainers should have a way of letting you know if a security problem crops up in their products.
Here are some links to some good security-related websites:
(Full disclosure: I am the world-famous BeginLinux Guru.)
One thing to always remember as you go through this book is that the only operating system you’ll ever see that’s totally 100% secure will be installed on a computer that never gets turned on.
Differences between physical, virtual, and cloud setups
So you can do the hands-on labs, I’ll introduce you to the concept of virtual machines. This is just a way of running one operating system within another operating system. So, it doesn’t matter whether you’re running Windows, macOS, or Linux on your host machine. In any case, you can run a Linux virtual machine that you can use for practice, and that you won’t have to worry about if it gets trashed.
Oracle’s VirtualBox, which is what we’ll be using, is great for what we’ll be doing. In an enterprise setting, you’ll find other forms of virtualization software that are better suited for use in data centers. In the past, server hardware could only handle doing one thing at a time, which meant that you had to have one server running DNS, another running DHCP, and so on. Nowadays, we have servers with gobs of memory, gobs of drive space, and CPUs with as many as 96 cores each. So, it’s now cheaper and more convenient to install multiple virtual machines on each server, with each virtual machine doing its own specific job. This also means that you not only have to worry about security on the physical server that hosts these virtual machines but you also need to worry about the security of each virtual machine. An added problem is that you need to ensure that the virtual machines remain properly isolated from each other, especially ones that contain sensitive data.
And then, there’s the cloud. Many different outfits provide cloud services, where a person or a company can spin up an instance of either Windows or their choice of a Linux distro. When setting up a Linux distro on a cloud service, there are things that you’ll have to do right away to enhance security. (That’s something that we’ll cover in Chapter 7, SSH Hardening.) And realize that when you set up a server on a cloud service, you’ll always have more concerns about proper security, because it will have an interface that connects to the wild and woolly Internet. (Your on-premises servers, except for ones that are meant to serve the public, are usually isolated from the Internet.)
With our introductory material out of the way, let’s get to the real meat of the matter, starting with an introduction to our virtualization software.
Introducing VirtualBox and Cygwin
Whenever I write or teach, I try very hard not to provide students with a cure for insomnia. Throughout this book, you’ll see a bit of theory whenever it’s necessary, but I mainly like to provide good, practical information. There will also be plenty of step-by-step hands-on labs and an occasional bit of humor.
The best way to do the labs is to use Linux virtual machines. Most of what we’ll do can apply to any Linux distro, but we will also do some things that are specific to either Red Hat Enterprise Linux (RHEL) or Ubuntu Linux. (RHEL is the most popular for enterprise use, while Ubuntu is the most popular for cloud deployments.) SUSE is the third big enterprise Linux distro. We won’t be doing too much with SUSE, but on occasion, I’ll point out some of its little quirks.
Red Hat is a billion-dollar company, so there’s no doubt about where they stand in the Linux market. But since Ubuntu Server is free of charge, we can’t judge its popularity strictly on the basis of its parent company’s worth. The reality is that Ubuntu Server is the most widely used Linux distribution for deploying cloud-based applications.
See here for details: http://www.zdnet.com/article/ubuntu-linux-continues-to-dominate-openstack-and-other-clouds/.
Since Red Hat is a fee-based product, we’ll substitute CentOS 7, AlmaLinux8, and AlmaLinux9, which are built from Red Hat source code and are free of charge. (We’re using all three of these distros because there are some differences between them, and all of them will be supported for quite some time to come.) CentOS and AlmaLinux offer various download images. You’ll want to download the DVD images, because they contain necessary things that are missing from the minimal images. Specifically, download these image files:
CentOS 7: CentOS-7-x86_64-DVD-2009.iso
AlmaLinux 8: AlmaLinux-8-latest-x86_64-dvd.iso
AlmaLinux 9: AlmaLinux-9-latest-x86_64-dvd.iso
For Ubuntu, we’ll concentrate on version 22.04, since it’s the newest Long Term Support (LTS) version. (We’ll also take an occasional look at Ubuntu 20.04, since it’s still supported and there are a few differences between it and 22.04.) A new LTS version of Ubuntu comes out in April of every even-numbered year, and non-LTS versions come out in April of every odd-numbered year and every October. For production use, you’ll mainly want to stick with the LTS versions, because the non-LTS versions can sometimes be a bit problematic.
There are several different virtualization platforms that you can use, but my own preferred choice is VirtualBox.
VirtualBox is available for Windows, Linux, and Mac hosts, and is free of charge for all of them. (It’s also available for Solaris hosts, but I doubt that many of you will be running that.) It has features that you have to pay for on other platforms, such as the ability to create snapshots of virtual machines.
Some of the labs that we’ll be doing will require you to simulate creating a connection from your host machine to a remote Linux server. If your host machine is either a Linux or a Mac machine, you’ll just be able to open the terminal and use the built-in Secure Shell (SSH) tools. If your host machine is running Windows, you’ll need to install some sort of Bash shell, such as Cygwin, or just use the Bash shell that’s built into Windows 10/11 Pro.
Installing a virtual machine in VirtualBox
For those of you who’ve never used VirtualBox, here’s a quick guide to get you going:
Download and install VirtualBox and the VirtualBox Extension Pack. You can get them from https://www.virtualbox.org/.
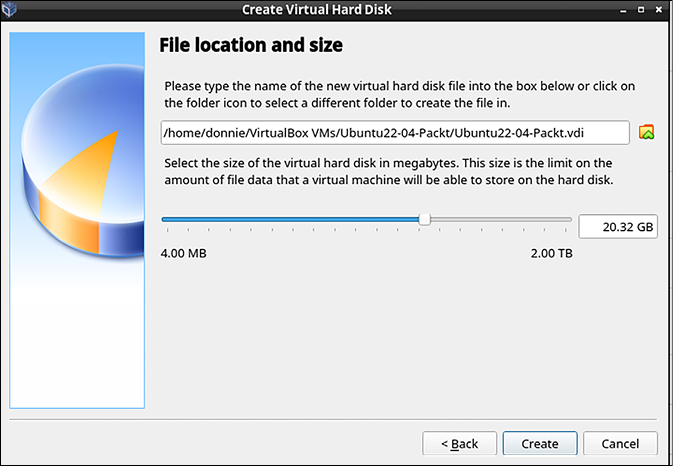
Start VirtualBox and click the New icon at the top of the screen. Fill out the information where requested. Increase the virtual drive size to 20 GB, but leave everything else as the default settings, as shown here:
Figure 1.1:Create the virtual drive
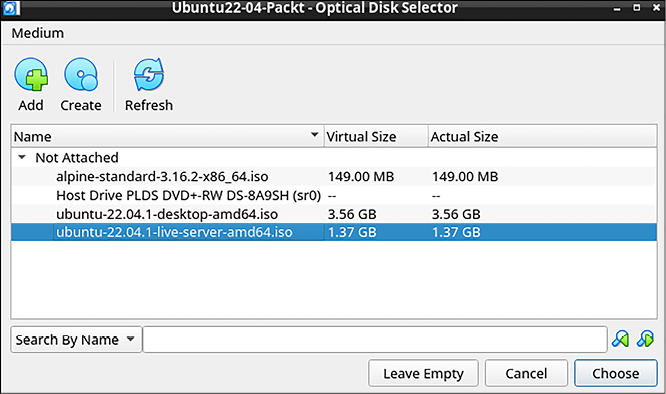
Start the new virtual machine. Click on the folder icon that’s beside the Location dialog box and navigate to the directory where you stored the .iso files that you downloaded. Choose either the Ubuntu ISO file, the CentOS ISO file, or one of the AlmaLinux ISO files, as shown in the following screenshot. (If the ISO file doesn’t show up in the list, click the Add button in the top-left corner to add it.)
Figure 1.2: Choose the .iso file
Click the Start button on the dialog box to start installing the operating system. Note that for Ubuntu Server, you won’t be installing a desktop interface. For the CentOS 7 and AlmaLinux virtual machines, choose to install a Server without a graphical interface. (Later on, we’ll go through at least one exercise that will require a desktop interface for an AlmaLinux machine. You can create a virtual machine with a graphical interface at that time.)
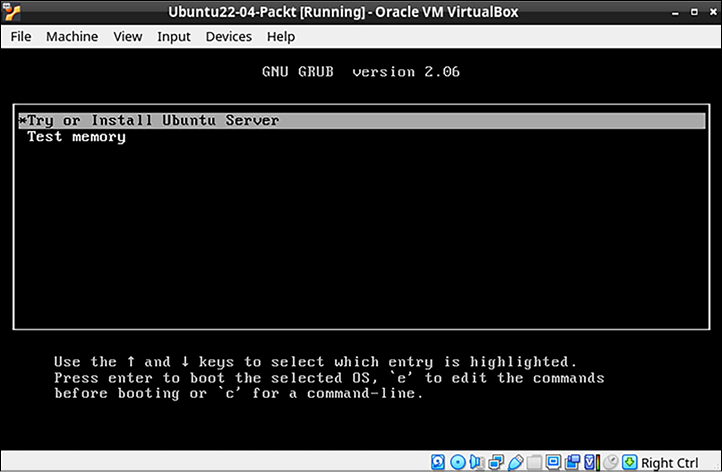
When installing Ubuntu, choose Try or Install Ubuntu Server when you get to this screen:
Figure 1.3: Installing Ubuntu
Repeat the procedure for the other Linux distros.
Update the Ubuntu virtual machine with these two commands:
sudo apt update
sudo apt dist-upgrade
Hold off on updating the CentOS and AlmaLinux virtual machines because we’ll do that in the next exercise.
For Ubuntu, choose to install the OpenSSH Server on the SSH setup screen.
When installing Ubuntu, you’ll be asked to create a normal user account and password for yourself. It won’t ask you to create a root user password, but will instead automatically add you to the sudo group so that you’ll have admin privileges.
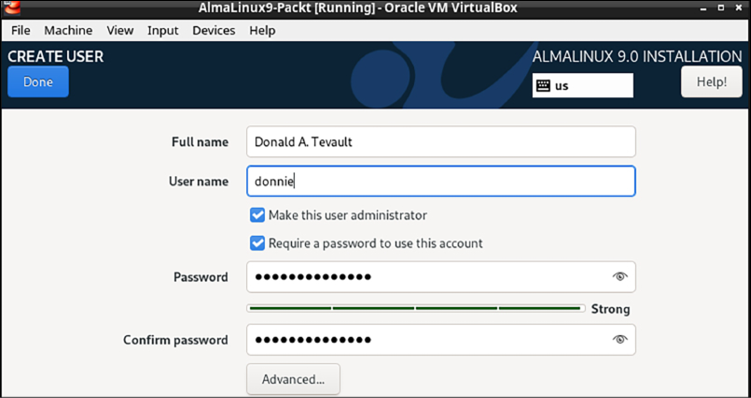
When you get to the user account creation screen of the CentOS or AlmaLinux installer, be sure to check the Make this user administrator box for your own user account, since it isn’t checked by default. It will offer you the chance to create a password for the root user, but that’s entirely optional. (In fact, I never do.)
The user account creation screen of the AlmaLinux 9 installer—which looks the same as the one on CentOS 7 and AlmaLinux 8—is shown here:
Figure 1.4: User creation for AlmaLinux
Important:
RHEL 9.1 and all of its clones were released a few months after I wrote the first draft of this chapter. You might already have noticed that there’s a bug in the 9.1 installer that wasn’t in the 9.0 installer. That is, the option to create a normal user account isn’t visible on the installer screen. I mean, it’s there, but you can’t see it and can’t scroll down to it. To bring it up, just keep hitting the Tab key until you’ve highlighted the option to create the root user password. Then, hit the Tab key once more, and then hit the Enter key. (Of course, there’s always the chance that the problem will get fixed by the time you read this.)
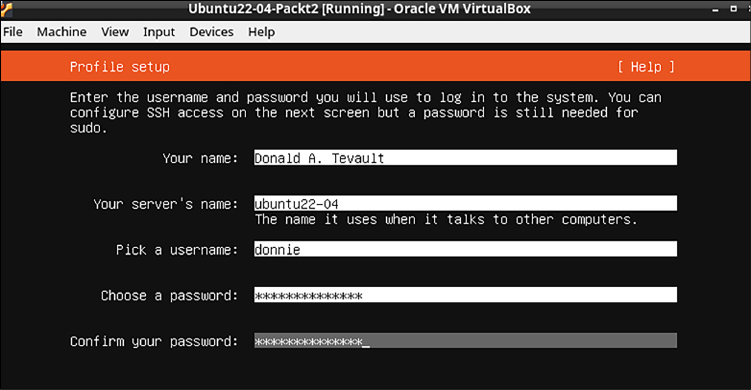
For Ubuntu 22.04, you’ll see just one self-explanatory screen to set up your real name, a username, and a password. The Ubuntu installer will automatically add your user account to the sudo group, which will give you full administrator privileges.
Here’s the user account creation screen for Ubuntu 22.04:
Figure 1.5: Ubuntu user creation
Now, let’s change gears and move on to CentOS 7.
Installing the EPEL repository on the CentOS 7 virtual machine
While the Ubuntu package repositories have pretty much everything that you need for this course, the CentOS and AlmaLinux package repositories are—shall we say—lacking. To have the packages that you’ll need for the CentOS and AlmaLinux hands-on labs, you’ll need to install the EPELrepository. (The EPEL project is run by the Fedora team.) When you install third-party repositories on Red Hat 7 and CentOS 7 systems, you’ll also need to install a priorities package and edit the .repo files to set the proper priorities for each repository. This will prevent packages from the third-party repository from overwriting official Red Hat and CentOS packages if they just happen to have the same name. The following steps will help you install the required packages and edit the .repo files:
The two packages that you’ll need to install EPEL are in the normal CentOS 7 repositories. To install them, just run this command:
When the installation completes, navigate to the /etc/yum.repos.d directory, and open the CentOS-Base.repo file in your favorite text editor. After the last line of the base, updates, and extras sections, add the line priority=1. After the last line of the centosplus section, add the line priority=2. Save the file and close the editor. Each of the sections that you’ve edited should look something like this, except with the appropriate name and priority number:
Open the epel.repo file for editing. After the last line of the epel section, add the line priority=10. After the last line of each remaining section, add the line priority=11.
Update the system and then create a list of the installed and available packages by running the following commands:
sudo yum upgrade
sudo yum list > yum_list.txt
Now, let’s move on to AlmaLinux.
Installing the EPEL repository on the AlmaLinux 8/9 virtual machines
To install the EPEL repository on AlmaLinux, all you have to do is run this command:
sudo dnf install epel-release
There’s no priorities package as there is on CentOS 7 and earlier, so we won’t have to worry about configuring the repository priorities.
When the package installation is complete, update the system and create a list of available software packages with these two commands:
sudo dnf upgrade
sudo dnf list > dnf_list.txt
Next, let’s configure our network.
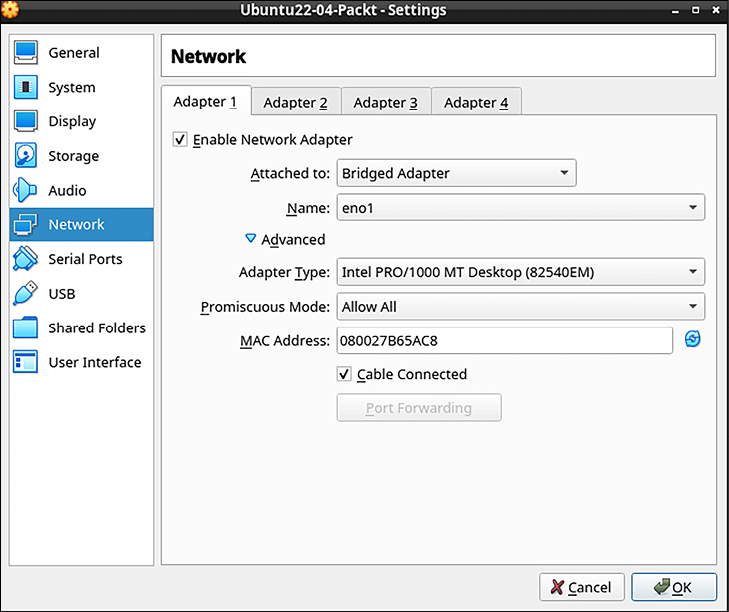
Configuring a network for VirtualBox virtual machines
Some of our training scenarios will require you to simulate creating a connection to a remote server. You would do this by using your host machine to connect to a virtual machine. When you first create a virtual machine on VirtualBox, the networking is set to NAT mode. In order to connect to the virtual machine from the host, you’ll need to set the virtual machine’s network adapter to Bridged Adapter mode. Here’s how you can do this:
Shut down any virtual machines that you’ve already created.
On the VirtualBox Manager screen, open the Settings dialog for a virtual machine.
Click the Network menu item. Change the Attached to setting from NAT to Bridged Adapter, and change the Promiscuous Mode setting to Allow All, as shown in this screenshot:
Figure 1.6: Configuring the network
Restart the virtual machine and set it to use a static IP address.
Tip
If you assign static IP addresses from the high end of your subnet range, it will be easier to prevent conflicts with low-number IP addresses that get handed out from your internet gateway.
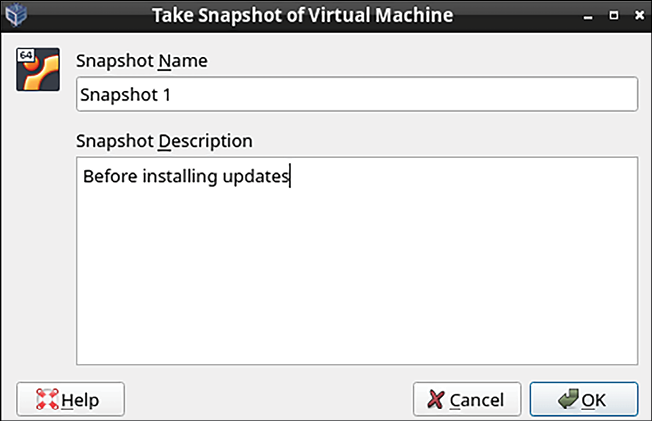
Creating a virtual machine snapshot with VirtualBox
One of the beautiful things about working with virtual machines is that you can create a snapshot and roll back to it if you mess something up. With VirtualBox, that’s easy to do, by following these steps:
From the Machine menu of the VirtualBox Manager screen, select Tools/Snapshots.
Further right on the screen, click on the Take icon to bring up the Snapshot dialog box. Either fill in the desired Snapshot Name or accept the default name. Optionally, you can create a description, as you see in this screenshot:
Figure 1.7: Taking a snapshot
After you’ve made changes to the virtual machine, you can roll back to the snapshot by shutting down the virtual machine, then highlighting the snapshot name, and clicking on the Restore button.
Using Cygwin to connect to your virtual machines
If your host machine is either a Linux or Mac machine, you’ll simply open the host’s terminal and use the tools that are already there to connect to the virtual machine. Windows 10 and Windows 11, even in the base Home Edition, now come with a Secure Shell client that’s built into both the normal Command Prompt and PowerShell, and you can use that if you desire. But if you’d prefer to use something that comes closer to the actual Linux experience, you might consider Cygwin.
Cygwin, a project of the Red Hat company, is a free open source Bash shell that’s built for Windows. It’s free of charge and easy to install.
Installing Cygwin on your Windows host
Here’s a quick how-to to get you going with Cygwin:
In your host machine’s browser, download the appropriate setup*.exe file for your version of Windows from http://www.cygwin.com/.
Double-click on the setup icon to begin the installation. For the most part, just accept the defaults until you get to the package selection screen. (The one exception will be the screen where you select a download mirror.)
At the top of the package selection screen, select Category from the View menu.
Expand the Net category, as shown in the following screenshot:
Figure 1.8: Installing Cygwin packages
Scroll down until you see the openssh package. Under the New column, click on Skip (this causes a version number to appear in place of Skip), as you see in this screenshot:
Figure 1.9: Select the OpenSSH package
After you have selected the proper package, your screen should look like this:
Figure 1.10: After selecting the OpenSSH package
In the bottom right-hand corner, click Next. If a Resolving Dependencies screen pops up, click Next on it as well.
Keep the setup file that you downloaded, because you’ll use it later to either install more software packages or to update Cygwin. (When you open Cygwin, any updated packages will show up on the Pending view on the View menu.)
Once you open Cygwin from the Windows Start menu, you can resize it as you desire, and use either the Ctrl + + or Ctrl + - key combinations to resize the font.
Next, we’ll look at the Windows 10/11 Bash shell.
Using the Windows 10 SSH client to interface with Linux virtual machines
If you’re using Windows 10, you already have an SSH client built into your operating system.
So, let’s see how to do this:
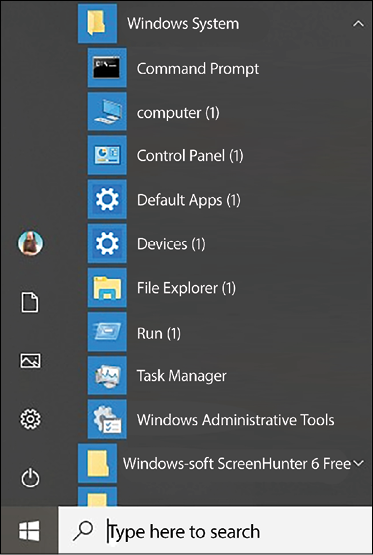
To get to it, you can open the traditional Command Prompt from the Windows System menu, like so:
Figure 1.11: Windows 10 Command Prompt
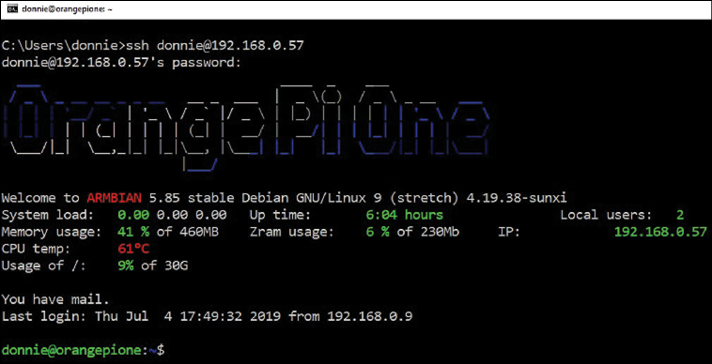
Then, just type in the SSH commands the same as you would from a Mac or Linux machine, like this:
Figure 1.12: SSH remote from Windows Command Prompt
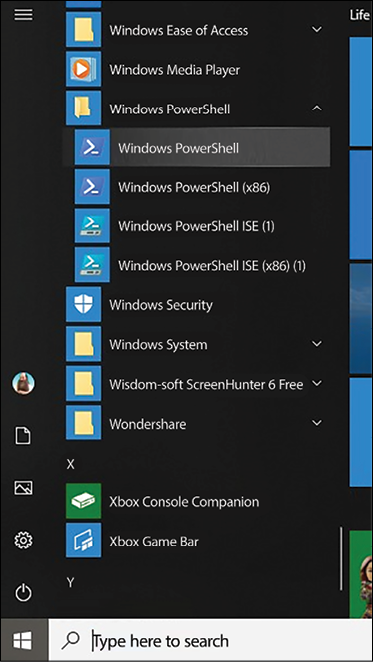
A better option is to use Windows PowerShell instead of the normal Command Prompt. Get to it as you see here:
Figure 1.13: PowerShell command prompt
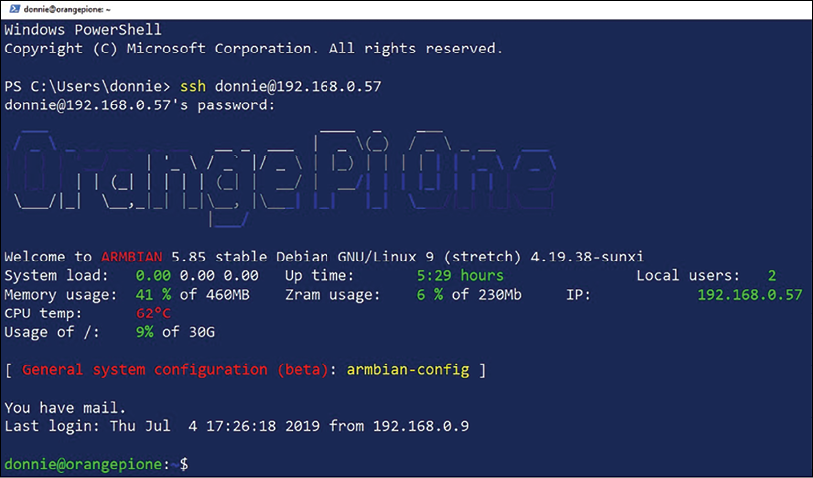
As before, let’s use it to log in to my Orange Pi device, as you see here:
Figure 1.14: Remote login from PowerShell
If you have the choice, go with PowerShell instead of Command Prompt. PowerShell is a bit closer to the Linux Bash shell experience, and you’ll be much happier with it.
Using the Windows 11 SSH client to interface with Linux virtual machines
You’ll work with Windows 11 the same way, except that the menu entries for the Command Prompt and PowerShell are in different places. The Command Prompt now has its own Terminal item on the main menu, and PowerShell is now under the Windows Tools submenu. Windows 11 also has a third option, which is a built-in Ubuntu virtual machine. You’ll see an icon for that in the bottom taskbar.
Cygwin versus the Windows shell
Both Cygwin and the SSH client that’s built into Windows 10/11 have their pros and cons. In favor of Cygwin, you can install a variety of packages to customize it pretty much any way you want. Also, Cygwin stores the SSH known_hosts and keys files in the .ssh directory of the user’s home directory, which is where you’d expect to find them if you’re used to working with Linux. If you use the SSH client that’s built into Windows, you’ll have to search for these files in other locations.
In favor of the Windows 10/11 built-in SSH client, there’s the fact that it’s already there. Also, it’s much easier to use if you need to access your normal Windows folders because Cygwin traps you in its own sandboxed directory structure.
Keeping the Linux systems updated
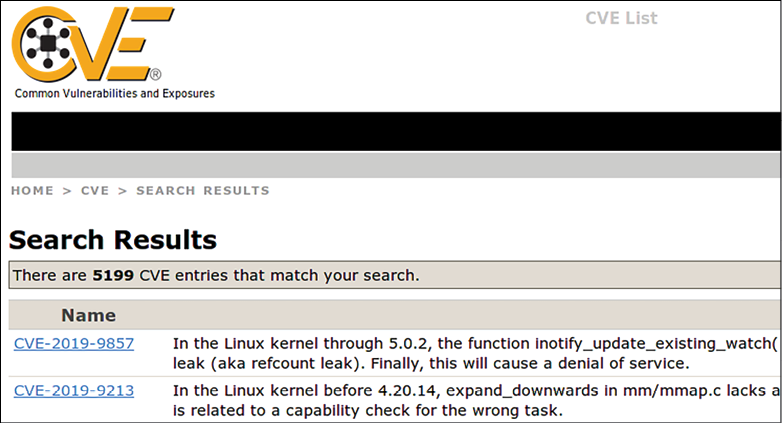
Spend some time perusing the Common Vulnerabilities and Exposures database, and you’ll soon see why it’s so important to keep your systems updated. Yes, indeed, you’ll even find that there have been security flaws with our beloved Linux, as you can see here:
Figure 1.15: Common Vulnerabilities and Exposures
Updating a Linux system only requires one or two simple commands, and it’s generally faster and less painful than updating a Windows system.
You can find the Common Vulnerabilities and Exposures database here:
https://cve.mitre.org/
All of you conscientious, dedicated Linux administrators will definitely want to become familiar with this site.
Next, let’s look at updating the Debian-based systems, which include Ubuntu.
Updating Debian-based systems
Let’s take a look at how to update Debian-based systems:
On Debian and its many children, including Ubuntu, run two commands, as shown here:
sudo apt update
sudo apt dist-upgrade
Occasionally, you’ll also need to remove some old packages that are no longer needed. How will you know? Easy. When you log in to the system, a message will appear on the command line. To remove these old packages, just run this command:
sudo apt auto-remove
Next, we will configure auto updates for Ubuntu.
Configuring auto updates for Ubuntu
When you first install Ubuntu 22.04, automatic updates are turned on by default. To verify that, you’ll first check the status of the unattended-upgrades service, like so:
donnie@ubuntu2204-packt:~$ systemctl status unattended-upgrades
● unattended-upgrades.service - Unattended Upgrades Shutdown
     Loaded: loaded (/lib/systemd/system/unattended-upgrades.service; enabled; vendor preset: enabled)
     Active: active (running) since Sat 2022-10-08 19:25:54 UTC; 52min ago
. . .
. . .
donnie@ubuntu2204-packt:~$
Then, look in the /etc/apt/apt.conf.d/20auto-upgrades file. If auto-updating is enabled, you’ll see this:
I must confess, though, that I have mixed feelings about this. I mean, it’s nice that the security updates get installed without me having to do anything, but a lot of those updates require that the system be rebooted before they can take effect. By default, Ubuntu systems don’t automatically reboot after an update is installed. If you keep it that way, you’ll see a message about it when you log into the system. But if you prefer, you can set Ubuntu to automatically reboot after it automatically updates itself. Here’s how to do it:
Go into the /etc/apt/apt.conf.d directory and open the 50unattended-upgrades file in your favorite text editor. In the vicinity of line 67, you’ll see a line that says:
//Unattended-Upgrade::Automatic-Reboot "false";
Uncomment the line by removing the leading slashes, and change false to true, like so:
Unattended-Upgrade::Automatic-Reboot "true";
With this new configuration, Ubuntu will now reboot itself immediately after the automatic update process has completed. If you’d rather have the machine reboot at a specific time, scroll down to about line 103, where you’ll see this:
Since this line is commented out with its pair of leading slashes, it currently has no effect. To have the machine reboot at 2:00 A.M., just uncomment this line. To have it reboot at, say, 10:00 P.M., uncomment the line and change the time to 22:00, like so:
Of course, there’s that old, basic precept that thou shalt not install system updates on a production system without first testing them on a test system. Any operating system vendor can occasionally supply you with problematic updates, and that has included Ubuntu. (I know what you’re saying: Preach it, Donnie.) Ubuntu’s automatic update feature is in direct opposition to that basic precept. If automatic updates have been enabled, disabling them is quite easy, if you choose to do so.
To disable automatic updates, just go into the /etc/apt/apt.conf.d directory and open the 20auto-upgrades file in your favorite text editor. Here’s what you’ll see:
Now, the system will still check for updates and show a message on the login screen when any are available, but it won’t automatically install them. And of course, it should go without saying that you need to check your systems on a regular basis to see if updates are available. If you do prefer to leave automatic updates enabled, be sure to either enable automatic rebooting or to log in to the system at least a couple of times a week to see if it needs to be rebooted.
If you want to see if there are any security-related updates available, but don’t want to see any non-security updates, use the unattended-upgrade command, like so:
sudo unattended-upgrade --dry-run -d
To manually install the security-related updates without installing non-security updates, just run:
sudo unattended-upgrade -d
If you’re running some form of desktop Ubuntu on a workstation that gets shut down after every use, you can enable the automatic updates if you like, but there’s no need to enable automatic reboots.
Also, if you’re running a non-Ubuntu flavor of Debian, which would include Raspbian for the Raspberry Pi, you can give it the same functionality as Ubuntu by installing the unattended-upgrades package. Just run this command:
sudo apt install unattended-upgrades
You can also use the apt command to install only the security updates, but it would require piping the apt output into a convoluted set of text filters in order to mask the non-security updates. Using the unattended-upgrade command is much easier.
I said before that we should always test updates on a test system before we install them on a production system, and that certainly does hold true for corporate servers. But what do we do when we have a whole bunch of IoT devices that we need to keep updated, especially if these devices are all over the place out in the field and in consumer devices?
In the wonderful world of IoT, the ARM CPU versions of Ubuntu, Raspbian, and Debian are the most popular Linux distros for use on the various Pi devices, including the ubiquitous Raspberry Pi. If you have lots of IoT devices in the field and in consumer devices, you might not have direct control over them once they’ve been deployed or sold. They still need to be kept updated, so setting up unattended updates with automatic rebooting would certainly be advantageous. But keep in mind that in the world of IoT, we have to be concerned about safety as well as security. So, for example, if you have devices that are set up as some sort of critical, safety-related industrial controller, then you most likely don’t want the device to automatically reboot after doing automatic updates. But if you’re a television vendor who installs Linux on smart televisions, then definitely set them up to automatically update and to automatically reboot themselves after an update.
Next, let’s look at updating the RHEL 7 systems.
Updating Red Hat 7-based systems
With Red Hat-based systems, which include CentOS and Oracle Linux, there’s no automatic update mechanism that you can set up during installation. So, with the default configuration, you’ll need to perform updates yourself:
To update a Red Hat 7-based system, just run this one command:
sudo yum upgrade
Sometimes, you might just want to see if there are any security-related updates that are ready to be installed. Do that by running this command:
sudo yum updateinfo list updates security
If any security updates are available, you’ll see them at the end of the command output. On the system that I just tested, there was only one security update available, which looks like this:
FEDORA-EPEL-2019-d661b588d2 Low/Sec. nagios-common-4.4.3-1.el7.x86_64
updateinfo list done
If the only thing you want to install is the security updates, run this command:
sudo yum upgrade --security
Now, let’s say that you need a CentOS system to automatically update itself. You’re in luck because there’s a package for that. Install and enable it, and start it by running these two commands:
This lists the various types of upgrades we can do. The last line shows that we’re set to update everything.
Let’s say that you only want security updates to get applied automatically. Just change the last line to the following:
update_cmd = security
On lines 15 and 20, you’ll see this:
download_updates = yes
apply_updates = no
This indicates that by default, yum-cron is only set to automatically download updates, but not to install them.
If you want the updates to get automatically installed, change the apply_updates parameter to yes.
Note that unlike Ubuntu, there’s no setting to make the system automatically reboot itself after an update.
Finally, let’s look at the mail settings for yum-cron, which you’ll find on lines 48 through 57 of the yum-cron.conf file, as shown here:
[email]
# The address to send email messages from.# NOTE: 'localhost' will be replaced with the value of system_name.
email_from = root@localhost
# List of addresses to send messages to.
email_to = root
# Name of the host to connect to to send email messages.
email_host = localhost
As you can see, the email_to = line is set to send messages to the root user account. If you want to receive messages on your own account, just change it here.
To see the messages, you’ll need to install a mail reader program, if one isn’t already installed. (It hasn’t been installed if you chose Minimal installation when you installed the operating system.) Your best bet is to install mutt, like so:
sudo yum install mutt
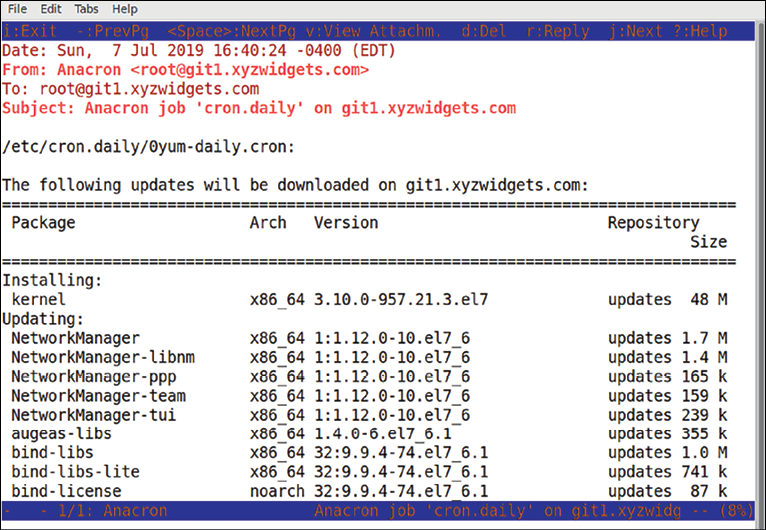
When you open mutt and look at a message, you’ll see something like this:
Figure 1.16: Mutt mail client
As with all operating systems, certain updates will require that the system be restarted. And how do you know when the system needs to be restarted? With the needs-restarting command, of course. First, though, you need to make sure that needs-restarting is installed on your system. Do that with this command:
sudo yum install yum-utils
Once the package is installed, there are three ways to use needs-restarting. If you just run the command without any option switches, you’ll see the services that need to be restarted and the packages that require you to reboot the machine. You can also use the -s or -r options, as shown here:
Command
Explanation
sudo needs-restarting
This shows the services that need to be restarted, and the reasons why the system might need to be rebooted.
sudo needs-restarting -s
This only shows the services that need to be restarted.
sudo needs-restarting -r
This only shows the reasons why the system needs to be rebooted.
Next, we will be updating Red Hat 8/9-based systems.
Updating Red Hat 8/9-based systems
The old yum utility has been around for practically forever, and it’s been a good, hard-working utility. But it does have its occasional quirks, and at times it can be excruciatingly slow. But, not to worry. Our heroes at Red Hat have finally done something about that, by replacing yum with dnf. So, when you work with your AlmaLinux 8/9 virtual machines, you’ll use dnf instead of yum. Let’s see how to do this:
For the most part, you use dnf the same way that you’d use yum, with the same arguments and options. For example, to do a system upgrade, just do:
sudo dnf upgrade
The main functional difference between yum and dnf is that dnf has a different automatic update mechanism. Instead of installing the yum-cron package, you’ll now install the dnf-automatic package, like so:
sudo dnf install dnf-automatic
In the /etc/dnf directory, you’ll see the automatic.conf file, which you’ll configure the same way as you did the yum-cron.conf file for CentOS 7. Instead of working as a cron job, as the old yum-cron did, dnf-automatic works with a systemd timer. When you first install dnf-automatic, the timer is disabled. Enable it and start it by running this command:
sudo systemctl enable --now dnf-automatic.timer
Verify that it’s running with this command:
sudo systemctl status dnf-automatic.timer
If it started successfully, you should see something like this when you check the status:
[donnie@redhat-8 ~]$ sudo systemctl status dnf-automatic.timer
 dnf-automatic.timer - dnf-automatic timer
   Loaded: loaded (/usr/lib/systemd/system/dnf-automatic.timer; enabled; vendor preset: disabled)
   Active: active (waiting) since Sun 2019-07-07 19:17:14 EDT; 13s ago
  Trigger: Sun 2019-07-07 19:54:49 EDT; 37min left
Jul 07 19:17:14 redhat-8 systemd[1]: Started dnf-automatic timer.
[donnie@redhat-8 ~]$
To determine if a system needs to be restarted, just install the yum-utils package and run the needs-restarting command, the same as you did for CentOS 7. (For some reason, the Red Hat developers never bothered to change the package name to dnf-utils.)
For more details about dnf-automatic, just type:
man dnf-automatic
And that’s all there is to it.
Automatic updating sounds like a good thing, right? Well, it is in some circumstances. On my own personal Linux workstations, I always like to turn it off. That’s because it drives me crazy whenever I want to install a package, and the machine tells me that I have to wait until the update process finishes. In an enterprise, it might also be desirable to disable automatic updates in some cases, so that administrators can have more control over the update process.
There are special considerations about doing updates in an enterprise environment. Let’s look at them next.
Managing updates in an enterprise
When you first install any Linux distro, it will be configured to access its own package repositories. This allows the user to install software packages and updates directly from these normal distro repositories. This is great for home or small business use, but not so great for the enterprise.
In an enterprise setting, there are two additional considerations:
You want to restrict what packages the end users are allowed to install.
You always want to test updates on a separate test network before allowing them to be installed on a production network.
For these reasons, enterprises will often set up their own repository servers that only have approved packages and approved updates. All other machines on the network will be configured to pull their packages and updates from them, rather than from the normal distro repository. (We won’t go into how to set up on-premises repository servers here, because that topic is better suited for a Linux administration book.)
Ubuntu has always been one of the more innovative Linux distros, but it’s also had more than its fair share of quality-control problems. In its early days, there was at least one Ubuntu update that completely broke the operating system, requiring the user to re-install the operating system. So, yeah, in any mission-critical environment, test those updates before putting them into production.
I think that that’s about it for our introductory chapter. Let’s wrap things up in a summary, shall we?
Summary
We’ve made a good start with our journey into Linux security and hardening. In this chapter, we looked at why it’s just as important to know about securing and hardening Linux systems as it is to know how to secure and harden Windows systems. We provided a few examples of how a poorly configured Linux system can be compromised, and we mentioned that learning about Linux security could be good for your career. We then looked at some special considerations for setting up Linux servers either as virtual machines or on a cloud service.
After that, we looked at how to set up a virtualized lab environment using VirtualBox, Cygwin, and the Windows 10/11 shell. We wrapped things up with a quick look at how to keep your Linux systems updated.
In the next chapter, we’ll look at locking down user accounts, and ensuring that the wrong people never get administrative privileges. I’ll see you there.
Questions
Because Linux is more securely designed than Windows, we never have to worry about Linux security.
True
False
Which of the following is true about Linux on IoT devices?
There are too many of them.
They’re taking over the world.
Too many of them are configured insecurely.
They’re so securely configured that they’ll put security practitioners out of their jobs.
Which of the following is true about automatic operating system updates in an enterprise?
You should always leave them enabled.
They violate the basic precept of testing updates on a test network before installing them on a production network.
Unlike with manual updates, you never have to reboot a system after automatic updates.
For IoT devices, it isn’t useful to enable automatic updates.
Further reading
Here are some handy resources for your viewing pleasure:
Discover security techniques to prevent malware from infecting a Linux system, and detect it
Prevent unauthorized people from breaking into a Linux system
Protect important and sensitive data from being revealed to unauthorized persons
Description
The third edition of Mastering Linux Security and Hardening is an updated, comprehensive introduction to implementing the latest Linux security measures, using the latest versions of Ubuntu and AlmaLinux.
In this new edition, you will learn how to set up a practice lab, create user accounts with appropriate privilege levels, protect sensitive data with permissions settings and encryption, and configure a firewall with the newest firewall technologies. You’ll also explore how to use sudo to set up administrative accounts with only the privileges required to do a specific job, and you’ll get a peek at the new sudo features that have been added over the past couple of years. You’ll also see updated information on how to set up a local certificate authority for both Ubuntu and AlmaLinux, as well as how to automate system auditing. Other important skills that you’ll learn include how to automatically harden systems with OpenSCAP, audit systems with auditd, harden the Linux kernel configuration, protect your systems from malware, and perform vulnerability scans of your systems. As a bonus, you’ll see how to use Security Onion to set up an Intrusion Detection System.
By the end of this new edition, you will confidently be able to set up a Linux server that will be secure and harder for malicious actors to compromise.
What you will learn
Prevent malicious actors from compromising a production Linux system
Leverage additional features and capabilities of Linux in this new version
Use locked-down home directories and strong passwords to create user accounts
Prevent unauthorized people from breaking into a Linux system
Configure file and directory permissions to protect sensitive data
Harden the Secure Shell service in order to prevent break-ins and data loss
Apply security templates and set up auditing
What do you get with eBook?
Instant access to your Digital eBook purchase
Download this book in EPUB and PDF formats
Access this title in our online reader with advanced features
DRM FREE - Read whenever, wherever and however you want
Donald A. Tevault – but you can call him Donnie – got involved with Linux way back in 2006, and has been working with it ever since. He holds the Linux Professional Institute Level 3-Security certification, as well as the GIAC Incident Handler certification. Donnie is a professional Linux trainer, and thanks to the magic of the internet, teaches Linux classes literally the world over from the comfort of his living room. He's also a Linux security researcher for an IoT security company.
Where there is an eBook version of a title available, you can buy it from the book details for that title. Add either the standalone eBook or the eBook and print book bundle to your shopping cart. Your eBook will show in your cart as a product on its own. After completing checkout and payment in the normal way, you will receive your receipt on the screen containing a link to a personalised PDF download file. This link will remain active for 30 days. You can download backup copies of the file by logging in to your account at any time.
If you already have Adobe reader installed, then clicking on the link will download and open the PDF file directly. If you don't, then save the PDF file on your machine and download the Reader to view it.
Please Note: Packt eBooks are non-returnable and non-refundable.
Packt eBook and Licensing When you buy an eBook from Packt Publishing, completing your purchase means you accept the terms of our licence agreement. Please read the full text of the agreement. In it we have tried to balance the need for the ebook to be usable for you the reader with our needs to protect the rights of us as Publishers and of our authors. In summary, the agreement says:
You may make copies of your eBook for your own use onto any machine
You may not pass copies of the eBook on to anyone else
How can I make a purchase on your website?
If you want to purchase a video course, eBook or Bundle (Print+eBook) please follow below steps:
Register on our website using your email address and the password.
Search for the title by name or ISBN using the search option.
Select the title you want to purchase.
Choose the format you wish to purchase the title in; if you order the Print Book, you get a free eBook copy of the same title.
Proceed with the checkout process (payment to be made using Credit Card, Debit Cart, or PayPal)
Where can I access support around an eBook?
If you experience a problem with using or installing Adobe Reader, the contact Adobe directly.
To view the errata for the book, see www.packtpub.com/support and view the pages for the title you have.
To view your account details or to download a new copy of the book go to www.packtpub.com/account
Our eBooks are currently available in a variety of formats such as PDF and ePubs. In the future, this may well change with trends and development in technology, but please note that our PDFs are not Adobe eBook Reader format, which has greater restrictions on security.
You will need to use Adobe Reader v9 or later in order to read Packt's PDF eBooks.
What are the benefits of eBooks?
You can get the information you need immediately
You can easily take them with you on a laptop
You can download them an unlimited number of times
You can print them out
They are copy-paste enabled
They are searchable
There is no password protection
They are lower price than print
They save resources and space
What is an eBook?
Packt eBooks are a complete electronic version of the print edition, available in PDF and ePub formats. Every piece of content down to the page numbering is the same. Because we save the costs of printing and shipping the book to you, we are able to offer eBooks at a lower cost than print editions.
When you have purchased an eBook, simply login to your account and click on the link in Your Download Area. We recommend you saving the file to your hard drive before opening it.
For optimal viewing of our eBooks, we recommend you download and install the free Adobe Reader version 9.
 Argentina
 Australia
 Austria
 Belgium
 Brazil
 Bulgaria
 Canada
 Chile
Chile
 Colombia
 Cyprus
 Czechia
 Denmark
 Ecuador
 Egypt
Egypt
 Estonia
 Finland
 France
 Germany
 Great Britain
 Greece
 Hungary
 India
India
 Indonesia
 Ireland
 Italy
Italy
 Japan
Japan
 Latvia
 Lithuania
 Luxembourg
 Malaysia
 Malta
Malta
 Mexico
 Netherlands
 New Zealand
 Norway
 Philippines
 Poland
 Portugal
 Romania
 Russia
 Singapore
 Slovakia
 Slovenia
 South Africa
 South Korea
 Spain
Spain
 Sweden
 Switzerland
 Taiwan
 Thailand
 Turkey
 Ukraine
 United States