I mentioned earlier in this chapter that VR development involves many components: 3D assets, animation, sounds, code, and more. The key to building VR experiences successfully and efficiently is all about navigating the required components and utilizing them effectively within your project.
How do you do that? Well, the short answer is trial and error. You have to spend time exploring the tools and making things. You may be rusty when you work on your first project, but by the 100th project, you will feel pretty comfortable with your ability to create. Regardless of whether you are a beginner, intermediate, or advanced developer, we will cover some techniques to put you on the right track. Acknowledging the importance of repetition to master these concepts, this section delves into the development of VR experiences using the principle of design thinking. As we explore these fundamental ideas, Chapter 10, Design Thinking for Virtual Reality Experiences, will revisit them, enhancing our grasp and underscoring their significance in our workflow.
Setting expectations for projects
VR development can be a lengthy process. It can take months, if not years, to complete a project. Sometimes, those experiences meet our expectations, and other times, they don’t. Throughout this process, you want to set yourself up for success at every turn, no matter how big or small the project is. With that being said, you want to develop a growth mindset. This means that with every experiment and project, your goal is not to be perfect – it is to constantly improve. You want to test your limits and capabilities and push the ideas you want to pursue as far as possible. The tools you are learning to use and the skills you apply to your projects are just a means to that end goal. Going back to the 100-project analogy, compared to your first project, your 100th project will not be perfect, but it will be better than your first. Your 200th project will be even better than your 100th. Quite often, you will look back at old projects that you were proud of and think, “I’m much better now.” That is the point!
Let’s say you have an idea for a project, such as a fully immersive massive multiplayer open-world role-playing game with dragons, unlockable achievements, and a robust character creation system, and you want it to work on both low-end headsets and high-end headsets smoothly. You must ask yourself, “What am I capable of developing now, and what will I be able to do later?” Pulling references from our favorite games and applications, we must understand that they were created by teams of people who devoted years, thousands of dollars, and countless resources to them. More importantly, they earned years of foundational education to know how to implement core elements and features. Can one person develop this? Yes, but it will not happen overnight. A developer’s most unspoken qualities are patience and persistence.
Developing VR experiences is all about improving – that’s why we call it developing. There is always something to improve. Ultimately, your goal, as a developer, is to develop experiences that can be usable. In VR, that means that you can interact with objects, traverse digital worlds, and not get motion sickness in the process. More importantly, your goal is to take an experience that works on your high-powered computer, export it as an application, and have it run smoothly on an HMD. If you can do that, you are on the right track.
Navigating available resources
One thing you will ask in your development process is: “Do I have to make everything in my VR experience?” The short answer is no. You don’t have to make every single model or character in your VR experience. There are games and applications on the market from developers that have little to no experience with 3D modeling, texturing, scripting, producing audio, and even animation. What they are successful at is coming up with interesting ideas and using the resources available to bring them to life. How do they do that? We will discuss this briefly here.
Major game engines such as Unity and Unreal have huge communities that come together all in the name of making games. With that large community comes a market for sharing and selling assets. You can find these in the respective marketplaces of the mentioned game engines. They are amazing places to find a wide range of assets for an affordable price. You may even find some stuff for free or in a blowout sale. In the marketplace, you will find 3D models and animation, 2D sprites and animation, music and sound effects, VFX, particle systems, templates for games, premade level designs, scripts to optimize your game, and more – literally anything you can think of you can find.
If you want to explore resources outside of the marketplace for content, you have pretty decent options:
- Sketchfab is one of the leading platforms for 3D content on the web, or you can download 3D models from users who post their content. So long as it is a
.fbx or .obj file, you can implement it into your project fairly easily.
- TurboSquid is an alternative market that allows you to buy 3D content. It is not specifically for games or XR experiences, but the content can be modified to work with any project you may have.
- ArtStation is one part portfolio and another part marketplace. Here, you can find inspiration from other users who post content, and you can download and purchase that content if the users make it available. ArtStation is a wonderful place to go if you need to get out of your creative block because it has such a talented creative community.
- Mixamo is a huge library of animations that can be utilized in any project. Whether you are looking for a walk cycle or some stock interactions for non-playable characters, this is a great place to go to get your characters moving. More importantly, they offer rigging for any humanoid character to apply those animations perfectly. This is a free resource with a great community of support.
If you need help with development and coding, there are some places you can explore as well:
- Unity Forums are great places to start when you are looking for a solution. There are experienced Unity developers who know the Unity game engine inside and out. Even if they don’t know how to fix problems for XR experiences specifically, they can walk you through possible solutions because of their experience with the Unity game engine.
- Unity Discord is an alternative to forums. Unlike forums where you could be waiting for days if not weeks for an answer to your inquiry, Unity Discord gives you access to the same support team in real time. They have specific groups for XR development and VR that you can post questions in. You may get responses from developers or one of the thousands of other members who may be able to help you.
- Stack Overflow is a perfect place to find help when you are stuck in the development process. The community is large and spans a variety of industries and coding languages. More than likely, if you post your problem, someone may have a solution. Often, you can simply copy and paste those solutions into your projects so that you can move on to the next task.
- YouTube is a great place to find help with problems others may be facing. A simple search in the search bar can lead you down a path of learning how to create a certain element or how to code a certain feature. When I got started, I made a point to follow certain Youtubers who created work I eventually wanted to create.
We are in a day and age where a simple internet search can help you tremendously. As a solo developer, being able to create experiences with high-quality assets, even if I don’t know how to create those myself, is liberating because I can focus on the core of my ideas and innovate in ways that speak to my interests.
Developing an efficient workflow
The final thing to discuss is the workflow. How do we take all the knowledge, skills, and assets we’ve acquired and apply them to a project? There is a methodology I follow that has helped me with projects from a variety of industries, such as healthcare, animation, and even bookmaking that I can share with you. The purpose of a workflow is to streamline your creative process so that you can focus your energy on the creative process rather than figuring out the steps to create the project. Although that does not seem like much of a problem, it can be taxing when you are working on large projects or exploring things you never did before. With a workflow, you will know what steps you need to take to create something before you even start working on the project. That in part gives you a level of confidence that is increasingly valuable as you embark on your experimental journeys. You may not know what it will look like when it is finished, but you know how to get to the finish line. That is half the battle right there!
Let’s say you have an idea you want to work on. You are excited about the possibilities, and you are eager to get to work. Before you begin a project, remember that everything starts on paper. It can be a napkin, a notebook, or even a document on your phone. The goal is to take that idea and transfer it from your brain to something tangible. Doing this does two things for you:
- It converts a project that is floating in the ether of your brain into something tangible that you can see and touch. You can share it with your peers, and you can deconstruct it and reconstruct it.
- The act of writing something down forces you to articulate it in a way that makes sense. When we have an idea in our head, it is normally a collection of elements that make up a project. We can think about it, but when someone asks us about our idea, we often find it difficult to provide a concise description of it. You have an idea, but the idea is only as good as how well you can communicate it to yourself and others. Writing it down will help you articulate it and fill in gaps with details you probably did not think of initially.
Let’s try out an example.
Brainstorming ideas for developing projects
Brainstorming for a project could go through the following seven stages, starting with idea creation:
- Idea: A cool VR experience that is fun to play.
How much should you write down for our idea? Well, the short answer is however much you want/need to get the point across. You will eventually be expanding on the idea, but if you need a starting point that is not too daunting, start with one to two sentences. Briefly describe what it is you want to create.
- Writing down a brief description: I want to make a cool VR experience that is fun to play where you can be a superhero for a day.
When you write down your brief description, you may have the urge to elaborate on what the experience is and some of the features involved in it. That is what we want. The purpose is to demystify and uncover elements of the experience so that you can turn those elements into actionable items you can apply your skills. Once you know what type of project you have, then you will know what elements you need, and how to acquire those elements. With your brief done, you can expand on it by adding a list of features. This can be elements of the user experiences, particular content, certain themes, and more. Think of this as a brain dump for your project. Get it all out and on paper. If you get stuck, don’t worry. We will revisit this later.
- Creating a feature list:
- An open VR world where people can run, walk, and fly
- You can save people and fight bad guys
- You can go to the highest mountain and watch the sunset
- There is a level-up system where you can earn more interactions and features
- You can customize your character
With this feature list, the project is starting to become clearer and clearer. You should be able to visualize the experience more than when it was in your head because articulating it on paper makes the idea more concrete.
- Research: Now, you can start doing some research. Research is valuable because you want to know what is out there already. If you are making a commercial game, you want to see if there is an idea similar to yours. You may need to tweak it or pivot to differentiate it from others. You can also look for inspiration on functionality, themes, artistic style, and more. We don’t live in a vacuum, and your creative process should not exist in a vacuum either. As you create stuff and put it out into the world, others are doing the same. This can be a valuable resource early on when you are exploring new ideas. It allows you to see what is possible. To do this, you can start with a Google search based on some keywords from your feature list. Formulate a list of terms you can search on the internet. Start with five keywords and add more if you need to. You may get enough from a few searches, but that is not always the case. Regardless, the goal is to give you enough inspiration to expand on your current ideas. Some good places to start are Google, YouTube, Twitter, Instagram, ArtStation, and Pinterest.
- Shortlisting keywords: Based on your research, you may notice that some words or phrases seem to appear more frequently and feel more relevant. Write some of them down. You could have a list that looks like this:
- Superhero VR experiences
- Flying in VR
- Games with superpowers
- Action-adventure VR experiences
- Cool VR interactions
- VR fighting games
You can use these keywords to fine-tune your research.
- Creating a mood board: You did a bunch of searches and found a bunch of cool ideas people are working on. Some of those ideas you want to explore in your experiences and others you don’t. By this time, you should have a better idea of what your experience is and what it is not. What do you do with all this? Make a mood board.
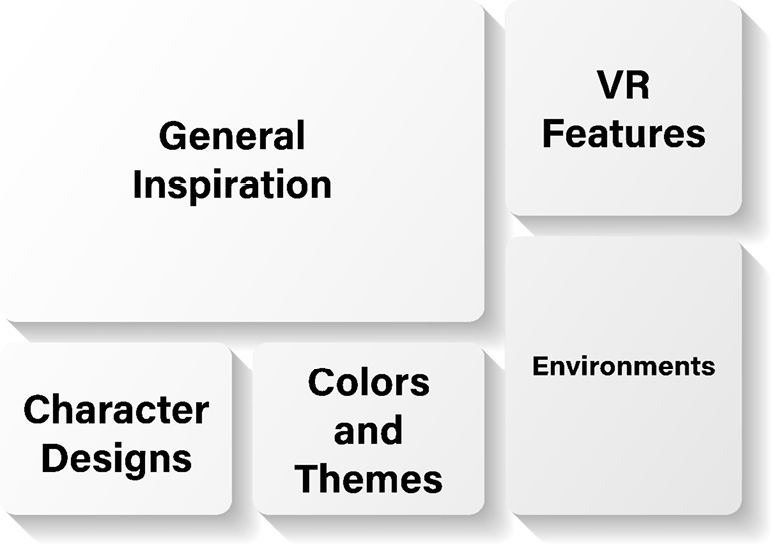
A mood board is a document that helps you organize the elements, features, and inspirations of your project. Create different sections on your mood board to place elements you like or don’t like. If you see a feature in a game you like, add it to your mood board. If you see a color palette, add it to your mood board. If you like a character style, add it to your mood board. If you played a game you hated, add it to your mood board. Some great tools to help with creating one are PureRefs, Google Docs, Microsoft Word, Milanote, and Pinterest. They work great for giving you a digital canvas to organize ideas and references. The following figure shows you how you could organize a mood board you create:
Figure 1.4 – Mood board example
With our mood board, we can elaborate on the list and expand it with more details. There may be some features that are nice to have now and some nice to have later. Maybe you want to have everything be in a particular style. Maybe there are some vague ideas in your feature list that need to be fleshed out more. Think about what it is the user will be doing and how it will make them feel. What is the experience you are trying to provide for them? What elements of your experience will the users be excited the most about? Take this time to address those questions.
- Creating a detailed feature list: Once you have answered the questions, you can create a more detailed feature list compared to what we did in step 3. Your list could now look like this:
- An open world where people can explore in VR:
- They can navigate three settings: a city, forest, and space environment
- They can run up buildings
- They can fly to the tops of mountains
- They can walk on the moon
- Users can interact with people and objects using common VR interactions:
- They can punch bad guys
- They can open doors and enter buildings
- They can shoot projectiles and use weapons
- Users can enjoy dynamic levels and environments:
- They can watch the sunset on top of a mountain
- They can do yoga in the park
- They can enjoy a concert with other non-playable characters
- As the user plays the game, they can customize their character:
- They can unlock and buy gear to equip themselves
- They can level up their skills
- They can improve their abilities through training
- They can add and remove various superpowers
The feature list we have now is more focused on something we want to build rather than an idea we have. Everyone has ideas, but what differentiates this from others is that we are focusing more on the user experience. Remember, people care about VR because it provides us with a unique and immersive user experience. If we don’t consider that early in the development process, then we will lose sight of what our goal is: making innovative VR experiences. We are not done, though. We need to convert this list into actionable items. This is a crucial step because this will be our guide for creating every element of the experience. That is why we call it a roadmap.
Planning development details using a roadmap
Based on the features we mentioned, we can split the elements into categories that make sense for us to develop. I like to label my categories based on the type of assets so that I can understand what it would require to include that element in my experience. Afterward, we will have a comprehensive list of what our VR experience will be made of, a list of to-dos to direct us, and all we would need to do is create those elements and implement them into the experience. We can use the following roadmap:
- Characters:
- Enemies:
- Grunt enemy model
- Boss enemy model
- Attack animations
- Character grunts
- Main character:
- Various customizable elements, such as hair and clothing
- Level up system
- Non-playable characters:
- Low poly mesh characters
- Idle and walk animations
- Stock conversation audio
- To-do: Record audio, character animation, character design, 3D model and texture, and create character controllers for each type of character
- Environments:
- City scene:
- Buildings, roads, streetlights, sidewalks, cars, city blocks
- Park, school, intersections, city hall, and more
- City ambiance sounds
- Objects that emit audio
- Forest scene:
- Terrain with grass, rocks, birds, and trees
- Walking paths and natural landmarks
- Nature sounds
- Objects that emit audio
- Space scene:
- Moon terrain, Sun, stars, and space environment
- To-do: Design 3D environments, populate environments with objects and characters, add sounds to various audio sources, and set boundaries for character navigation
- User interface:
- Menu screens:
- Buttons, text, scene navigation
- Pause screen:
- Buttons, text, scene navigation, game settings
- Heads-up displays:
- UI design, health bar, map indicator
- To-do: Design the interface screens and create each element according to the color palette and theme
- User interactions:
- Character controller
- Flying system
- Shooting projectiles
- Grabbing objects
- Fighting system
- To-do: Code each system
- Rewards:
- Superpowered abilities:
- To-do: different VFX for the abilities
- Level-up system:
- To-do: Code the system and use particle and sound effects for user feedback
We can elaborate on the roadmap even more, but you get the gist. You list all of the elements needed for a particular experience and try to think about what the technical requirements are. Some things may only need to be recorded; others may need to be rendered. Figure out what you need to do for that element and add it to the roadmap. The bulk of the prep work is done. You should have a familiarity with the project that will inform you what your first objective would be. Regardless of where you start, you aren’t going to have that element finished before you move on to the next element. Your development process should still be at a high level. Focus on the core elements of the experience and not the itty-bitty details. There will be time for that later. Right now, we just need to lay the foundation that we can build on. If we shortcut this process, then we will be sure to regret it in the future because our project’s foundation will not be able to fully support our aspirations for the project. In the Roadmapping section of Chapter 10, Design Thinking for Virtual Reality Experiences, we will cover a full concept of the roadmapping process that we will be able to flesh out with more details and eventually put into practice in Chapters 11 to 17.
Developing a prototype based on your mood board and roadmap
Using the to-dos as a guide, we can perform some steps to prepare us for making our prototype. We can divide what we need to do into three stages:
- Sketching/drafting:
- Coding: Before we spend countless hours coding in Visual Studio, we can create some of the necessary scripts and place comments describing what we intend to do instead of coding. We may not need all the code to get up and running but having a plan can provide us with directions we can do ourselves or collaborate with others on.
- Character design: It can take time to develop one character let alone a whole cast. Start with sketching the character design in a side and front pose. This will help you when you begin modeling because it is easier to replicate a premade character than modeling on the fly.
- Environment design: Just like character design, building an environment that can take on a life of its own can be time-consuming. A way to mitigate some of the problems is to create a map of your environments. Include everything from city blocks, key landmarks, points of interest, and more. Think of all the elements that make up an area and include them. When you plan out all the areas of a location, you can simply move elements to those areas of the map and cut out most of the guesswork. Another opportunity is to do concept art for how the environment should look and feel. You can design buildings and objects and visualize settings you want to replicate in the experience. Again, the goal is to take the guesswork out of the creative process.
- Sound recording: Audio is a crucial component of an immersive experience. Even if you are not a sound design expert, there are things you can do to create the best auditory experience for the user. Think about all the sounds in your experience and try to create a comprehensive list you can use to build a library of sounds. You may have started doing that in your roadmap, but if not, here is your opportunity. You will need sounds for cars, sword slashes, people talking, footsteps, grunts, and more. You can record them yourself, or you can get them from a third party. Regardless, building a library based on your needs is a great way to prepare for your prototype.
- User interface design: User interfaces benefit the most from planning because you can do most of the designing of the buttons, text, and visual elements, and then import them into your experience for coding, regardless of whether it is a menu screen, pause screen, character HUD, or something else. Sketch out the locations of each element and prepare them for prototyping.
- Animation: Develop a list of all the animated elements that need to be made for the different situations. Animating can be time-consuming, so knowing what to animate can minimize the time needed to spend on the process. Some of these assets can be purchased or downloaded from third parties.
You will get to a point where you want to start putting things together. When that point comes, it means you are ready to prototype.
- Prototyping: I normally encourage developers to get to the prototype phase as quickly as possible, but only if they have the other stuff done. Again, we are in the business of building experiences, not making pitch decks. We want to make things we can show users instead of creating documents that describe the experiences we want to make. If we are talking about building full experiences, the preparation work will take longer, but if we are trying to develop an element of the experience, we can jump into the prototyping phase with minimal prep work. The purpose of this phase is to make something that we can quickly use with a headset. It will be rough and buggy but getting to a prototype sooner allows us to address the problems early before the project becomes too big to manage:
- Code: We can follow our comments from our previous steps to implement any interactions we want. This can include downloading SDKs and toolkits to lighten the developmental load of our projects. This will not be production-ready code, but just enough to test out the features.
- Characters: We don’t need fully rendered, high-quality characters right now. We just need simple meshes with a character rig and character controller. They can be place markers for our final character designs. We focus on their interactions with the environment and players right now.
- Environments: We will be introduced to the term grayboxing later in this book, but the concept is all about using primitive shapes to build environments. We can color code them based on whether they are buildings, cars, or trees, but don’t focus on the details right now. So long as the environment is to scale and has all the core elements, you can be satisfied with a world of cubes, spheres, and prisms.
- Sounds: You should have a decent number of sounds in a library at this point. You can swap them out later if you want. The goal is to start playing around with different sound combinations in your prototype early so that you can capture the different effects you want a user to experience.
- User interfaces: User interfaces also do not need to be pretty. They just need to be functional. For a prototype, it will be good enough to have simple buttons, sliders, and scenes that you can navigate. Focus on being able to load scenes within your experience, point buttons to specific results, and load whatever information you want to load on the screen. The beautiful themes can come later.
- Animation: You can get pretty far without having animation right now. Much like building a sound library, you can build an animation library to use for your projects. If you have little to no experience with animation, Mixamo and Marketplaces are great places to build your library. Since most of the VR interactions will be code-based for your player, the animation assets will typically be used for enemies, non-playable characters, and objects in your environment.
Having a prototype is a feat in and of itself. Test it out and see how far you have come. If you have friends and colleagues, have them try it too. Feedback early in the process is very valuable. Make note of all the things that work and don’t in the experience so that you can quickly address them before you add more elements to the experience. When you are satisfied with where the experience is, you can begin polishing the experience. This can come in a variety of forms. If you are creating all the assets yourself, that would mean that you would be spending the majority of your time building 3D models and characters, animating, designing environments, and more. If you are using primarily third-party assets, you would be kitbashing and implementing those assets into your project in place of the cubes and low poly meshes. More than likely, you are doing a combination of both. With that being said, the goal here is to make the game look as polished as possible. Add all the code you need, replace all the characters, integrate all the sounds and animation you want from your library, and spruce up your UI screens.
By this time, your experience has taken on a life of its own. What started as an idea is now an interactive experience that occupies gigabytes on your hard drive. It looks good and sounds good when you are in the experience, but now, we need to make sure it runs well on a device. We will discuss some good optimization techniques later in this book. At this point, you want to try to optimize all your assets and content: compress audio and image files, clean up your code, bake all your lights, reduce keyframes in your animation, and more. This will help improve your frame rate and minimize the number of crashes your experience may have as people try to run them in a variety of settings and contexts.
Beyond this, you will continue to improve on different features of your experience, and on some occasions, rebuild it to correct some of the mistakes you made early in the development process. Like I said before, you are not making a final product – you are developing experiences. That developmental process is never-ending. The experiences will never be fully completed because there is always room for improvement. What you are doing is creating experiences that are good enough to share with others.
With that, we have gone through a full project workflow that you can follow to make your development process more efficient. You know the steps required to build the experience. Now, you can spend more time applying those steps and focusing on the creative process.
- Creating a workflow checklist: To make prototype development even simpler, you can turn it into a checklist you can reuse over and over to keep you on track. This is something you can expand on and make your own, but we will be using this later in this book as we dive deeper into developing VR experiences:
- Get your idea on paper.
- Write a brief one to two-sentence description.
- Create a feature list.
- Create a keyword list to do research.
- Create a mood board of inspiration and ideas.
- Expand on your list of features.
- Create a roadmap for your project.
- Sketch out elements, including menus, designs, code, assets, concepts, and more.
- Prototype features such as scenes, UIs, interactions, and animation.
- Test our experience, in the editor and on the device.
- Polish our experience by creating final assets, kitbashing, and populating worlds.
- Optimize our experience for function and performance.
With this refined roadmap, you will be better equipped to build, test, and deploy your VR experience in Unity.
 Argentina
 Australia
 Austria
 Belgium
 Brazil
 Bulgaria
 Canada
 Chile
Chile
 Colombia
 Cyprus
 Czechia
 Denmark
 Ecuador
 Egypt
Egypt
 Estonia
 Finland
 France
 Germany
 Great Britain
 Greece
 Hungary
 India
India
 Indonesia
 Ireland
 Italy
Italy
 Japan
Japan
 Latvia
 Lithuania
 Luxembourg
 Malaysia
 Malta
Malta
 Mexico
 Netherlands
 New Zealand
 Norway
 Philippines
 Poland
 Portugal
 Romania
 Russia
 Singapore
 Slovakia
 Slovenia
 South Africa
 South Korea
 Spain
Spain
 Sweden
 Switzerland
 Taiwan
 Thailand
 Turkey
 Ukraine
 United States