CSS Modules
A recent pattern that has become popular in the reactive framework world is CSS modules. Frontend development has always had to face the issue of conflicting CSS class names, ill-structured BEM code, and confusing CSS file structures. Vue components help to solve this by being modular and allowing you to compose CSS that, at compile time, will generate unique class names for the specific component that it was composed for. You can even have the exact same class names across components; however, they will be uniquely identified using a randomly generated string attached to the end.
To enable this feature in Vue, you will need to add the module attribute to the style block, and reference classes using JavaScript syntax:
<template>
    <div :class="$style.container">CSS modules</div>
</template>
<style lang="scss" module>
.container {
  Width: 100px;
    Margin: 0 auto;
    background: green;
}
</style>
In the preceding example, if you inspected the DOM tree that class will be called something like .container_ABC123. If you were to create multiple components that had a semantic class name like .container but used CSS modules, you would never run into style conflicts again.
Exercise 1.04: Style Vue Components Using CSS Modules
In this exercise, you will utilize CSS modules to style a .vue component. By using the $style syntax inside of a :class bind, you refer to the Vue instance's this.$style scope. Vue will generate random class names based on the components at run or build time ensuring the style will not overlap with any other classes in your project.
To access the code files for this exercise, refer to https://packt.live/36PPYdd.
- Open a command-line terminal, navigate into the
Exercise1.04folder, and run the following commands in order:> cd Exercise1.04/ > code . > yarn > yarn serve
Go to
https://localhost:8080. - Inside of
Exercise1-04.vue, compose the following code:<template> <div> <h1>{{ title }}</h1> <h2>{{ subtitle }}</h2> </div> </template> <script> export default { data() { return { title: 'CSS module component!', subtitle: 'The fourth exercise', } }, } </script> - Add the
<style>block with the SCSS language and addmoduleas an attribute instead ofscoped:<style lang="scss" module> h1, h2 { font-family: 'Avenir', Helvetica, Arial, sans-serif; text-align: center; } .title { font-family: 'Avenir', Helvetica, Arial, sans-serif; color: #2c3e50; margin-top: 60px; } .subtitle { color: #4fc08d; font-style: italic; } </style> - To use CSS modules in your template, you need to bind them to your HTML elements by using
:classsyntax, which is the same as thev-bind:classdirective:<h1 :class="$style.title">{{ title }}</h1> <h2 :class="$style.subtitle">{{ subtitle }}</h2>When you save, your project should look something like this:

Figure 1.14: Exercise 1.04 output using CSS modules
If you inspect the virtual DOM, you will see how it has applied unique class names to the bound elements:
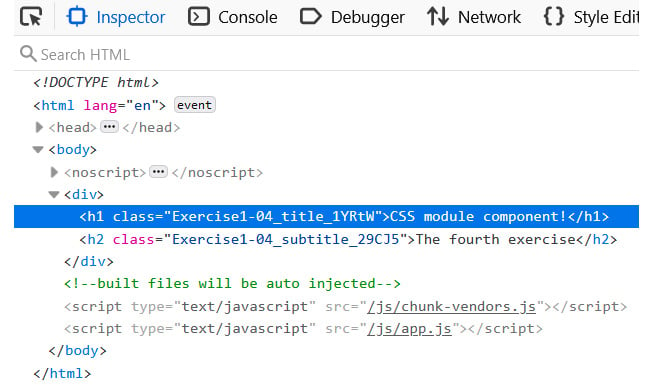
Figure 1.15: The virtual DOM tree's generated CSS module class
In this exercise, we saw how to use CSS modules in your Vue components and how it works differently to CSS scoping. In the next exercise, we will learn how to write a template in PUG (HAML).
Note
In combination with file splitting and importing SCSS, CSS modules are the preferred method of scoping component styling here. This safely ensures that individual component styles and business rules do not risk overriding each other and do not pollute global styling and variables with component-specific styling requirements. Readability is important. The class name also hints to the component name as opposed to the v-data attribute, which can be good when debugging large projects.
Exercise 1.05: Writing a Component Template in PUG (HAML)
With the right loader enabled you can use HTML abstractions such as PUG and HAML to template your Vue components instead of writing HTML.
To access the code files for this exercise, refer to https://packt.live/2IOrHvN.
- Open a command-line terminal and navigate into the
Exercise1.05folder and run the following commands in order:> cd Exercise1.05/ > code . > yarn
Go to
https://localhost:8080. - If Vue is running in the command line, press Ctrl + C to stop the instance. Then run the following command:
vue add pug
yarn serve
- Inside of
Exercise1-05.vue, compose the following code and specify thelangattributepugon the<template>tag:<template lang="pug"> div h1(class='title') {{ title }} </template> <script> export default { data() { return { title: 'PUG component!', } }, } </script> <style lang="scss"> .title { font-family: 'Avenir', Helvetica, Arial, sans-serif; text-align: center; color: #2c3e50; margin-top: 60px; } </style>The preceding code will generate the following output:

Figure 1.16: Output for the PUG exercise
In this exercise, we saw how to use other HTML languages for templating and to interpolate data in PUG format. After installing the Vue.js PUG plugin you can write your component syntax inside of these template tags using PUG by adding the lang attribute with the value pug.