Reader small image

You're reading from  The Kubernetes Workshop

Product typeBook
Published inSep 2020
PublisherPackt
ISBN-139781838820756
Edition1st Edition
Right arrow
Authors (6):
Zachary Arnold
Zachary Arnold
author image
Zachary Arnold

Zachary Arnold works as a software engineer at Ygrene Energy Fund. Zach has an experience of over 10 years in modern web development. He is an active contributor to the Open Source Kubernetes project in both SIG-Release and SIG-Docs currently focusing on security. He has been running clusters in production since Kubernetes 1.7 and has spoken at the previous 4 KubeCons. His passion areas in the project center on building highly stable Kubernetes cluster components and running workloads securely inside of Kubernetes.
Read more about Zachary Arnold

Sahil Dua
Sahil Dua
author image
Sahil Dua

Sahil Dua is a software engineer. He started using Kubernetes to run machine learning workloads. Currently, he is running various types of applications on Kubernetes. He shared his learnings as a keynote session at KubeCon Europe 2018. He is a passionate open source contributor and has contributed to some famous projects such as Git, pandas, hound, go-GitHub, and so on. He has been an open source community leader for over 2 years at DuckDuckGo.
Read more about Sahil Dua

Wei Huang
Wei Huang
author image
Wei Huang

Wei Huang: Wei works as a senior software engineer in IBM. He has over 10 years' experiences around database, data warehouse tooling, cloud, container, monitoring and devops. He started to use Kubernetes since 1.3, including extending Kubernetes LoadBalancer using CRD, networking, scheduling and monitoring. Now he is a core maintainer of Kubernetes SIG-Scheduling.
Read more about Wei Huang

Faisal Masood
Faisal Masood
author image
Faisal Masood

Faisal Masood is a cloud transformation architect at AWS. Faisal's focus is to assist customers in refining and executing strategic business goals. Faisal main interests are evolutionary architectures, software development, ML lifecycle, CD and IaC. Faisal has over two decades of experience in software architecture and development.
Read more about Faisal Masood

Mélony Qin
Mélony Qin
author image
Mélony Qin

Mélony Y. QIN, also known as CloudMelon, is the founder of CloudMelon Vis, a tech media and educational platform for technopreneurs in the cloud-native and serverless space, and a former product manager at Microsoft. With a passion for cloud-native technologies, OSS, DevOps, Kubernetes, serverless, data, and AI, Mélony has authored multiple books, including the Certified Kubernetes Administrator (CKA) Exam Guide, the Kubernetes Workshop, and Microsoft Azure Infrastructure, all published by Packt Publishing. Mélony is a member of the Association for Computing Machinery (ACM) and the Project Management Institute (PMI), leveraging her extensive experience with diverse cloud technologies to drive innovation in the cloud-native, serverless, and generative AI space. She runs the CloudMelonVis YouTube channel and Cloud-Native Innovators newsletter, read by professionals from top tech companies such as Microsoft, Google, Amazon, Dell, and Carrefour.
Read more about Mélony Qin

Mohammed Abu Taleb
Mohammed Abu Taleb
author image
Mohammed Abu Taleb

Mohammed Abu-Taleb works as a Technical Advisor at Microsoft. Working at Microsoft CSS team for troubleshooting complex issues and cases for premier customers that are using Azure Kubernetes Services (AKS). Prior that, Mohammed was a SME (subject matter expert) for the azure managed monitoring service (Azure Monitor) focusing on designing, deploying, and troubleshooting monitoring strategies for containers.
Read more about Mohammed Abu Taleb

View More author details
Right arrow

1. Introduction to Kubernetes and Containers

Overview

The chapter begins by describing the evolution of software development and delivery, beginning with running software on bare-metal machines, through to the modern approach of containerization. We will also take a look at the underlying Linux technologies that enable containerization. By the end of the chapter, you will be able to run a basic Docker container from an image. You will also be able to package a custom application to make your own Docker image. Next, we will take a look at how we can control the resource limits and group for a container. Finally, the end of the chapter describes why we need to have a tool such as Kubernetes, along with a short introduction to its strengths.

Introduction

About a decade ago, there was a lot of discussion over software development paradigms such as service-oriented architecture, agile development, and software design patterns. In hindsight, those were all great ideas, but only a few of them were practically adopted a decade ago.

One of the major reasons for the lack of adoption of these paradigms is that the underlying infrastructure couldn't offer the resources or capabilities for abstracting fine-grained software components and managing an optimal software development life cycle. Hence, a lot of duplicated efforts were still required for resolving some common issues of software development such as managing software dependencies and consistent environments, software testing, packaging, upgrading, and scaling.

In recent years, with Docker at the forefront, containerization technology has provided a new encapsulation mechanism that allows you to bundle your application, its runtime, and its dependencies, and also brings in a new angle to view the development of software. By using containerization technology, the underlying infrastructure gets abstracted away so that applications can be seamlessly moved among heterogeneous environments. However, along with the rising volume of containers, you may need orchestration tools to help you to manage their interactions with each other as well as to optimize the utilization of the underlying hardware.

That's where Kubernetes comes into play. Kubernetes provides a variety of options to automate deployment, scaling, and the management of containerized applications. It has seen explosive adoption in recent years and has become the de-facto standard in the container orchestration field.

As this is the first chapter of this book, we will start with a brief history of software development over the past few decades, and then illustrate the origins of containers and Kubernetes. We will focus on explaining what problems they can solve, and three key reasons why their adoption has seen a considerable rise in recent years.

The Evolution of Software Development

Along with the evolution of virtualization technology, it's common for companies to use virtual machines (VMs) to manage their software products, either in the public cloud or an on-premises environment. This brings huge benefits such as automatic machine provisioning, better hardware resource utilization, resource abstraction, and more. More critically, for the first time, it employs the separation of computing, network, and storage resources to unleash the power of software development from the tediousness of hardware management. Virtualization also brings in the ability to manipulate the underlying infrastructure programmatically. So, from a system administrator and developer's perspective, they can better streamline the workflow of software maintenance and development. This is a big move in the history of software development.

However, in the past decade, the scope and life cycle of software development have changed vastly. Earlier, it was not uncommon for software to be developed in big monolithic chunks with a slow-release cycle. Nowadays, to catch up with the rapid changes of business requirements, a piece of software may need to be broken down into individual fine-grained subcomponents, and each component may need to have its release cycle so that it can be released as often as possible to get feedback from the market earlier. Moreover, we may want each component to be scalable and cost-effective.

So, how does this impact application development and deployment? In comparison to the bare-metal era, adopting VMs doesn't help much since VMs don't change the granularity of how different components are managed; the entire software is still deployed on a single machine, only it is a virtual one instead of a physical one. Making a number of interdependent components work together is still not an easy task.

A straightforward idea here is to add an abstraction layer to connect the machines with the applications running on them. This is so that application developers would only need to focus on the business logic to build the applications. Some examples of this are Google App Engine (GAE) and Cloud Foundry.

The first issue with these solutions is the lack of consistent development experience among different environments. Developers develop and test applications on their machines with their local dependencies (both at the programming language and operating system level); while in a production environment, the application has to rely on another set of dependencies underneath. And we still haven't talked about the software components that need the cooperation of different developers in different teams.

The second issue is that the hard boundary between applications and the underlying infrastructure would limit the applications from being highly performant, especially if the application is sensitive to the storage, compute, or network resources. For instance, you may want the application to be deployed across multiple availability zones (isolated geographic locations within data centers where cloud resources are managed), or you may want some applications to coexist, or not to coexist, with other particular applications. Alternatively, you may want some applications to adhere to particular hardware (for example, solid-state drives). In such cases, it becomes hard to focus on the functionality of the app without exposing the topological characteristics of the infrastructure to upper applications.

In fact, in the life cycle of software development, there is no clear boundary between the infrastructure and applications. What we want to achieve is to manage the applications automatically, while making optimal use of the infrastructure.

So, how could we achieve this? Docker (which we will introduce later in this chapter) solves the first issue by leveraging Linux containerization technologies to encapsulate the application and its dependencies. It also introduces the concept of Docker images to make the software aspect of the application runtime environment lightweight, reproducible, and portable.

The second issue is more complicated. That's where Kubernetes comes in. Kubernetes leverages a battle-tested design rationale called the Declarative API to abstract the infrastructure as well as each phase of application delivery such as deployment, upgrades, redundancy, scaling, and more. It also offers a series of building blocks for users to choose, orchestrate, and compose into the eventual application. We will gradually move on to study Kubernetes, which is the core of this book, toward the end of this chapter.

Note

If not specified particularly, the term "container" might be used interchangeably with "Linux container" throughout this book.

Virtual Machines versus Containers

A virtual machine (VM), as the name implies, aims to emulate a physical computer system. Technically, VMs are provisioned by a hypervisor, and the hypervisor runs on the host OS. The following diagram illustrates this concept:

Figure 1.1: Running applications on VMs

Figure 1.1: Running applications on VMs

Here, the VMs have full OS stacks, and the OS running on the VM (called the Guest OS) must rely on the underlying hypervisor to function. The applications and operating system reside and run inside the VM. Their operations go through the guest OS's kernel and are then translated to the system calls by the hypervisor, which are eventually executed on the host OS.

Containers, on the other hand, don't need a hypervisor underneath. By leveraging some Linux containerization technologies such as namespaces and cgroups (which we will revisit later), each container runs independently on the host OS. The following diagram illustrates containerization, taking Docker containers as an example:

Figure 1.2: Running applications in containers

Figure 1.2: Running applications in containers

It's worth mentioning that we put Docker beside the containers instead of between the containers and the host OS. That's because, technically, it's not necessary to have Docker Engine hosting those containers. Docker Engine plays more of a manager role to manage the life cycle of the containers. It is also inappropriate to liken Docker Engine to the hypervisor because once a container is up and running, we don't need an extra layer to "translate" the application operations to be understandable by the host OS. From Figure 1.2, you can also tell that applications inside the containers are essentially running directly on the host OS.

When we spin up a container, we don't need to bring up an entire OS; instead, it leverages the features of the Linux kernel on the host OS. Therefore, containers start up faster, function with less overhead, and require much less space compared to VMs. The following is a table comparing VMs with containers:

Figure 1.3: Comparison of VMs and Containers

Figure 1.3: Comparison of VMs and Containers

Looking at this comparison, it seems that containers win in all aspects except for isolation. The Linux container technologies that are leveraged by the containers are not new. The key Linux kernel features, namespace, and cgroup (which we will study later in this chapter) have existed for more than a decade. There were some older container implementations such as LXC and Cloud Foundry Warden before the emergence of Docker. Now, an interesting question is: given that container technology has so many benefits, why has it been adopted in recent years instead of a decade ago? We will find some answers to this question in the following sections.

Docker Basics

Until now, we have seen the different advantages that containerization provides as opposed to running applications on a VM. Docker is the most commonly used containerization technology by a wide margin. In this section, we will start with some Docker basics and perform some exercises to get you first-hand experience of working with Docker.

Note

Apart from Docker, there are other container managers such as containerd and podman. They behave differently in terms of features and user experiences, for example, containerd and podman are claimed to be more lightweight than Docker, and better fit than Kubernetes. However, they are all Open Container Initiatives (OCI) compliant to guarantee the container images are compatible.

Although Docker can be installed on any OS, you should be aware that, on Windows and macOS, it actually creates a Linux VM (or uses equivalent virtualization technology such as HyperKit in macOS) and embeds Docker into the VM. In this chapter, we will use Ubuntu 18.04 LTS as the OS and the Docker Community Edition 18.09.7.

Before you proceed, please ensure that Docker is installed as per the instructions in the Preface. You can confirm whether Docker is installed by querying the version of Docker using the following command:

docker --version

You should see the following output:

Docker version 18.09.7, build 2d0083d

Note

All the commands in the following sections are executed as root. Enter sudo -s in the terminal, followed by the admin password when prompted, to get root access.

What's behind docker run?

After Docker is installed, running a containerized application is quite simple. For demonstration purposes, we will use the Nginx web server as an example application. We can simply run the following command to start up the Nginx server:

docker run -d nginx

You should see the similar result:

Figure 1.4: Starting up Nginx

Figure 1.4: Starting up Nginx

This command involves several actions, described as follows:

  1. docker run tells Docker Engine to run an application.
  2. The -d parameter (short for --detach) forces the application to run in the background so that you won't see the output of the application in the terminal. Instead, you have to run docker logs <container ID> to implicitly get the output.

    Note

    The "detached" mode usually implies that the application is a long-running service.

  3. The last parameter, nginx, indicates the image name on which the application is based. The image encapsulates the Nginx program as well as its dependencies.

The output logs explain a brief workflow: first, it tried to fetch the nginx image locally, which failed, so it retrieved the image from a public image repository (Docker Hub, which we will revisit later). Once the image is downloaded locally, it uses that image to start an instance, and then outputs an ID (in the preceding example, this is 96c374…), identifying the running instance. As you can observe, this is a hexadecimal string, and you can use the beginning four or more unique characters in practice to refer to any instance. You should see that even the terminal outputs of the docker commands truncate the ID.

The running instance can be verified using the following command:

docker ps

You should see the following result:

Figure 1.5: Getting a list of all the running Docker containers

Figure 1.5: Getting a list of all the running Docker containers

The docker ps command lists all the running containers. In the preceding example, there is only one container running, which is nginx. Unlike a typical Nginx distribution that runs natively on a physical machine or VM, the nginx container functions in an isolated manner. The nginx container does not, by default, expose its service on host ports. Instead, it serves at the port of its container, which is an isolated entity. We can get to the nginx service by calling on port 80 of the container IP.

First, let's get the container IP by running the following command:

docker inspect --format '{{.NetworkSettings.IPAddress}}' <Container ID or NAME>

You should see the following output (it may vary depending on your local environment):

172.17.0.2

As you can see, in this case, the nginx container has an IP address of 172.17.0.2. Let's check whether Nginx responds by accessing this IP on port 80:

curl <container IP>:80

You should see the following output:

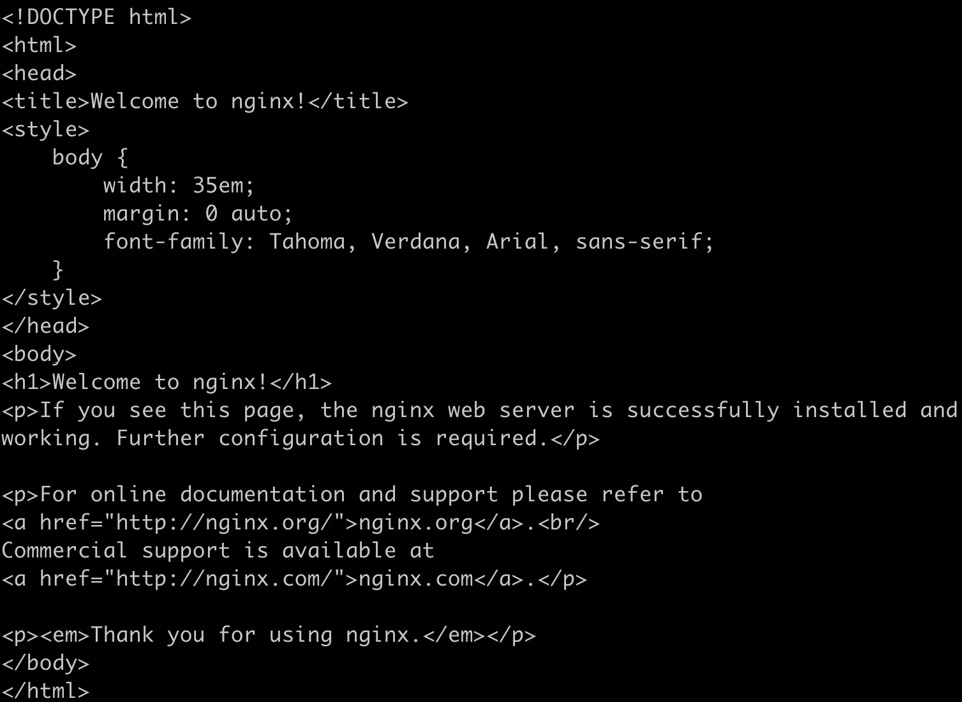
Figure 1.6: Response of the Nginx container

Figure 1.6: Response of the Nginx container

As you can see in Figure 1.6, we get a response, which is displayed in the terminal as the source HTML of the default home page.

Usually, we don't rely on the internal IP to access the service. A more practical way is to expose the service on some port of the host. To map the host port 8080 to the container port 80, use the following command:

docker run -p 8080:80 -d nginx

You should see a similar response:

39bf70d02dcc5f038f62c276ada1675c25a06dd5fb772c5caa19f02edbb0622a

The -p 8080:80 parameter tells Docker Engine to start the container and map the traffic on port 8080 of the host to the inside container at port 80. Now, if we try to access the localhost on port 8080, we will be able to access the containerized nginx service. Let's try it out:

curl localhost:8080

You should see the same output as in Figure 1.6.

Nginx is an example of a type of workload that doesn't have a fixed termination time, that is, it does not just show output and then terminates. This is also known as a long-running service. The other type of workload, which just runs to completion and exits, is called a short-time service, or simply a job. For containers running jobs, we can omit the -d parameter. Here is an example of a job:

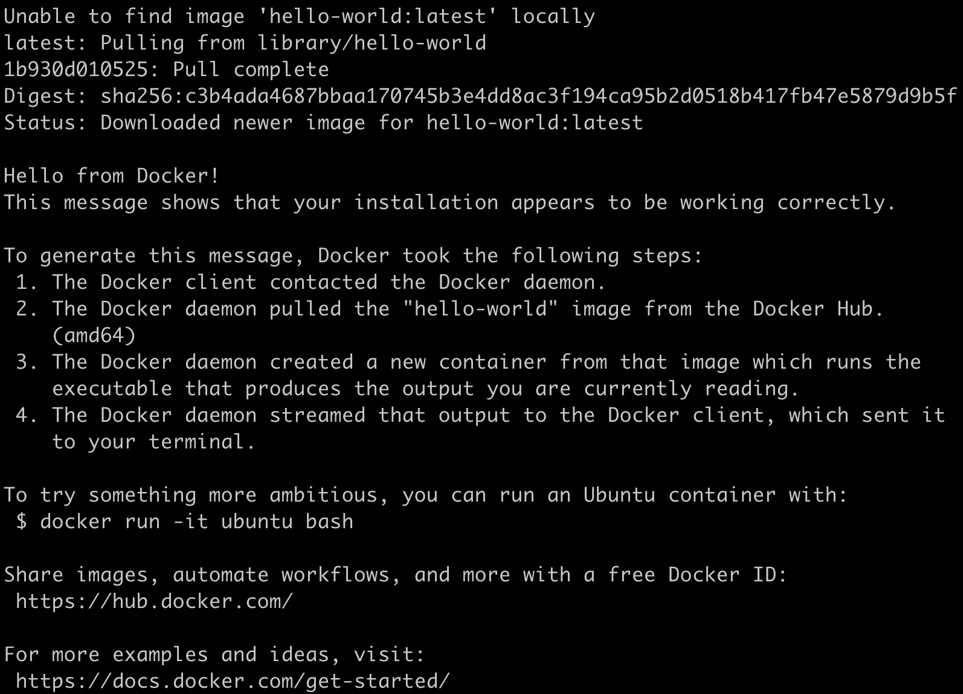
docker run hello-world

You should see the following response:

Figure 1.7: Running the hello-world image

Figure 1.7: Running the hello-world image

Now, if you run docker ps, which is intended to list running containers, it doesn't show the hello-world container. This is as expected since the container has finished its job (that is, printing out the response text that we saw in the previous screenshot) and exited. To be able to find the exited container, you can run the same command with the -a flag, which will show all the containers:

docker ps -a

You should see the following output:

Figure 1.8: Checking our exited container

Figure 1.8: Checking our exited container

For a container that has stopped, you can delete it using docker rm <container ID>, or rerun it with docker run <container ID>. Alternatively, if you rerun the docker run hello-world, it will again bring up a new container with a new ID and exit after it finishes its job. You can try this out yourself as follows:

docker run hello-world
docker ps -a

You should see the following output:

Figure 1.9: Checking multiple exited containers

Figure 1.9: Checking multiple exited containers

Thus, you can see that running multiple containers based on the same underlying image is pretty straightforward.

By now, you should have a very basic understanding of how a container is launched, and how to check its status.

Dockerfiles and Docker Images

In the VM era, there was no standard or unified way to abstract and pack various kinds of applications. The traditional way was to use a tool, such as Ansible, to manage the installation and update the processes for each application. This is still used nowadays, but it involves lots of manual operations and is error-prone due to inconsistencies between different environments. From a developer's perspective, applications are developed on local machines, which are vastly different from the staging and eventual production environment.

So, how does Docker resolve these issues? The innovation it brings is called Dockerfile and Docker image. A Dockerfile is a text file that abstracts a series of instructions to build a reproducible environment including the application itself as well as all of its dependencies.

By using the docker build command, Docker uses the Dockerfile to generate a standardized entity called a Docker image, which you can run on almost any OS. By leveraging Docker images, developers can develop and test applications in the same environment as the production one, because the dependencies are abstracted and bundled within the same image. Let's take a step back and look at the nginx application we started earlier. Use the following command to list all the locally downloaded images:

docker images

You should see the following list:

Figure 1.10: Getting a list of images

Figure 1.10: Getting a list of images

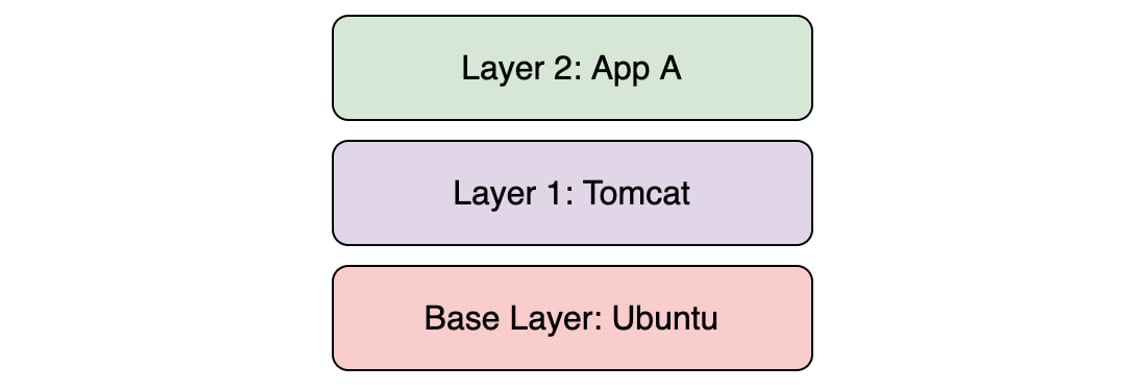
Unlike VM images, Docker images only bundle the necessary files such as application binaries, dependencies, and the Linux root filesystem. Internally, a Docker image is separated into different layers, with each layer being stacked on top of another one. In this way, upgrading the application only requires an update to the relevant layers. This reduces both the image footprint as well as the upgrade time.

The following figure shows the hierarchical layers of a hypothetical Docker image that is built from the base OS layer (Ubuntu), the Java web application runtime layer (Tomcat), and the topmost user application layer:

Figure 1.11: An example of stacked layers in a container

Figure 1.11: An example of stacked layers in a container

Note that it is common practice to use the images of a popular OS as a starting point for building Docker images (as you will see in the following exercise) since it conveniently includes the various components required to develop an application. In the preceding hypothetical container, the application would use Tomcat as well as some dependencies included in Ubuntu in order to function properly. This is the only reason that Ubuntu is included as the base layer. If we wanted, we could bundle the required dependencies without including the entire Ubuntu base image. So, don't confuse this with the case of a VM, where including a guest OS is necessary.

Let's take a look at how we can build our own Docker image for an application in the following exercise.

Exercise 1.01: Creating a Docker Image and Uploading It to Docker Hub

In this exercise, we will build a Docker image for a simple application written in Go.

We're going to use Go in this exercise so that the source code and its language dependencies can be compiled into a single executable binary. However, you're free to use any programming language you prefer; just remember to bundle the language runtime dependencies if you're going to use Java, Python, Node.js, or any other language:

  1. For this exercise, we will create a file named Dockerfile. Note that this filename has no extension. You can use your preferred text editor to create this file with the following content:
    FROM alpine:3.10
    COPY k8s-for-beginners /
    CMD ["/k8s-for-beginners"]

    Note

    From the terminal, whenever you create a file using any simple text editor such as vim or nano or using the cat command, it will be created in the current working directory in any Linux distro or even macOS. The default working directory when you open the terminal is /home/. If you prefer to use a different directory, please take that into account when following any of the exercise steps throughout this book.

    The first line specifies which base image to use as the foundation. This example uses Alpine, a popular base image that takes only about 5 MB and is based on Alpine Linux. The second line copies a file called k8s-for-beginners from the directory where the Dockerfile is located to the root folder of the image. In this example, we will build a tiny web server and compile it to a binary with the name k8s-for-beginners, which will be placed in the same directory as the Dockerfile. The third line specifies the default startup command. In this case, we just start our sample web server.

  2. Next, let's build our sample web server. Create a file named main.go with the following content:
    package main
    import (
            "fmt"
            "log"
            "net/http"
    )
    func main() {
            http.HandleFunc("/", handler)
            log.Fatal(http.ListenAndServe("0.0.0.0:8080", nil))
    }
    func handler(w http.ResponseWriter, r *http.Request) {
            log.Printf("Ping from %s", r.RemoteAddr)
            fmt.Fprintln(w, "Hello Kubernetes Beginners!")
    }

    As you can observe from func main(), this application serves as a web server that accepts an incoming HTTP request at port 8080 on the root path and responds with the message Hello Kubernetes Beginners.

  3. To verify this program works, you can just run go run main.go, and then open http://localhost:8080 on the browser. You're expected to get the "Hello Kubernetes Beginners!" output.
  4. Use go build to compile runtime dependencies along with the source code into one executable binary. Run the following command in the terminal:
    CGO_ENABLED=0 GOOS=linux GOARCH=amd64 go build -o k8s-for-beginners

    Note

    Unlike step 3, the arguments GOOS=linux GOARCH=amd64 tell the Go compiler to compile the program on a specific platform, which turns out to be compatible with the Linux distro we are going to build this problem into. CGO_ENABLED=0 is aimed to generate a statically linked binary so that it can work with some minimum-tailored image (For example, alpine).

  5. Now, check whether the k8s-for-beginners file is created:
    ls

    You should see the following response:

    Dockerfile k8s-for-beginners  main.go
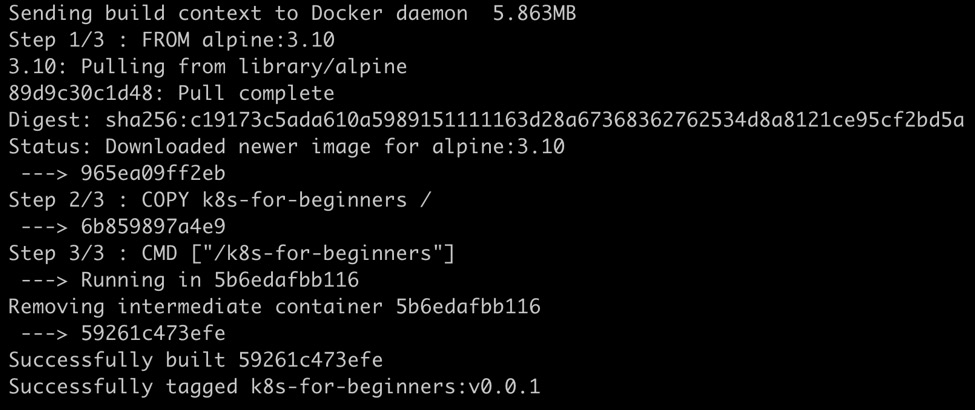
  6. Now we have both the Dockerfile and the runnable binary. Build the Docker image by using the following command:
    docker build -t k8s-for-beginners:v0.0.1 .

    Don't miss the dot (.) at the end of this command. You should see the following response:

    Figure 1.12: Output of docker build command

    Figure 1.12: Output of docker build command

    There are two parameters in the command that we used: -t k8s-for-beginners:v0.0.1 provides a tag on the image with format <imagename:version>, while . (the dot at the end of the command) denotes the path to look for the Dockerfile. In this case, . refers to the current working directory.

    Note

    If you clone the GitHub repository for this chapter, you will find that we have provided a copy of the Dockerfile in each directory so that you can conveniently run the docker build command by navigating to the directory.

  7. Now, we have the k8s-for-beginners:v0.0.1 image available locally. You can confirm that by running the following command:
    docker images

    You should see the following response:

    Figure 1.13: Verifying whether our Docker image has been created

Figure 1.13: Verifying whether our Docker image has been created

An interesting thing to observe is that the image merely consumes 11.4 MB, which includes both the Linux system files and our application. A tip here is to only include necessary files in the Docker image to make it compact so that it is easy to distribute and manage.

Now that we have built our image, we will run it in a container in the next exercise. Another thing to note is that, currently, this image resides on our local machine, and we can build a container using it only on our machine. However, the advantage of packaging an application with its dependencies is that it can be easily run on different machines. To easily facilitate that, we can upload our images to online Docker image repositories such as Docker Hub (https://hub.docker.com/).

Note:

In addition to Docker Hub, there are other public image repositories such as quay.io, gcr.io, and more. You can refer to the documentation of the respective repository to configure it properly in your Docker client.

Exercise 1.02: Running Your First Application in Docker

In Exercise 1.01, Creating a Docker Image and Uploading it to Docker Hub, we packaged the web application into a Docker image. In this exercise, we will run it and push it to Docker Hub:

  1. First, we should clean up any leftover containers from the previous exercise by running the following command in the terminal:
    docker rm -f $(docker ps -aq)

    You should see the following response:

    43c01e2055cf
    286bc0c92b3a
    39bf70d02dcc
    96c374000f6f

    We have seen that docker ps -a returns the information of all the containers. The extra q in the -aq flag means "quiet" and the flag will only display numeric IDs. These IDs will be passed to docker rm -f, and, therefore, all the containers will be removed forcefully.

  2. Run the following command to start the webserver:
    docker run -p 8080:8080 -d k8s-for-beginners:v0.0.1

    You should see the following response:

    9869e9b4ab1f3d5f7b2451a7086644c1cd7393ac9d78b6b4c1bef6d423fd25ac

    As you can see in the preceding command, we are mapping the internal port 8080 of the container to the host machine's port 8080. The 8080:8080 parameter preceded by -p maps port 8080 of the container to port 8080 on the host machine. The -d parameter indicates the detached mode. By default, Docker checks the local registry first. So, in this case, the local Docker image will be used for launching the container.

  3. Now, let us check whether it works as expected by sending an HTTP request to localhost at port 8080:
    curl localhost:8080

    The curl command checks for a response from the stated address. You should see the following response:

    Hello Kubernetes Beginners!
  4. We can also observe the logs of the running container by using the following commands:
    docker logs <container ID>

    You should see the following logs:

    2019/11/18  05:19:41 Ping from 172.17.0.1:41416

    Note

    Before running the following commands, you should register for a Docker Hub account and have your username and password ready.

  5. Finally, we need to log in to Docker Hub, and then push the local image to the remote Docker Hub registry. Use the following command:
    docker login

    Now enter the username and password to your Docker Hub account when prompted. You should see the following response:

    Figure 1.14: Logging in to Docker Hub

    Figure 1.14: Logging in to Docker Hub

  6. Next, we will push the local image, k8s-for-beginners:v0.0.1, to the remote Docker Hub registry. Run the following command:
    docker push k8s-for-beginners:v0.0.1

    You should see the following response:

    Figure 1.15: Failing to push the image to Docker Hub

    Figure 1.15: Failing to push the image to Docker Hub

    But wait, why does it say, "requested access to the resource is denied"? That is because the parameter followed by the docker push must comply with a <username/imagename:version> naming convention. In the previous exercise, we specified a local image tag, k8s-for-beginners:v0.0.1, without a username. In the docker push command, if no username is specified, it will try to push to the repository with the default username, library, which also hosts some well-known libraries such as Ubuntu, nginx, and more.

  7. To push our local image to our own user, we need to give a compliant name for the local image by running docker tag <imagename:version> <username/imagename:version>, as shown in the following command:
    docker tag k8s-for-beginners:v0.0.1 <your_DockerHub_username>/k8s-for-beginners:v0.0.1
  8. You can verify that the image has been properly tagged using the following command:
    docker images

    You should see the following output:

    Figure 1.16: Checking the tagged Docker image

    Figure 1.16: Checking the tagged Docker image

    After tagging it properly, you can tell that the new image actually has the same IMAGE ID as the old one, which implies they're the same image.

  9. Now that we have the image tagged appropriately, we're ready to push this image to Docker Hub by running the following command:
    docker push <your_username>/k8s-for-beginners:v0.0.1

    You should see a response similar to this:

    Figure 1.17: Image successfully pushed to Docker Hub

    Figure 1.17: Image successfully pushed to Docker Hub

  10. The image will be live after a short time on Docker Hub. You can verify it by replacing the <username> with your username in the following link: https://hub.docker.com/repository/docker/<username>/k8s-for-beginners/tags.

    You should be able to see some information regarding your image, similar to the following image:

    Figure 1.18: The Docker Hub page for our image

Figure 1.18: The Docker Hub page for our image

Now our Docker image is publicly accessible for anyone to use, just like the nginx image we used at the beginning of this chapter.

In this section, we learned how to build Docker images and push them to Docker Hub. Although it looks inconspicuous, it is the first time we have a unified mechanism to manage the applications, along with their dependencies, consistently across all environments. Docker images and their underlying layered filesystem are also the primary reason why container technology has been widely adopted in recent years, as opposed to a decade ago.

In the next section, we will dive a little deeper into Docker to see how it leverages Linux container technologies.

The Essence of Linux Container Technology

All things look elegant and straightforward from the outside. But what's the magic working underneath to make a container so powerful? In this section, we will try to open the hood to take a look inside. Let us take a look at a few Linux technologies that lay the foundation for containers.

Namespace

The first key technology relied upon by containers is called a Linux namespace. When a Linux system starts up, it creates a default namespace (the root namespace). Then, by default, the processes created later join the same namespace, and, hence, they can interact with each other boundlessly. For example, two processes are able to view the files in the same folder, and also interact through the localhost network. This sounds pretty straightforward, but technically it's all credited to the root namespace, which connects all the processes.

To support advanced use cases, Linux offers the namespace API to enable different processes being grouped into different namespaces so that only the processes that belong to the same namespace can be aware of each other. In other words, different groups of processes are isolated. This also explains why we mentioned earlier that the isolation of Docker is process-level. The following is a list of the types of namespaces supported in the Linux kernel:

  • Mount namespaces
  • PID (Process ID) namespaces
  • Network namespaces
  • IPC (Inter-Process Communication) namespaces
  • UTS (Unix Time-sharing System) namespaces
  • User namespaces (since Linux kernel 3.8)
  • Cgroup namespaces (since Linux kernel 4.6)
  • Time namespaces (to be implemented in a future version of the Linux kernel)

For the sake of brevity, we will choose two easy ones (UTS and PID) and use concrete examples to explain how they're reflected in Docker later.

Note

If you are running macOS, some of the following commands will need to be used differently, since we are exploring Linux features. Docker on macOS runs inside a Linux VM using HyperKit. So, you need to open another terminal session and log into the VM:

screen ~/Library/Containers/com.docker.docker/Data/vms/0/tty

After this command, you may see an empty screen. Press Enter, and you should have root access to the VM that is running Docker. To exit the session, you can press Ctrl + A + K, and then press Y when asked for confirmation for killing the window.

We recommend that you use a different terminal window to access the Linux VM. We will mention which commands need to be run in this terminal session if you are using macOS. If you are using any Linux OS, you can ignore this and simply run all the commands in the same terminal session, unless mentioned otherwise in the instructions.

Once a Docker container is created, Docker creates and associates a number of namespaces with the container. For example, let's take a look at the sample container we created in the previous section. Let's use the following command:

docker inspect --format '{{.State.Pid}}' <container ID>

The preceding command checks the PID of the container running on the host OS. You should see a response similar to the following:

5897

In this example, the PID is 5897, as you can see in the preceding response. Now, run this command in the Linux VM:

ps -ef | grep k8s-for-beginners

This should give an output similar to this:

Figure 1.19: Checking the PID of our process

Figure 1.19: Checking the PID of our process

The ps -ef command lists all the running processes on the host OS, and | grep k8s-for-beginners then filters this list to display the processes that have k8s-for-beginners in their name. We can see that the process also has the PID 5897, which is consistent with the first command. This reveals an important fact that a container is nothing but a particular process running directly on the host OS.

Next, run this command:

ls -l /proc/<PID>/ns

For macOS, run this command in the VM terminal. You should see the following output:

Figure 1.20: Listing the different namespaces created for our container

Figure 1.20: Listing the different namespaces created for our container

This command checks the /proc folder (which is a Linux pseudo-filesystem) to list all the namespaces created along with the start of the container. The result shows some well-known namespaces (take a look at the highlighted rectangle) such as uts, pid, net, and more. Let's take a closer look at them.

The uts namespace is created to enable the container to have its hostname instead of the host's hostname. By default, a container is assigned its container ID as the hostname, and it can be changed using the -h parameter while running a container, as shown here:

docker run -h k8s-for-beginners -d packtworkshops/the-kubernetes-workshop:k8s-for-beginners

This should give the following response:

df6a15a8e2481ec3e46dedf7850cb1fbef6efafcacc3c8a048752da24ad793dc

Using the returned container ID, we can enter the container and check its hostname using the following two commands one after the other:

docker exec -it <container ID> sh
hostname

You should see the following response:

k8s-for-beginners

The docker exec command tries to enter into the container and execute the sh command to launch the shell inside the container. And once we're inside the container, we run the hostname command to check the hostname from inside the container. From the output, we can tell that the -h parameter is in effect because we can see k8s-for-beginners as the hostname.

In addition to the uts namespace, the container is also isolated in its own PID namespace, so it can only view the processes launched by itself, and the launching process (specified by CMD or ENTRYPOINT in the Dockerfile that we created in Exercise 1.01, Creating a Docker Image and Uploading it to Docker Hub) is assigned PID 1. Let's take a look at this by entering the following two commands one after the other:

docker exec -it <container ID> sh
ps

You should see the following response:

Figure 1.21: The list of processes inside our container

Figure 1.21: The list of processes inside our container

Docker provides the --pid option for a container to join another container's PID namespace.

In addition to the uts and pid namespaces, there are some other namespaces that Docker leverages. We will examine the network namespace ("net" in Figure 1.20) in the next exercise.

Exercise 1.03: Joining a Container to the Network Namespace of Another Container

In this exercise, we will recreate the k8s-for-beginners container without host mapping, and then create another container to join its network namespace:

  1. As with the previous exercise, remove all the existing containers by running the following command:
    docker rm -f $(docker ps -aq)

    You should see an output similar to this:

    43c01e2055cf
    286bc0c92b3a
    39bf70d02dcc
    96c374000f6f
  2. Now, begin by running our container using the following command:
    docker run -d packtworkshops/the-kubernetes-workshop:k8s-for-beginners

    You should see the following response:

    33003ddffdf4d85c5f77f2cae2528cb2035d37f0a7b7b46947206ca104bbbaa5
  3. Next, we will get the list of running containers so that we can see the container ID:
    docker ps

    You should see the following response:

    Figure 1.22: Getting a list of all of the running containers

    Figure 1.22: Getting a list of all of the running containers

  4. Now, we will run an image called netshoot in the same network namespace as the container that we created in step 1, by using the --net parameter:
    docker run -it --net container:<container ID> nicolaka/netshoot

    Use the container ID of our previous container that we obtained in the previous step. You should see a response that is similar to the following:

    Figure 1.23: Starting up the netshoot container

    Figure 1.23: Starting up the netshoot container

    nicolaka/netshoot is a tiny image packaged with some commonly used network libraries such as iproute2, curl, and more.

  5. Now, let's run the curl command inside netshoot to check whether we are able to access the k8s-for-beginners container:
    curl localhost:8080

    You should see the following response:

    Hello Kubernetes Beginners!

    The preceding example proves that the netshoot container was created by joining the network namespace of k8s-for-beginners; otherwise, accessing port 8080 on localhost wouldn't have got us a response.

  6. This can also be verified by double-checking the network namespace IDs of the two containers, which we will do in the following steps.

    To confirm our result, let us first open another terminal without exiting the netshoot container. Get the list of containers to ensure both containers are  running:

    docker ps

    You should see a response as follows:

    Figure 1.24: Checking whether both of the k8s-for-beginners and netshoot 
containers are online

    Figure 1.24: Checking whether both of the k8s-for-beginners and netshoot containers are online

  7. Next, get the PID of the k8s-for-beginners container:
    docker inspect --format '{{.State.Pid}}' <container ID>

    You should see the following response:

    7311

    As you can see, the PID for this example is 7311.

  8. Now get the pseudo-filesystem of the process using the preceding PID:
    ls -l /proc/<PID>/ns/net

    If you are using macOS, run this command on the Linux VM in another terminal session. Use the PID you obtained in the previous step in this command. You should see the following response:

    lrwxrwxrwx 1 root root 0 Nov 19 08:11 /proc/7311/ns/net -> 'net:[4026532247]'
  9. Similarly, get the PID of the netshoot container using the following command:
    docker inspect --format '{{.State.Pid}}' <container ID>

    Use the appropriate container ID from step 6 in this command. You should see the following response:

    8143

    As you can see, the PID of the netshoot container is 8143.

  10. Next, we can get its pseudo-filesystem using its PID or by using this command:
    ls -l /proc/<PID>/ns/net

    If you are using macOS, run this command on the Linux VM in another session. Use the PID from the previous step in this command. You should see the following response:

    lrwxrwxrwx 1 root root 0 Nov 19 09:15 /proc/8143/ns/net -> 'net:[4026532247]'

    As you can observe from the outputs of step 8 and step 10, the two containers share the same network namespace (4026532247).

  11. As a final cleanup step, let's remove all of the containers:
    docker rm -f $(docker ps -aq)

    You should see a response similar to the following:

    61d0fa62bc49
    33003ddffdf4
  12. What if you want to join a container to the host's root namespace? Well, --net host is a good way of achieving that. To demonstrate this, we will start a container using the same image, but with the --net host parameter:
    docker run --net host -d packtworkshops/the-kubernetes-workshop:k8s-for-beginners

    You should see the following response:

    8bf56ca0c3dc69f09487be759f051574f291c77717b0f8bb5e1760c8e20aebd0
  13. Now, list all of the running containers:
    docker ps

    You should see the following response:

    Figure 1.25: Listing all the containers

    Figure 1.25: Listing all the containers

  14. Get the PID of the running container using the following command:
    docker inspect --format '{{.State.Pid}}' <container ID>

    Use the appropriate container ID in this command. You should see the following response:

    8380
  15. Find the network namespace ID by looking up the PID:
    ls -l /proc/<PID>/ns/net

    If you are using macOS, run this command on the Linux VM. Use the appropriate PID in this command. You should see the following response:

    lrwxrwxrwx 1 root root 0 Nov 19 09:20 /proc/8380/ns/net -> 'net:[4026531993]'

    You may be confused by the 4026531993 namespace. By giving the --net host parameter, shouldn't Docker bypass the creation of a new namespace? The answer to this is that it's not a new namespace; in fact, it's the aforementioned Linux root namespace. We will confirm this in the next step.

  16. Get the namespace of PID 1 of the host OS:
    ls -l /proc/1/ns/net

    If you are using macOS, run this command on the Linux VM. You should see the following response:

    lrwxrwxrwx 1 root root 0 Nov 19 09:20 /proc/1/ns/net -> 'net:[4026531993]'

    As you can see in this output, this namespace of the host is the same as that of the container we saw in step 15.

From this exercise, we can get an impression of how a container is isolated into different namespaces, and also which Docker parameter can be used to relate it with other namespaces.

Cgroups

By default, no matter which namespace a container joins, it can use all of the available resources of the host. That is, for sure, not what we want when we are running multiple containers on a system; otherwise, a few containers may hog the resources shared among all the containers.

To address this, the cgroups (short for Control Groups) feature was introduced in Linux kernel version 2.6.24 onward to limit the resource usage of processes. Using this feature, a system administrator can control the most important resources, such as memory, CPU, disk space, and network bandwidth.

In Ubuntu 18.04 LTS, a series of cgroups under path /sys/fs/cgroup/<cgroup type> are created by default.

Note

You can run mount -t cgroup in order to view all the cgroups in Ubuntu; though, we are leaving them out of the scope of this book since they are not very relevant to us.

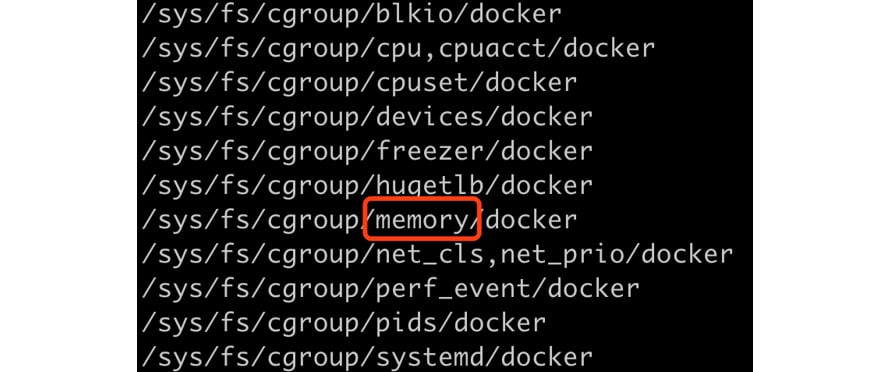
Right now, we don't quite care about the system processes and their cgroups; we just want to focus on how Docker is related in the whole cgroups picture. Docker has its cgroups folders under the path /sys/fs/cgroup/<resource kind>/docker. Use the find command to retrieve the list:

find /sys/fs/cgroup/* -name docker -type d

If you are using macOS, run this command on the Linux VM in another session. You should see the following results:

Figure 1.26: Getting all the cgroups related to Docker

Figure 1.26: Getting all the cgroups related to Docker

Each folder is read as a control group, and the folders are hierarchical, meaning that each cgroup has a parent from which it inherits properties, all the way up to the root cgroup, which is created at the system start.

To illustrate how a cgroup works in Docker, we will use the memory cgroup, highlighted in Figure 1.26 as an example.

But first, let's remove all existing containers using the following command:

docker rm -f $(docker ps -aq)

You should see a response similar to the following:

61d0fa62bc49

Let's confirm that by using the following command:

docker ps

You should see an empty list as follows:

CONTAINER ID     IMAGE       COMMAND          CREATED          STATUS
        PORTS          NAMES

Let's see whether there is a cgroup memory folder:

find /sys/fs/cgroup/memory/docker/* -type d

If you are using macOS, run this command on the Linux VM. You should then see the following response:

root@ubuntu: ~# find /sys/fs/cgroup/memory/docker/* -type d

No folders show up. Now, let's run a container:

docker run -d packtworkshops/the-kubernetes-workshop:k8s-for-beginners 

You should see the output similar to the following:

8fe77332244b2ebecbda27a4496268264218c4e59614d59b5849a22b12941e1

Check the cgroup folder again:

find /sys/fs/cgroup/memory/docker/* -type d

If you are using macOS, run this command on the Linux VM. You should see this response:

/sys/fs/cgroup/memory/docker/8fe77332244b2ebecbda27a4496268264218c4e59614d59b5849a22b12941e1

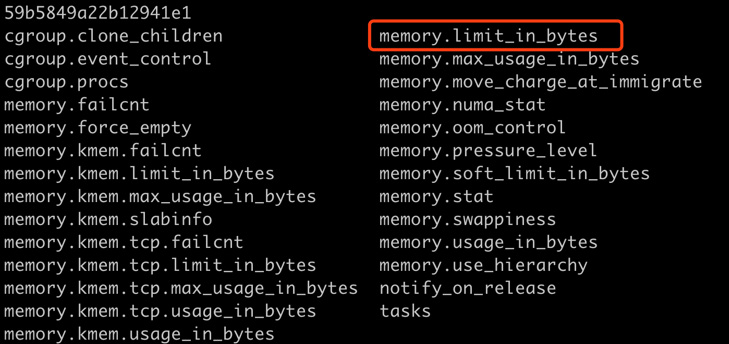
By now, you can see that once we create a container, Docker creates its cgroup folder under a specific resource kind (in our example, it's memory). Now, let's take a look at which files are created in this folder:

ls /sys/fs/cgroup/memory/docker/8fe77332244b2ebecbd8a2704496268264218c4e59614d59b5849022b12941e1

If you are using macOS, run this command on the Linux VM. Please use the appropriate path that you obtained from the previous screenshot for your instance. You should see the following list of files:

Figure 1.27: Exploring memory cgroups created by Docker

Figure 1.27: Exploring memory cgroups created by Docker

We won't go through every setting here. The setting we're interested in is memory.limit_in_bytes, as highlighted previously, which denotes how much memory the container can use. Let's see what value is written in this file:

cat /sys/fs/cgroup/memory/docker/8fe77332244b2ebecbd8a2704496268264218c4e59614d59b5849022b12941e1/memory.limit_in_bytes

If you are using macOS, run this command on the Linux VM. You should see the following response:

9223372036854771712

The value 9223372036854771712 is the largest positive signed integer (263 – 1) in a 64-bit system, which means unlimited memory can be used by this container.

To discover how Docker deals with the containers that overuse claimed memory, we're going to show you another program that consumes a certain amount of RAM. The following is a Golang program used to consume 50 MB of RAM incrementally and then hold the entire program (sleep for 1 hour) so as to not exit:

package main
import (
        "fmt"
        "strings"
        "time"
)
func main() {
        var longStrs []string
        times := 50
        for i := 1; i <= times; i++ {
                fmt.Printf("===============%d===============\n", i)
                // each time we build a long string to consume 1MB                     (1000000 * 1byte) RAM
                longStrs = append(longStrs, buildString(1000000,                     byte(i)))
        }
        // hold the application to exit in 1 hour
        time.Sleep(3600 * time.Second)
}
// buildString build a long string with a length of `n`.
func buildString(n int, b byte) string {
        var builder strings.Builder
        builder.Grow(n)
        for i := 0; i < n; i++ {
                builder.WriteByte(b)
        }
        return builder.String()
}

You may try building an image using this code, as shown in Exercise 1.01, Creating a Docker Image and Uploading it to Docker Hub. This code will be used in place of the code provided in step 2 of that exercise, and then you can tag the image with <username>/memconsumer. Now, we can test resource limitations. Let's use the Docker image and run it with the --memory (or -m) flag to instruct Docker that we only want to use a certain amount of RAM.

If you are using Ubuntu or any other Debian-based Linux, to continue with the chapter, you may need to manually enable cgroup memory and swap capabilities if you see the following warning message when running this command:

docker info > /dev/null

This is the warning message that you may see:

WARNING: No swap limit support

The steps to enable cgroup memory and swap capabilities are as follows:

Note

The following three steps are not applicable if you are using macOS.

  1. Edit the /etc/default/grub file (you may need root privileges for this). Add or edit the GRUB_CMDLINE_LINUX line to add the following two key-value pairs:
    GRUB_CMDLINE_LINUX="cgroup_enable=memory swapaccount=1"
  2. Run update-grub using root privileges.
  3. Reboot the machine.

Next, we should be able to limit the container memory usage to 100 MB by running the following command:

docker run --name memconsumer -d --memory=100m --memory-swap=100m packtworkshops/the-kubernetes-workshop:memconsumer

Note

This command pulls the image that we have provided for this demonstration. If you have built your image, you can use that by using <your_username>/<tag_name> in the preceding command.

You should see the following response:

WARNING: Your kernel does not support swap limit capabilities or the cgroup is not mounted. Memory limited without swap.
366bd13714cadb099c7ef6056e3b72853735473938b2e633a5cdbf9e94273143

This command disables usage on the swap memory (since we specify the same value on --memory and --memory-swap) so as to gauge the consumption of memory easily.

Let's check the status of our container:

docker ps

You should see the following response:

Figure 1.28: Getting the list of containers

Figure 1.28: Getting the list of containers

Now, let's confirm the restrictions placed on the container by reading the cgroup file for the container:

cat /sys/fs/cgroup/memory/docker/366bd13714cadb099c7ef6056e3b7285373547e9e8b2e633a5cdbf9e94273143/memory.limit_in_bytes

If you are using macOS, run this command on the Linux VM. Please use the appropriate path in this command. You should see the following response:

104857600

The container is launched with a request of 100 MB of RAM, and it runs without any problem since it internally only consumes 50 MB of RAM. From the cgroup setting, you can observe that the value has been updated to 104857600, which is exactly 100 MB.

But what if the container requests less than 50 MB, while the program running in it requires more than 50 MB? How will Docker and Linux respond to that? Let's take a look.

First, let's remove any running containers:

docker rm -f $(docker ps -aq)

You should see the following response:

366bd13714ca

Next, we're going to run the container again, but we will request only 20 MB of memory:

docker run --name memconsumer -d --memory=20m --memory-swap=20m packtworkshops/the-kubernetes-workshop:memconsumer

You should see this response:

298541bc46855a749f9f8944860a73f3f4f2799ebda7969a5eada60e3809539bab

Now, let's check the status of our container:

docker ps

You should see an empty list like this:

CONTAINER ID     IMAGE       COMMAND      CREATED        STATUS
       PORTS          NAMES

As you can see, we cannot see our container. Let's list all kinds of containers:

docker ps -a

You should see the following output:

Figure 1.29: Getting a list of all containers

Figure 1.29: Getting a list of all containers

We found our container. It has been forcibly killed. It can be verified by checking the container logs:

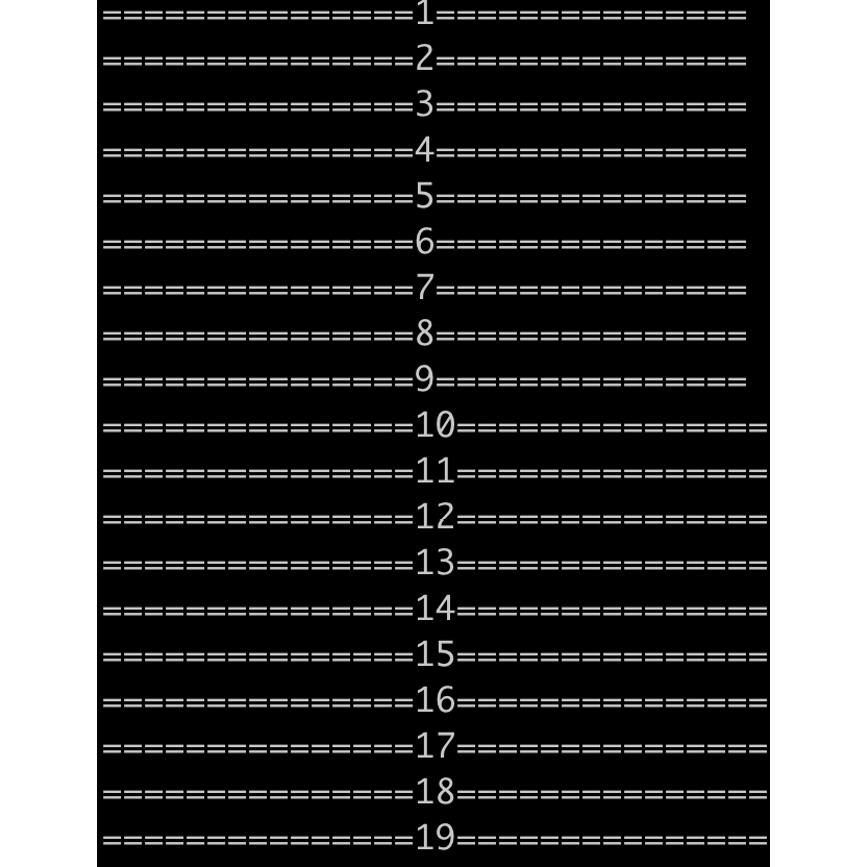
docker logs memconsumer

You should see the following output:

Figure 1.30: The logs of our terminated container

Figure 1.30: The logs of our terminated container

The container tried to increase the memory consumed by 1 MB each time, and when it came to the memory limit (20 MB), it was killed.

From the preceding examples, we have seen how Docker exposes flags to end-users, and how those flags interact with underlying Linux cgroups to limit resource usage.

Containerization: The Mindset Change

In the previous sections, we looked at the anatomy of Linux namespaces and cgroups. We explained that a container is essentially a process running natively on the host OS. It is a special process with additional limitations such as OS-level isolation from other processes and the control of resource quotas.

Since Docker 1.11, containerd has been adopted as the default container runtime, instead of directly using Docker Daemon (dockerd) to manage containers. Let's take a look at this runtime. First, restart our container normally:

docker run -d packtworkshops/the-kubernetes-workshop:k8s-for-beginners

You should see the following response:

c7ee681ff8f73fa58cf0b37bc5ce08306913f27c5733c725f7fe97717025625d

We can use ps -aef --forest to list all of the running processes in a hierarchy, and then use | grep containerd to filter the output by the containerd keyword. Finally, we can use -A 1 to output one extra line (using -A 1) so that at least one running container shows up:

ps -aef --forest | grep containerd -A 1

If you are using macOS, run this command on the Linux VM without the --forest flag. You should see the following response:

Figure 1.31: Getting processes related to containerd

Figure 1.31: Getting processes related to containerd

In the output, we can see that containerd (PID 1037) acts as the top parent process, and it manages containerd-shim (PID 19374), and containerd-shim manages most of the child processes of k8s-for-beginners (PID 19394), which is the container we started.

Keeping the core idea of a container in mind can help you while migrating any VM-based applications to container-based ones. Basically, there are two patterns to deploy applications in containers:

Several Applications in One Container

This kind of implementation requires a supervisor application to launch and hold the container. And then, we can put applications into the container as child processes of the supervisor. The supervisor has several variants:

  • A customized wrapper script: This needs complicated scripting to control the failures of managed applications.
  • A third-party tool such as supervisord or systemd: Upon application failures, the supervisor is responsible for getting it restarted.

One Application in One Container

This kind of implementation does not require any supervisor as in the previous case. In fact, the life cycle of the application is tied to the life cycle of the container.

A Comparison of These Approaches

By deploying several applications in a single container, we are essentially treating a container as a VM. This container as a lightweight VM approach was once used as a promotion slogan of container technologies. However, as explained, they vary in a lot of aspects. Of course, this way can save the migration efforts from the VM-based development/deployment model to the containers, but it also introduces several drawbacks in the following aspects:

  • Application life cycle control: Looking from the outside, the container is exposed as one state, as it is essentially a single host process. The life cycles of the internal applications are managed by the "supervisor", and, therefore, cannot be observed from the outside. So, looking from the outside, you may observe that a container stays healthy, but some applications inside it may be restarting persistently. It may keep restarting due to a fatal error in one of its internal applications, which you may not be able to point out.
  • Version upgrade: If you want to upgrade any one of the different applications in a container, you may have to pull down the entire container. This causes unnecessary downtime for the other applications in that container, which don't need a version upgrade. Thus, if the applications require components that are developed by different teams, their release cycles have to be tightly coupled.
  • Horizontal scaling: If only one application needs to be scaled out, you have no option but to scale out the whole container, which will also replicate all the other applications. This leads to a waste of resources on the applications that don't need scaling.
  • Operational concerns: Checking the logs of the applications becomes more challenging as the standard output (stdout) and error (stderr) of the container don't represent the logs of the applications inside containers. You have to make an extra effort to manage those logs, such as installing additional monitoring tools to diagnose the health of each application.

Technically, having multiple applications in a single container works, and it doesn't require many mindset changes from a VM perspective. However, when we adopt the container technology to enjoy its benefits, we need to make a trade-off between migration conveniences and long-term maintainability.

The second way (that is, having one application in one container) enables a container to automatically manage the life cycle of the only application present inside it. In this way, we can unify container management by leveraging native Linux capabilities, such as getting an application status by checking the container state and fetching application logs from the stdout/stderr of the container. This enables you to manage each application in its own release cycle.

However, this is not an easy task. It requires you to rethink the relationship and dependencies of different components so as to break the monolithic applications into microservices. This may require a certain amount of refactoring of the architectural design to include both source code and delivery pipeline changes.

To summarize, adopting container technology is a break-up-and-reorganize journey. It not only takes time for the technology to mature but also, more importantly, it requires changes in people's mindsets. Only with this mindset change can you restructure the applications as well as the underlying infrastructure to unleash the value of containers and enjoy their real benefits. It's the second reason that container technologies only started to rise in recent years instead of a decade ago.

The Need for Container Orchestration

The k8s-for-beginners container we built in Exercise 1.01, Creating a Docker Image and Uploading it to Docker Hub, is nothing but a simple demonstration. In the case of a serious workload deployed in a production environment, and to enable hundreds of thousands of containers running in a cluster, we have many more things to consider. We need a system to manage the following problems:

Container Interactions

As an example, suppose that we are going to build a web app with a frontend container displaying information and accepting user requests, and a backend container serving as a datastore that interacts with the frontend container. The first challenge is to figure out how to specify the address of the backend container to the frontend container. It is not a good idea to hardcode the IP, as the container IP is not static. In a distributed system, it is not uncommon for containers or machines to fail due to unexpected issues. So, the link between any two containers must be discoverable and effective across all the machines. On the other hand, the second challenge is that we may want to limit which containers (for example, the backend container) can be visited by which kind of containers (for example, its corresponding frontend ones).

Network and Storage

All the examples that we gave in the previous sections used containers running on the same machine. This is pretty straightforward, as the underlying Linux namespaces and cgroup technologies were designed to work within the same OS entity. If we want to run thousands of containers in a production environment, which is pretty common, we have to resolve the network connectivity issue to ensure that different containers across different machines are able to connect with each other. On the other hand, local or temporary on-disk storage doesn't always work for all workloads. Applications may need the data to be stored remotely and be available to be mounted at will to any machine in the cluster the container is run on, no matter if the container is starting up for the first time or restarting after a failure.

Resource Management and Scheduling

We have seen that a container leverages Linux cgroups to manage its resource usage. To be a modern resource manager, it needs to build an easy-to-use resource model to abstract resources such as CPU, RAM, disk, and GPU. We need to manage a number of containers efficiently, and to provision and free up resources in time so as to achieve high cluster utilization.

Scheduling involves assigning an appropriate machine in the cluster for each of our workloads to run on. We will take a closer look at scheduling as we proceed further in this book. To ensure that each container has the best machine to run, the scheduler (a Kubernetes component that takes care of scheduling) needs to have a global view of the distribution of all containers across the different machines in the cluster. Additionally, in large data centers, the containers would need to be distributed based on the physical locations of the machines or the availability zones of the cloud services. For example, if all containers supporting a service are allocated to the same physical machine, and that machine happens to fail, the service will experience a period of outage regardless of how many replicas of the containers you had deployed.

Failover and Recovery

Application or machine errors are quite common in a distributed system. Therefore, we must consider container and machine failures. When containers encounter fatal errors and exit, they should be able to be restarted on the same or another suitable machine that is available. We should be able to detect machine faults or network partitions so as to reschedule the containers from problematic machines to healthy ones. Moreover, the reconciliation process should be autonomous, to make sure the application is always running in its desired state.

Scalability

As demand increases, you may want to scale up an application. Take a web frontend application as an example. We may need to run several replicas of it and use a load balancer to distribute the incoming traffic evenly among the many replicas of containers supporting the service. To walk one step further, depending on the volume of incoming requests, you may want the application to be scaled dynamically, either horizontally (by having more or fewer replicas), or vertically (by allocating more or fewer resources). This takes the difficulty of system design to another level.

Service Exposure

Suppose we've tackled all the challenges mentioned previously; that's to say, all things are working great within the cluster. Well, here comes another challenge: how can the applications be accessed externally? On one hand, the external endpoint needs to be associated with the underlying on-premises or cloud environment so that it can leverage the infrastructure's API to make itself always accessible. On the other hand, to keep the internal network traffic always going through, the external endpoint needs to be associated with internal backing replicas dynamically – any unhealthy replicas need to be taken out and backfilled automatically to ensure that the application remains online. Moreover, L4 (TCP/UDP) and L7 (HTTP, HTTPS) traffic has different characteristics in terms of packets, and, therefore, needs to be treated in slightly different ways to ensure efficiency. For example, the HTTP header information can be used to reuse the same public IP to serve multiple backend applications.

Delivery Pipeline

From a system administrator's point of view, a healthy cluster must be monitorable, operable, and autonomous in responding to failures. This requires the applications deployed on to the cluster to follow a standardized and configurable delivery pipeline so that it can be managed well at different phases, as well as in different environments.

An individual container is typically used only for completing a single functionality, which is not enough. We need to provide several building blocks to connect the containers all together to accomplish a complicated task.

Orchestrator: Putting All the Things Together

We don't mean to overwhelm you, but the aforementioned problems are very serious, and they arise as a result of the large number of containers that need to be automatically managed. Compared to the VM era, containers do open another door for application management in a large, distributed cluster. However, this also takes container and cluster management challenges to another level. In order to connect the containers to each other to accomplish the desired functionality in a scalable, high-performant, and self-recovering manner, we need a well-designed container orchestrator. Otherwise, we would not be able to migrate our applications from VMs to containers. It's the third reason why containerization technologies began to be adopted on a large scale in recent years, particularly upon the emergence of Kubernetes – which is the de facto container orchestrator nowadays.

Welcome to the Kubernetes World

Unlike typical software that usually evolves piece by piece, Kubernetes got a kick-start as it was designed based on years of experience on Google's internal large-scale cluster management software such as Borg and Omega. That's to say, Kubernetes was born equipped with lots of best practices in the container orchestration and management field. Since day one, the team behind it understood the real pain points and came up with proper designs for tackling them. Concepts such as pods, one IP per pod, declarative APIs, and controller patterns, among others that were first introduced by Kubernetes, seemed to be a bit "impracticable", and some people at that time might have questioned their real value. However, 5 years later, those design rationales remain unchanged and have proven to be the key differentiators from other software.

Kubernetes resolves all the challenges mentioned in the previous section. Some of the well-known features that Kubernetes provides are:

  • Native support for application life cycle management

    This includes built-in support for application replicating, autoscaling, rollout, and rollback. You can describe the desired state of your application (for example, how many replicas, which image version, and so on), and Kubernetes will automatically reconcile the real state to meet its desired state. Moreover, when it comes to rollout and rollback, Kubernetes ensures that the old replicas are replaced by new ones gradually to avoid downtime of the application.

  • Built-in health-checking support

    By implementing some "health check" hooks, you can define when the containers can be viewed as ready, alive, or failed. Kubernetes will only start directing traffic to a container when it's healthy as well as ready. It will also restart the unhealthy containers automatically.

  • Service discovery and load balancing

    Kubernetes provides internal load balancing between different replicas of a workload. Since containers can fail occasionally, Kubernetes doesn't use an IP for direct access. Instead, it uses an internal DNS and exposes each service with a DNS record for communication within a cluster.

  • Configuration management

    Kubernetes uses labels to describe the machines and workloads. They're respected by Kubernetes' components to manage containers and dependencies in a loosely coupled and flexible fashion. Moreover, the simple but powerful labels can be used to achieve advanced scheduling features (for example, taint/toleration and affinity/anti-affinity).

    In terms of security, Kubernetes provides the Secret API to allow you to store and manage sensitive information. This can help application developers to associate the credentials with your applications securely. From a system administrator's point of view, Kubernetes also provides varied options for managing authentication and authorization.

    Moreover, some options such as ConfigMaps aim to provide fine-grained mechanics to build a flexible application delivery pipeline.

  • Network and storage abstraction

    Kubernetes initiates the standards to abstract the network and storage specifications, which are known as the CNI (Container Network Interface) and CSI (Container Storage Interface). Each network and storage provider follows the interface and provides its implementation. This mechanism decouples the interface between Kubernetes and heterogeneous providers. With that, end users can use standard Kubernetes APIs to orchestrate their workloads in a portable manner.

Under the hood, there are some key concepts supporting the previously mentioned features, and, more critically, Kubernetes provides different extension mechanics for end-users to build customized clusters or even their own platform:

  • The Declarative API

    The Declarative API is a way to describe what you want to be done. Under this contract, we just specify the desired final state rather than describing the steps to get there.

    The declarative model is widely used in Kubernetes. It not only enables Kubernetes' core features to function in a fault-tolerant way but also serves as a golden rule to build Kubernetes extension solutions.

  • Concise Kubernetes core

    It is common for a software project to grow bigger over time, especially for famous open source software such as Kubernetes. More and more companies are getting involved in the development of Kubernetes. But fortunately, since day one, the forerunners of Kubernetes set some baselines to keep Kubernetes' core neat and concise. For example, instead of binding to a particular container runtime (for example, Docker or Containerd), Kubernetes defines an interface (CRI or the container runtime interface) to be technology-agnostic so that users can choose which runtime to use. Also, by defining the CNI (Container Network Interface), it delegates the pod and host's network routing implementation to different projects such as Calico and Weave Net. In this way, Kubernetes is able to keep its core manageable, and also encourage more vendors to join, so the end-users can have more choices to avoid vendor lock-ins.

  • Configurable, pluggable, and extensible design

    All Kubernetes' components provide configuration files and flags for users to customize the functionalities. And each core component is implemented strictly to adhere to the public Kubernetes API; for advanced users, you can choose to implement a part of or the entire component yourself to fulfill a special requirement, as long as it is subject to the API. Moreover, Kubernetes provides a series of extension points to extend Kubernetes' features, as well as building your platform.

In the course of this book, we will walk you through the high-level Kubernetes architecture, its core concepts, best practices, and examples to help you master the essentials of Kubernetes, so that you can build your applications on Kubernetes, and also extend Kubernetes to accomplish complex requirements.

Activity 1.01: Creating a Simple Page Count Application

In this activity, we will create a simple web application that counts the number of visitors. We will containerize this application, push it to a Docker image registry, and then run the containerized application.

A PageView Web App

We will first build a simple web application to show the pageviews of a particular web page:

  1. Use your favorite programming language to write an HTTP server to listen on port 8080 at the root path (/). Once it receives a request, it adds 1 to its internal variable and responds with the message Hello, you're visitor #i, where i is the accumulated number. You should be able to run this application on your local development environment.

    Note

    In case you need help with the code, we have provided a sample piece of code written in Go, which is also used for the solution to this activity. You can get this from the following link: https://packt.live/2DcCQUH.

  2. Compose a Dockerfile to build the HTTP server and package it along with its dependencies into a Docker image. Set the startup command in the last line to run the HTTP server.
  3. Build the Dockerfile and push the image to a public Docker images registry (for example, https://hub.docker.com/).
  4. Test your Docker images by launching a Docker container. You should use either Docker port mapping or an internal container IP to access the HTTP server.

You can test whether your application is working by repeatedly accessing it using the curl command as follows:

root@ubuntu:~# curl localhost: 8080
Hello, you're visitor #1.
root@ubuntu:~# curl localhost: 8080
Hello, you're visitor #2.
root@ubuntu:~# curl localhost: 8080
Hello, you're visitor #3.

Bonus Objective

Until now, we have implemented the basics of Docker that we have learned in this chapter. However, we can demonstrate the need to link different containers by extending this activity.

For an application, usually, we need multiple containers to focus on different functionalities and then connect them together as a fully functional application. Later on, in this book, you will learn how to do this using Kubernetes; however, for now, let's connect the containers directly.

We can enhance this application by attaching a backend datastore to it. This will allow it to persist its state even after the container is terminated, that is, it will retain the number of visitors. If the container is restarted, it will continue the count instead of resetting it. Here are some guidelines for building on top of the application that you have built so far.

A Backend Datastore

We may lose the pageview number when the container dies, so we need to persist it into a backend datastore:

  1. Run one of the three well-known datastores: Redis, MySQL, or MongoDB within a container.

    Note

    The solution to this activity can be found at the following address: https://packt.live/304PEoD. We have implemented Redis for our datastore.

    You can find more details about the usage of the Redis container at this link: https://hub.docker.com/_/redis.

    If you wish to use MySQL, you can find details about its usage at this link: https://hub.docker.com/_/mysql.

    If you wish to use MongoDB, you can find details about its usage at this link: https://hub.docker.com/_/mongo.

  2. You may need to run the container using the --name db flag to make it discoverable. If you are using Redis, the command should look like this:
    docker run --name db -d redis

Modifying the Web App to Connect to a Backend Datastore

  1. Every time a request comes in, you should modify the logic to read the pageview number from the backend, then add 1 to its internal variable, and respond with a message of Hello, you're visitor #i, where i is the accumulated number. At the same time, store the added pageview number in the datastore. You may need to use the datastore's specific SDK Software Development Kit (SDK) to connect to the datastore. You can put the connection URL as db:<db port> for now.

    Note

    You may use the source code from the following link: https://packt.live/3lBwOhJ.

    If you are using the code from this link, ensure that you modify it to map to the exposed port on your datastore.

  2. Rebuild the web app with a new image version.
  3. Run the web app container using the --link db:db flag.
  4. Verify that the pageview number is returned properly.
  5. Kill the web app container and restart it to see whether the pageview number gets restored properly.

Once you have created the application successfully, test it by accessing it repeatedly. You should see it working as follows:

root@ubuntu:~# curl localhost: 8080
Hello, you're visitor #1.
root@ubuntu:~# curl localhost: 8080
Hello, you're visitor #2.
root@ubuntu:~# curl localhost: 8080
Hello, you're visitor #3.

Then, kill the container and restart it. Now, try accessing it. The state of the application should be persisted, that is, the count must continue from where it was before you restarted the container. You should see a result as follows:

root@ubuntu:~# curl localhost: 8080
Hello, you're visitor #4.

Note

The solution to this activity can be found at the following address: https://packt.live/304PEoD.

Summary

In this chapter, we walked you through a brief history of software development and explained some of the challenges in the VM era. With the emergence of Docker, containerization technologies open a new gate in terms of resolving the problems that existed with earlier methods of software development.

We walked you through the basics of Docker and detailed the underlying features of Linux such as namespaces and cgroups, which enable containerization. We then brought up the concept of container orchestration and illustrated the problems it aims to solve. Finally, we gave a very brief overview of some of the key features and methodologies of Kubernetes.

In the next chapter, we will dive a little deeper and take a look at Kubernetes' architecture to understand how it works.

lock icon
The rest of the chapter is locked
You have been reading a chapter from
The Kubernetes Workshop
Published in: Sep 2020Publisher: PacktISBN-13: 9781838820756
Register for a free Packt account to unlock a world of extra content!
A free Packt account unlocks extra newsletters, articles, discounted offers, and much more. Start advancing your knowledge today.
undefined
Unlock this book and the full library FREE for 7 days
Get unlimited access to 7000+ expert-authored eBooks and videos courses covering every tech area you can think of
Renews at AU $19.99/month. Cancel anytime

Authors (6)

author image
Zachary Arnold

Zachary Arnold works as a software engineer at Ygrene Energy Fund. Zach has an experience of over 10 years in modern web development. He is an active contributor to the Open Source Kubernetes project in both SIG-Release and SIG-Docs currently focusing on security. He has been running clusters in production since Kubernetes 1.7 and has spoken at the previous 4 KubeCons. His passion areas in the project center on building highly stable Kubernetes cluster components and running workloads securely inside of Kubernetes.
Read more about Zachary Arnold

author image
Sahil Dua

Sahil Dua is a software engineer. He started using Kubernetes to run machine learning workloads. Currently, he is running various types of applications on Kubernetes. He shared his learnings as a keynote session at KubeCon Europe 2018. He is a passionate open source contributor and has contributed to some famous projects such as Git, pandas, hound, go-GitHub, and so on. He has been an open source community leader for over 2 years at DuckDuckGo.
Read more about Sahil Dua

author image
Wei Huang

Wei Huang: Wei works as a senior software engineer in IBM. He has over 10 years' experiences around database, data warehouse tooling, cloud, container, monitoring and devops. He started to use Kubernetes since 1.3, including extending Kubernetes LoadBalancer using CRD, networking, scheduling and monitoring. Now he is a core maintainer of Kubernetes SIG-Scheduling.
Read more about Wei Huang

author image
Faisal Masood

Faisal Masood is a cloud transformation architect at AWS. Faisal's focus is to assist customers in refining and executing strategic business goals. Faisal main interests are evolutionary architectures, software development, ML lifecycle, CD and IaC. Faisal has over two decades of experience in software architecture and development.
Read more about Faisal Masood

author image
Mélony Qin

Mélony Y. QIN, also known as CloudMelon, is the founder of CloudMelon Vis, a tech media and educational platform for technopreneurs in the cloud-native and serverless space, and a former product manager at Microsoft. With a passion for cloud-native technologies, OSS, DevOps, Kubernetes, serverless, data, and AI, Mélony has authored multiple books, including the Certified Kubernetes Administrator (CKA) Exam Guide, the Kubernetes Workshop, and Microsoft Azure Infrastructure, all published by Packt Publishing. Mélony is a member of the Association for Computing Machinery (ACM) and the Project Management Institute (PMI), leveraging her extensive experience with diverse cloud technologies to drive innovation in the cloud-native, serverless, and generative AI space. She runs the CloudMelonVis YouTube channel and Cloud-Native Innovators newsletter, read by professionals from top tech companies such as Microsoft, Google, Amazon, Dell, and Carrefour.
Read more about Mélony Qin

author image
Mohammed Abu Taleb

Mohammed Abu-Taleb works as a Technical Advisor at Microsoft. Working at Microsoft CSS team for troubleshooting complex issues and cases for premier customers that are using Azure Kubernetes Services (AKS). Prior that, Mohammed was a SME (subject matter expert) for the azure managed monitoring service (Azure Monitor) focusing on designing, deploying, and troubleshooting monitoring strategies for containers.
Read more about Mohammed Abu Taleb