
Using custom rows in a list
The number of lines of code required to display items in a list view row could vary from one to several lines of code. A custom list row is used when working with several lines of code within a list view row. Implementing custom lists improves modularity and readability, and allows code reuse.
Getting ready
Let's start by creating a new SwiftUI app called CustomRows.
How to do it…
We will reuse part of the code in the static list and clean it up to make it more modular. We create a separate file to hold the WeatherInfo struct, a separate SwiftUI file for the custom WeatherRow, and finally, we implement the components in the ContentView.swift file. The steps are as follows:
- Create a new Swift file called
WeatherInfoby selecting File | New | File | Swift File or by pressing the ⌘ + N keys. - Define the
WeatherInfostruct within theWeatherInfo.swiftfile:struct WeatherInfo: Identifiable { var id = UUID() var image: String var temp: Int var city: String } - Create a
weatherDatavariable that holds an array ofWeatherInfo:let weatherData: [WeatherInfo] = [ WeatherInfo(image: "snow", temp: 5, city:"New York"), WeatherInfo(image: "cloud", temp:5, city:"Kansas City"), WeatherInfo(image: "sun.max", temp: 80, city:"San Francisco"), WeatherInfo(image: "snow", temp: 5, city:"Chicago"), WeatherInfo(image: "cloud.rain", temp: 49, city:"Washington DC"), WeatherInfo(image: "cloud.heavyrain", temp: 60, city:"Seattle"), WeatherInfo(image: "sun.min", temp: 75, city:"Baltimore"), WeatherInfo(image: "sun.dust", temp: 65, city:"Austin"), WeatherInfo(image: "sunset", temp: 78, city:"Houston"), WeatherInfo(image: "moon", temp: 80, city:"Boston"), WeatherInfo(image: "moon.circle", temp: 45, city:"denver"), WeatherInfo(image: "cloud.snow", temp: 8, city:"Philadelphia"), WeatherInfo(image: "cloud.hail", temp: 5, city:"Memphis"), WeatherInfo(image: "cloud.sleet", temp:5, city:"Nashville"), WeatherInfo(image: "sun.max", temp: 80, city:"San Francisco"), WeatherInfo(image: "cloud.sun", temp: 5, city:"Atlanta"), WeatherInfo(image: "wind", temp: 88, city:"Las Vegas"), WeatherInfo(image: "cloud.rain", temp: 60, city:"Phoenix"), ]
- Create a new SwiftUI file by selecting File | New | File | SwiftUI View or by pressing the ⌘ + N keys.
- Name the file
WeatherRow. - Add the following code to design the look and functionality of the weather row:
struct WeatherRow: View { var weather: WeatherInfo var body: some View { HStack { Image(systemName: weather.image) .frame(width: 50, alignment: .leading) Text("\(weather.temp)°F") .frame(width: 80, alignment: .leading) Text(weather.city) } .font(.system(size: 25)) .padding() } } - Add the following code to the
WeatherRow_Previewsstruct to display information from a sampleWeatherInfostruct instance:static var previews: some View { WeatherRow(weather: WeatherInfo(image: "snow", temp: 5, city:"New York")) } - The resulting
WeatherRow.swiftcanvas preview should look as follows:
Figure 2.3 – WeatherRow preview
- Open the
ContentView.swiftfile and create a list to display data using the customWeatherRowcomponent:var body: some View { List { ForEach(weatherData){ weather in WeatherRow(weather: weather) } } }The resulting canvas preview should look as follows:
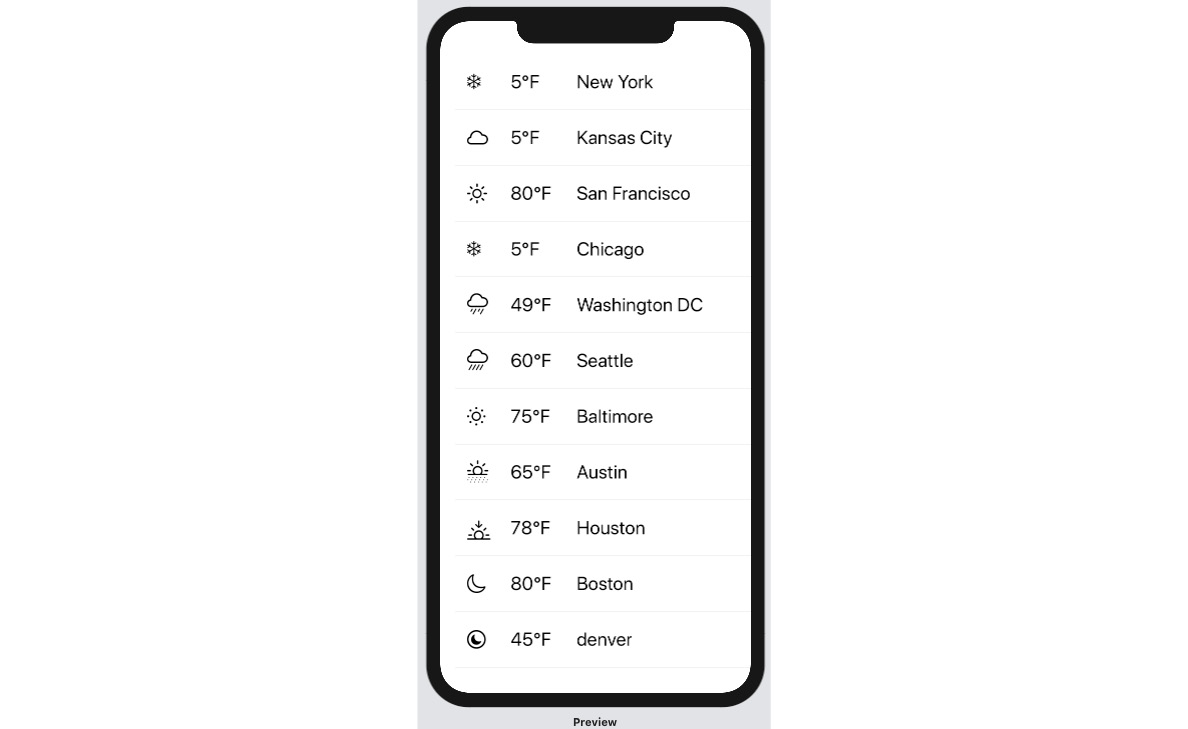
Figure 2.4 – CustomRowApp preview
Run the app live preview and admire the work of your own hands.
How it works…
The WeatherInfo Swift file contains the description of the WeatherInfo struct. Our dataset, an array of WeatherInfo variables, was also declared in the file to make it available to other sections of the project.
The WeatherRow SwiftUI file contains the design we will use for each weather row. The weather property within WeatherRow will hold the WeatherInfo arguments passed to the view. HStack in the body of WeatherRow is used to display data from weather variables since a SwiftUI view can only return one view at a time. When displaying multiple views – an image view and two text views, in this case – the views are all encased in an HStack component. The .frame(width: 50, alignment: .leading) modifier added to the image and first text view sets the width used by the element it modifies to 50 units and the alignment to the .leading parameter.
Finally, the .font(.system(size: 25)) and .padding() modifiers are added to HStack to increase the text and image font sizes and add padding to all sides of WeatherRow.