


The What and Why of Scripting with Bash
Welcome to the what and why of bash scripting. In this chapter, you will discover the types of shells in Linux and why we chose bash. You will learn what bash is, how to write your first bash script, and how to run it. Also, you will see how to configure Linux editors, such as vim and nano, in order to type your code.
Like in any other scripting language, variables are the basic blocks of coding. You will learn how to declare variables such as integers, strings, and arrays. Furthermore, you will learn how to export these variables and extend their scope outside the running process.
Finally, you will see how to visually debug your code using Visual Studio Code.
We will cover the following topics in this chapter:
- Types of Linux shells
- What is bash scripting?
- The bash command hierarchy
- Preparing text editors for scripting
- Creating and executing scripts
- Declaring variables
- Variable scope
- Command substitution
- Debugging your scripts
Technical requirements
You'll need a running Linux box. It doesn't matter which distribution you use, since all Linux distributions are shipped nowadays with the bash shell.
Download and install Visual Studio Code, which is free from Microsoft. You can download it from here: https://code.visualstudio.com/.
You can use VS Code as an editor instead of vim and nano; it's up to you.
We prefer to use VS Code because it has a lot of features such as code completion, debugging, and many more besides.
Install bashdb, which is a required package for the bash debug plugin. If you are using a Red Hat-based distribution, you can install it like this:
$ sudo yum install bashdb
If you are using a Debian-based distribution, you can install it like this:
$ sudo apt-get install bashdb
Install the plugin for VS Code, called bash debug, from https://marketplace.visualstudio.com/items?itemName=rogalmic.bash-debug. This plugin will be used to debug bash scripts.
The source code for this chapter can be downloaded here:
Types of Linux shells
As you know, Linux consists of some major parts, such as the kernel, the shell, and the GUI interface (Gnome, KDE, and so on).
The shell translates your commands and sends them to the system. Most Linux distributions are shipped with many shells.
Every shell has its own features, and some of them are very popular among developers today. These are some of the popular ones:
- Sh shell: This is called the Bourne shell, this was developed at AT&T labs in the 70s by a guy named Stephen Bourne. This shell offers many features.
- Bash shell: Also called the Bourne again shell, this is very popular and compatible with sh shell scripts, so you can run your sh scripts without changing them. We are going to use this shell in this book.
- Ksh shell: Also called the Korn shell, this is compatible with sh and bash. Ksh offers some enhancements over the Bourne shell.
- Csh and tcsh: Linux was built using the C language and that drove developers at Berkeley University to develop a C-style shell in which the syntax is similar to the C language. Tcsh adds some minor enhancements to csh.
Now we know the types of shells and we know that we are going to use bash, so what is bash scripting?
What is bash scripting?
The basic idea of bash scripting is to execute multiple commands to automate a specific job.
As you might know, you can run multiple commands from the shell by separating them with semi colons (;):
ls ; pwd
The previous line is a mini bash script.
The first command runs, followed by the result of the second command.
Every keyword you type in bash scripting is actually a Linux binary (program), even the if statement, or else or while loops. All are Linux executables.
You can say that the shell is the glue that binds these commands together.
The bash command hierarchy
When working on the bash shell and when you are sitting comfortably at your prompt eagerly waiting to type a command, you will most likely feel that it is a simple matter of typing and hitting the Enter key. You should know better than to think this, as things are never quite as simple as we imagine.
Command type
For example, if we type and enter ls to list files, it is reasonable to think that we were running the command. It is possible, but we often will be running an alias. Aliases exist in memory as a shortcut to commands or commands with options; these aliases are used before we even check for the file. Bash's built-in type command can come to our aid here. The type command will display the type of command for a given word entered at the command line. The types of command are listed as follows:
- Alias
- Function
- Shell built-in
- Keyword
- File
This list is also representative of the order in which they are searched. As we can see, it is not until the very end where we search for the executable file ls.
The following command demonstrates the simple use type:
$ type ls
ls is aliased to 'ls --color=auto'
We can extend this further to display all the matches for the given command:
$ type -a ls
ls is aliased to 'ls --color=auto'
ls is /bin/ls
If we need to just type in the output, we can use the -t option. This is useful when we need to test the command type from within a script and only need the type to be returned. This excludes any superfluous information, and thus makes it easier for us humans to read. Consider the following command and output:
$ type -t ls
alias
The output is clear and simple, and is just what a computer or script requires.
The built-in type can also be used to identify shell keywords such as if, and case. The following command shows type being used against multiple arguments and types:
$ type ls quote pwd do id
The output of the command is shown in the following screenshot:
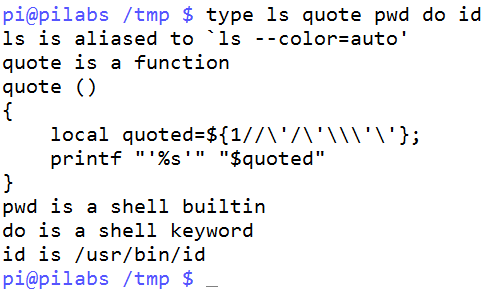
You can also see that the function definition is printed when we stumble across a function when using type.
Command PATH
Linux will check for executables in the PATH environment only when the full or relative path to the program is supplied. In general, the current directory is not searched unless it is in the PATH. It is possible to include our current directory within the PATH by adding the directory to the PATH variable. This is shown in the following command example:
$ export PATH=$PATH:.
This appends the current directory to the value of the PATH variable; each item in the PATH is separated using a colon. Now your PATH has been updated to include the current working directory and, each time you change directories, the scripts can be executed easily. In general, organizing scripts into a structured directory hierarchy is probably a great idea. Consider creating a subdirectory called bin within your home directory and add the scripts into that folder. Adding $HOME/bin to your PATH variable will enable you to find the scripts by name and without the file path.
The following command-line list will only create the directory, if it does not already exist:
$ test -d $HOME/bin || mkdir $HOME/bin
Although the preceding command-line list is not strictly necessary, it does show that scripting in bash is not limited to the actual script, and we can use conditional statements and other syntax directly at the command line. From our viewpoint, we know that the preceding command will work whether you have the bin directory or not. The use of the $HOME variable ensures that the command will work without considering your current filesystem context.
As we work through the book, we will add scripts into the $HOME/bin directory so that they can be executed regardless of our working directory.
Preparing text editors for scripting
Throughout the book, we will be working on Linux Mint, and this will include the creation and editing of the scripts. You, of course, can choose the way you wish to edit your scripts and may prefer to make use of a graphical editor, so we will show some settings in gedit. We will make one excursion into a Red Hat system to show screenshots of gedit in this chapter.
Also, we will use Visual Studio Code as a modern GUI editor to edit and debug our scripts.
To help make the command-line editor easier to use, we can enable options and we can persist with these options through hidden configuration files. Gedit and other GUI editors, and their menus, will provide similar functionality.
Configuring vim
Editing the command line is often a must and is part of a developer's everyday life. Setting up common options that make life easier in the editor give us the reliability and consistency we need, a little like scripting itself. We will set some useful options in the vi or vim editor file, $HOME/.vimrc.
The options we set are detailed in the following list:
- set showmode: Ensures we see when we are in insert mode
- set nohlsearch: Does not highlight the words that we have searched for
- set autoindent: We indent our code often; this allows us to return to the last indent level rather than the start of a new line on each line break
- set tabstop=4: Sets a tab to be four spaces
- set expandtab: Converts tabs to spaces, which is useful when the file moves to other systems
- syntax on: Note that this does not use the set command and is used to turn on syntax highlighting
When these options are set, the $HOME/.vimrc file should look similar to this:
set showmode
set nohlsearch
set autoindent
set tabstop=4
set expandtab
syntax on
Configuring nano
The nano text editor is increasing in importance and it is the default editor in many systems. Personally, I don't like the navigation or the lack of navigation features that it has. It can be customized in the same way as vim. This time, we will edit the $HOME/.nanorc file. Your edited file should look something like the following:
set autoindent
set tabsize 4
include /usr/share/nano/sh.nanorc
The last line enables syntax highlighting for shell scripts.
Configuring gedit
Graphical editors, such as gedit, can be configured using the preferences menu, and are pretty straightforward.
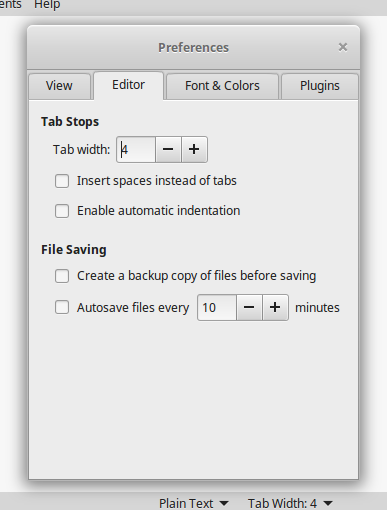
Enabling tab spacing to be set to 4 spaces and expanding tabs to spaces can be done using the Preferences | Editor tab, as shown in the following screenshot:
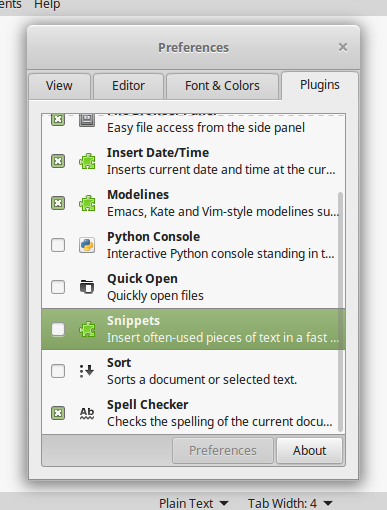
Another very useful feature is found on the Preferences | Plugins tab. Here, we can enable the Snippets plugin, which can be used to insert code samples. This is shown in the following screenshot:
For the rest of the book, we will be working on the command line and in vim; feel free to use the editor that you work with best. We have now laid the foundations to create good scripts, and, although whitespace, tabs, and spaces in bash scripts are not significant, a well-laid-out file with consistent spacing is easy to read. When we look at Python later in the book, you will realize that in some languages, the whitespace is significant to the language and it is better to adopt good habits early on.
Creating and executing scripts
With our editors primed and ready, we can now move quickly to creating and executing our scripts. If you are reading this book with some prior experience, we will warn you that we are going to start with the basics, but we will also include looking at positional parameters; feel free to move on at your own pace.
Hello World!
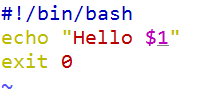
As you know, it is almost obligatory to begin with a Hello World script and we will not disappoint as far as this is concerned. We will begin by creating a new script, $HOME/bin/hello1.sh. The contents of the file should read as in the following screenshot:
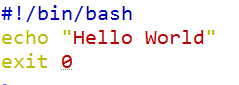
We hope that you haven't struggled with this too much; it is just three lines, after all. We encourage you to run through the examples as you read to really help you instill the information with good hands-on practice.
- #!/bin/bash: Normally, this is always the first line of the script and is known as the shebang. The shebang starts with a comment, but the system still uses this line. A comment in a shell script has the # symbol. The shebang instructs the interpreter of the system to execute the script. We use bash for shell scripts, and we may use PHP or Perl for other scripts, as required. If we do not add this line, then the commands will be run within the current shell; it may cause issues if we run another shell.
- echo "Hello World": The echo command will be picked up in a built-in shell and can be used to write a standard output, STDOUT; this defaults to the screen. The information to print is enclosed in double quotes; there will be more on quotes later.
- exit 0: The exit command is a built-in shell, and is used to leave or exit the script. The exit code is supplied as an integer argument. A value of anything other than 0 will indicate some type of error in the script's execution.
Executing the script
With the script saved in our PATH environment, it still will not execute as a standalone script. We will have to assign and execute permissions for the file, as needed. For a simple test, we can run the file directly with bash. The following command shows you how to do this:
$ bash $HOME/bin/hello1.sh
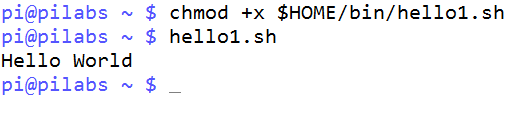
We should be rewarded with the Hello World text being displayed on our screens. This is not a long-term solution, as we need to have the script in the $HOME/bin directory, specifically, to make running the script easy from any location without typing the full path. We need to add in the execute permissions as shown in the following code:
$ chmod +x $HOME/bin/hello1.sh
We should now be able to run the script simply, as shown in the following screenshot:
Checking the exit status
This script is simple, but we still need to know how to make use of the exit codes from scripts and other applications. The command-line list that we generated earlier, while creating the $HOME/bin directory, is a good example of how we can use the exit code:
$ command1 || command 2
In the preceding example, command2 is executed only if command1 fails in some way. To be specific, command2 will run if command1 exits with a status code other than 0.
Similarly, in the following extract, we will only execute command2 if command1 succeeds and issues an exit code of 0:
$ command1 && command2
To read the exit code from our script explicitly, we can view the $? variable, as shown in the following example:
$ hello1.sh
$ echo $?
The expected output is 0, as this is what we have added to the last line of the file and there is precious little else that can go wrong to cause the failure to reach that line.
Ensuring a unique name
We can now create and execute a simple script, but we need to consider the name a little. In this case, hello1.sh will be good enough and is unlikely to clash with anything else on the system. We should avoid using names that may clash with existing aliases, functions, keywords, and building commands, as well as avoiding names of programs already in use.
Adding the sh suffix to the file does not guarantee the name will be unique, but, in Linux, where we do not use file extensions, the suffix is part of the filename. This helps you to provide a unique identity to your script. Additionally, the suffix is used by the editor to help you identify the file for syntax highlighting. If you recall, we specifically added the syntax highlighting file sh.nanorc to the nano text editor. Each of these files is specific to a suffix and subsequent language.
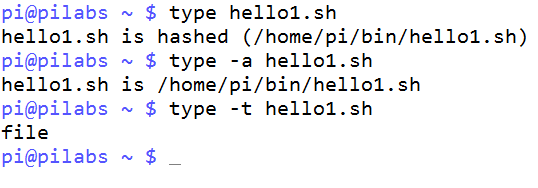
Referring back to the command hierarchy within this chapter, we can use a type to determine the location and type of file hello.sh:
$ type hello1.sh  #To determine the type and path
$ type -a hello1.sh  #To print all commands found if the name is NOT unique
$ type -t hello1.sh ~To print the simple type of the command
These commands and output can be seen in the following screenshot:
Hello Dolly!
It is possible that we might need a little more substance in the script than a simple fixed message. Static message content does have its place, but we can make this script much more useful by building in some flexibility.
In this chapter, we will look at the positional parameters or arguments that we can supply to the script and in the next chapter, we will see how we can make the script interactive and also prompt the user for input at runtime.
Running the script with arguments
We can run the script with arguments; after all, it's a free world and Linux promotes your freedom to do what you want to do with the code. However, if the script does not make use of the arguments, then they will be silently ignored. The following command shows the script running with a single argument:
$ hello1.sh fred
The script will still run and will not produce an error. The output will not change either and will print Hello World:
|
Argument Identifier |
Description |
|
$0 |
The name of the script itself, which is often used in usage statements. |
|
$1 |
A positional argument, which is the first argument passed to the script. |
|
${10} |
Where two or more digits are needed to represent the argument position. Brace brackets are used to delimit the variable name from any other content. Single value digits are expected. |
|
$# |
The argument count is especially useful when we need to set the amount of arguments needed for correct script execution. |
|
$* |
Refers to all arguments. |
For the script to make use of the argument, we can change its content a little. Let's first copy the script, add in the execute permissions, and then edit the new hello2.sh:
$ cp $HOME/bin/hello1.sh $HOME/bin/hello2.sh
$ chmod +x $HOME/bin/hello2.sh
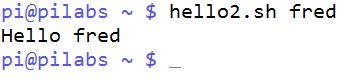
We need to edit the hello2.sh file to make use of the argument as it is passed at the command line. The following screenshot shows the simplest use of command-line arguments, now allowing us to have a custom message:
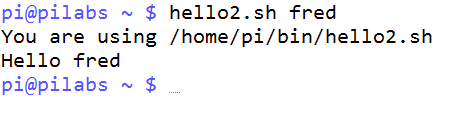
Run the script now; we can provide an argument as shown in the following:
$ hello2.sh fred
The output should now say Hello fred. If we do not provide an argument, then the variable will be empty and will just print Hello. You can refer to the following screenshot to see the execution argument and output:
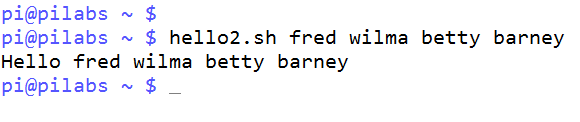
If we adjust the script to use $*, all the arguments will print. We will see Hello and then a list of all the supplied arguments. Edit the script and replace the echo line as follows:
echo "Hello $*"
This will execute the script with the following arguments:
$ hello2.sh fred wilma betty barney
And this will result in the output shown in the following screenshot:
If we want to print Hello <name>, with each name on a separate line, we will need to wait a little until we cover looping structures. A for loop is a good way to achieve this.
The importance of correct quotes
So far, we have used a simple double-quoting mechanism to encase the strings that we want to use with echo.
In the first script, it does not matter if we use single or double quotes. echo "Hello World" will be exactly the same as echo 'Hello World'.
However, this is not the case in the second script, so it is very important to understand the quoting mechanisms available in bash.
As we have seen, using double quotes in echo "Hello $1" will result in Hello fred or whatever the supplied value is. Whereas, if we use single quotes in echo 'Hello $1', the printed output on the screen will be Hello $1; that is, we see the variable name and not its value.
The idea of the quotes is to protect special characters, such as a space between the two words; both quotes protect the space from being misinterpreted. The space is normally read as a default field, separated by the shell. In other words, all characters are read by the shell as literals with no special meaning. This has the knock-on effect of the $ symbol printing its literal format rather than allowing bash to expand its value. The bash shell is prevented from expanding the variable's value as it is protected by the single quotes.
This is where the double quote comes to our rescue. The double quote will protect all the characters except the $, allowing bash to expand the stored value.
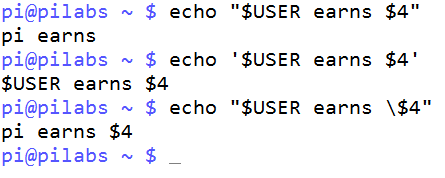
If we ever need to use a literal $ within the quoted string, along with variables that need to be expanded, we can use double quotes, but escape the desired $ with the backslash (\). For example, echo "$USER earns \$4" would print as Fred earns $4 if the current user were Fred.
Try the following examples at the command line using all quoting mechanisms. Feel free to up your hourly rate as required:
$ echo "$USER earns $4"
$ echo '$USER earns $4'
$ echo "$USER earns \$4"
The output is shown in the following screenshot:
Printing the script name
The $0 variable represents the script name, and this is often used in usage statements. As we are not yet looking at conditional statements, we will get the script name printed above the displayed name.
Edit your script so that it reads like the following complete code block for $HOME/bin/hello2.sh:
#!/bin/bash
echo "You are using $0"
echo "Hello $*"
exit 0
The output from the command is shown in the following screenshot:
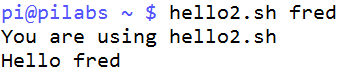
If we prefer not to print the path and only want the name of the script to show, we can use the basename command, which extracts the name from the path. Adjust the script so that the second line now reads as follows:
echo "You are using $(basename $0)"
The $(....) syntax is used to evaluate the output of the inner command. We first run basename $0 and feed the result into an unnamed variable represented by the $.
The new output will appear as seen in the following screenshot:
It is possible to achieve the same results using back quotes; this is less easy to read, but we have mentioned this as you might need to understand and modify the scripts that have been written by others. The alternative to the $(....) syntax is shown in the following example:
echo "You are using 'basename $0'"
Please note that the characters used are back quotes and NOT single quotes. On UK and US keyboards, these are found in the top-left corner next to the number 1 key.
Declaring variables
Just like in any programming language, you can declare variables in bash scripts. So, what are these variables and what are the benefits of using them?
Well, a variable is like a placeholder where you store some value for later use in your code.
There are two kinds of variables you can declare in your script:
- User-defined variables
- Environment variables
User-defined variables
To declare a variable, just type the name you want and set its value using the equals sign (=).
Check out this example:
#!/bin/bash
name="Mokhtar"
age=35
total=16.5
echo $name  #prints Mokhtar
echo $age   #prints 35
echo $total #prints 16.5
As you can see, to print the variable's value, you should use the dollar sign ($) before it.
Note that there are no spaces between the variable name and the equals sign, or between the equals sign and the value.
If you forget and type a space in between, the shell will treat the variable as if it were a command, and, since there is no such command, it will show an error.
All of the following examples are incorrect declarations:
# Don't declare variables like this:
name = "Mokhtar"
age =35
total= 16.5
Another useful type of user-defined variable is the array. An array can hold multiple values. So, if you have tens of values you want to use, you should use arrays instead of filling your script with variables.
To declare an array, just enclose its elements between brackets, like this:
#!/bin/bash
myarr=(one two three four five)
To access a specific array element, you can specify its index like this:
#!/bin/bash
myarr=(one two three four five)
echo ${myarr[1]} #prints two which is the second element
The index is zero based.
To print the array elements, you can use an asterisk, like this:
#!/bin/bash
myarr=(one two three four five)
echo ${myarr[*]}
To remove a specific element from the array, you can use the unset command:
#!/bin/bash
myarr=(one two three four five)
unset myarr[1] #This will remove the second element
unset myarr    #This will remove all elements
Environment variables
So far, we have used variables that we didn't define, such as $BASH_VERSION, $HOME, $PATH, and $USER. You might wonder, as we didn't declare these variables, where did they come from?
These variables are defined by the shell for your use and they are called environment variables.
There are many environment variables. If you want to list them, you can use the printenv command.
Also, you can print a specific environment variable by specifying it to the printenv command:
$ printenv HOME
We can use any of these variables in our bash scripts.
Note that all environment variables are written in capital letters, so you can declare your variables as lower case to make it easy to differentiate your variables from environment variables. This is not required, but is preferable.
Variable scope
Once you have declared your variable, it will be available for use in your entire bash script without any problems.
Let's assume this scenario: you have divided your code into two files and you will execute one of them from inside the other, like this:
# The first script
#!/bin/bash
name="Mokhtar"
./script2.sh # This will run the second script
The second script looks like this:
# The script2.sh script
#!/bin/bash
echo $name
Suppose that you want to use the name variable in the second script. If you try to print it, nothing will show up; this is because a variable's scope is only limited to the process that creates it.
To use the name variable, you can export it using the export command.
So, our code will be like this:
# The first script
#!/bin/bash
name="Mokhtar"
export name # The variable will be accessible to other processes
./script2.sh
Now if you run the first script, it will print the name that came from the first script file.
Keep in mind that the second process or script2.sh only makes a copy of the variable and never touches the original one.
To prove this, try to change that variable from the second script and try to access that variable value from the first script:
# The first script
#!/bin/bash
name="Mokhtar"
export name
./script2.sh
echo $name
The second script will be like this:
# The first script
#!/bin/bash
name="Another name"
echo $name
If you run the first script, it will print the modified name from the second script and then it will print the original name from the first script. So, the original variable remains as it is.
Command substitution
So far, we have seen how to declare variables. These variables can hold integers, strings, arrays, or floats, as we have seen, but this is not everything.
A command substitution means storing the output of a command execution in a variable.
As you might know, the pwd command prints the current working directory. So, we will see how to store its value in a variable.
There are two ways to perform a command substitution:
- Using the backtick character (')
- Using the dollar sign format, like this: $()
Using the first method, we just surround the command between two backticks:
#!/bin/bash
cur_dir='pwd'
echo $cur_dir
And the second way is written as follows:
#!/bin/bash
cur_dir=$(pwd)
echo $cur_dir
The output coming from commands can be further processed and actions can be made based on that output.
Debugging your scripts
With the scripts as simple as we have seen so far, there is little that can go wrong or need debugging. As the script grows and decision paths are included with conditional statements, we may need to use some level of debugging to analyze the scripts' progress better.
Bash provides two options for us, -v and -x.
If we want to look at the verbose output from our script and the detailed information about the way the script is evaluated line by line, we can use the -v option. This can be within the shebang, but it is often easier to run the script directly with bash:
$ bash -v $HOME/bin/hello2.sh fred
This is especially useful in this example as we can see how each element of the embedded basename command is processed. The first step is removing the quotes and then the parentheses. Take a look at the following output:

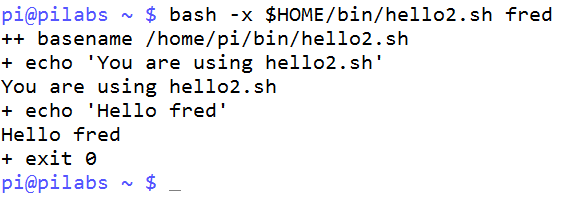
The -x option, which displays the commands as they are executed, is more commonly used. It's useful to know the decision branch that has been chosen by the script. The following shows this in action:
$ bash -x $HOME/bin/hello2.sh fred
We again see that the basename is evaluated first, but we do not see the more detailed steps involved in running that command. The screenshot that follows captures the command and output:
The previous method might be hard for beginners or people who have a programming background in which they debugged their code visually.
Another modern way of debugging shell scripts is by using Visual Studio Code.
There is a plugin called bash debug that enables you to debug bash scripts visually, as is the case for any other programming language.
You can step into, step over, add watches, and do all the other usual debugging stuff you know.
After installing the plugin, from the File menu, open your shell-scripts folder. Then you can configure the debugging process by pressing Ctrl + Shift + P and typing the following:
Debug:open launch.json
This will open an empty file; type in the following configurations:
{
    "version": "0.2.0",
    "configurations": [

        {
            "name": "Packt Bash-Debug",
            "type": "bashdb",
            "request": "launch",
            "scriptPath": "${command:SelectScriptName}",
            "commandLineArguments": "",
            "linux": {
                "bashPath": "bash"
            },
            "osx": {
                "bashPath": "bash"
            }
        }
    ]
}
This will create a debug configuration named Packt Bash-Debug:
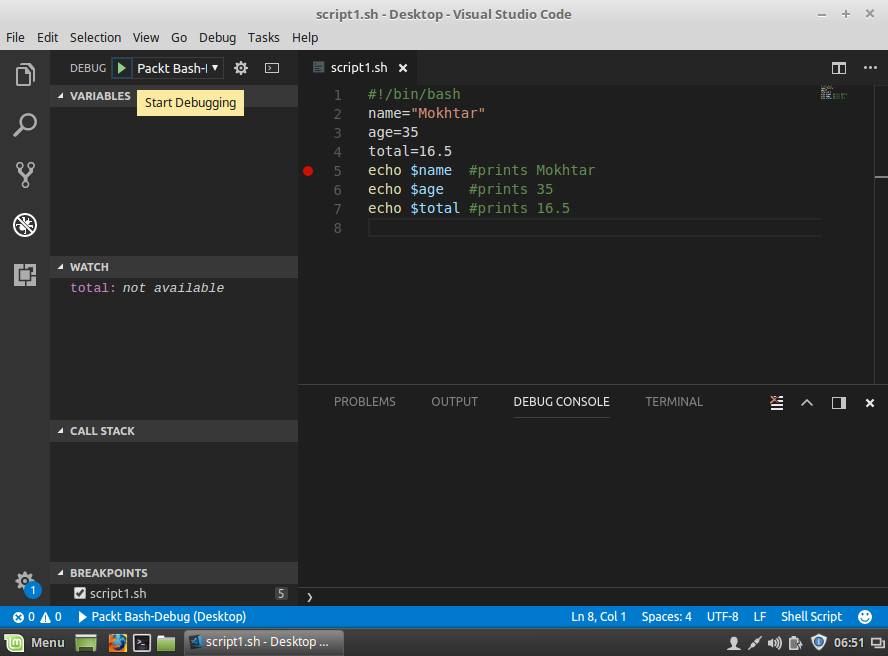
Now insert a breakpoint and press F5, or start debugging from the Debug menu; it will show you the list of .sh files:
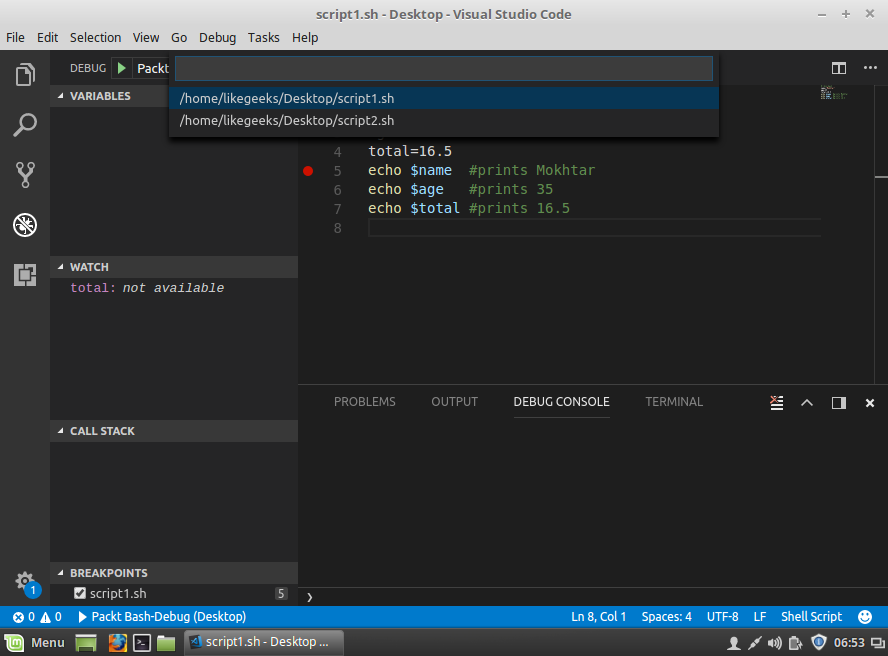
Select the one you want to debug, and set a breakpoint on any line to test it, as shown in the following screenshot:
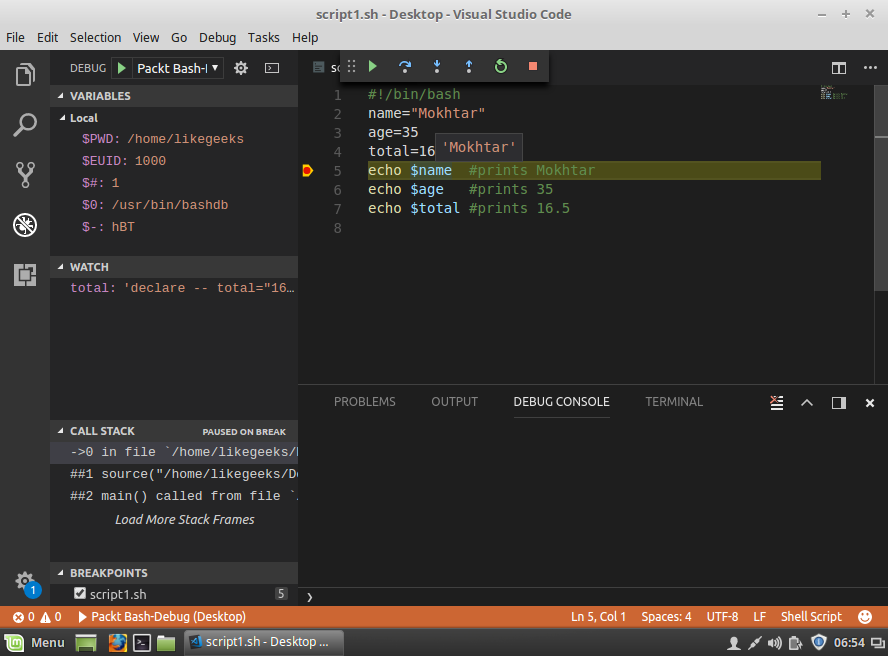
You can add watches to watch variables' values while stepping over your lines of code:
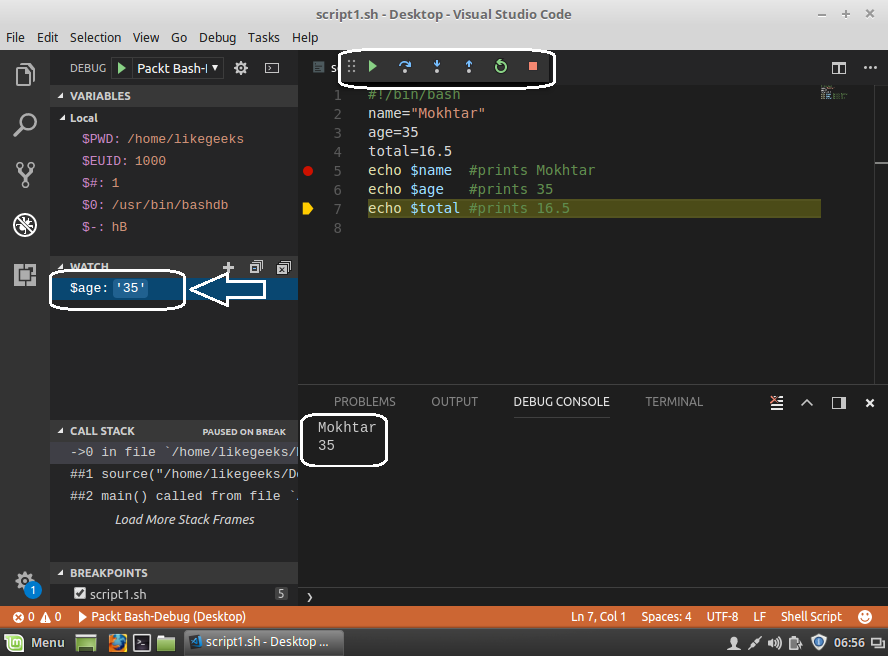
Now you can enjoy the visual method of debugging. Happy coding!
Summary
This marks the end of this chapter and you have no doubt found this useful. Especially for those making a start with bash scripting, this chapter will have established a firm foundation on which you can build your knowledge.
We began by ensuring that bash is secure and not susceptible to shell-shock from embedded functions. With bash secured, we considered the execution hierarchy where aliases, functions, and so on are checked before the command; knowing this can help us plan a good naming structure and a path to locate the scripts.
Then we went on to illustrate the types of Linux shells and we found out what bash scripting is.
Soon, we were writing simple scripts with static content, but we saw how easy it was to add flexibility using arguments. The exit code from the script can be read with the $? variable and we can create a command-line list using || and &&, which depends on the success or failure of the preceding command in the list.
Then we saw how to declare variables and how to use environment variables. We identified the variables' scope and saw how to export them to another process.
Also, we saw how to store commands' output in variables, which is called command substitution.
Finally, we closed the chapter by looking at debugging the script using bash options and VS Code. It's not really required when the script is trivial, but it will be useful later when complexity is added.
In the next chapter, we will create interactive scripts that read the user's input during script execution.
Questions
- What is the problem with the following code? And how do we fix it?
#!/bin/bash
var1 ="Welcome to bash scripting ..."
echo $var1
- What is the result of the following code?
#!/bin/bash
arr1=(Saturday Sunday Monday Tuesday Wednesday)
echo ${arr1[3]}
- What is the problem with the following code? And how do we fix it?
#!/bin/bash
files = 'ls -la'
echo $files
- What is the value of the b and c variables in the following code?
#!/bin/bash
a=15
b=20
c=a
b=c
Further reading
Please see the following for further reading relating to this chapter: