


In this chapter, we will cover the following topics:
Installing virtualenv and virtualenvwrapper
Installing pyproj and NumPy
Installing shapely, matplotlib, and descartes
Installing pyshp, geojson, and pandas
Installing SciPy, PySal, and IPython
Installing GDAL and OGR
Installing GeoDjango and PostgreSQL with PostGIS
This chapter will get the grunt work done for you so that you can freely and actively complete all the recipes in this book. We will start off by installing, each of the libraries you will be using, one by one. Once each step is completed, we will test each library installation to make sure it works. Since this book is directed toward those of you already working with spatial data, you can skip this chapter if you have it installed already. If not, you will find the installation instructions here useful as a reference.
The choice of Python libraries is based on industry-proven reliability and functionality. The plethora of functions in Python libraries has led to a flourishing GIS support on many top desktop GIS systems, such as QGIS and ESRI ArcGIS.
Also included in this book is an installer.sh bash file. The installer.sh file can be used to install the Python libraries that are available for your virtual environment from pip and other dependencies via the apt-get command. The installer.sh bash file is executed from the command line and installs almost everything in one go, so please take a look at it. For those of you who are starting with Python for the first time, follow the instructions in this chapter and your machine will be set up to complete different recipes.
Installations can sometimes be tricky even for advanced users, so you will find some of the most common pitfalls and hook-ups described in this chapter.
The development of these recipes was completed on a fresh Linux/Ubuntu 14.04 machine. Therefore, the code examples, if not otherwise specified, are Linux/Ubuntu-specific with Windows notes wherever necessary, unless otherwise specified.
This recipe will enable you to manage different versions of different libraries for multiple projects. We use virtualenv to create virtual Python environments to host collections of project-specific libraries in an isolated directory. For example, you may have an old legacy project using Django 1.4, whereas a new project requires you use Django version 1.8. With virtualenv, you can have both versions of Django installed on the same machine, and each project can access the appropriate version of Django without any conflicts or problems.
Without virtualenv, you are forced to either upgrade the old project or find a workaround to implement the new features of the other version, therefore limiting or complicating the new project.
The virtualenv
allows you to simply switch between different Python virtual environments for your individual projects. This has the added benefit that you can easily and quickly set up a new machine for testing or help a new developer get their machine up and running as fast as possible.
Before anything, we are going to assume that you already have a Linux/Ubuntu machine or a virtualbox instance running Linux/Ubuntu so you can follow these instructions.
Tip
I also suggest trying out Vagrant (http://www.vagrantup.com), which uses virtualbox to box and standardize your development environment.
Ubuntu 14.04 comes with Python 2.7.6 and Python 3.4 preinstalled; the other libraries are your responsibility as explained in the following sections.
Windows users need to download and install Python 2.7.x from the Python home page at https://www.python.org/downloads/windows/; please download the newest version of the 2.7.x series since this book is written with 2.7.X in mind. The installer includes a bundled version of pip, so make sure you install it!
Take a close look at the correct version to download, making sure that you get either the 32-bit or 64-bit download. You cannot mix and match the versions, so be careful and remember to install the correct version.
A great site for other kinds of Windows binaries can be found at http://www.lfd.uci.edu/~gohlke/pythonlibs/. Wheel files are the new norms of installations and can be executed from the command line as follows:
python pip install libraryName.whl
Note
On Windows, make sure that your Python interpreter is set up on your system path. This way, you can simply call Python directly from the command prompt using the C:\Users\Michael> python filename.py command. If you need more help, information can be found by following one of the online instructions at https://pypi.python.org/pypi/pip.
As of Python 2.7.9 and later versions, pip is available on installation.
Python 3 would be awesome to use, and for many Python GIS libraries, it is ready for show time. Unfortunately, not all GIS libraries jive with Python 3 (pyproj) as one would love to see at the time of writing this. If you want, feel free to go for Python 3.x and give it a go. A great webpage to check the compatibility of a library can be found at https://caniusepython3.com/.
To install
virtualenv, you need to have a running installation of Python and pip. The pip package manager manages and installs Python packages, making our lives easier. Throughout this book, if we need to install a package, pip will be our tool of choice for this job. The official installation instructions for pip can be found at https://pip.pypa.io/en/latest/installing.html. To install pip from the command line, we first need to install easy_install. Let's try it out from the Terminal:
$ sudo apt-get install python-setuptools python-pip
With this one line, you have both pip and easy_install installed.
Note
What is sudo?
sudo is a program for Unix-like computer operating systems that allows users to run programs with the security privileges of another user (normally, the super user or root). Its name is a concatenation of su (substitute user) and do (take action). Take a look at http://en.wikipedia.org/wiki/Sudo for more information on this.
The command sudo means to run an execution as a super user. If this fails, you will need to get theez_setup.py file, which is available at https://bootstrap.pypa.io/ez_setup.py. After downloading the file, you can run it from the command line:
$ python ez_setup.py
Now pip should be up and running and you can execute commands to complete the installations of virtualenv and virtualenvwrapper. The
virtualenvwrapper creates shortcuts that are faster ways to create or delete your virtual environments. You can test it as follows:
$ pip install virtualenv
The steps to install your Python virtualenv and virtualenvwrapper packages are as follows:
Install
virtualenvusing the pip installer:$ sudo pip install virtualenvInstall
virtualenvwrapperusingeasy_install:$ sudo easy_install virtualenvwrapperAssign the
WORKON_HOMEvariable to your home directory with the folder namevenvs. Create a single folder where you want to store all your different Python virtual environments; in my case, the folder is located at/home/mdiener/venvs:$ export WORKON_HOME=~/venvs $ mkdir $WORKON_HOME
Run the source command to execute the
virtualenvrapper.shbash file:$ source /usr/local/bin/virtualenvwrapper.shNext, we create a new virtual environment called
pygeoan_cb, and this is also the name of the new folder where the virtual environment is installed:$ mkvirtualenv pygeoan_cbTo use
virtualenvwrapperthe next time you start up your machine, we need to set it up so that your bash terminal runs thevirtualenvwrapper.shscript when your computer starts.First, put it in your
~/.bashrcfile:$ echo "export WORKON_HOME=$WORKON_HOME" >> ~/.bashrcNext, we'll import the
virtualenvwrapperfunction in our bash:$ echo "source /usr/local/bin/virtualenvwrapper.sh" >> ~/.bashrcNow we can execute our bash:
$ source ~/.bashrc
Step one shows how pip installs the virtualenv package into your system-wide Python installation. Step two shows how the virtualenvwrapper helper package is installed with easy_install because the virtualenvwrapper.sh file is not created using the pip installer. This will help us create, enter, and generally, work or switch between Python virtual environments with ease. Step three assigns the WORKON_HOME variable to a directory where we want to have all of our virtual environments. Then, we'll create a new directory to hold all the virtual environments. In step four, the command source is used to execute the shell script to set up the virtualenvwrapper package. In step five, we see how to actually create a new virtualenv called pygeoan_cb in our /home/mdiener/venvs directory. This final step automatically starts our virtualenv session.
Once the virtualenv session starts, we can now see the name of virtualenv in brackets like this:
(pygeoan_cb)mdiener@mdiener-VirtualBox:~$
To exit virtualenv, simply type the following code:
$ deactivate
Now, your command line should be back to normal as shown here:
mdiener@mdiener-VirtualBox:~$
To reactivate virtualenv, simply type:
$ workon pygeoan_cb
Tip
The workon command has Tab completion. So, simply type workon, and then the first letter of the name of the virtual environment you want to enter, such as py. Hit Tab and it will autocomplete the name.
Inside the /venvs folder, you will find specific individual virtual environments for each project in the form of a subfolder. The virtualenvwrapper package will always create a new folder for each new project you create. You can, therefore, easily delete a folder and it will remove your virtual environment.
To quickly print a list all of the installed libraries to a file, we'll use the pip command:
$ pip freeze > requirements.txt
This will create a text file called requirements.txt in the current folder. The text file contains a list of all the installed Python packages inside the Python virtual environment currently running.
To create a new
virtualenv from a requirements file, use the following command:
$ pip install -r /path/to/requirements.txt
For those of you who are just starting out with geospatial Python development, it should be noted that you should keep your project-specific code at another location outside your Python virtual environment folder. For example, I always have each project-related code contained in a separate folder called 01_projects, which is my main folder. The path to my projects folder is /home/mdiener/01_projects, and the structure of two of my projects is as follows:
01_projects/Name_project101_projects/Name_project2
All virtual environments are located under /home/mdiener/venvs/. Usually, I give them the same name as a project to keep things organized, as follows:
/home/mdiener/venvs/Name_project1/home/mdiener/venvs/Name_project2
The pyproj is a wrapper around the PROJ.4 library that works with projections and performs transformations (https://pypi.python.org/pypi/pyproj/) in Python. All your geographic information should be projected into one of the many coordinate systems supported by the European Petroleum Survey Group (EPSG). This information is necessary for the systems to correctly place data at the appropriate location on Earth. The geographic data can then be placed on top of each other as layers upon layers of data in order to create maps or perform analysis. The data must be correctly positioned or we won't be able to add, combine, or compare it to other data sources spatially.
Data comes from many sources and, often, a projection is not the same as a dataset. Even worse, the data could be delivered with a description from a data provider stating it's in projection UTM31 when, in reality, the data is in projection UTM34! This can lead to big problems later on when trying to get your data to work together as programs will throw you some ugly error messages.
NumPy is the scientific backbone of number crunching arrays and complex numbers that are used to power several popular geospatial libraries including GDAL (geospatial abstraction library). The power of NumPy lies is in its support for large matrices, arrays, and math functions. The installation of NumPy is, therefore, necessary for the other libraries to function smoothly, but is seldom used directly in our quest for spatial analysis.
Fire up your virtual environment, if it is not already running, using the following standard start command:
$ workon pygeoan_cb
Your prompt should now look like this:
(pygeoan_cb)mdiener@mdiener-VirtualBox:~$
Note
If workon for some reason does not start your virtual environment, you can start it simply by executing source /home/mdiener/venvs/pygeoan_cb/bin/activate from the command line; try the steps listed in the Installing virtualenv and virtualenvwrapper recipe again to get it going.
Now, we need to install some Python tools for development that allow us to install NumPy, so run this command:
$ sudo apt-get install -y python-dev
You are now ready to move on and install pyproj and NumPy inside your running virtual environment.
Simply fire up virtualenv and we will use the pip installer to do all the heavy lifting as follows:
Use pip to go ahead and install NumPy; this can take a couple of minutes as many lines of installation verbosity are written on screen:
$ pip install numpyWindows users can grab the
.whlfile for NumPy and execute it using following command:pip install numpy -1.9.2+mkl-cp27-none-win32.whlUse
pipone more time to install pyproj:$ pip install pyprojWindows users can use the following command to install pyproj:
pip install pyproj-1.9.4-cp27-none-win_amd64.whlWait a few minutes; NumPy should be now running along with pyproj. To test if it's worked out, enter the following command in the Python console. The output should look like this:
(pygeoan_cb)mdiener@mdiener-VirtualBox:~/venv$ python
Python 2.7.3 (default,  Feb 27 2014, 19:58:35)
[GCC 4.6.3] on linux2
Type “help”,  “copyright”, “credits”, or  “license” for more information.
>> import numpy
>> import pyproj
No errors, I hope. You have now successfully installed NumPy and pyproj.
Note
All sorts of errors could show up, so please take a look at the respective installation links to help you solve them:
For pyproj: https://pypi.python.org/pypi/pyproj/
For NumPy: http://www.numpy.org
This easy installation works using the standard pip installation method. No tricks or special commands are needed. You need to simply execute the pip install <library_name> command and you are off to the races.
Tip
Library names can be found by visiting the https://pypi.python.org/pypi web page if you are unsure of the exact name you want to install.
A large part of geospatial analysis and visualization is made possible using Shapely, matplotlib, GDAL, OGR, and descartes, which are installed later. Most of the recipes here will use these libraries extensively so setting them up is necessary to complete our exercises.
Shapely (http://toblerity.org/shapely) provides pure spatial analysis of geometries using the Cartesian coordinate system as is used by AutoCAD, for those of you familiar with CAD-like programs. The benefit of using a flat coordinate system is that all the rules of Euclidean geometry and analytic geometry are applied. For a quick refresher in the coordinate systems that we all learned in school, here is a little image to quickly jolt your memory.

Note
Description: A Cartesian coordinate system demonstrating a flat plane to plot and measure geometry.
Illustration 1: Source: http://en.wikipedia.org/wiki/Cartesian_coordinate_system.
The classic overlay analysis and other geometric computations is where Shapely shines using the GEOS library as its workhorse in the background.
As for matplotlib (http://matplotlib.org/), it is the plotting engine that renders nice graphs and data to your screen as an image or scalable vector graphic (svg). The uses of matplotlib are only limited to your imagination. So, like the name partially implies, matplotlib enables you to plot your data on a graph or even on a map. For those of you familiar with MATLAB, you will find matplotlib quite similar in functionality.
The descartes library provides a nicer integration of Shapely geometry objects with Matplotlib. Here, you will see that descartes opens the fill and patch of matplotlib plots to work with the geometries from Shapely and saves you from typing them individually.
To prepare for installation, it is necessary to install some global packages, such as libgeos_c, as these are required by Shapely. NumPy is also a requirement that we have already met and is also used by Shapely.
Install the requirements of matplotlib from the command line like this:
$ sudo apt-get install freetype* libpng-dev libjpeg8-dev
These are the dependencies of matplotlib, which can be seen on a Ubuntu 14.04 machine.
Run pip to install shapely:
$ pip install shapelyRun pip to install matplotlib:
$ pip install matplotlibFinally, run pip to install descartes:
$ pip install descartes
Another test to see if all has gone well is to simply enter the Python console and try to import the packages, and if no errors occur, your console should show an empty Python cursor. The output should look like what is shown in the following code:
(pygeoan_cb)mdiener@mdiener-VirtualBox:~/venv$ python
Python 2.7.3 (default,  Feb 27 2014, 19:58:35)
[GCC 4.6.3] on linux2
Type “help”,  “copyright”, “credits”, or  “license” for more information.
>>> import shapely
>>> import matplotlib
>>> import descartes
>>>

# type exit() to return
>>> exit()
If any errors occur, Python usually provides some good clues as to where the problem is located and there is always Stack Overflow. For example, have a look at http://stackoverflow.com/questions/19742406/could-not-find-library-geos-c-or-load-any-of-its-variants/23057508#2305750823057508.
Here, the order in which you install the packages is very important. The descartes package depends on matplotlib, and matplotlib depends on NumPy plus freetype and libpng. This narrows you down to installing NumPy first, then matplotlib and its dependencies, and finally, descartes.
The installation itself is simple with pip and should be quick and painless. The tricky parts occur if libgeos_c is not installed properly, and you might need to install the libgeos-dev library.
These specific libraries are for specific formats that make our life easier and simpler than using GDAL for some projects. pyshp will work with shapefiles, geojson with GeoJSON, and pandas with all other textual data types in a structured manner.
pyshp is pure Python and is used to import and export shapefiles; you can find the source code for pyshp here at https://github.com/GeospatialPython/pyshp. The pyshp library's sole purpose is to work with shapefiles. GDAL will be used to do most of our data's in/out needs, but sometimes, a pure Python library is simpler when working with shapefiles.
geojson is the name of a Python library and also a format, making it a little confusing to understand. The GeoJSON format (http://geojson.org) is becoming ever more popular and to this extent, we use the Python geojson library to handle its creation. You will find it on Python Package Index (PyPI) if you search for geojson. As you would expect, this will help us create all the different geometry types supported in the GeoJSON specifications.
pandas (http://pandas.pydata.org) is a data analysis library that structures your data in a spreadsheet-like manner for further computations. Since our geospatial data comes from a broad set of sources and formats, such as CSV, pandas helps work with the data with minimal effort.
Enter your virtual environment using the following command:
$ workon pygeoan_cb
Your prompt should now look like this:
(pygeoan_cb)mdiener@mdiener-VirtualBox:~$
The three installations are as follows:
To test your installation of pyshp, use the import shapefile type. The output should look like what is shown in the following output:
(pygeoan_cb)mdiener@mdiener-VirtualBox:~/venv$ python
Python 2.7.3 (default,  Feb 27 2014, 19:58:35)
[GCC 4.6.3] on linux2
Type “help”,  “copyright”, “credits”, or  “license” for more information.
>> import shapefile
>> import geojson
>> import pandas
SciPy is a collection of Python libraries, including SciPy library, matplotlib, pandas, SymPy, and IPython. The SciPy library itself is used for many operations, but we are particularly interested in the spatial module. This module can do many things including running a nearest neighbor query.
PySAL is a geospatial computing library that's used for spatial analysis. Creating models and running simulations directly from Python code are some of the many library functions that PySAL offers. PySAL is a library that, when put together with our visualization tools such as matplotlib, gives us a great tool.
IPython is a Python interpreter for a console that replaces the normal Python console you may be used to when running and testing Python code from your terminal. This is really just an advanced interpreter with some cool features, such as Tab completion, which means that beginners can get commands quickly by typing a letter and hitting Tab. The IPython notebooks help share code in the form of a web page, including code, images, and more without any installation.
The dependency jungle we looked at earlier is back and we need three more universal installations to our Ubuntu system using apt-get install as follows:
$ sudo apt-get install libblas-dev liblapack-dev gfortran
Note
Windows and Mac users can use a full installer (http://www.scipy.org/install.html), such as Anaconda or Enthought Canopy, which will perform all the installation dependencies for you in one go.
Three dependencies are used for the SciPy installation. PySAL depends on SciPy so make sure to install SciPy first. Only IPython does not need any extra installations.
Start up your Python virtual environment with the following code:
mdiener@mdiener-VirtualBox:~$ workon pygeoan_cb
(pygeoan_cb)mdiener@mdiener-VirtualBox:~$
First, we'll install SciPy since PySAL depends on it. This will take a while to install; it took my machine 5 minutes to go through so take a break:
$ pip install scipyPySAL can be installed super quickly using pip:
$ pip install pysalAs usual, we'd like to see whether everything's working, so let's fire up the Python shell as follows:
(pygeoan_cb)mdiener@mdiener-VirtualBox:~$python
>>> import scipy
>>> import pysal
>>>
IPython is to be installed globally or inside the virtual environment using pip as follows:
$ pip install ipython
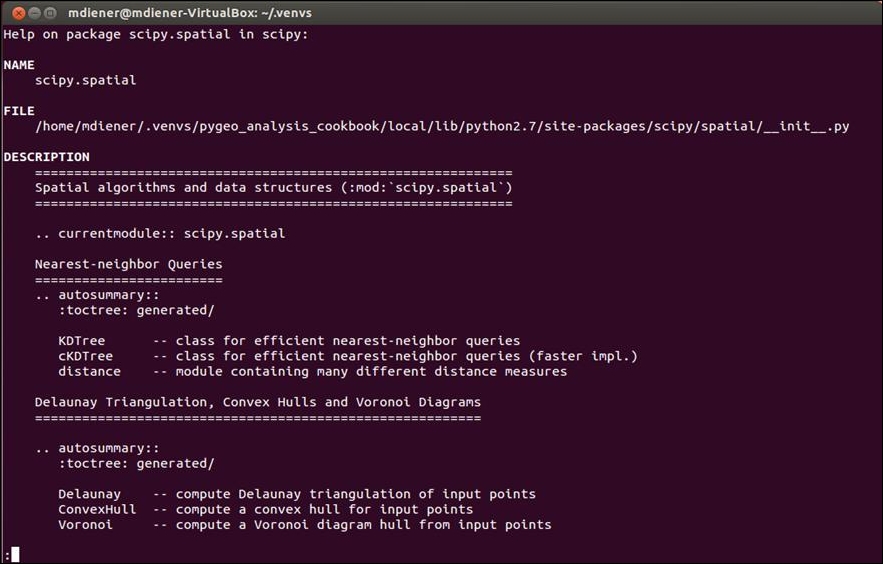
SciPy and PySAL libraries are both geared to help accomplish various spatial analysis duties. The choice of tool is based on the task at hand, so make sure that you check which library offers what function at the command prompt as follows:
>>> from scipy import spatial
>>> help(spatial)
The output should look like what is shown in the following screenshot:
Converting formats is boring, repetitive, and is one of the many, many responsibilities that the GDAL library provides, not to mention format transformations. However, GDAL also shines with regard to other geospatial functions, such as getting the current projections of a Shapefile or generating contours from elevation data. So, to only say that GDAL is a transformation library would be wrong; it really is so much more. The father of GDAL, Frank Warmerdam, deserves credit for starting it all off, and the GDAL project is now part of the OSGEO (Open Source Geospatial Foundation, refer to www.osgeo.org).
Currently, GDAL covers working with raster data, and OGR covers working with vector data. With GDAL 2.x now here, the two sides, raster and vector, are merged under one hat. GDAL and OGR are the so-called Swiss Army knives of geospatial data transformations, covering over 200 different spatial data formats.
GDAL isn't known to be the friendliest beast to install on Windows, Linux, or OSX. There are many dependencies and even more ways to install them. The descriptions are not all very straightforward. Keep in mind that this description is just one way of doing things and will not always work on all machines, so please refer to the online instructions for the latest and best ways to get your system up and running.
To start with, we will install some dependencies globally on our machine. After the dependencies have been installed, we will go into the global installation of GDAL for Python in our global site packages.
To globally install GDAL into our Python site packages, we will proceed with the following steps:
The following command is used when installing build and XML tools:
$ sudo apt-get install -y build-essentiallibxml2-dev libxslt1-devInstall the GDAL development files using the following command:
$ sudo apt-get install libgdal-dev # install is 125MBThis following command will install GDAL package in the main Python package. This means that GDAL will be installed globally. The global installation of GDAL is usually not a bad thing since, as far as I am aware, there are no backward incompatible versions, which is very rare these days. The installation of GDAL directly and only in
virtualenvis painful, to say the least, and if you are interested in attempting it, I've mentioned some links for you to try out.$ sudo apt-get install python-gdalNote
If you would like to attempt the installation inside your virtual environment, please take a look at this Stack Overflow question at http://gis.stackexchange.com/questions/28966/python-gdal-package-missing-header-file-when-installing-via-pip.
To get GDAL in the Python virtual environment, we only need to run a simple virtualevnwrapper command:
toggleglobalsitepackagesMake sure you have your virtual environment activated as follows:
mdiener@mdiener-VirtualBox:~$ workon pygeoan_cb
(pygeoan_cb)mdiener@mdiener-VirtualBox:~$
Now, activate the global Python site packages in your current virtual environment:
(pygeoan_cb)mdiener@mdiener-VirtualBox:~$ toggleglobalsitepackages
enable global site-packages
The final check is to see if GDAL is available as follows:
$ python
>>> import gdal
>>>
No errors have been found and GDAL is ready for action.
Windows 7 plus users should use the OSGeo4W windows installer (https://trac.osgeo.org/osgeo4w/).Find the following section on the web page and download your Windows version in 32-bit or 64-bit. Follow the graphical installer instructions and the GDAL installation will then be complete.
Tip
Windows users can also directly get binaries if all fails at http://www.gisinternals.com/sdk/. This installer should help avoid any other Windows specific problems that can arise and this site can help get you going in the right direction.
The GDAL installation encompasses both the raster (GDAL) and vector (OGR) tools in one. Within the GDAL install are five modules that can be separately imported into your project depending on your needs:
>>> from osgeo import gdal
>>> from osgeo import ogr
>>> from osgeo import osr
>>> from osgeo import gdal_array
>>> from osgeo import gdalconst
>>> python
>>> import osgeo
>>> help(osgeo)
To see what packages are included with your Python GDAL installation, we use the Python built-in help function to list what the OSGeo module has to offer. This is what you should see:
NAME
    osgeo - # __init__ for osgeo package.
FILE
    /usr/lib/python2.7/dist-packages/osgeo/__init__.py
MODULE DOCS
    http://docs.python.org/library/osgeo
PACKAGE CONTENTS
    _gdal
    _gdal_array
    _gdalconst
    _ogr
    _osr
    gdal
    gdal_array
    gdalconst
    gdalnumeric
    ogr
    osr
DATA
    __version__ = '1.10.0'
    version_info = sys.version_info(major=2, minor=7, micro=3, releaseleve...
VERSION
    1.10.0
(END)
At the time of writing this, the GDAL version is now bumped up to 2.0, and in developer land, this is old even before it gets printed. Beware that the GDAL 2.0 has compatibility issues and for this book, version 1.x.x is recommended.
The http://www.gdal.org homepage is always the best place for reference regarding any information about it. The OSGEO includes GDAL as a supported project, and you can find more information on it at http://www.osgeo.org.
This is our final installation recipe and if you have followed along so far, you are ready for a simple, straightforward start to Django. Django is a web framework for professionals with deadlines, according to the Django homepage. The spatial part of it can be found in GeoDjango. GeoDjango is a contrib module installed with every Django installation therefore, you only need to install Django to get GeoDjango running. Of course, "geo" has its dependencies that were met in the previous sections. For reference purposes, take a look at this great documentation on the Django homepage at
https://docs.djangoproject.com/en/dev/ref/contrib/gis/install/#ref-gis-install.
We will use PostgreSQL and PostGIS since they are the open source industry go-to spatial databases. The installations are not 100% necessary, but without them there is no real point because you then limit your operations, and they're definitely needed if you plan to store your spatial data in a spatial database. The combination of PostgreSQL and PostGIS is the most common spatial database setup for GeoDjango. This installation is definitely more involved and can lead to some hook-ups depending on your system.
To use GeoDjango, we will need to have a spatial database installed, and in our case, we will be using PostgreSQL with the PostGIS extension. GeoDjango also supports Oracle, Spatialite, and MySQL. The dependencies of PostGIS include GDAL, GEOS, PROJ.4, LibXML2, and JSON-C.
Start up your Python virtual environment as follows:
mdiener@mdiener-VirtualBox:~$ workon pygeoan_cb
(pygeoan_cb)mdiener@mdiener-VirtualBox:~$
Tip
Downloading the example code
You can download the example code files for all Packt books you have purchased from your account at http://www.packtpub.com. If you purchased this book elsewhere, you can visit http://www.packtpub.com/support and register to have the files e-mailed directly to you.
Follow these steps. These are taken from the PostgreSQL homepage for Ubuntu Linux:
Create a new file called
pgdg.listusing the standard gedit text editor. This stores the command to fire up your Ubuntu installer package:$ sudo gedit /etc/apt/sources.list.d/pgdg.listAdd this line to the file, save, and then close it:
$ deb http://apt.postgresql.org/pub/repos/apt/ precise-pgdg mainNow, run the
wgetcommand for add the key:$ wget --quiet -O - https://www.postgresql.org/media/keys/ACCC4CF8.asc | \ sudo apt-key add -Run the
updatecommand to actualize your installer packages:$ sudo apt-get updateRun the
installcommand to actually install PostgreSQL 9.3:$ sudo apt-get install postgresql-9.3To install PostGIS 2.1, we will have one unmet dependency,
libgdal1, so go ahead and install it:$ sudo apt-get install libgdal1Now we can install PostGIS 2.1 for PostgreSQL 9.3 on our machine:
$ sudo apt-get install postgresql-9.3-postgis-2.1Install the PostgreSQL header files:
$ sudo apt-get install libpq-devFinally, install the
contribmodule with contributions:$ sudo apt-get install postgresql-contribInstall the Python database adapter,
psycopg2, to connect to your PostgreSQL database from Python:$ sudo apt-get install python-psycopg2Now we can create a standard PostgreSQL database as follows:
(pygeoan_cb)mdiener@mdiener-VirtualBox:~$ createdb [NewDatabaseName]Using the
psqlcommand-line tool, we can create a PostGIS extension to our newly created database to give it all the PostGIS functions as follows:(pygeoan_cb)mdiener@mdiener-VirtualBox:~$ psql -d [NewDatabaseName] -c "CREATE EXTENSION postgis;"Moving on, we can finally install Django in one line directly in our activated virtual environment:
$ pip install djangoTest out your install of Django and GDAL and, as always, try to import them as follows:
>>> from django.contrib.gis import gdal
>>> gdal.HAS_GDAL
True
Windows users should be directed to the PostgreSQL Windows (http://www.postgresql.org/download/windows/) binaries provided by EnterpriseDB (http://www.enterprisedb.com/products-services-training/pgdownload#windows). Download the correct version and follow the installer instructions. PostGIS is also included in the list of extensions that you can directly install using the installer.
Installations using the apt-get Ubuntu installer and the Windows installers are simple enough in order to have PostgreSQL, PostGIS, and Django up and running. However, the inner workings of the installers are beyond the scope of this book.
To summarize all the installed libraries, take a look at this table:
|
Library name |
Description |
Reason to install |
|---|---|---|
|
NumPy |
This adds support for large multidimensional arrays and matrices |
It is a requirement for many other libraries |
|
pyproj |
This handles projections |
It transforms projections |
|
shapely |
This handles geospatial operations |
It performs fast geometry manipulations and operations |
|
matplotlib |
This plots libraries |
It provides a quick visualization of results |
|
descartes |
This uses Shapely or GeoJSON objects as matplotlib paths and patches |
It speedily plots geo-data |
|
pandas |
This provides high-performance data structures and data analysis |
It performs data manipulation, CSV creation, and data manipulation |
|
SciPy |
This provides a collection of Python libraries for scientific computing |
It has the best collection of necessary tools |
|
PySAL |
This contains a geospatial analysis library |
It performs a plethora of spatial operations (optional) |
|
IPython |
This provides interactive Python computing |
It is a helpful notebook to store and save your scripts (optional) |
|
Django |
This contains a web application framework |
It is used for our demo web application in Chapter 11, Web Analysis with GeoDjango |
|
pyshp |
This provides pure Python shapefile manipulation and generation |
It helps input and output shapefiles |
|
GeoJSON |
This contains the JSON format for spatial data |
It facilitates the exchange and publication of this format |
|
PostgreSQL |
This is a relational database |
It helps store spatial data |
|
PostGIS |
This is the spatial extension to PostgreSQL |
It stores and performs spatial operations on geographic data in PostgreSQL |