


 Download code from GitHub
This chapter will detail some common methods to set up Spark. Spark on a single machine is excellent for testing or exploring small Datasets, but here you will also learn to use Spark's built-in deployment scripts with a dedicated cluster via Secure Shell (SSH). For Cloud deployments of Spark, this chapter will look at EC2 (both traditional and Elastic Map reduce). Feel free to skip this chapter if you already have your local Spark instance installed and want to get straight to programming. The best way to navigate through installation is to use this chapter as a guide and refer to the Spark installation documentation at http://spark.apache.org/docs/latest/cluster-overview.html.
Regardless of how you are going to deploy Spark, you will want to get the latest version of Spark from https://spark.apache.org/downloads.html (Version 2.0.0 as of this writing). Spark currently releases every 90 days. For coders who want to work with the latest builds, try cloning the code directly from the repository at https://github.com/apache/spark. The building instructions are available at https://spark.apache.org/docs/latest/building-spark.html. Both source code and prebuilt binaries are available at this link. To interact with Hadoop Distributed File System (HDFS), you need to use Spark, which is built against the same version of Hadoop as your cluster. For Version 2.0.0 of Spark, the prebuilt package is built against the available Hadoop Versions 2.3, 2.4, 2.6, and 2.7. If you are up for the challenge, it's recommended that you build against the source as it gives you the flexibility of choosing the HDFS version that you want to support as well as apply patches with. In this chapter, we will do both.
Tip
As you explore the latest version of Spark, an essential task is to read the release notes and especially what has been changed and deprecated. For 2.0.0, the list is slightly long and is available at https://spark.apache.org/releases/spark-release-2-0-0.html#removals-behavior-changes-and-deprecations. For example, the note talks about where the EC2 scripts have moved to and support for Hadoop 2.1 and earlier.
To compile the Spark source, you will need the appropriate version of Scala and the matching JDK. The Spark source tar utility includes the required Scala components. The following discussion is only for information there is no need to install Scala.
The Spark developers have done a good job of managing the dependencies. Refer to the https://spark.apache.org/docs/latest/building-spark.html web page for the latest information on this. The website states that:
"Building Spark using Maven requires Maven 3.3.9 or newer and Java 7+."
Scala gets pulled down as a dependency by Maven (currently Scala 2.11.8). Scala does not need to be installed separately; it is just a bundled dependency.
Just as a note, Spark 2.0.0 by default runs with Scala 2.11.8, but can be compiled to run with Scala 2.10. I have just seen e-mails in the Spark users' group on this.
Tip
This brings up another interesting point about the Spark community. The two essential mailing lists are user@spark.apache.org and dev@spark.apache.org. More details about the Spark community are available at https://spark.apache.org/community.html.
One convention that would be handy is to download and install software in the /opt directory. Also, have a generic soft link to Spark that points to the current version. For example, /opt/spark points to /opt/spark-2.0.0 with the following command:
sudo ln -f -s spark-2.0.0 spark
Tip
Downloading the example code
You can download the example code files for all of the Packt books you have purchased from your account at http://www.packtpub.com. If you purchased this book elsewhere, you can visit http://www.packtpub.com/support and register to have the files e-mailed directly to you.
Later, if you upgrade, say to Spark 2.1, you can change the soft link.
However, remember to copy any configuration changes and old logs when you change to a new distribution. A more flexible way is to change the configuration directory to /etc/opt/spark and the log files to /var/log/spark/. In this way, these files will stay independent of the distribution updates. More details are available at https://spark.apache.org/docs/latest/configuration.html#overriding-configuration-directory and https://spark.apache.org/docs/latest/configuration.html#configuring-logging.
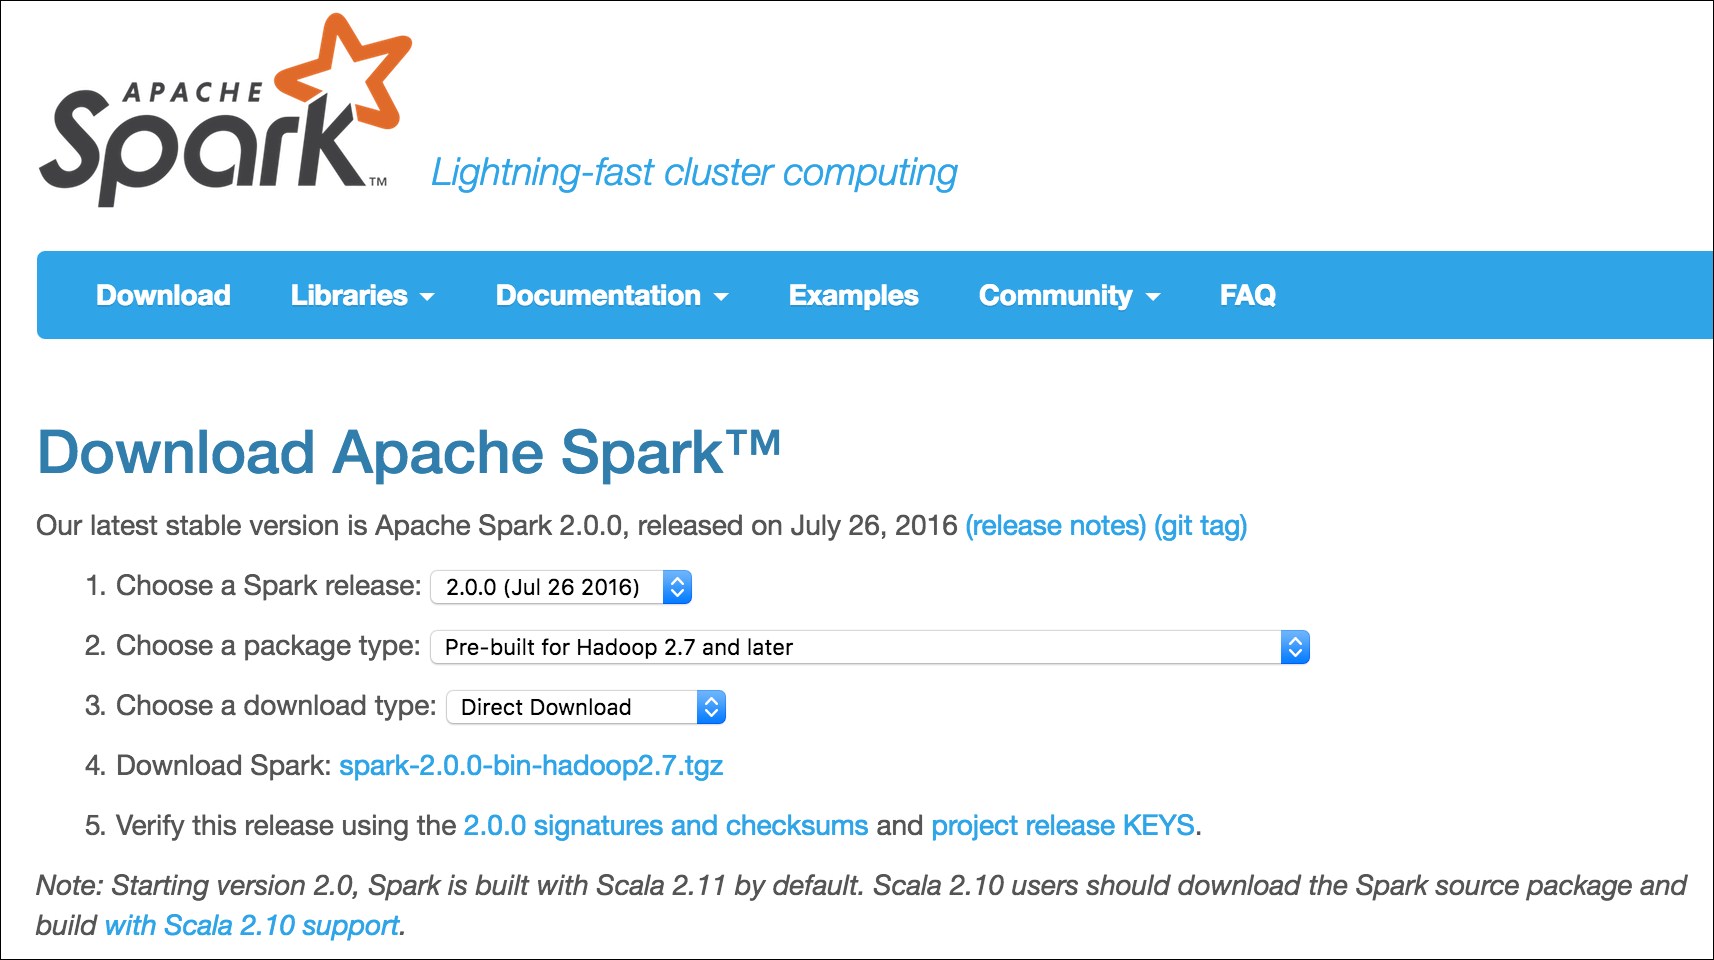
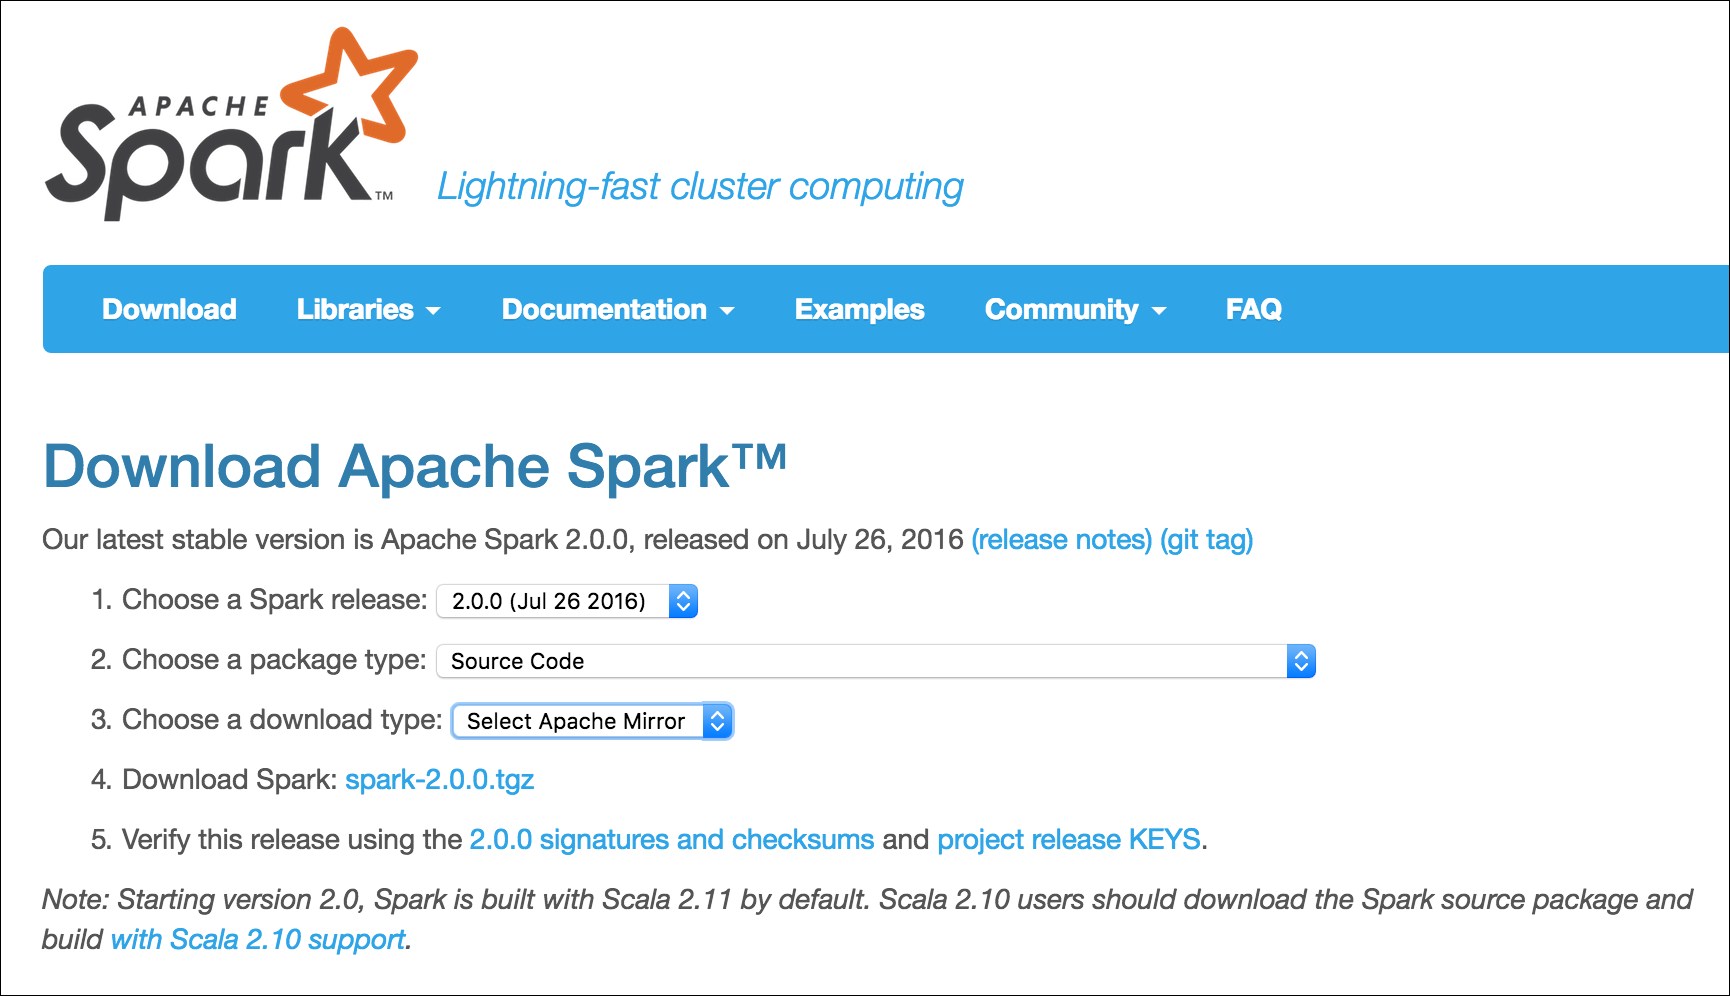
Let's download prebuilt Spark and install it. Later, we will also compile a version and build from the source. The download is straightforward. The download page is at http://spark.apache.org/downloads.html. Select the options as shown in the following screenshot:
We will use wget from the command line. You can do a direct download as well:
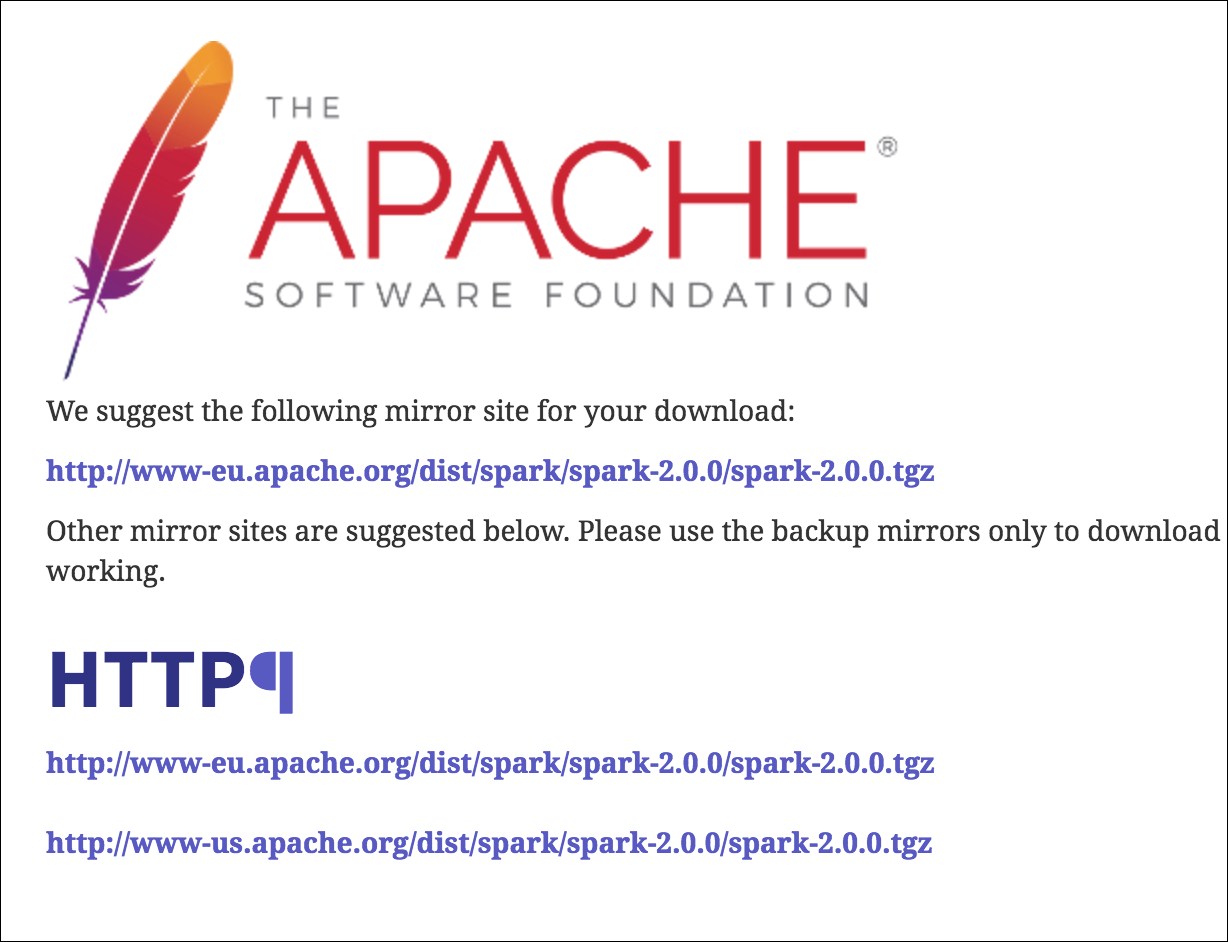
cd /opt
sudo wget http://www-us.apache.org/dist/spark/spark-2.0.0/spark-2.0.0-bin-hadoop2.7.tgz
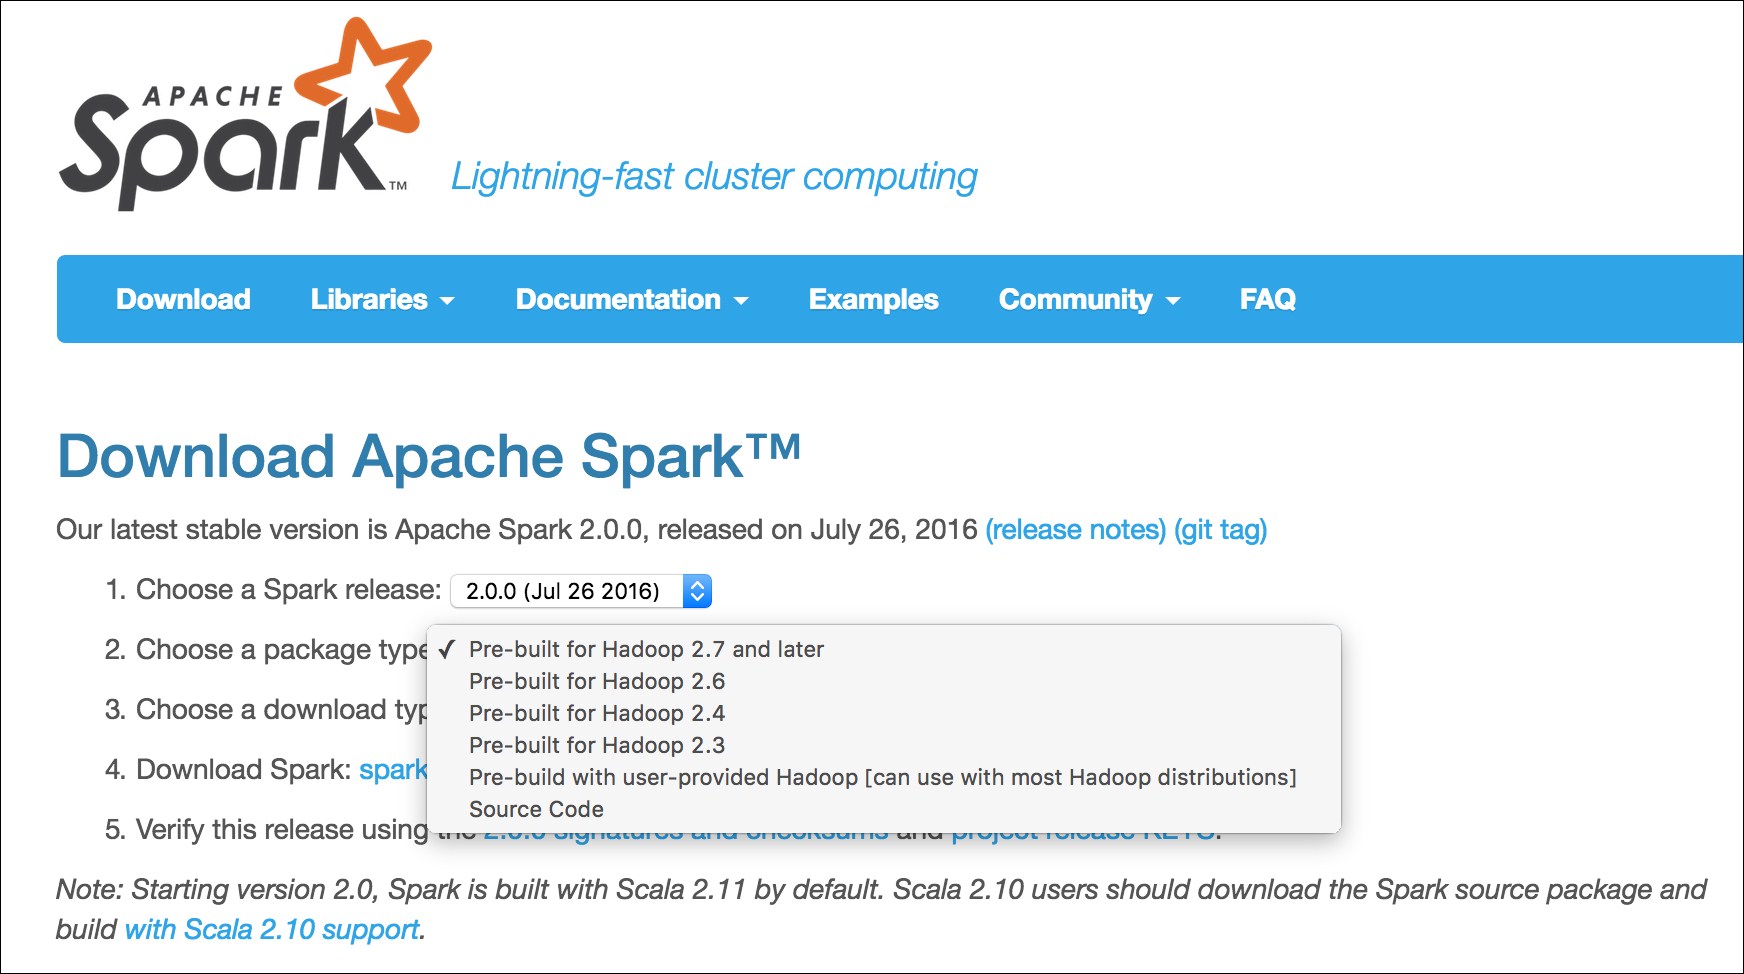
We are downloading the prebuilt version for Apache Hadoop 2.7 from one of the possible mirrors. We could have easily downloaded other prebuilt versions as well, as shown in the following screenshot:
To uncompress it, execute the following command:
sudo tar xvf spark-2.0.0-bin-hadoop2.7.tgz
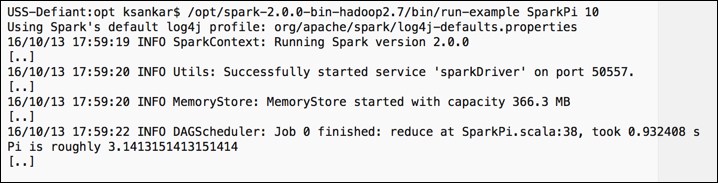
To test the installation, run the following command:
/opt/spark-2.0.0-bin-hadoop2.7/bin/run-example SparkPi 10
It will fire up the Spark stack and calculate the value of Pi. The result will be as shown in the following screenshot:
Let's compile Spark on a new AWS instance. In this way, you can clearly understand what all the requirements are to get a Spark stack compiled and installed. I am using the Amazon Linux AMI, which has Java and other base stacks installed by default. As this is a book on Spark, we can safely assume that you would have the base configurations covered. We will cover the incremental installs for the Spark stack here.
Note
The latest instructions for building from the source are available at http://spark.apache.org/docs/latest/building-spark.html.
The first order of business is to download the latest source from https://spark.apache.org/downloads.html. Select Source Code from option 2. Choose a package type and either download directly or select a mirror. The download page is shown in the following screenshot:
We can either download from the web page or use wget.
We will use wget from the first mirror shown in the preceding screenshot and download it to the opt subdirectory, as shown in the following command:
cd /opt
sudo wget http://www-eu.apache.org/dist/spark/spark-2.0.0/spark-2.0.0.tgz
sudo tar -xzf spark-2.0.0.tgz
Tip
The latest development source is in GitHub, which is available at https://github.com/apache/spark. The latest version can be checked out by the Git clone at https://github.com/apache/spark.git. This should be done only when you want to see the developments for the next version or when you are contributing to the source.
Compilation by nature is uneventful, but a lot of information gets displayed on the screen:
cd /opt/spark-2.0.0
export MAVEN_OPTS="-Xmx2g -XX:MaxPermSize=512M -XX:ReservedCodeCacheSize=512m"
sudo mvn clean package -Pyarn -Phadoop-2.7 -DskipTests
In order for the preceding snippet to work, we will need Maven installed on our system. Check by typing mvn -v. You will see the output as shown in the following screenshot:

In case Maven is not installed in your system, the commands to install the latest version of Maven are given here:
wget http://mirror.cc.columbia.edu/pub/software/apache/maven/maven-3/3.3.9/binaries/apache-maven-3.3.9-bin.tar.gz
sudo tar -xzf apache-maven-3.3.9-bin.tar.gz
sudo ln -f -s apache-maven-3.3.9 maven
export M2_HOME=/opt/maven
export PATH=${M2_HOME}/bin:${PATH}
Tip
Detailed Maven installation instructions are available at http://maven.apache.org/download.cgi#Installation.
Sometimes, you will have to debug Maven using the -X switch. When I ran Maven, the Amazon Linux AMI didn't have the Java compiler! I had to install javac for Amazon Linux AMI using the following command:
sudo yum install java-1.7.0-openjdk-devel
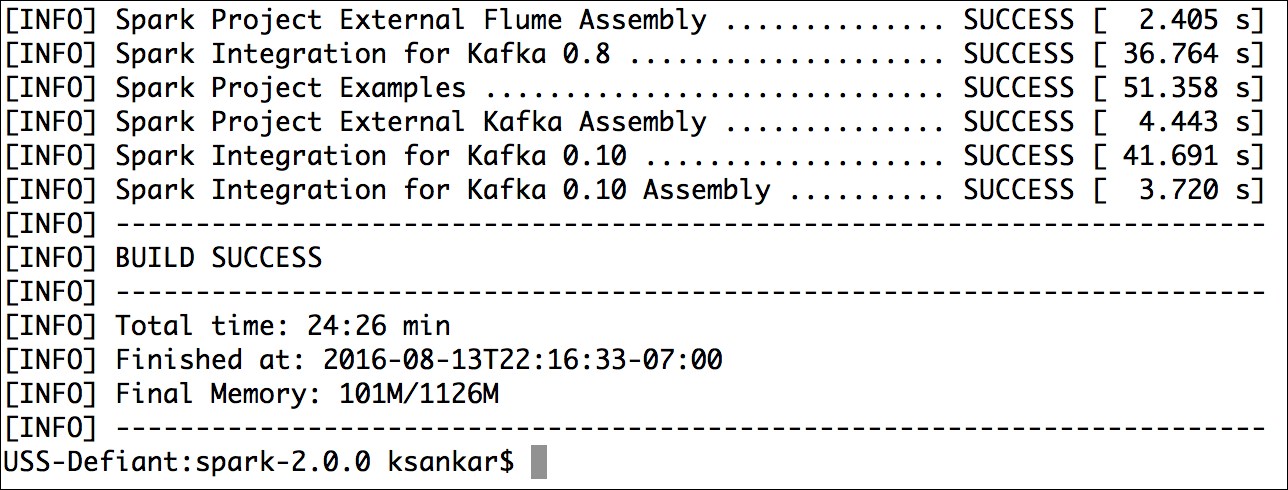
The compilation time varies. On my Mac, it took approximately 28 minutes. The Amazon Linux on a t2-medium instance took 38 minutes. The times could vary, depending on the Internet connection, what libraries are cached, and so forth.
In the end, you will see a build success message like the one shown in the following screenshot:
As an example, the switches for the compilation of -Pyarn -Phadoop-2.7 -DskipTests are explained in https://spark.apache.org/docs/latest/building-spark.html#specifying-the-hadoop-version. The -D instance defines a system property and -P defines a profile.

This is a good time to talk about the basic mechanics and mechanisms of Spark. We will progressively dig deeper, but for now let's take a quick look at the top level.
Essentially, Spark provides a framework to process the vast amounts of data, be it in gigabytes, terabytes, and occasionally petabytes. The two main ingredients are computation and scale. The size and effectiveness of the problems that we can solve depends on these two factors, that is, the ability to apply complex computations over large amounts of data in a timely fashion. If our monthly runs take 40 days, we have a problem.
The key, of course, is parallelism, massive parallelism to be exact. We can make our computational algorithm tasks work in parallel, that is, instead of doing the steps one after another, we can perform many steps at the same time, or carry out data parallelism. This means that we run the same algorithms over a partitioned Dataset in parallel. In my humble opinion, Spark is extremely effective in applying data parallelism in an elegant framework. As you will see in the rest of this book, the two components are Resilient Distributed Dataset (RDD) and cluster manager. The cluster manager distributes the code and manages the data that is represented in RDDs. RDDs with transformations and actions are the main programming abstractions and present parallelized collections. Behind the scenes, a cluster manager controls the distribution and interaction with RDDs, distributes code, and manages fault-tolerant execution. As you will see later in the book, Spark has more abstractions on RDDs, namely DataFrames and Datasets. These layers make it extremely efficient for a data engineer or a data scientist to work on distributed data. Spark works with three types of cluster managers-standalone, Apache Mesos, and Hadoop YARN. The Spark page at http://spark.apache.org/docs/latest/cluster-overview.html has a lot more details on this. I just gave you a quick introduction here.
Tip
If you have installed Hadoop 2.0, it is recommended to install Spark on YARN. If you have installed Hadoop 1.0, the standalone version is recommended. If you want to try Mesos, you can choose to install Spark on Mesos. Users are not recommended to install both YARN and Mesos.
Refer to the following diagram:
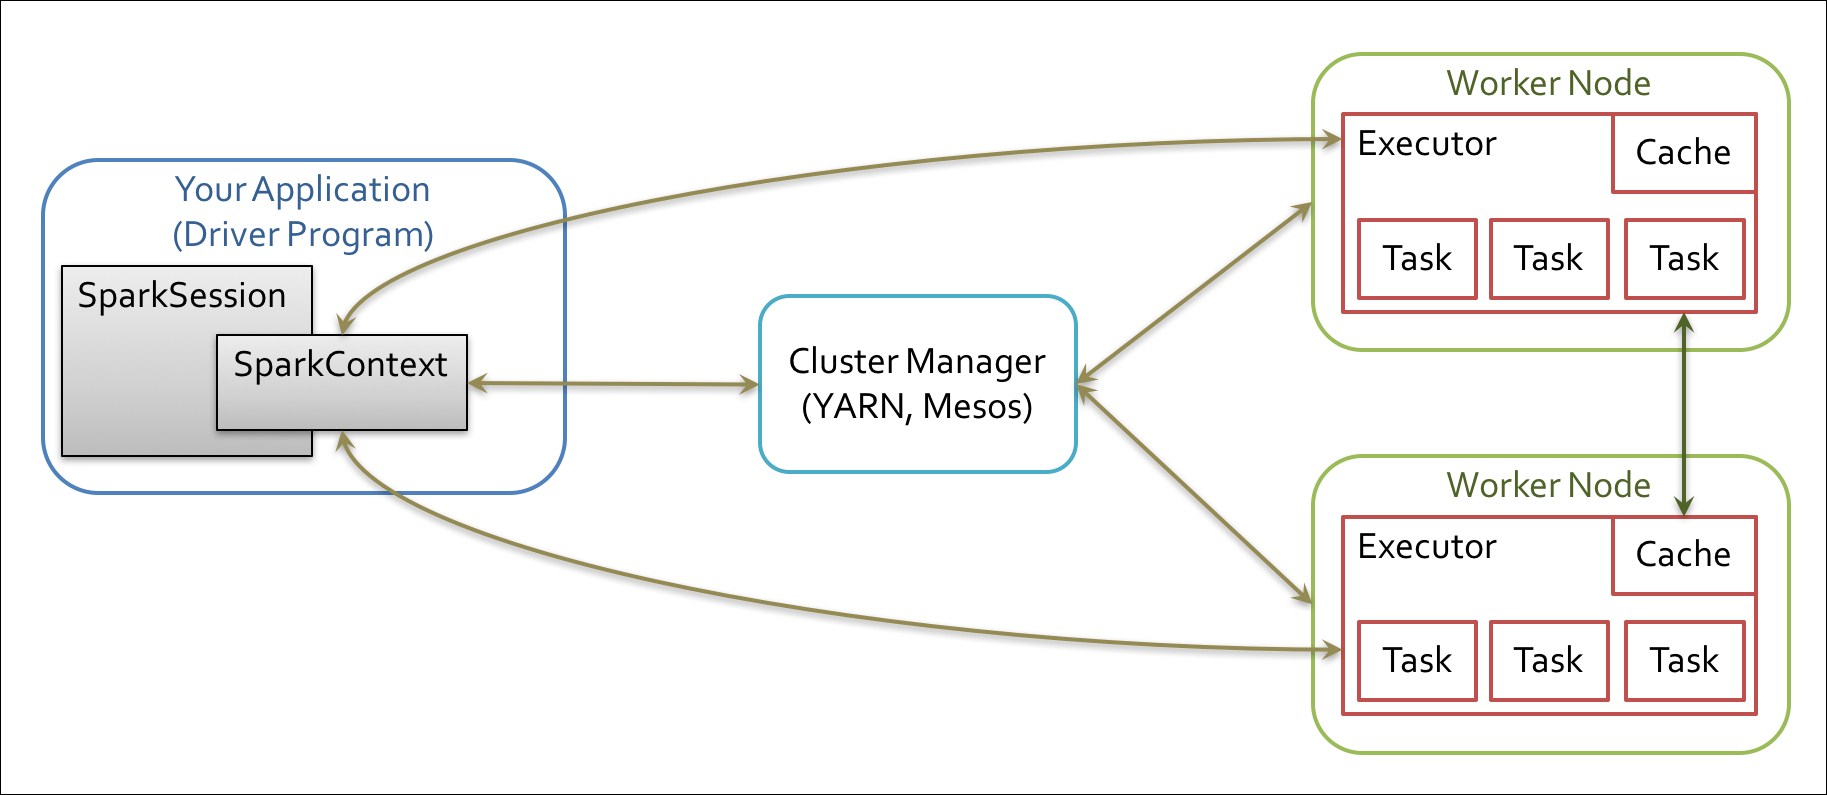
The Spark driver program takes the program classes and hands them over to a cluster manager. The cluster manager, in turn, starts executors in multiple worker nodes, each having a set of tasks. When we ran the example program earlier, all these actions happened transparently on your machine! Later, when we install in a cluster, the examples will run, again transparently, across multiple machines in the cluster. This is the magic of Spark and distributed computing!
A single machine is the simplest use case for Spark. It is also a great way to sanity check your build. In spark/bin, there is a shell script called run-example, which can be used to launch a Spark job. The run-example script takes the name of a Spark class and some arguments. Earlier, we used the run-example script from the /bin directory to calculate the value of Pi. There is a collection of the sample Spark jobs in examples/src/main/scala/org/apache/spark/examples/.
All of the sample programs take the parameter, master (the cluster manager), which can be the URL of a distributed cluster or local[N], where N is the number of threads.
Going back to our run-example script, it invokes the more general bin/spark-submit script. For now, let's stick with the run-example script.
To run GroupByTest locally, try running the following command:
bin/run-example GroupByTest
This line will produce an output like this given here:
14/11/15 06:28:40 INFO SparkContext: Job finished: count at  GroupByTest.scala:51, took 0.494519333 s
2000
Till Spark 2.0.0, the ec2 directory contained the script to run a Spark cluster in EC2. From 2.0.0, the ec2 scripts have been moved to an external repository hosted by the UC Berkeley AMPLab. These scripts can be used to run multiple Spark clusters and even run on-the-spot instances. Spark can also be run on Elastic MapReduce (Amazon EMR), which is Amazon's solution for MapReduce cluster management, and it gives you more flexibility around scaling instances. The UCB AMPLab page at https://github.com/amplab/spark-ec2 has the latest onrunning Spark on EC2.
Tip
The Stack Overflow page at http://stackoverflow.com/questions/38611573/how-to-launch-spark-2-0-on-ec2 is a must-read before attempting to run Spark on EC2. The blog at https://medium.com/@eyaldahari/how-to-set-apache-spark-cluster-on-amazon-ec2-in-a-few-simple-steps-d29f0d6f1a81#.8wfa4vqbl also has some good tips for running Spark in EC2.
There are many ways you can get the scripts. The best way is to download the .zip file from the AMPLab GitHub, unzip it, and move it from the ec2 directory to the spark-2.0.0 directory. In this way, things will work as before and are contained in the spark directory.
Tip
Remember to repeat this, that is, download the .zip file, and then move the ec2 directory, when you download newer versions of spark, say spark-2.1.0.
You can download a .zip file from GitHub, as shown here:
Perform the following steps:
Download the
.zipfile from GitHub to, say~/Downloads(or another equivalent directory).Run this command to unzip the files:
unzip spark-ec2-branch-1.6.zipRename the subdirectory:
mv spark-ec2-branch-1.6 ec2Move the directory under
spark-2.0.0:mv ~/Downloads/ec2 /opt/spark-2.0.0/Viola! It is as if the
ec2directory was there all along!
To get started, you should make sure you have EC2 enabled on your account by signing up at https://portal.aws.amazon.com/gp/aws/manageYourAccount. Then it is a good idea to generate a separate access key pair for your Spark cluster, which you can do at https://portal.aws.amazon.com/gp/aws/securityCredentials. You will also need to create an EC2 key pair so that the Spark script can SSH to the launched machines, which can be done at https://console.aws.amazon.com/ec2/home by selecting Key Pairs under NETWORK & SECURITY. Remember that key pairs are created per region and so you need to make sure that you create your key pair in the same region as you intend to run your Spark instances. Make sure to give it a name that you can remember as you will need it for the scripts (this chapter will use spark-keypair as its example key pair name.). You can also choose to upload your public SSH key instead of generating a new key. These are sensitive; so make sure that you keep them private. You also need to set AWS_ACCESS_KEY and AWS_SECRET_KEY as environment variables for the Amazon EC2 scripts:
chmod 400 spark-keypair.pem
export AWS_ACCESS_KEY=AWSACcessKeyId
export AWS_SECRET_KEY=AWSSecretKey
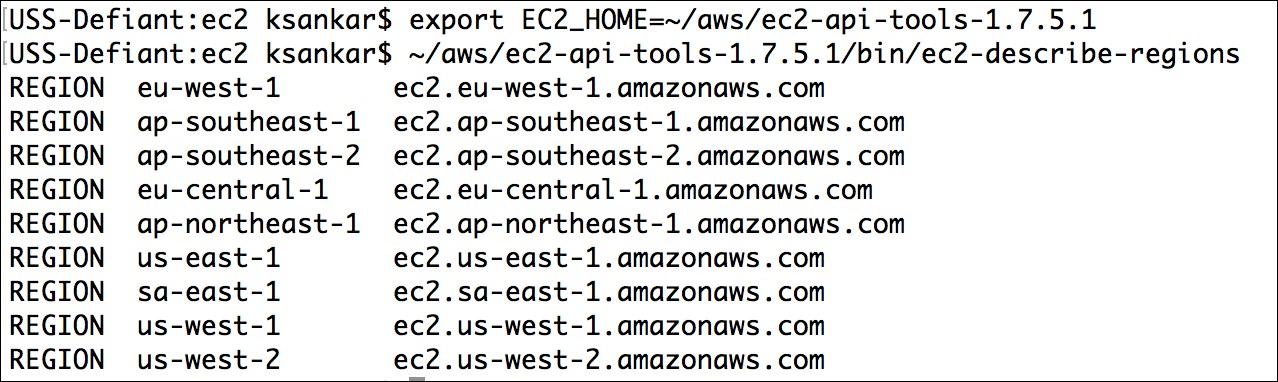
You will find it useful to download the EC2 scripts provided by Amazon from http://docs.aws.amazon.com/AWSEC2/latest/CommandLineReference/set-up-ec2-cli-linux.html. Once you unzip the resulting .zip file, you can add bin to PATH in a manner similar to the way you did with the Spark bin instance:
wget http://s3.amazonaws.com/ec2-downloads/ec2-api-tools.zip
unzip ec2-api-tools.zip
cd ec2-api-tools-*
export EC2_HOME='pwd'
export PATH=$PATH:'pwd'/bin
In order to test whether this works, try the following command:
$ec2-describe-regions
This command will display the output shown in the following screenshot:
Finally, you can refer to the EC2 command-line tool reference page at http://docs.aws.amazon.com/AWSEC2/latest/CommandLineReference/set-up-ec2-cli-linux.html as it has all the gory details.
The Spark EC2 script automatically creates a separate security group and firewall rules for running the Spark cluster. By default, your Spark cluster will be universally accessible on port 8080, which is somewhat poor. Sadly, the spark_ec2.py script does not currently provide an easy way to restrict access to just your host. If you have a static IP address, I strongly recommend limiting access in spark_ec2.py; simply replace all instances of 0.0.0.0/0 with [yourip]/32. This will not affect intra-cluster communication as all machines within a security group can talk to each other by default.
Next, try to launch a cluster on EC2:
./ec2/spark-ec2 -k spark-keypair -i pk-[....].pem -s 1 launch myfirstcluster
Tip
If you get an error message, such as The requested Availability Zone is currently constrained and…, you can specify a different zone by passing in the --zone flag.
The -i parameter (in the preceding command line) is provided for specifying the private key to log into the instance; -i pk-[....].pem represents the path to the private key.
If you get an error about not being able to SSH to the master, make sure that only you have the permission to read the private key, otherwise SSH will refuse to use it.
You may also encounter this error due to a race condition, when the hosts report themselves as alive but the spark-ec2 script cannot yet SSH to them. A fix for this issue is pending in https://github.com/mesos/spark/pull/555. For now, a temporary workaround until the fix is available in the version of Spark you are using is to simply sleep an extra 100 seconds at the start of setup_cluster using the -w parameter. The current script has 120 seconds of delay built in.
If you do get a transient error while launching a cluster, you can finish the launch process using the resume feature by running the following command:
./ec2/spark-ec2 -i ~/spark-keypair.pem launch myfirstsparkcluster --resume
Refer to the following screenshot:

It will go through a bunch of scripts, thus setting up Spark, Hadoop, and so forth. If everything goes well, you will see something like the following screenshot:
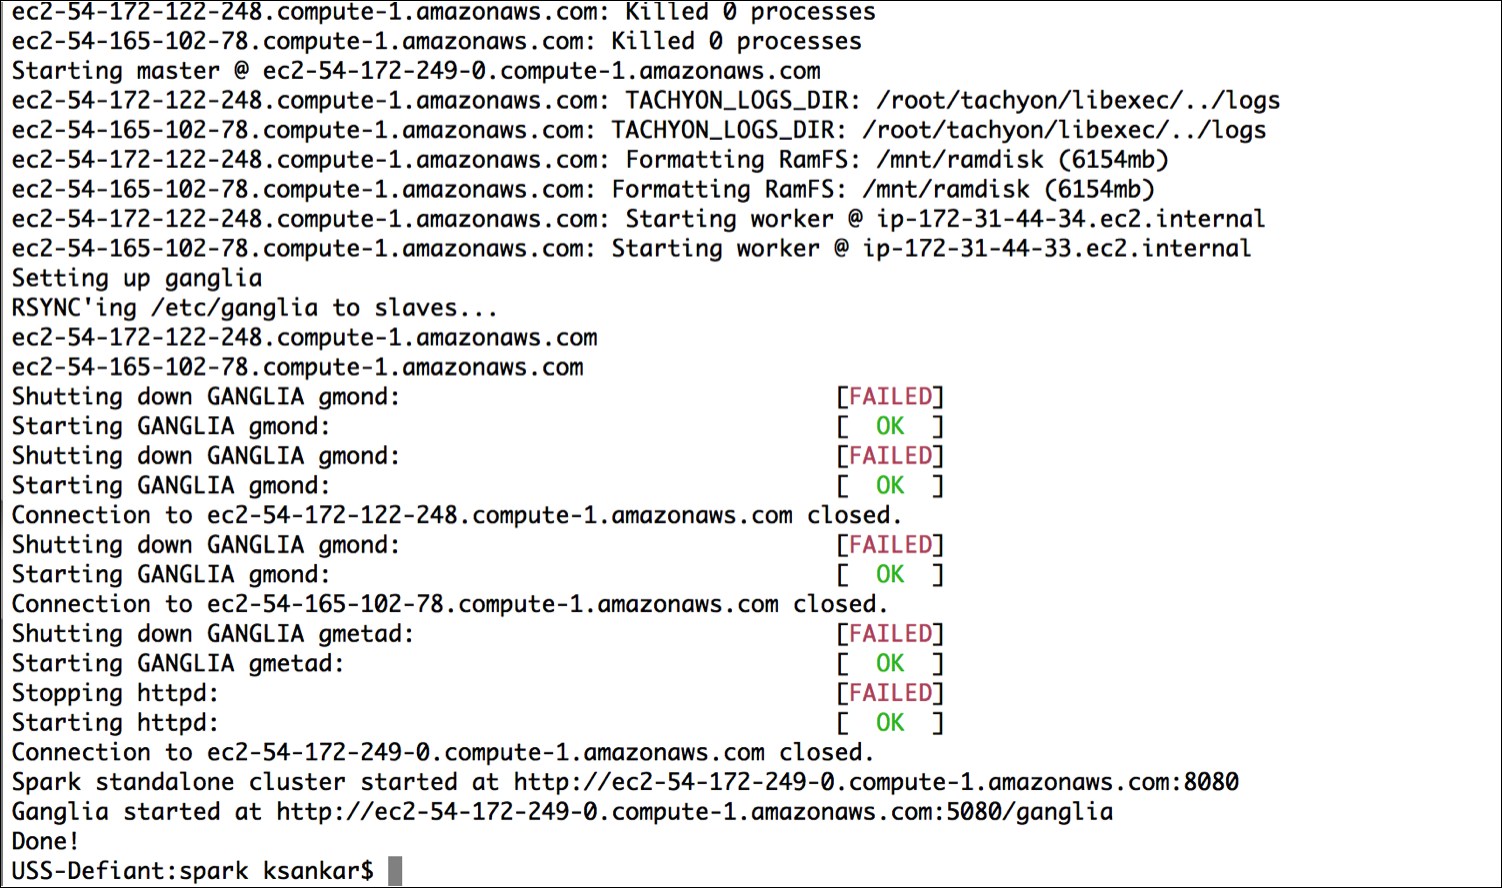
This will give you a barebones cluster with one master and one worker with all of the defaults on the default machine instance size. Next, verify that it started up and your firewall rules were applied by going to the master on port 8080. You can see in the preceding screenshot that the UI for the master is the output at the end of the script with port at 8080 and ganglia at 5080.
Your AWS EC2 dashboard will show the instances as follows:
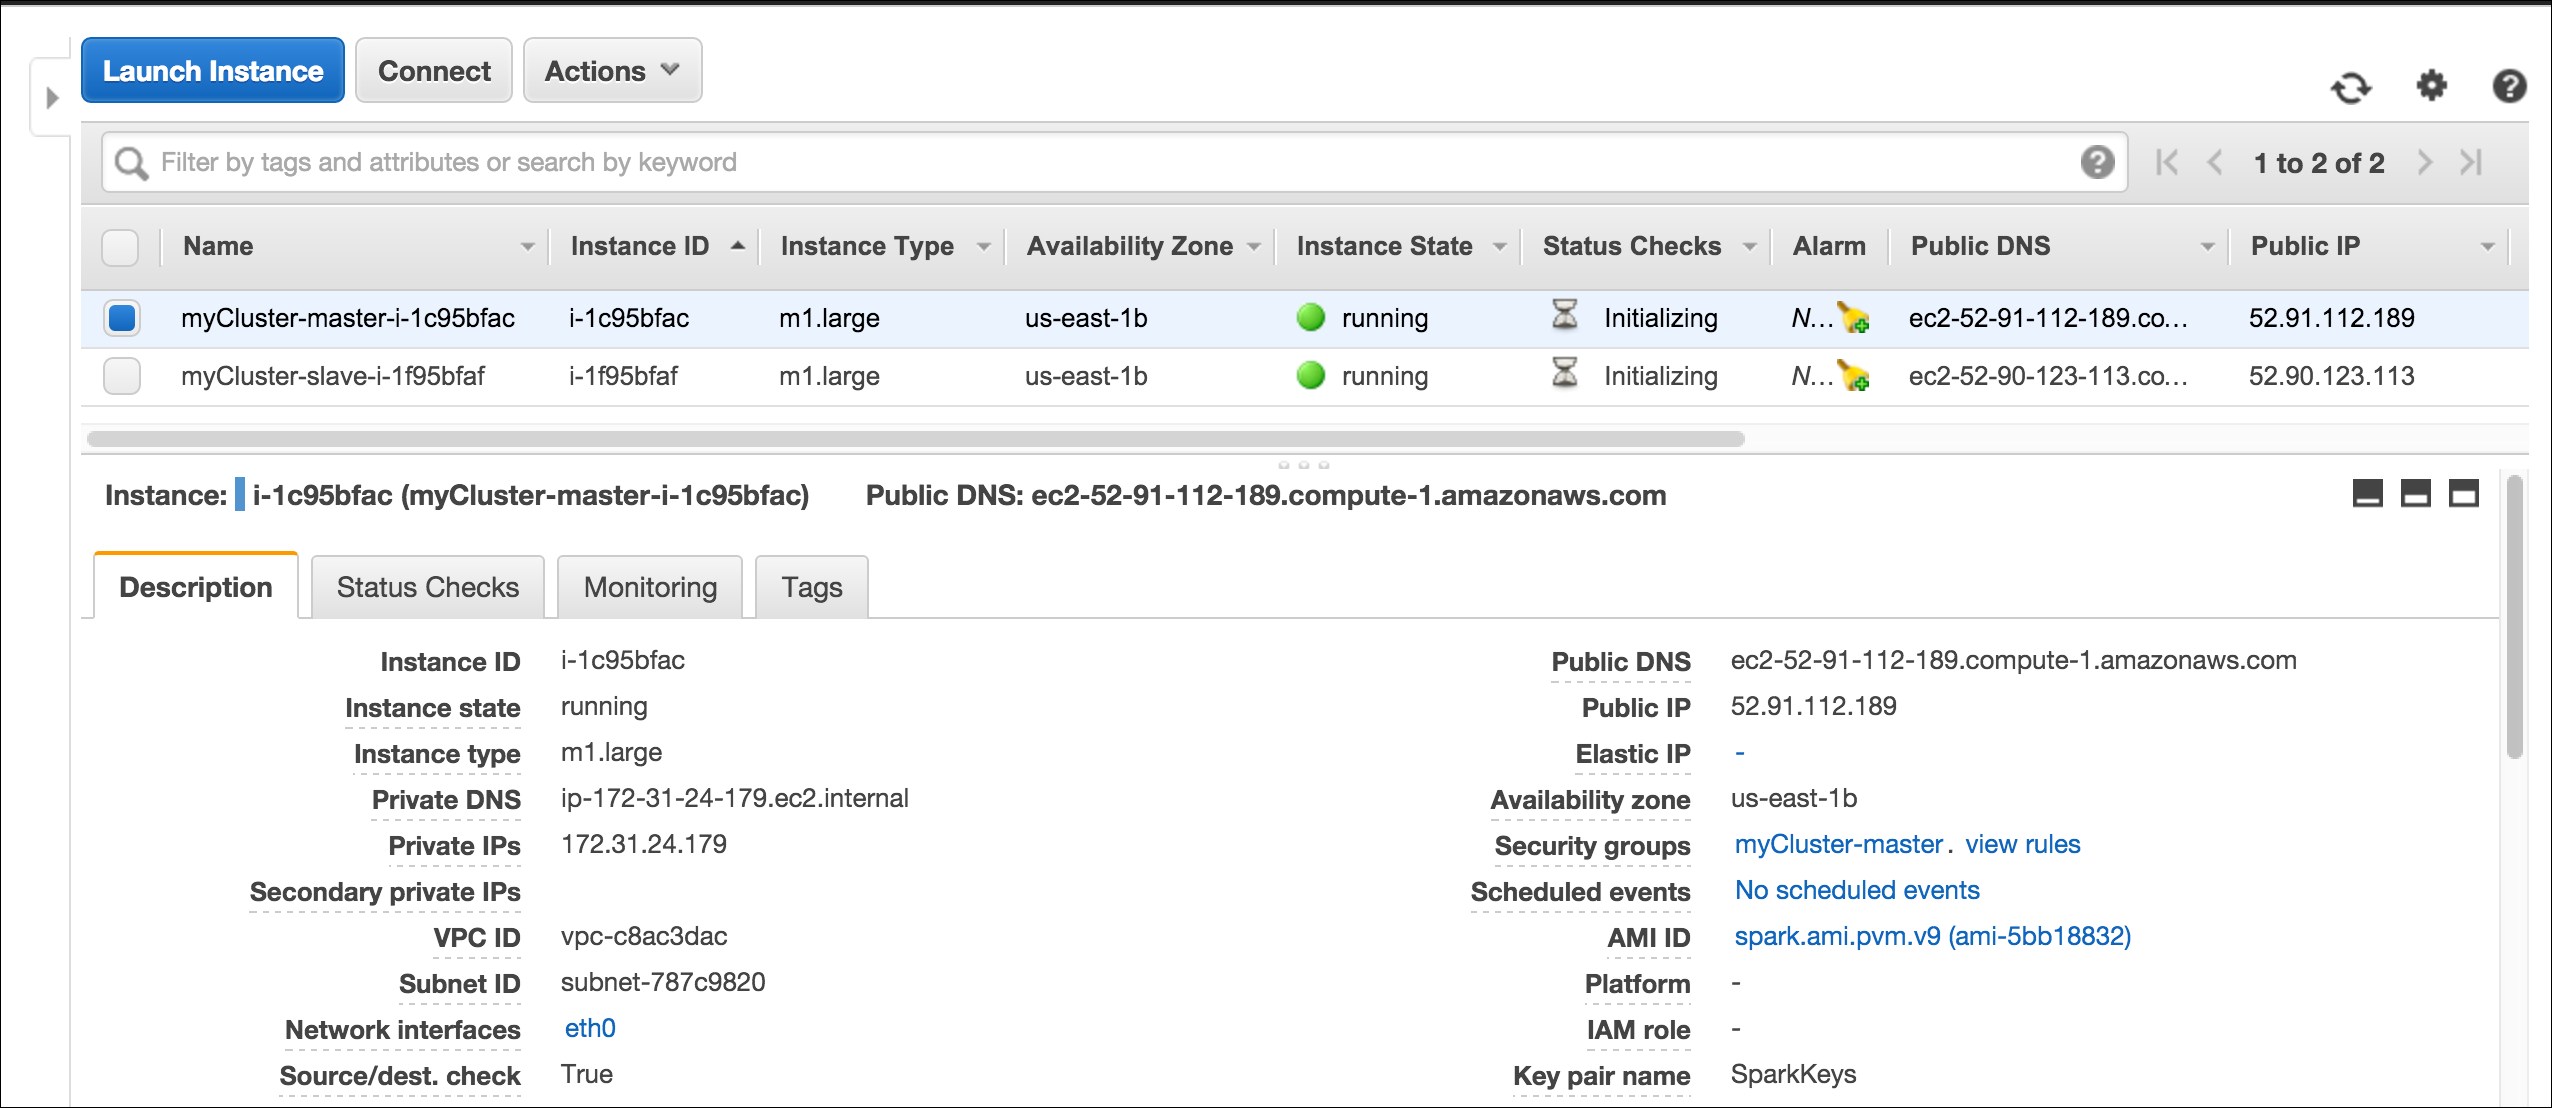
The ganglia dashboard shown in the following screenshot is a good place to monitor the instances:

Try running one of the example jobs on your new cluster to make sure everything is okay, as shown in the following screenshot:
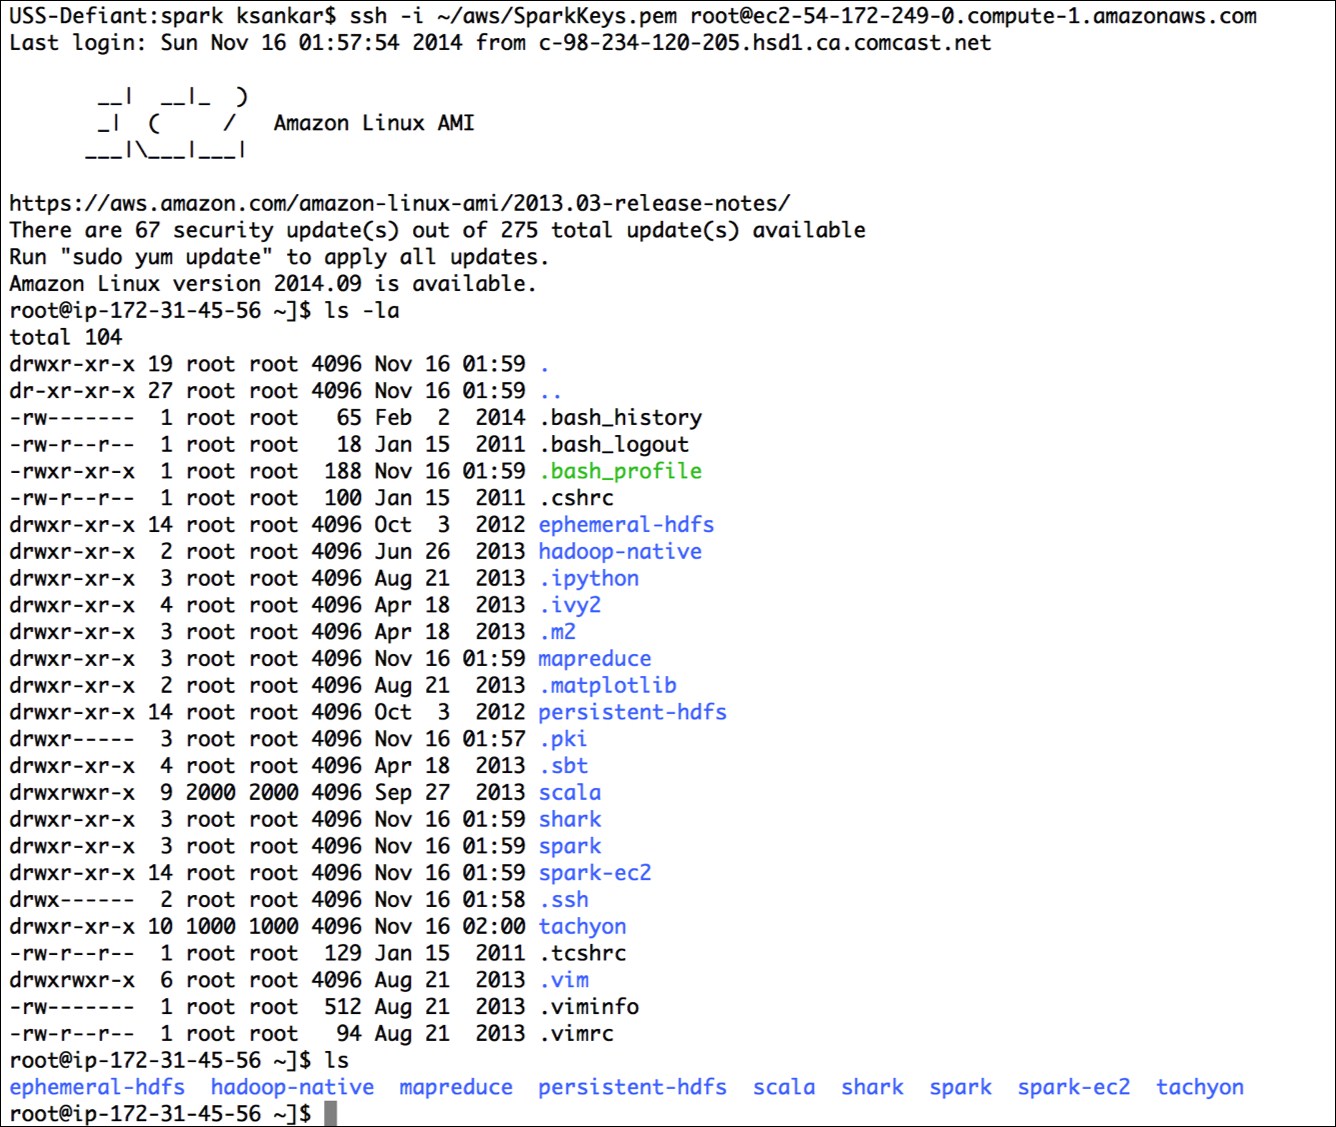
The JPS should show this:
root@ip-172-31-45-56 ~]$ jps
1904 NameNode
2856 Jps
2426 Master
2078 SecondaryNameNode
The script has started the Spark master, the Hadoop name node, and data nodes (in slaves).
Let's run the two programs that we ran earlier on our local machine:
cd spark
bin/run-example GroupByTest
bin/run-example SparkPi 10
The ease with which one can spin up a few nodes in the Cloud, install the Spark stack, and run the program in a distributed manner is interesting.
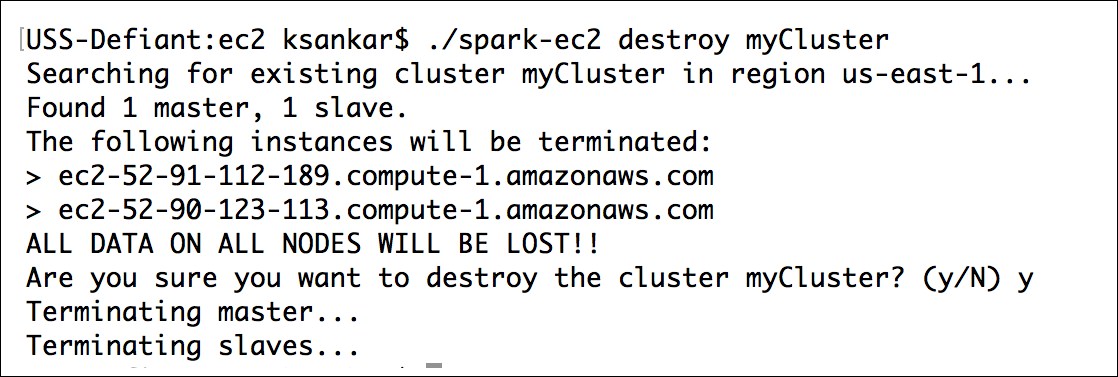
The ec2/spark-ec2 destroy <cluster name> command will terminate the instances.
If you have a problem with the key pairs, I found the command, ~/aws/ec2-api-tools-1.7.5.1/bin/ec2-describe-keypairs helpful to troubleshoot.
Now that you've run a simple job on our EC2 cluster, it's time to configure your EC2 cluster for our Spark jobs. There are a number of options you can use to configure with the spark-ec2 script.
The ec2/ spark-ec2 -help command will display all the options available.
First, consider what instance types you may need. EC2 offers an ever-growing collection of instance types and you can choose a different instance type for the master and the workers. The instance type has the most obvious impact on the performance of your Spark cluster. If your work needs a lot of RAM, you should choose an instance with more RAM. You can specify the instance type with --instance-type= (name of instance type). By default, the same instance type will be used for both the master and the workers; this can be wasteful if your computations are particularly intensive and the master isn't being heavily utilized. You can specify a different master instance type with --master-instance-type= (name of instance).
Spark's EC2 scripts use Amazon Machine Images (AMI) provided by the Spark team. Usually, they are current and sufficient for most of the applications. You might need your own AMI in certain circumstances, such as custom patches (for example, using a different version of HDFS) for Spark, as they will not be included in the machine image.
In addition to the Amazon basic EC2 machine offering, Amazon offers a hosted MapReduce solution called Elastic MapReduce (EMR). The blog at http://blogs.aws.amazon.com/bigdata/post/Tx6J5RM20WPG5V/Building-a-Recommendation-Engine-with-Spark-ML-on-Amazon-EMR-using-Zeppelin has lots of interesting details on how to start Spark in EMR.
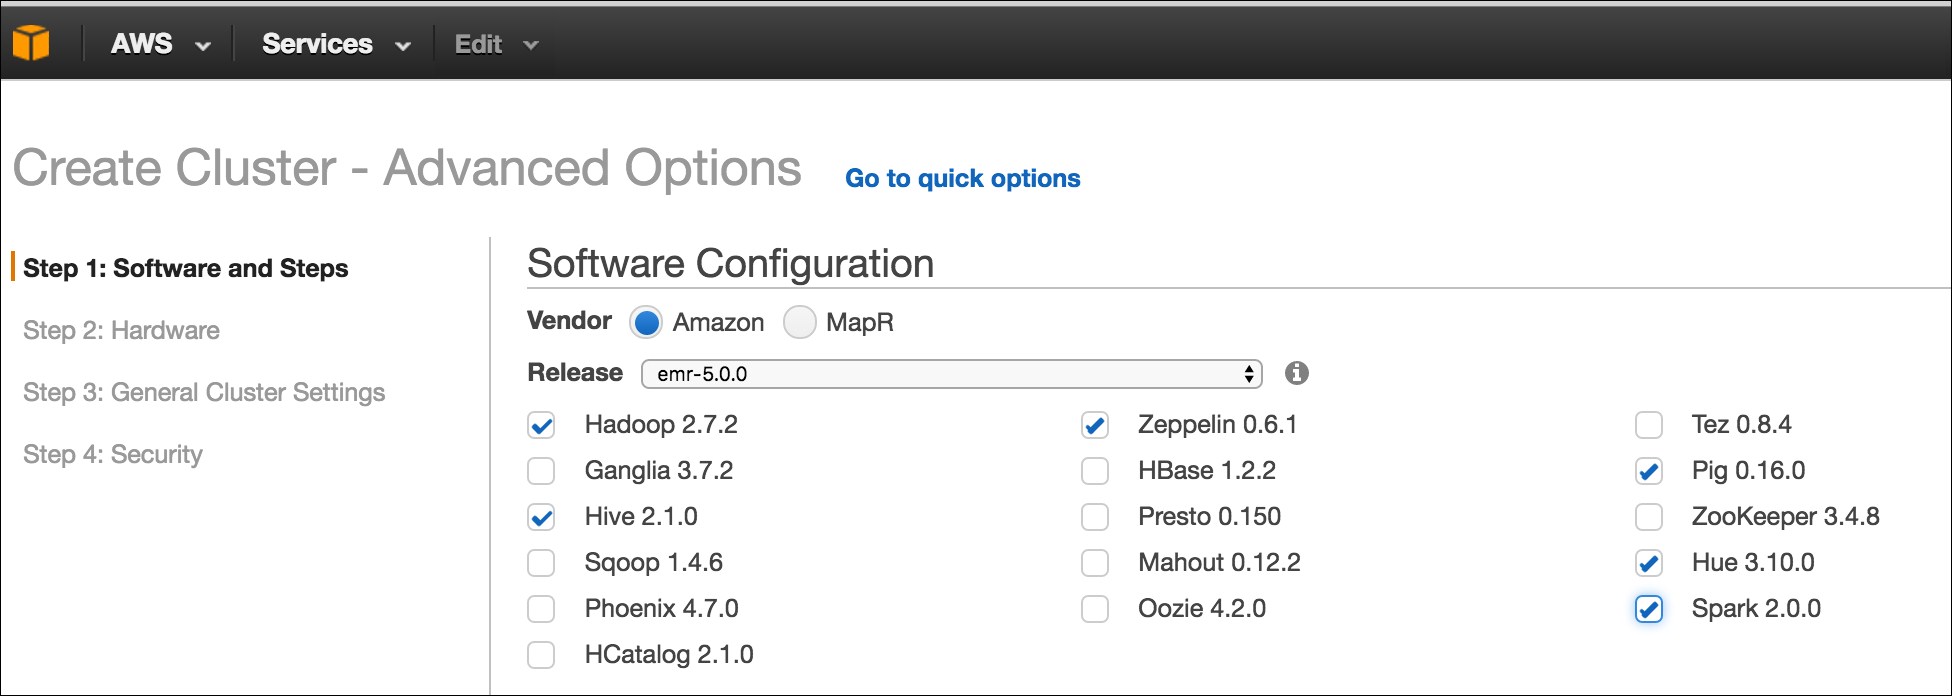
Deploying a Spark-based EMR has become very easy, Spark is a first class entity in EMR. When you create an EMR cluster, you have the option to select Spark. The following screenshot shows the Create Cluster-Quick Options of EMR:
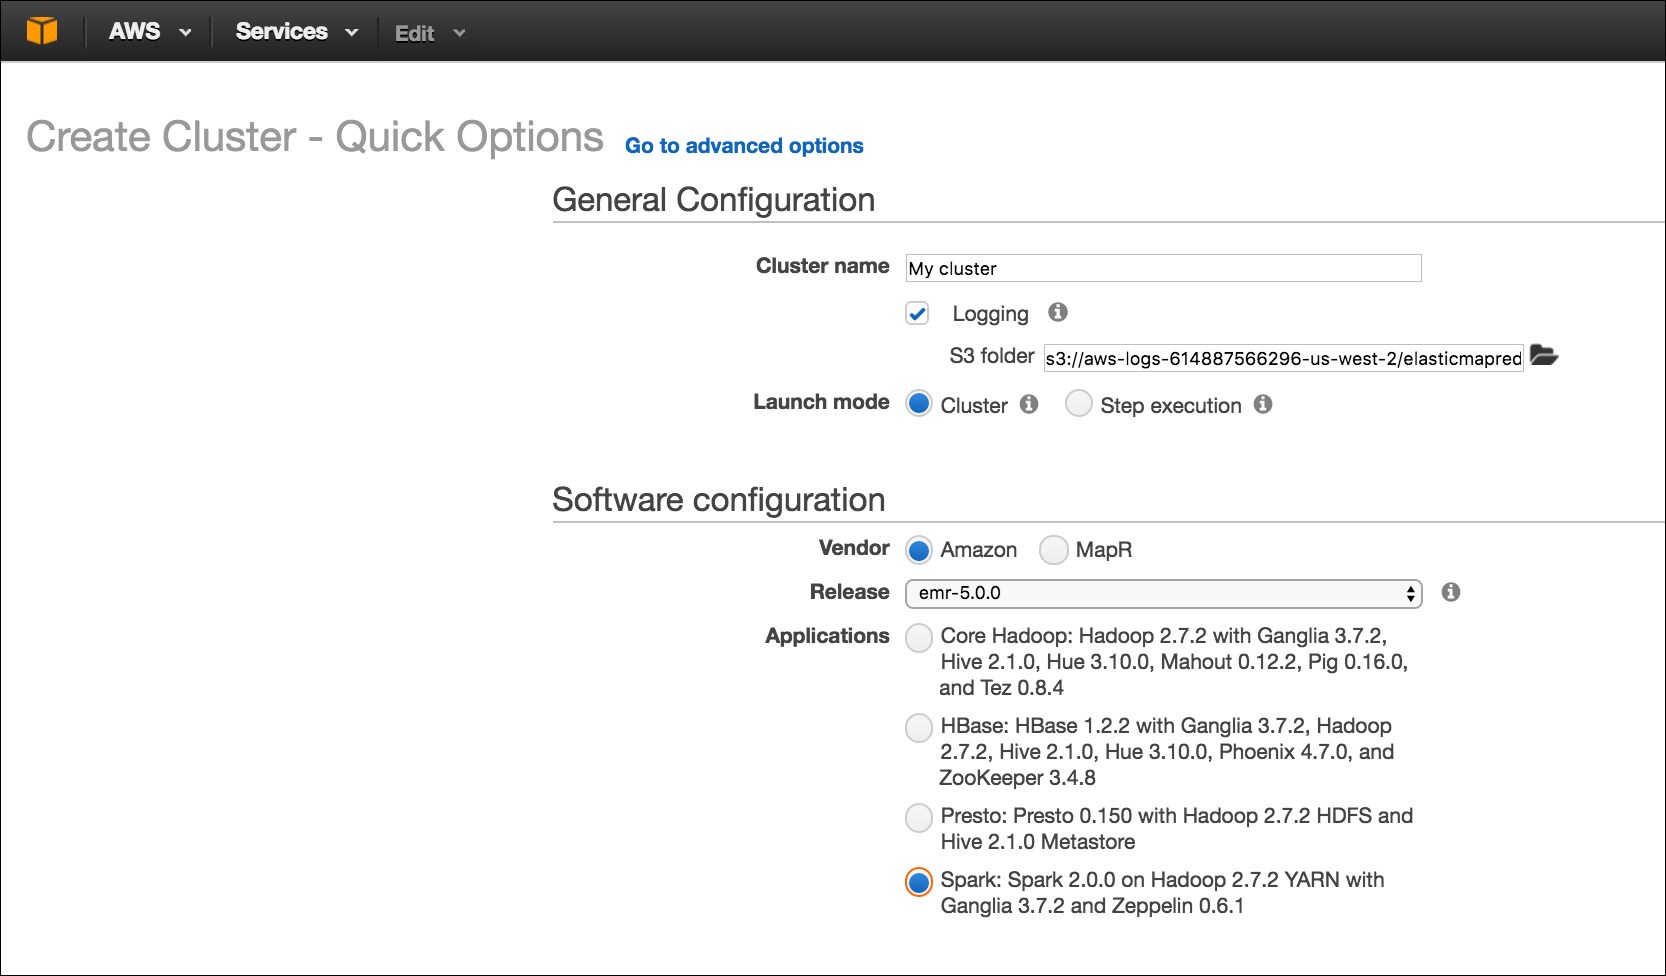
The advanced option has Spark as well as other stacks.
Chef is an open source automation platform that has become increasingly popular for deploying and managing both small and large clusters of machines. Chef can be used to control a traditional static fleet of machines and can also be used with EC2 and other cloud providers. Chef uses cookbooks as the basic building blocks of configuration and can either be generic or site-specific. If you have not used Chef before, a good tutorial for getting started with Chef can be found at https://learnchef.opscode.com/. You can use a generic Spark cookbook as the basis for setting up your cluster.
To get Spark working, you need to create a role for both the master and the workers as well as configure the workers to connect to the master. Start by getting the cookbook from https://github.com/holdenk/chef-cookbook-spark. The bare minimum requirements are to set the master host name (as master) to enable worker nodes to connect, and the username so that Chef can be installed in the correct place. You will also need to either accept Sun's Java license or switch to an alternative JDK. Most of the settings that are available in spark-env.sh are also exposed through the cookbook settings. You can see an explanation of the settings in the Configuring multiple hosts over SSH section. The settings can be set as per role or you can modify the global defaults.
Create a role for the master with a knife role; create spark_master_role -e [editor]. This will bring up a template role file that you can edit. For a simple master, set it to this code:
{
  "name": "spark_master_role", "description": "", "json_class": "Chef::Role",   "default_attributes": {   }, "override_attributes": {
   "username":"spark", "group":"spark", "home":"/home/spark/sparkhome", "master_ip":"10.0.2.15", }, "chef_type": "role", "run_list": [ "recipe[spark::server]", "recipe[chef-client]", ], "env_run_lists": {
  }
}
Then, create a role for the client in the same manner except that instead of spark::server, you need to use the spark::client recipe. Deploy the roles to different hosts:
knife node run_list add master role[spark_master_role]
knife node run_list add worker role[spark_worker_role]
Then, run chef-client on your nodes to update. Congrats, you now have a Spark cluster running!
Mesos is a cluster management platform for running multiple distributed applications or frameworks on a cluster. Mesos can intelligently schedule and run Spark, Hadoop, and other frameworks concurrently on the same cluster. Spark can be run on Mesos either by scheduling individual jobs as separate Mesos tasks or running all of the Spark code as a single Mesos task. Mesos can quickly scale up to handle large clusters beyond the size of which you would want to manage with the plain old SSH scripts. Mesos, written in C++, was originally created at UC Berkley as a research project; it is currently undergoing Apache incubation and is actively used by Twitter.
The Spark web page, http://spark.apache.org/docs/latest/running-on-mesos.html, has detailed instructions on installing and running Spark on Mesos.
YARN is Apache Hadoop's NextGen Resource Manager. The Spark project provides an easy way to schedule jobs on YARN once you have a Spark assembly built. The Spark web page, http://spark.apache.org/docs/latest/running-on-yarn.html, has the configuration details for YARN, which we had built earlier for compiling with the -Pyarn switch.
If you have a set of machines without any existing cluster management software, you can deploy Spark over SSH with some handy scripts. This method is known as standalone mode in the Spark documentation at http://spark.apache.org/docs/latest/spark-standalone.html. An individual master and worker can be started by sbin/start-master.sh and sbin/start-slaves.sh, respectively. The default port for the master is 8080. As you likely don't want to go to each of your machines and run these commands by hand, there are a number of helper scripts in bin/ to help you run your servers.
A prerequisite for using any of the scripts is having password less SSH access set up from the master to all of the worker machines. You probably want to create a new user for running Spark on the machines and lock it down. This book uses the username sparkuser. On your master, you can run ssh-keygen to generate the SSH keys and make sure that you do not set a password. Once you have generated the key, add the public one (if you generated an RSA key, it would be stored in ~/.ssh/id_rsa.pub by default) to ~/.ssh/authorized_keys2 on each of the hosts.
Tip
The Spark administration scripts require that your usernames match. If this isn't the case, you can configure an alternative username in your ~/.ssh/config.
Now that you have the SSH access to the machines set up, it is time to configure Spark. There is a simple template in [filepath]conf/spark-env.sh.template[/filepath], which you should copy to [filepath]conf/spark-env.sh[/filepath].
You may also find it useful to set some (or all) of the environment variables shown in the following table:
|
Name |
Purpose |
Default |
|
|
This variable is used to point to math where Mesos lives. |
None |
|
|
This variable is used to point to where you extracted Scala. |
None, must be set |
|
|
This variable states the IP address for the master to listen on and the IP address for the workers to connect to. |
The result of running hostname |
|
|
This variable states the port |
|
|
|
This variable states the port |
|
|
|
This variable states the number of cores to use. |
All of them |
|
|
This variable states how much memory to use. |
Max of (system memory-1 GB, 512 MB) |
|
|
This variable states what port |
|
|
|
This variable states what port |
|
|
|
This variable states where to store files from the worker. |
|
Once you have completed your configuration, it's time to get your cluster up and running. You will want to copy the version of Spark and the configuration you have built to all of your machines. You may find it useful to install pssh, a set of parallel SSH tools, including pscp. The pscp tool makes it easy to scp to a number of target hosts, although it will take a while, as shown here:
pscp -v -r -h conf/slaves -l sparkuser ../opt/spark ~/
If you end up changing the configuration, you need to distribute the configuration to all of the workers, as shown here:
pscp -v -r -h conf/slaves -l sparkuser conf/spark-env.sh /opt/spark/conf/spark-env.sh
Tip
If you use a shared NFS on your cluster, while by default Spark names log files and similar with shared names, you should configure a separate worker directory; otherwise, they will be configured to write to the same place. If you want to have your worker directories on the shared NFS, consider adding 'hostname', for example SPARK_WORKER_DIR=~/work-'hostname'.
You should also consider having your log files go to a scratch directory for performance.
Now you are ready to start the cluster and you can use the sbin/start-all.sh, sbin/start-master.sh, and sbin/start-slaves.sh scripts. It is important to note that start-all.sh and start-master.sh both assume that they are being run on the node, which is the master for the cluster. The start scripts all daemonize, and so you don't have to worry about running them on a screen.
ssh master bin/start-all.sh
If you get a class not found error stating java.lang.NoClassDefFoundError: scala/ScalaObject, check to make sure that you have Scala installed on that worker host and that the SCALA_HOME is set correctly.
Tip
The Spark scripts assume that your master has Spark installed in the same directory as your workers. If this is not the case, you should edit bin/spark-config.sh and set it to the appropriate directories.
The commands provided by Spark to help you administer your cluster are given in the following table. More details are available on the Spark website at http://spark.apache.org/docs/latest/spark-standalone.html#cluster-launch-scripts.
|
Command |
Use |
|
|
This command runs the provided command on all of the worker hosts. For example, |
|
|
This command starts the master and all of the worker hosts. This command must be run on the master. |
|
|
This command starts the master host. This command must be run on the master. |
|
|
This command starts the worker hosts. |
|
|
This command starts a specific worker. |
|
|
This command stops master and workers. |
|
|
This command stops the master. |
|
|
This command stops all the workers. |
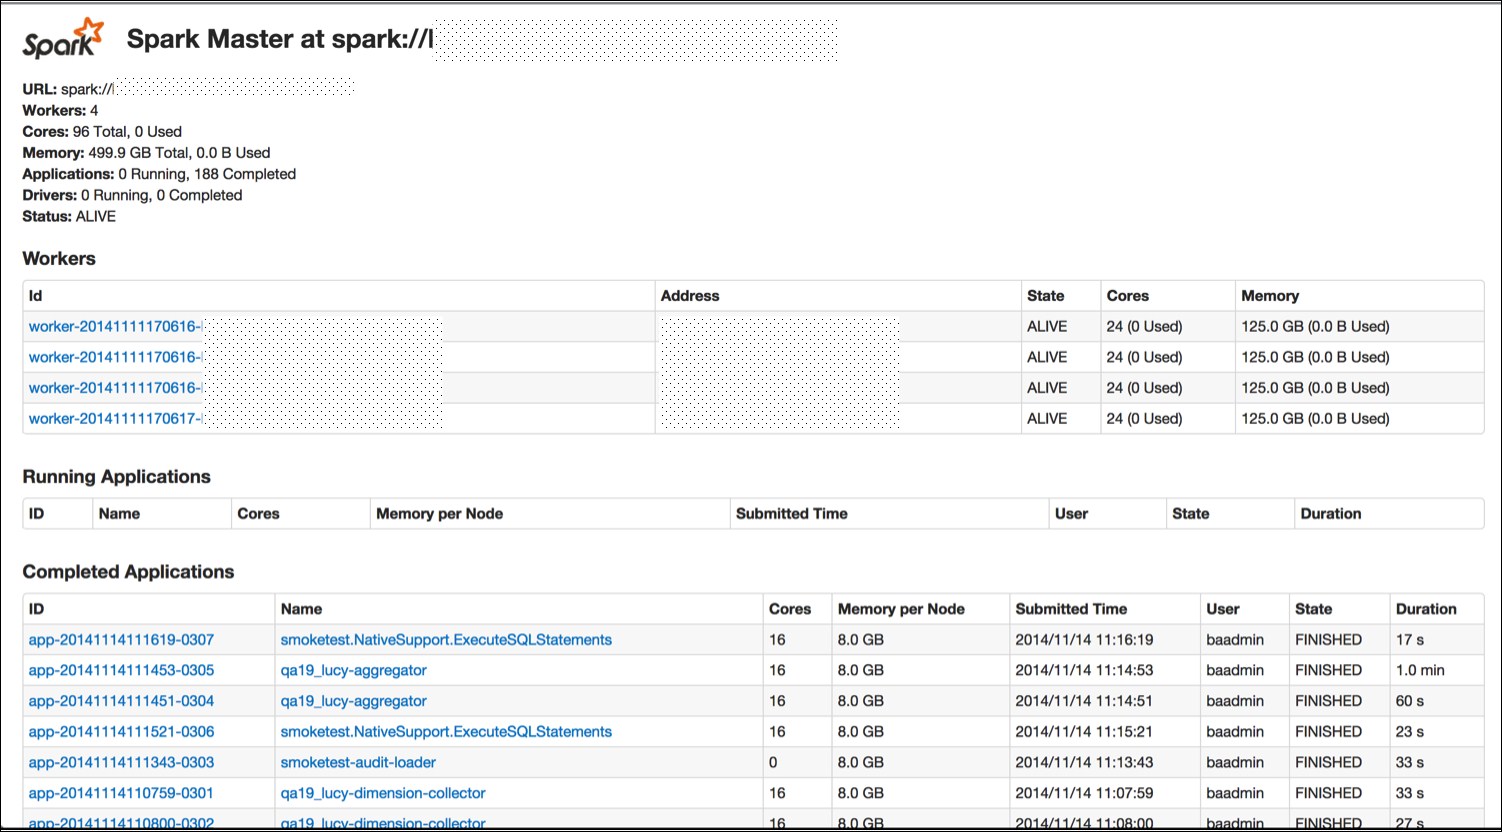
You now have a running Spark cluster. There is a handy Web UI on the master running on port 8080 you should go and visit, and on all of the workers on port 8081. The Web UI contains helpful information such as the current workers, and current and past jobs.
Now that you have a cluster up and running, let's actually do something with it. As with the single host example, you can use the provided run script to run the Spark commands. All of the examples listed in examples/src/main/scala/spark/org/apache/spark/examples/ take a parameter, master, which points them to the master. Assuming that you are on the master host, you could run them with this command:
./run-example GroupByTest spark://'hostname':7077
Tip
If you run into an issue with java.lang.UnsupportedClassVersionError, you may need to update your JDK or recompile Spark if you grabbed the binary version. Version 1.1.0 was compiled with JDK 1.7 as the target. You can check the version of the JRE targeted by Spark with the following commands:
java -verbose -classpath ./core/target/scala- 2.9.2/classes/
spark.SparkFiles |head -n 20
Version 49 is JDK1.5, Version 50 is JDK1.6, and Version 60 is JDK1.7.
If you can't connect to localhost, make sure that you've configured your master (spark.driver.port) to listen to all of the IP addresses (or if you don't want to replace localhost with the IP address configured to listen to). More port configurations are listed at http://spark.apache.org/docs/latest/configuration.html#networking.
If everything has worked correctly, you will see the following log messages output to stdout:
13/03/28 06:35:31 INFO spark.SparkContext: Job finished: count at GroupByTest.scala:35, took 2.482816756 s2000
The references are listed here:
http://bickson.blogspot.com/2012/10/deploying-graphlabsparkmesos-cluster-on.html
http://aws.amazon.com/articles/Elastic-MapReduce/4926593393724923https://www.cs.berkeley.edu/~matei/papers/2012/nsdi_spark.pdf
http://aws.amazon.com/articles/4926593393724923http://docs.aws.amazon.com/ElasticMapReduce/latest/DeveloperGuide/emr-cli-install.html
In this chapter, we have installed Spark on our machine for local development and set it up on our cluster, and so we are ready to run the applications that we write. While installing and maintaining a cluster is a good option, Spark is also available as a service option from Databricks. Databricks' Databricks Cloud for Spark, available at http://databricks.com/product, is a very convenient offering for anyone who does not want to deal with the set up/maintenance of the cluster. They have the concept of a big data pipeline from ETL to analytics. This looks truly interesting to explore!
In the next chapter, you will learn to use the Spark shell.