


Dynamics CRM 2011 is a piece of customer relationship management (CRM) software by Microsoft. It provides a powerful business application platform for marketing, sales, and services modules. The Microsoft Dynamics CRM 2011 software solution works as a web client, while it can also be embedded within an Outlook client.
This chapter will explore recipes for installing the various components of Microsoft Dynamics CRM 2011. With the installation of Dynamics CRM, the process of exploring the world of Dynamics CRM 2011 will begin.
In this chapter, we will learn how to install various components of Microsoft Dynamics CRM 2011 step by step.
The chapter includes the following recipes:
Installing Dynamics CRM Server
Installing Microsoft Dynamics CRM Reporting Extensions
Installing Dynamics CRM for Outlook
Installing a Dynamics CRM language pack
Installing Microsoft Dynamics CRM E-mail Router
Configuring Microsoft Dynamics CRM E-mail Router
Installing Microsoft Dynamics CRM E-mail Router on multiple computers
Deploying Microsoft Dynamics CRM on multiple servers
Creating a new organization
Editing organization details
Microsoft Dynamics CRM 2011 Server is a .NET-based web application that works exclusively with Microsoft SQL Server databases. It uses Windows Communication Foundation (WCF) as the communication protocol. Microsoft Dynamics CRM 2011 supports three types of deployment, namely, on-premises deployment , Internet-facing Deployment (IFD), and CRM Online . Each deployment supports a choice of client applications, which are as follows:
The on-premises and IFD deployment types are deployed using the data center or hardware capabilities of the customer or a hosting partner. On the other hand, Microsoft Dynamics CRM Online is a powerful solution that provides customers with the benefits of Dynamics CRM in a Microsoft-hosted environment.
In this chapter, we will dive deep into the recipes for on-premises deployment of Microsoft Dynamics CRM 2011, and in Chapter 3, Administering Microsoft Dynamics CRM 2011, we will discuss how to configure a CRM deployment for IFD.
Microsoft Dynamics CRM 2011 can be installed on a single server as well as on multiple servers. While a single-server deployment is mainly recommended for development purposes or small-user-based production deployments, a multiserver deployment is more suitable for most production environments because multiserver environments provide a better balancing of processing load across several servers. Load-balanced multiserver deployment can increase the performance, availability, scalability, and throughput of the system. In addition, it also can increase the resilience of the system to server failures.
To begin with, we shall start with a recipe on the installation of Microsoft Dynamics CRM 2011 on a single-server box with all its required components. Upon successful installation on a single box, we will find the recipe on the installation of a multiserver machine more useful.
One limitation of single-server deployments is that the server machine on which Dynamics CRM 2011 is installed cannot function as an Active Directory directory service domain controller unless the operating system of the server is Windows Small Business Server.
Like any other software, Microsoft Dynamics CRM 2011 also comes with minimum recommended hardware and software specifications. Based on the Microsoft guidelines, the recommended hardware specifications for a Full Server deployment is as follows:
Quad-core x64 architecture
2 GHz CPU or higher, such as Intel Xeon or AMD Opteron systems
8 GB of RAM or more
40 GB or more of hard disk space
Hardware sizing greatly depends on nonfunctional requirements such as total user base, maximum number of concurrent users, required page load time, initial data volume, data growth, and data archival policy. Microsoft Dynamics Lab has released Performance Toolkit for Dynamics CRM 2011, which can be used to collect performance-related data that then can be used for sizing the related decisions in on-premises deployment. Performance Toolkit can be downloaded at http://pinpoint.microsoft.com/en-gb/applications/performance-toolkit-for-microsoft-dynamics-crm-2011-12884915630.
The Microsoft-recommended hardware specifications for the SQL Server-based Dynamics CRM database are as follows:
Quad-core x64 architecture
2 GHz CPU or higher, such as AMD Opteron or Intel Xeon systems
16 GB of RAM or more
SAS RAID 5 or RAID 10 hard disk array
Note
This specification is based on an estimated top load of up to 320 users on the system. Computers with more than 16 GB of memory will require more disk space for paging, hibernation, and dump files.
Microsoft-defined hardware requirements for Dynamics CRM Server 2011 can be found at:
http://technet.microsoft.com/en-us/library/hh699840.aspx
The recommended operating systems for Dynamics CRM 2011 Server are Windows Server 2008 (Standard/Enterprise/Datacenter editions), Windows Server 2008 R2, Windows Small Business Server (Premium/Standard), and Windows Small Business Server (Standard/Essential Update Rollup 13 of Dynamics CRM 2013 also supports Windows Server 2012.).
Internet Information Services (IIS) 7.0 or 7.5, along with Indexing Service, IIS Admin service, and World Wide Web Publishing Service (W3SVC), need to be installed and running. Windows Data Access Components (Windows DAC) 6.0, and Microsoft ASP.NET 4 are also required for the installation of Microsoft Dynamics CRM 2011 Server.
The Microsoft Dynamics CRM 2011 Server machine must be a domain member of a domain that is running in one of these Active Directory directory service domain modes: Windows 2000 (Mixed/Native), Windows Server 2003 (Interim/Native), and Windows Server 2008 (Interim/Native).
Microsoft Dynamics CRM 2011 only supports the x64 version of Microsoft SQL Server 2008 with SP1 (Standard/Enterprise/Datacenter editions) / Microsoft SQL Server 2008 R2 (x64 version). Update Rollup 6 (and higher) also supports SQL Server 2012 (Enterprise/Business Intelligence/Standard versions).
Note
Active/Active SQL Server clustering is supported in Dynamics CRM Server 2011 from Update Rollup 1 onwards but not as a load-balancing configuration.
Other than that, 32-bit versions of SQL Server and SQL Server Reporting Services (SSRS) are not supported.
Microsoft defined hardware requirements for SQL Server for Dynamics CRM Server 2011 can be found at:
The installation of the on-premises version of Microsoft Dynamics CRM 2011 involves a little more than the standard Microsoft wizard process. Here we will discuss how to install the on-premises version on a single-server machine.
Microsoft Dynamics CRM is designed so that its components (Application Service, Deployment Service , Sandbox Processing Service , and Asynchronous Processing Service) can run under separate identities. It is recommended that you use separate Active Directory accounts for running these components and SQL Server Reporting Services. Additionally, these accounts should be set up as service accounts in Active Directory and should only be granted the permissions necessary to enable a particular component to function. By this, we can help secure the system and reduce the likelihood of exploitation.
Note
Managed service accounts, introduced in Windows Server 2008 R2, are not supported for running Microsoft Dynamics CRM services.
We will now take a look into these identity accounts and the privileges to be granted to them for proper functioning. It is very important to set up these accounts before starting the installation of Dynamics CRM 2011. After the installation of Dynamics CRM, these accounts should not be added to Dynamics CRM as users. This might create authentication issues and unexpected behavior in the application. These service accounts should be granted the following permissions:
Application service account:
Should be a member of the Active Directory Domain Users group and the local machine's Performance Log Users group
Should have administrative access on the computers that are running Microsoft Dynamics CRM website and SQL Server
The service account may need a service principal number (SPN) for the URL used to access the website that is associated with it
Deployment Web service account:
Should be a member of the Active Directory Domain Users group
Must be granted the Logon as service permission in Local Security Policy
Should have administrative access on the computers where Dynamics CRM 2011 Deployment Web Service and SQL Server are running
Should have sysadmin permission on the instance of SQL Server to be used for the configuration and organization databases
The service account may need an SPN for the URL used to access the website associated with it
Microsoft Dynamics CRM Asynchronous Processing service account:
Microsoft Dynamics CRM Sandbox Processing service account:
Should be a member of the Active Directory Domain Users group.
Must be granted the Logon as service permission in the Local Security Policy.
The service account may need an SPN for the URL used to access the website associated with it. To set the SPN for the Sandbox Processing service account, run the following command at the command prompt on the computer where the service is running:
SETSPN –a MSCRMSandboxService/<ComputerName> <service account>Replace
<ComputerName>with the name of the computer running this service and<serviceaccount>with the name of the service account.
Dynamics CRM 2011 Installation User account:
Should be a member of the Active Directory Domain User group.
Should have administrative access on the computer where the Dynamics CRM 2011 setup will be run.
Should have read and write permissions to the local
Program Filesfolder.Should have administrative access on the computer where the instance of SQL Server that will be used to store the Microsoft Dynamics CRM databases is located.
Should have sysadmin membership on the instance of SQL Server that will be used to store the Microsoft Dynamics CRM databases.
Should have organization and security group creation permission in the Active Directory directory service.
If Microsoft SQL Server Reporting Services is installed on a different server, the Content Manager role must be added at the root level for installing the user account. We must also add the System Administrator role at the site-wide level for the installation of the user account. Also make sure that port 80 (the default port on which Reporting Services is installed) accepts connections.
In the previous sections we have discussed the minimum recommended software and hardware specifications and service account requirements. Now we will discuss how to install Dynamics CRM Server components on a single-server machine.
During the installation, if a machine restart is requested by the setup, it is recommended that one selects the Restart option before proceeding with the installation.
It is usually recommended that one creates separate organization units (OUs) for each CRM deployment, especially for production or production-like deployment environments. Dynamics CRM 2011 Server installer creates security groups within the specified OU, and hence, it is advisable to create separate OUs for deployment isolation purposes.
Follow these steps to install Dynamics CRM 2011 Server in a single-server machine:
Log in to the machine using the installation user account setup using the recommended privileges.
Run the Dynamics CRM 2011 setup.
Alternatively, navigate to the installation directory for Dynamics CRM 2011 Server and run the Dynamics CRM 2011 setup file at
\Server\amd64\SetupServer.exe.It is recommended that you run the setup using the Run as Administrator option by right-clicking on the
.exefile.On the Welcome to Microsoft Dynamics CRM Setup page, select Get updates for Microsoft Dynamics CRM (recommended) in the latest update rollups that have to be applied during the installation; otherwise, select Do not get updates. Press Next to continue.
It is recommended that you assess the impact of the update rollups before applying them because they can break any existing code or the rollup itself can have defects.
On the Product Key Information page, enter the product key.
On the Accept License page, accept the license agreement.
If the setup detects that a few of the required components are missing, the Install Required Components page will appear. The missing required components can be installed by clicking on Install. When the components are installed, the status column will change from Not Installed to Installed and we can click on Next to continue as shown in the following screenshot:

The Select Installation Location page provides us with the option of choosing the installation directory. Accept the default location or enter a different file installation location, and then click on Next.
The Specify Server Roles page appears. By default, Full Server is selected. For a single-server deployment, we will go with the Full Server option.

On the Specify Deployment Options page, select the Create a new deployment option. In the Enter or select the name of the computer that is running SQL Server to use with the deployment box, type or select the instance of SQL Server that will be used to store Dynamics CRM 2011 databases.
In case there already exists an
MSCRM_CONFIGdatabase from a previous CRM deployment that is intended to be used here, select the Connect to, and if necessary, upgrade an existing deployment option. But, if anMSCRM_CONFIGdatabase does not exist in the SQL Server instance, an error will occur.
On the Select the Organizational Unit page, click on Browse to display the Active Directory structure. Select the location where the Microsoft Dynamics CRM organizational unit is to be installed, click on OK, and then click on Next.
Four Microsoft Dynamics CRM-specific security groups will be created in this organizational unit. To know more about these groups, read the How it works… section of this recipe.
In the Specify Service Accounts page, select the service accounts for the Microsoft Dynamics CRM services and then click on Next as shown in the following screenshot:

On the Select Web Site page, select the website that will host the Dynamics CRM web application. Here we can use the default website (port 80) or any other existing websites.
Note
Unless there is a valid reason for not installing the application in the default website, leave it as it is because among other advantages, it will be much easier for users to access the website as they won't have to remember another port number. If we select a network port other than the default port, we have to ensure that the firewall does not block the port.
If you decide to create a new website, select the Create new Web site option; the setup creates a new website for Microsoft Dynamics CRM Server 2011. We can specify the port number by typing the TCP port number that Microsoft Dynamics CRM clients will use to connect to Microsoft Dynamics CRM Server 2011. The default port number is 5555.
Click on Next> to proceed:

On the Specify E-mail Router Settings page, specify the name or IP address of the machine where E-mail Router will be installed. If E-mail Router is not to be installed, this information can be left blank. Click on Next to proceed.
On the Specify Organization Settings page, we have to specify the following details:
Name of the CRM Organization in the Display Name textbox. Usually the organization name represents the company name, but the organization name has to be properly thought through as, once deployed, this name cannot be changed.
The Unique Database Name value will be generated from the organization name specified above it. In most cases, we should proceed with this generated name as it becomes easy in the future to recognize the database linked to a CRM Organization in the database server. But this name can be changed and a new name of up to 30 characters can be provided
Under ISO Currency code, click on Browse and select a base currency.
In the SQL collation list, we can leave the default selection or select a different database collation that the organization database will use to sort and compare data characters.
The default SQL collation changes based on the base language selection of the deployment. The collation settings cannot be changed after installation.
Note
SQL Server Collation refers to a set of rules that is used to determine how character data is sorted and compared. Collation encodes the rules governing the proper use of characters for either a language, such as Greek or Polish, or an alphabet, such as Latin1_General (the Latin alphabet used by Western European languages).
More information about SQL Server Collation can be found at:
After setting these details, click on Next.

On the Specify Reporting Services Server page, please type the Reporting Server URL. Please verify the URL in a separate browser window. Please note that the Reporting Server URL should be specified here and not the Reporting Manager URL. Click on Next to proceed.
On the Help Us Improve the Customer Experience page, select whether you want to participate in the Customer Experience Improvement Program, and then click on Next.
On the Select Microsoft Update Preference page, indicate whether to use Microsoft Update to keep CRM Server 2011 updated.
Click on Next to proceed.
Next is the System Checks page, which outlines a summary of all requirements and recommendations for successful installation.
If there are any errors or warnings, they will be listed here. We have to rectify all errors before proceeding further. Warnings, however, can be ignored, but it is strongly suggested that you rectify the warnings as they may cause issues later on in the system.
Click on Next to proceed.
Next, we have the Service Disruption Warning page. This page indicates all services that can be stopped or restarted during installation. Click on Next to proceed.
Review the Ready to Install Microsoft Dynamics CRM page, and click on Back to correct any setting to proceed warning free. When we are ready to continue, click on Install.
If installation completes successfully, the Microsoft Dynamics CRM Server setup completed page appears.
To install Dynamics CRM, we must click on Finish and wait until the server is restarted.
In this recipe we have installed Microsoft Dynamics CRM 2011 on a single-server machine. During the process, the installer creates four security groups in Active Directory; these groups are fundamental for Dynamics CRM's functioning. Usually it is left to the installer to create these groups, but these groups can be precreated manually and can be used during the Dynamics CRM installation. If these groups do not already exist in Active Directory, the installation user must have Active Directory rights to create them. The following are the groups that will get created during installation:
|
Group |
Description |
|---|---|
|
This is the privileged Microsoft Dynamics CRM user group for reporting functions. It is configured during the setup of Microsoft Dynamics CRM Reporting Extensions. | |
|
This is the privileged Microsoft Dynamics CRM user group for special administrative functions, including the | |
|
This group pertains to all server processes / service accounts that require access to SQL Server, including the | |
|
All Microsoft Dynamics CRM users are included in this group. This group is updated automatically as users are added and removed from Microsoft Dynamics CRM. By default, all Microsoft Dynamics CRM Reporting Services reports grant the |
One more important point to be noted here is that the four service accounts used during installation and the SQL access accounts are part of some or all of the aforementioned Active Directory groups. The following matrix will explain the group membership of these accounts:
|
Service account |
PrivUserGroup |
SQLAccessGroup |
PrivReportingGroup |
ReportingGroup |
Performance log users |
|---|---|---|---|---|---|
|
√ |
√ |
– |
– |
√ | |
|
√ |
√ |
– |
– |
– | |
|
√ |
√ |
– |
– |
√ | |
|
– |
– |
– |
– |
√ | |
|
– |
– |
– |
– |
– | |
|
√ |
– |
√ |
– |
– |
For Dynamics CRM to function properly, these service accounts will have to have the following rights:
Folder read and write permission on the
Tracefolder, by default located under\%Program Files%\Microsoft Dynamics CRM\, and the%AppData%folder of the user account on the local computerRead and write permission to the
HKEY_LOCAL_MACHINE\SOFTWARE\Microsoft\MSCRMandHKEY_LOCAL_MACHINE\SYSTEM\ControlSet001\services\MSCRMSandboxServicesubkeys in the Windows RegistryThe Application service account and Deployment Web service account should also be part of the
CRM_WPGgroup
Microsoft Dynamics CRM 2011 uses a list of ports, and these ports have to be allowed in the firewall for CRM to function. The following matrix lists all these ports:
|
Protocol |
Port |
Description |
Explanation |
|---|---|---|---|
|
TCP |
80 |
HTTP |
The default web application port. The port number may be different if it is changed during Microsoft Dynamics CRM Server setup. For new websites, the default port number is 5555. |
|
TCP |
135 |
MSRPC |
RPC endpoint resolution |
|
TCP |
139 |
NETBIOS-SSN |
NETBIOS session service |
|
TCP |
443 |
HTTPS |
The default HTTP secure port |
|
TCP |
445 |
Microsoft-DS |
An Active Directory directory service is required for access and authentication. |
|
UDP |
123 |
NTP |
Network Time Protocol |
|
UDP |
137 |
NETBIOS-NS |
NETBIOS name service |
|
UDP |
138 |
NetBIOS-dgm |
NetBIOS datagram service |
|
UDP |
445 |
Microsoft-DS |
Active Directory directory service is required for access and authentication. |
|
UDP |
1025 |
Blackjack |
DCOM, used as an RPC listener |
Each of these service accounts runs a specific component within the Dynamics CRM 2011 Server infrastructure. The following outlines how these service accounts are used within Dynamics CRM 2011:
Application service account: The installation of Dynamics CRM 2011 creates a separate application pool (
CRMAppPool) in IIS to isolate the CRM application for better security, reliability, availability, and performance and to keep running without impacting other web applications hosted in the same IIS. The Application service account is used by Dynamics CRM 2011 to run the CRM application pool in IIS.Deployment Web service account: Dynamics CRM 2011 uses this service account to run Deployment Web Service, which is responsible for deployment-related activities such as:
Creating, importing, updating, upgrading, enabling, and disabling of CRM Organizations
Retrieving Microsoft Dynamics CRM license information for a deployment
Adding or removing deployment administrators
Enabling, disabling, or deleting servers
Updating deployment configuration settings
Enumerating and changing the state of servers in the deployment
Microsoft Dynamics CRM Asynchronous Processing service account: This service account is used to run the Asynchronous Processing Service, which is responsible for executing long-running operations independent of the main Microsoft Dynamics CRM system process. This results in an improved overall system performance and improved scalability. The asynchronous service features a managed queue for the execution of asynchronous registered plugins, workflows, and operations such as bulk mail, bulk import, and campaign activity propagation. These operations are registered with the asynchronous service and executed later when the service processes its queue.
Microsoft Dynamics CRM Sandbox Processing service account: Dynamics CRM 2011 uses this service account to run Sandbox Processing Service, which enables an isolated environment to allow the execution of custom codes, for example, plugins. Such an isolated environment reduces the possibility of custom code, affecting the operation of the organizations in the production Dynamics CRM 2011 deployment.
It is worth installing the Sandbox Processing Service role onto a dedicated server on a separate virtual LAN (VLAN) from other computers that are running Microsoft Dynamics CRM roles. This network isolation strategy can help protect other Microsoft Dynamics CRM 2011 resources from being compromised if there is a malicious plugin running in the sandbox.
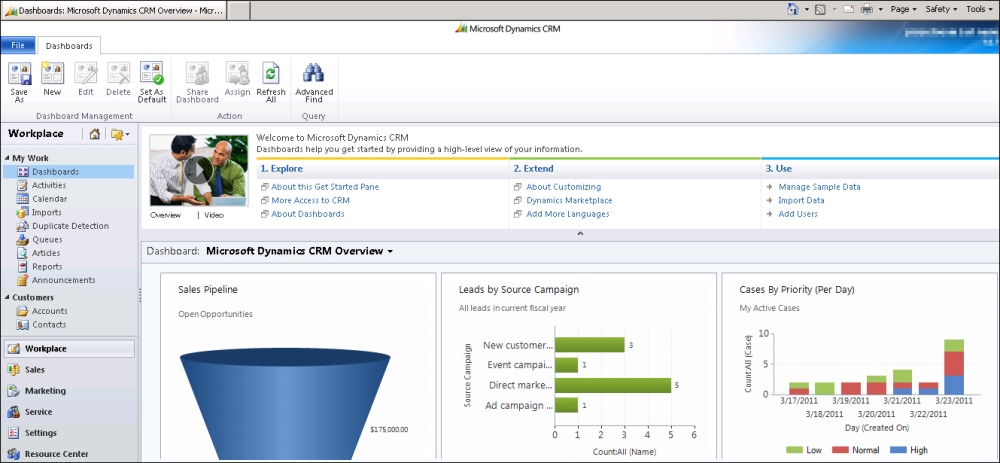
Once the installation has completed, its success can be verified by accessing the CRM server URL. The URL would be in the format http://<servername>:<port _number>/<organization_name>/main.aspx.
Here, we will replace <servername> with the name of the Dynamics CRM 2011 server, <port_number> with the port used by Dynamics CRM 2011 Server, and <organization_name> with the CRM Organization that was created during installation.
If installation is successful, the Dynamics CRM landing page will appear in the browser window as shown in the following screenshot:
Before we end this recipe, let's take look at some information on the use of currency codes in Microsoft Dynamics CRM 2011:
Dynamics CRM 2011 is a multicurrency system that allows a user to perform any financial transaction using their own currency, known as transaction currency . During installation, a primary or default currency has to be selected. This currency is the de facto currency for financial transactions within a CRM Organization and known as the base currency . After defining a base currency for the organization, we have to define exchange rates to associate the base currency with transaction currencies.
Each currency record has three parts describing the currency:
The name of the currency
The symbol that is used to represent the currency, such as $ (dollar), £ (pound), € (euro), or ¥ (yen)
The exchange rate with the base currency
Any transaction in other currencies will automatically be converted to the base currency, using the exchange rate defined in the record for that currency, in the Microsoft Dynamics CRM database.
The base currency of a CRM Organization has to be selected carefully as:
The base currency is used as the basis to calculate additional currencies that can be used for transaction-based records. Hence, the native currency of the CRM Organization users is usually chosen as the base currency to avoid too many currency conversions.
Financial reporting is done based on the base currency.
The supported currency code details can be found at:
http://msdn.microsoft.com/en-us/library/hh699729.aspx
We have seen that, in the process of a single-server installation, all the server roles of Dynamics CRM 2011 are installed onto one single machine. But in a multiserver deployment, the server roles are usually separately deployed on multiple machines. We will find out more about multiserver Dynamics CRM deployments in the latter parts of this chapter.
While Microsoft Dynamics CRM Reporting Extensions is not absolutely required to run Microsoft Dynamics CRM 2011, without Reporting Server installed, certain important functionalities of Dynamics CRM will not function. For example, the reporting functionality will not function and creating a new organization and organization import will be blocked until the extensions are installed and configured.
The Microsoft Dynamics CRM Reporting Extensions setup includes two data processing extensions: Fetch data processing extension and SQL data processing extension. These extensions are installed by default during Microsoft Dynamics CRM Reporting Extensions setup.
While the Fetch data processing extension is required to create, run, and schedule Fetch-based reports, the SQL data processing extension is required to run and schedule the default (out of box) or SQL-based custom reports in Microsoft Dynamics CRM 2011.
Before we start installing Microsoft Dynamics CRM Reporting Extensions, Microsoft Dynamics CRM Server setup must be complete.
Dynamics CRM Reporting Extensions can only be installed for one instance of SQL Server Reporting Services on a computer. In addition, different deployments of Dynamics CRM 2011 cannot share a single SQL Server Reporting Services server; however, a multitenant CRM deployment can use the same instance of Reporting Services.
The Microsoft Dynamics CRM Reporting Extensions setup must be run on a computer that has Microsoft SQL Server 2012/2008 Reporting Services installed. The user account to be used in order to install Reporting Extensions:
Must have appropriate rights on the organization databases
Must be the local machine administrator
The Microsoft SQL Server Reporting Services (SSRS) should be running under a separate Active Directory service account. This account should be added to two of the Dynamics CRM-specific Active Directory groups, namely, PrivUserGroup and PrivReportingUserGroup. However, this account should not be part of SQLAccessGroup. This account should not be set up as Local Service as well.
Reporting Extensions should be installed on that Microsoft SQL Server Reporting Services instance which is being used by the CRM Organization. Otherwise, reports will not function. In addition to that, the base language of CRM Organization and that of CRM Reporting Extensions has to be the same.
Please follow these steps to install Microsoft Dynamics CRM Reporting Extensions:
Run the setup utility, or alternatively, navigate to the installation directory for Dynamics CRM 2011 Server located at the route
\Server\amd64\SrsDataConnector\SetupSrsDataConnector.exe.It is recommended that you run the setup using the Run as Administrator option by right-clicking on the
.exefile.Like the Dynamics CRM 2011 installer, this setup also asks whether we want to check if updates are available for download and apply before proceeding with the installation.
It is recommended that you assess the impact of the update rollups before applying it because update rollups can break any existing code or the rollup itself can have defects.
On the License Agreement page, select I accept this license agreement and click on I Accept to proceed.
On the Install Required Components page, the installer automatically identifies the components that need to be installed and allows you to install them . This page will not appear if all the required components are already installed. If something is missing, it can be installed by clicking on the Install button. When the components are installed, the
Statuscolumn will change from Missing to Installed and we can click on Next to continue.On the Specify Configuration Database Server page, please enter the instance of the SQL Server.
Now if we are using the default instance of the SQL Server, enter the name of the computer that is running SQL Server and contains the Microsoft Dynamics CRM configuration database named
MSCRM_CONFIG, and if we are using the named instance of SQL Server then enter<machine-name>\<instance-name>:
On the Specify SSRS Instance Name page, select a Microsoft SQL Server Reporting Services instance that will be used for Microsoft Dynamics CRM reporting, and then click on Next as shown in the following screenshot:

On the Select Microsoft Update Preference page, select the Use Microsoft Update when I check for updates option if updates have to be applied automatically. Proceed by clicking on Next.
On the Select Installation Location page, browse to specify where it will be installed.
Then the System Checks page appears with a summary of the requirements for a successful CRM Reporting Extensions installation. All errors must be resolved to continue. If no errors and/or only warnings appear, the installation can continue. Click on Next to proceed.
Then you will see the Ready to Install Microsoft Dynamics CRM Reporting Extensions page, which provides us with an overview of the system parameters in order to proceed with it. If you agree, simply click on Install to begin the installation.
When the setup is completed successfully, the Microsoft Dynamics CRM Reporting Extensions Setup Completed page appears. Click on Finish. The reports will be published for the default organization.
This recipe installs the Fetch and SQL data processing extensions on the Microsoft SQL Server Reporting Services server. It is recommended that the SSRS instance be run on a server separate from the one which has hosted the Dynamics CRM databases.
SQL Server Reporting Services should be running on a service account that is not part of SQLAccessGroup; in case it does, the Reporting Extensions installer throws an error message, A Microsoft Dynamics CRM Server component is using the same account as the instance of SQL Server Reporting Services. Usually, it happens when the account is used to run the Dynamics CRM 2011 Server components is also used to run the SQL Server Reporting Services. It is recommended that you use a separate account to run the SQL Server Reporting Services to reduce security vulnerability.
With Dynamics CRM Reporting Extensions installed, all the default CRM reports will start working and custom SQL bad Fetch-based reports can now be created, uploaded, and scheduled.
Post the reporting extensions installation, log in to the Dynamics CRM 2011 and run any of the out-of-the-box reports. This can be done by navigating to Workplace | Reports. If Reporting Extensions has been successfully installed, the out-of-the-box reports will function successfully.
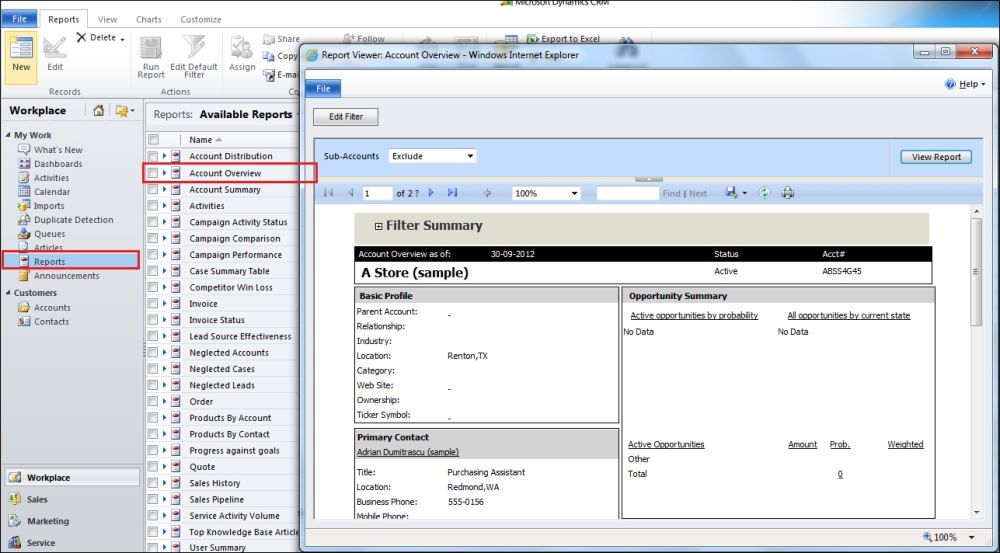
The preceding screenshot of the Account Overview report has been generated by using the sample data.
Microsoft Dynamics CRM 2011 can also be accessed via a familiar Microsoft Outlook client. To access Dynamics CRM via Outlook, the Dynamics CRM Outlook client has to be installed on the client machine. If a machine is used by multiple users, Microsoft Dynamics CRM for Outlook has to be configured for each user.
Microsoft Dynamics CRM for Outlook can be installed with either the online or offline capability. Offline access enables a user to access Dynamics CRM data even when he or she is not connected to Dynamics CRM Server.
The Microsoft-recommended software and hardware requirements for the machine where Dynamics CRM for Outlook has to be installed are as follows:
|
Component |
Recommended specification |
|---|---|
|
Processor (32-bit) |
Multicore 1.8 GHz CPU or higher |
|
Processor (64-bit) |
Multicore x64 architecture 2 GHz CPU or higher, such as AMD Opteron or Intel Xeon systems |
|
Memory |
4 GB of RAM or more |
|
Hard disk |
2 GB of available hard disk space and 7200 RPM or more |
|
Display |
Super VGA with a resolution higher than 1024 x 768 |
Note
Actual requirements and product functionality may vary based on the system configuration and operating system.
Additionally, Microsoft Dynamics CRM for Outlook using the offline capability increases the need for a higher specification of hardware, which can include processor, memory, hard disk, and network throughput. For a successful network installation, a minimum network bandwidth of 300 kbps or higher is required.
Microsoft-recommended hardware and network specifications for Dynamics CRM 2011 for Outlook can be found at:
http://msdn.microsoft.com/en-us/library/hh699680.aspx
To install Microsoft Dynamics CRM for Outlook, any of the following operating environments is required:
Windows 8 (requires Dynamics CRM 2011 Update Rollup 10 or higher)
Windows 7 (64- or 32-bit)
Windows Vista SP2 (64- or 32-bit)
Windows XP SP3 (32-bit Professional edition or 64-bit Professional edition or Tablet edition)
Windows Server 2008 or Windows Server 2003 when running with Remote Desktop Services
The other software prerequisites are as follows:
Web browser
Any one of the following web browsers will suffice for the installation:
Internet Explorer 10 (desktop mode only)
Internet Explorer 9
Internet Explorer 8
Internet Explorer 7 (the on-premises version only)
Mozilla Firefox (latest publicly released version) running on Windows 8, Windows 7, Windows Vista, or Windows XP
Google Chrome (latest publicly released version) running on Windows 8, Windows 7, Windows Vista, or Windows XP
Apple Safari (latest publicly released version) running on Mac OS X 10.7 (Lion) or 10.8 (Mountain Lion)
Microsoft Office
Any one of the following Microsoft Office versions will suffice for the installation:
Microsoft Office 2013 (requires Dynamics CRM 2011 Update Rollup 12 or higher for full compatibility)
Microsoft Office 2010
Microsoft Office 2007 SP2
Microsoft Office 2003 SP3
Indexing service (must be installed and running)
Before running Microsoft Dynamics CRM for Outlook, the user must have an Outlook profile configured
To install and run the 64-bit version of Microsoft Dynamics CRM for Outlook, a 64-bit version of Office 2010 is required.
Note
Running Microsoft Dynamics CRM for Outlook on a computer that is running Microsoft Exchange Server is not supported.
Microsoft-recommended software specifications for Dynamics CRM 2011 for Outlook can be found at:
In order to set up Microsoft Dynamics CRM for Outlook for a user, there are three major activities that need to be completed:
Installing Microsoft Dynamics CRM for Outlook
Configuring Microsoft Dynamics CRM for Outlook
Configuring user e-mail settings
During the installation, if a machine restart is requested by the setup, it is recommended that you select the Restart option before proceeding further with installation.
Installing Microsoft Dynamics CRM for Outlook:
Log in to the machine with an account that has local administrative permissions on that computer.
To install Microsoft Dynamics CRM 2011 for Outlook, the installation files can be downloaded from the Microsoft website (http://www.microsoft.com/en-in/download/details.aspx?id=27821). If downloading is not permitted on this machine, the files can be downloaded elsewhere and then copied here.
After downloading the package, start the installation process by double-clicking on the downloaded EXE file. The first step would be to specify the location to which the package content would be unzipped.
Post unzipping, locate the unzipped files and then double-click on the
SetupClient.exefile. Alternatively, log in to the machine without administrative permissions, right-click on theSetupClient.exefile, and select Run as Administrator by supplying the administrator password.The Microsoft Dynamics CRM 2011 for Microsoft Office Outlook setup wizard will be launched.
On the License Agreement page, select I accept the license agreement, and then click on Next.
On the Get Recommended Updates page, indicate whether to obtain updates through Microsoft Update, and then click on Next.
It is recommended that you assess the impact of the update rollups before applying them because update rollups can break any existing code or the rollup itself can have defects.
Next, you will see the Select the Installation screen. Here, select the Install Now option, if Outlook with online access has to be installed, and Options, if Outlook with offline access has to be installed.
If Options has been selected, select Offline Capability on the Customize Installation page and then click on Install Now as shown in the following screenshot:

On the completion page of the Microsoft Dynamics CRM 2011 for Microsoft Office Outlook Setup wizard, click on Close.
Configuring Microsoft Dynamics CRM for Outlook:
After Microsoft Dynamics CRM for Outlook is installed, it has to be configured for the user. If the machine is used by multiple users, it has to be configured separately for each user.
Please follow these steps to configure Microsoft Dynamics CRM for Outlook:
When Outlook is restarted after Microsoft Dynamics CRM for Outlook has been installed, the configuration wizard starts automatically.
If you do not intend to configure Microsoft Dynamics CRM for Outlook immediately after installing it, click on Cancel on the Configure Organization page of the wizard. A Configure Microsoft Dynamics CRM for Outlook button then appears on the Microsoft Outlook toolbar and will remain there until we configure Microsoft Dynamics CRM for Outlook. We also can start the configuration wizard by clicking on the Configure Microsoft Dynamics CRM for Outlook button.
If the configuration wizard does not start automatically, you can manually launch it by clicking on Start | All Programs | Microsoft Dynamics CRM 2011 | Configuration Wizard.
On the Configure Organization page, select a value on the Dynamics CRM 2011 Server URL drop-down list and then click on Test Connection.
To connect to a Microsoft Dynamics CRM Online organization, click on CRM Online in the server URL list.
Once the connection has been successfully established, select the correct organization from the Organization list. If prompted, please provide credentials to connect to CRM and then click on OK as shown in the following screenshot:

Finally, click on the Close button on the Manage Microsoft Dynamics CRM Organizations page:

Configuring user e-mail settings:
Outlook can be used to send and receive e-mails, and in this case, E-mail Router is not required. By default, the incoming and outgoing e-mail access types are set to Microsoft Dynamics CRM for Outlook in Dynamics CRM. If it is changed, Outlook will be unable to send and receive e-mails.
If the incoming and outgoing e-mail access types have been changed, these can be reset using the following steps:
Log in to Dynamics CRM as a system administrator.
Navigate to Settings | Administration | Users, select the user record, and open it.
On the user record, modify the incoming and outgoing e-mail access types to Microsoft Dynamics CRM for Outlook as shown in the following screenshot:

Once Microsoft Dynamics CRM for Outlook is installed on a user's computer, Dynamics CRM-related toolbar or ribbon changes will be reflected in the Outlook application. Dynamics CRM 2011 can be accessed by using the Microsoft Outlook shortcut bars, ribbon, and folder navigation. Installing Microsoft Dynamics CRM for Outlook also creates a toolbar in Microsoft Outlook and a folder in the structure of the user's mailbox.
In the following screenshot, we can see how Microsoft Dynamics CRM has been accessed in the Microsoft Outlook 2003 client:

Dynamics CRM 2011 supports multiple languages. In this recipe, we will discuss how to apply additional language packs after Dynamics CRM 2011 (base language version) has been installed.
The user account that will be used to run the language pack should have local administrative rights on the machine. The language pack for Microsoft Dynamics CRM 2011 enables users to change the CRM user interface language or Help Text . It is important to note that the language pack must be installed on both Microsoft Dynamics CRM 2011 Server as well as client machines that are using Microsoft Dynamics CRM for Outlook. The supported languages are as follows:
|
Arabic |
Dutch |
Hungarian |
Portuguese (Portugal) |
|
Basque |
English |
Italian |
Romanian |
|
Bulgarian |
Estonian |
Japanese |
Russian |
|
Catalan |
Finnish |
Kazakh |
Slovak |
|
Chinese (Hong Kong SAR) |
French |
Korean |
Slovenian |
|
Chinese (Simplified) |
Galician |
Latvian |
Spanish |
|
Chinese (Traditional) |
German |
Lithuanian |
Swedish |
|
Croatian |
Greek |
Norwegian |
Thai |
|
Czech |
Hebrew |
Polish |
Turkish |
|
Danish |
Hindi |
Portuguese (Brazil) |
Ukrainian |
Note
For users who are running Microsoft Dynamics CRM for Microsoft Office Outlook, in addition to installing the language pack on the computer running Microsoft Dynamics CRM Server 2011, the same language pack has to be installed on the computer where Microsoft Dynamics CRM for Outlook is installed.
The language pack deployment has the following two steps:
Installing the language pack
Provisioning the language pack
The following steps are required to be followed to install the Dynamics CRM language pack:
Log on to the computer where Microsoft Dynamics CRM Server 2011 or Microsoft Dynamics CRM for Outlook is installed.
Download Microsoft Dynamics CRM 2011 Language Pack from the Microsoft website (http://www.microsoft.com/en-us/download/details.aspx?id=27819). Before downloading, we should select the correct language in the Change Language drop-down list. If download is not permitted on this machine, it can be downloaded elsewhere and then copied onto this machine.
To run the installer, the logged-in user must have administrator privileges on the computer and either full or administrator privileges on Microsoft Dynamics CRM.
After downloading the package, start the installation by double-clicking on the downloaded EXE file. The first step would be to specify the location to which the package content will be unzipped.
Post unzipping, locate the language pack files and then double-click on the
MUISetup_<loc_code>_<proc_type>.msifile, where<loc_ code>is the locale code for the language pack being installed (for example,1033for English or3082for Spanish), and<proc_type>specifies the type of processor the server is running on (for example, "amd64").On the End User License Agreement page, click on I accept the terms in the license agreement, and then click on Install.
Installation continues; once done, please click on Finish.
To provision the language pack in the Microsoft Dynamics CRM deployment, perform the following steps:
After installation, log in to the Dynamics CRM application with system administrator security privileges. Navigate to Settings | System | Administration | Languages as shown in the following screenshot:

This will launch a new web dialog, where the language (in this example, Spanish) can be selected:

Then, click on the Apply button to enable the language pack. A confirmation dialog (Confirm Language Change) will appear; please click on OK and continue.
Once done, the language pack's Status field must change to Enabled.
The previous step only enables the language. Now the language change at the user interface level has to be effected. This can be done by navigating to File | Options for every user login:

In the options window, navigate to the Languages tab. Change the User Interface Language and Help Language fields to the newly enabled language (in this case, Spanish):

Click on the OK button to apply the changes.
The language pack installs a translation package of the labels, text, and help content of the Dynamics CRM user interface. While the base language defines the default Dynamics CRM UI language, the language packs further installed can provide flexibility to users to select another language of their choice. This is often a very important feature of Dynamics CRM when there is a use case of deploying Dynamics CRM for a multilingual user base.
In Microsoft Dynamics CRM for Outlook, the user language settings only apply to Microsoft Dynamics CRM for Outlook features, such as the user interface display of the CRM menu; they do not affect other areas of Microsoft Office Outlook.
Microsoft Dynamics CRM E-mail Router creates an interface between a Microsoft Dynamics CRM deployment and the organization's messaging system. E-mail Router performs the following tasks:
Routing incoming e-mail messages to Microsoft Dynamics CRM
Sending e-mail messages generated from Microsoft Dynamics CRM
E-mail Router is for users or queues that do not use Microsoft Dynamics CRM for Outlook. If CRM Organization uses e-mail queues, E-mail Router must be used because queues are not supported by using Microsoft Dynamics CRM for Outlook.
With E-mail Router, an e-mail is routed to Microsoft Dynamics CRM regardless of whether the recipient is logged in.
E-mail Router routes qualified e-mail messages to the Microsoft Dynamics CRM system as e-mail activities and fully integrates with different messaging systems, such as Microsoft Exchange Server, Microsoft Exchange Online, POP3, and SMTP. E-mail Router includes the functionality of sending e-mails through any desired SMTP provider and receiving e-mails from Microsoft Exchange Server or from a POP3 server.
The minimum recommended hardware specifications for the server machine where E-mail Router will be installed are as follows:
A multi-core 1.8 GHz processor
2 GB of RAM or more
A minimum of 100 MB of available hard disk space
E-mail Router components can be installed on a machine that runs on Windows 7 (32- or 64-bit editions), and on Windows Server 2008 or Windows Server 2008 R2 (x64-bit editions only).
Note
Running Microsoft Dynamics CRM E-mail Router and the E-mail Router Configuration Manager application (32-bit) is not supported on a Windows Server 64-bit operating system in the Windows on Windows (WOW) mode.
Finally, Rule Deployment Wizard requires the Microsoft Exchange Server Messaging API (MAPI) client libraries.
Note
For Microsoft Exchange Server 2010, MAPI Version 6.5.8147 (or later) is required. If an earlier version is installed, it has to be uninstalled before installing the newer version.
Download the latest MAPI client from:
http://www.microsoft.com/en-us/download/details.aspx?id=1004
This package, however, will not be installed on a system on which any version of Microsoft Outlook or Microsoft Exchange Server 2003 or earlier is installed.
Update Rollup 2 (or later) of Microsoft Exchange Server 2010 is also a requirement if Rule Deployment Wizard is intended to use Microsoft Exchange Server 2010 as its e-mail server.
Microsoft does not recommend installing E-mail Router on a computer that is running Microsoft Exchange Server.
The minimum permissions required to run E-mail Router are:
The account that is running E-mail Router must be
LocalSystemAccountThe computer where E-mail Router will be installed must be added to the
PrivUserGroupgroup
Follow these steps to set up E-mail Router component:
Log in to the server machine where E-mail Router has to be installed with local administrative privileges.
Download Microsoft Dynamics CRM 2011 E-mail Router from the Microsoft website (http://www.microsoft.com/en-in/download/details.aspx?id=27818). If downloading is not permitted on this machine, this can be downloaded elsewhere and then copied onto this machine.
After downloading the package, start the installation by double-clicking on the downloaded EXE file. The first step would be to specify the location to which the package content will be unzipped.
After unzipping, locate the unzipped files and then double-click on the
SetupEmailRouter.exefile.If a Security Warning page pops up, proceed by clicking on Run.
Then a Welcome to Microsoft Dynamics CRM 2011 E-mail Router Setup page appears. Select Get Updates for Microsoft Dynamics CRM if Dynamics CRM update rollups have to be applied; otherwise, select Do not get updates and then click on Next.
When the License Agreement page appears, select I accept this license agreement to accept the license terms and click on I Accept.
If the required components are missing, the Download and Install Required Components page appears. If this page does not appear, all required components are installed and the next step in the installation procedure can be skipped.
If the required components are listed, they can be installed now. Click on Install to launch the installation. After the components are installed, the Status column value changes from Not Installed to Installed. Click on Next to continue.
On the Select Router Components page, select either one or both options and then click on Next:
The Microsoft Dynamics CRM E-mail Router Service option installs the E-mail Router service and the E-mail Router configuration manager
The Rule Deployment Wizard option installs Rule Deployment Wizard. Optionally, this wizard can be installed on any computer in the Active Directory domain of the Exchange Server.

On the Select Install Location page, accept either the default file installation directory or browse to indicate a different location, and then click on Next.
The System Checks page appears. This page displays a summary of all system requirements for a successful E-mail Router installation. Any reported error must be corrected before proceeding with installation. If there is a problem that will take time to be solved, setup has to be cancelled at this point; the problem has to be fixed and only then can setup be restarted.
When no verification errors remain, click on Next.
The Ready to Install page appears. The installation selections made have to be reviewed; click on Back to change any selections, or click on Install to install now.
After the E-mail Router setup has finished installing files, click on Finish.
The setup for E-mail Router for Microsoft Dynamics CRM 2011 contains two main components:
E-mail Router (the E-mail Router service and the E-mail Router configuration manager)
Rule Deployment Wizard
Rule Deployment Wizard lets us deploy rules that are used to route e-mail messages to a forward mailbox from the mailbox of a user or queue. Rule Deployment Wizard does not work with POP3/SMTP e-mail servers.
Users and queues in CRM can be configured to use E-mail Router for processing of the incoming and outgoing CRM e-mails. To utilize this functionality, users and queues must have a valid e-mail address and must select E-mail Router for the incoming and outgoing E-mail access types. This can be set up by an administrator or by users having the relevant permissions.
E-mail Router can also be installed on a multiserver cluster to provide high availability and failover functionality. We will discuss this in the Installing Microsoft Dynamics CRM E-mail Router on multiple computers recipe later in this chapter.
After E-mail Router is installed, the E-mail Router configuration manager, an application that is installed during the Microsoft Dynamics CRM E-mail Router setup, must be run. We will discuss this in the next recipe.
After installing E-mail Router, it has to be configured. Certain configuration tasks are mandatory; whereas a few are optional. The configuration tasks can be listed as follows:
Task 1 (Mandatory): Setup profiles are (optionally) set up deployments using the E-mail Router configuration manager
Task 2 (Mandatory): Dynamics CRM users must have their incoming e-mail access type set to E-mail Router
Task 3 (Optional): We can set up the forward mailbox
Task 4 (Optional): As part of configuration, inbox rules can also be deployed
E-mail Router has several options, and before running the E-mail Router configuration manager, we need to be certain about the choices to be made here:
Incoming configuration: For incoming e-mail messages, E-mail Router supports the Exchange Server 2003/2007 or POP3 e-mail systems
Outgoing configuration: For outgoing e-mail messages, E-mail Router supports SMTP e-mail systems
Mailbox monitoring type:
Two types of mailbox monitoring can be configured, they are as follows:
Forward mailbox: Forward mailbox, also known as sink mailbox, allows Dynamics CRM to monitor one central mailbox instead of monitoring the mailbox of each user who needs Microsoft Dynamics CRM e-mail capabilities. CRM Organizations, which has a large number of mailboxes to monitor, can opt for this alternative.
E-mail Router: If e-mail messages can be forwarded as attachments but the e-mail system does not allow rules, each user must be configured to use the E-mail Router setting.
We will take a look at all the previously mentioned tasks one by one:
Task 1 – Setting up profiles
Please follow the ensuing steps to configure the E-mail Router settings:
To start E-mail Router Configuration Manager, click on Start | All Programs | Microsoft Dynamics CRM 2011 E-mail Router | E-mail Router Configuration Manager.
The E-mail Router Configuration Manager application will be launched. It has three sections as follows:
Configuration Profiles: This section contain information about the e-mail server and the authentication methods the E-mail Router will use.
At least one incoming e-mail profile and one outgoing e-mail profile have to be configured to enable E-mail Router to route e-mails to and from Microsoft Dynamics CRM Organization.
Deployments: For E-mail Router to use the incoming and outgoing configuration profiles we just created, it has to be linked with a Microsoft Dynamics CRM Deployment.
My company: Select this option if Microsoft Dynamics CRM is deployed on premises
An online service provider: Select this option if the deployment that E-mail Router will connect to is an online service provider deployment of Microsoft Dynamics CRM
Microsoft Dynamics CRM Online: Select this option to connect E-mail Router to a Microsoft Dynamics CRM Online organization
Users, Queues, and Forward Mailboxes: Once the configuration profile and deployment have been completed, we need to manage the users, queues, and forward mailboxes that will be used by E-mail Router.
To create a configuration profile, click on New in the Configuration Profile tab.
Provide a profile name and then select the intended values for Direction and E-mail Server Type. Finally, provide values for Location and Access Credentials as shown in the following screenshot.
By repeating steps 2 and 3, multiple incoming and outgoing profiles can be created:

To link a Dynamics CRM Deployment, click on New in the Deployment tab.
For Deployment Type, select between My company, An online service provider, and Microsoft Dynamics CRM Online.
In the Microsoft Dynamics CRM Server box, please provide the Microsoft Dynamics CRM Discovery service followed by the organization name, which is case-sensitive.
In the Access Credentials section, please specify the credentials that E-mail Router will use to log on to the Microsoft Dynamics CRM Server.
Note
Use a Local System account if the machine account can be used to connect to Microsoft Dynamics CRM Server. In such a case, E-mail Router must be in the same domain as the Microsoft Dynamics CRM Server and the E-mail Router machine account should be added to
PrivUserGroupin Active Directory.Alternatively, the Other Specified account can be used to specify the credentials of a user of with the system administrator role to connect to Microsoft Dynamics CRM.
In the Incoming configuration profile field, select an incoming profile already created, and in the Outgoing configuration profile field, select an outgoing profile already created.
Finally, click on OK to finish the deployment:

The next step would be that of loading the users and mailboxes from CRM Deployment, and this can be done by clicking on the Load Data button as shown in the following screenshot:

Task 3 – Setting up the forward mailbox
To set up forward mailboxes, once the data is loaded, click on the Forward Mailboxes tab. Click on New to create a new forward mailbox, or click on Modify to change an existing forward mailbox.
In the Forward Mailbox dialog box, fill in the following boxes, and then click on OK:
E-mail Address: This field will bear the e-mail address for the forward mailbox.
Incoming Configuration Profile: This field will bear the name of the incoming configuration profile to associate with the forward mailbox. We can have multiple forward mailboxes that use different incoming configuration profiles.
To delete e-mail messages in the forward mailbox after they have been processed by E-mail Router, select the Delete messages in forward mailbox after processing option.

Finally, click on Publish.
Then restart the Microsoft CRM E-mail Router service. To do this, click on Run, type
services.msc, and then press Enter. Right-click on the Microsoft CRM E-mail Router service, and then click on Restart.
Task 2 – Configuring user e-mail settings
By default, incoming and outgoing e-mail access types in Dynamics CRM are set to Microsoft Dynamics CRM for Outlook. Unless this is changed, Outlook will be unable to send and receive e-mails.
To configure E-mail Router for incoming and outgoing e-mail access types, perform the following steps:
Log in to Dynamics CRM with system administrator access.
Navigate to Settings | Administration | Users, select the user record, and open it.
On the user record, modify the incoming and outgoing e-mail access types to E-mail Router.

Task 4 – Configuring rules using Rule Deployment Wizard
To deploy these Microsoft Dynamics CRM user inbox rules, the Rule Deployment Wizard can be used. Rule Deployment Wizard can be run at any time to add or change the inbox rules for Microsoft Dynamics CRM users.
Note
The Rule Deployment Wizard can only deploy rules to Exchange Server mailboxes. The Rule Deployment Wizard cannot be used to deploy rules to POP3 e-mail servers.
To run Rule Deployment Wizard, the user must:
Be logged on as a Microsoft Dynamics CRM user with a security role
Be a local administrator on the computer on which the wizard is running
Have Exchange administrative permissions
The following are the steps to run the Rule Deployment Wizard:
Navigate to Start | All Programs | Microsoft Dynamics CRM 2011 E-mail Router and click on Rule Deployment Wizard.
Click on Next to start the wizard.
For Deployment, select a Microsoft Dynamics deployment type.
Enter the URL of the CRM Organization for Microsoft Dynamics CRM Server.
For Access Credentials, provide the correct credentials of a system administrator of the Dynamics CRM Organization.
Then click on Next to proceed:

Type the e-mail address of the forward mailbox and click on Next to proceed.

Select the Microsoft Dynamics CRM user(s) or queues to whom/which we want to deploy the rule. Then click on Next.
Click on Deploy rule to user mailboxes, and then click on Next.
After the rules have been deployed, click on Cancel to close the wizard.
E-mail Router Configuration Manager configures the deployment and enables Dynamics CRM users and queues to send and receive e-mail messages. The E-mail Router configuration steps remain the same irrespective of whether E-mail Router is installed on a single machine or multiple-machine clusters. With this recipe, the E-mail Router installation activities come to a close.
To install E-mail Router in a failover cluster environment, the minimum requirements are as follows:
At least two Windows servers to support clustering
A common storage I/O technology between the nodes in the cluster, such as Parallel SCSI or Fiber Channel
Cluster configured in an active/passive manner; installing E-mail Router on nodes operating in an active/active cluster, such as an Exchange Server active/active cluster, is not supported.
To install Microsoft Dynamics CRM 2011 E-mail Router on multiple computers, the following main steps have to be followed:
Installing E-mail Router to the active primary node in the cluster
Installing E-mail Router to the passive nodes in the cluster
Creating the generic resource service for the cluster
Please perform the following steps to install E-mail Router to the active node in the cluster:
Run the E-mail Router setup in the active primary node in the cluster by following the Installing Microsoft Dynamics CRM E-mail Router recipe.
Configure E-mail Router using the E-mail Router Configuration Manager by following the Configuring Microsoft Dynamics E-mail Router recipe. Verify that E-mail Router is routing messages correctly to and from Microsoft Dynamics CRM and the e-mail systems.
Create shared storage on a secondary node in the cluster and grant full access to the service account running the E-mail Router service and those administrators who may have to update configuration files manually.
The following files have to be copied manually to the shared storage. This is essential because these files can be moved to a secondary node in the cluster in the event of a failover.
Microsoft.Crm.Tools.EmailAgent.Configuration.binMicrosoft.Crm.Tools.EmailAgent.SystemState.xmlMicrosoft.Crm.Tools.EmailAgent.xmlEncryptionKey.xml(if it exists)
Then update the following registry subkey, so that E-mail Router uses the shared location to load the E-mail Router settings.
HKEY_LOCAL_MACHINE\SYSTEM\CurrentControlSet\Services\MSCRMEmailFinally, restart the Microsoft CRM E-mail Router service.
Next, we will install E-mail Router on each of the passive nodes of the cluster using the following steps:
Run the E-mail Router setup in the passive node of the cluster.
Update the Windows Registry subkey as mentioned in the previous steps on the primary node.
Restart the Microsoft CRM E-mail Router service.
Finally, we will create a generic resource service for the cluster by following these steps:
On each node in the cluster, start the Services MMC snap-in. On the list of services, right-click on Microsoft CRM Email Router, click on Properties, and then set Startup Type to Manual. Close the Services MMC snap-in.
Launch Active Directory Users and Computers. Locate the
PrivUserGroup {GUID}security group for the deployment. Add the computer accounts for each node in the cluster. Close Active Directory Users and Computers.If Windows Server 2003 is used here, start Cluster Administrator—if Windows Server 2008 is used, start Failover Cluster Management—and create a generic resource service. Use the following parameters:
Name: Create a descriptive name for the generic resource service, for example,
MSCRM E-mail RouterResource type: Enter the generic service
Group: Enter the cluster group name
Possible owners: Add all nodes in the cluster
Dependencies: If Exchange Server is used and E-mail Router has been installed on Exchange Server (not recommended), add Microsoft Exchange Information Store
Service Name: Mention the Microsoft CRM E-mail Router service
Start Parameters: Leave this field blank
Use Network Name for computer name: Leave this field unchecked
Do not checkpoint any registry keys
Bring the resource online. If it is necessary, configure the resource properties, such as the failover policies.
Close the Cluster Administrator/Failover Cluster Management window.
We achieve high availability for the Microsoft Dynamics CRM E-mail Router service by deploying it on multiple computers by using Windows Server's clustering technology. The server cluster has to be configured in an active/passive manner. In case of an active node failover scenario, the passive node becomes the primary node and the common storage or shared disk resources will move from active node 1 to the passive node.
Earlier, in the Single server versus multiserver subsection of this chapter's Introduction section, we mentioned some of the reasons for and benefits of installing Dynamics CRM 2011 on multiple computers. In this recipe, we will discuss how to deploy Dynamics CRM on a multiserver environment.
In a multiple-server deployment, there are usually two or more server computers running the Dynamics CRM 2011 Full Server installation. But for improved performance, the server roles (Front End Server role, Back End Server role, Deployment Administration Server) can further be deployed across different server machines. When Dynamics CRM 2011 is deployed across multiple servers, Network Load Balancing (NLB) must be configured to provide load balancing.
In case of deploying various server roles into separate servers, Microsoft's recommendation is to not install the Help Server role on the same server where Front End Server roles are installed. This is to minimize the CRM system's exposure to denial-of-service attacks.
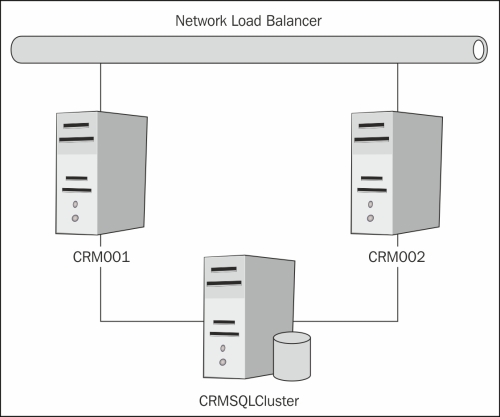
Let us take an example of two server nodes (CRM001 and CRM002), where Microsoft Dynamics CRM 2011 Full Server is configured (or will be installed) as a server cluster (CRMCluster) and the CRM installation uses a SQL Cluster environment (SQLCluster).
The following network diagram describes our multiserver deployment scenario:
We have to perform the following steps to make this setup work:
Installing Dynamics CRM 2011 on both the server nodes (
CRM001andCRM002)Creating a server cluster (
CRMCluster)Configuring the SPN for the CRM Application Pool service account (
CRMServiceAccount)Configuring NLB
To achieve multi-server deployment in our scenario, we have to complete the following subtasks.
First, we have to install Dynamics CRM 2011 on two server nodes; we will achieve this one at a time. Here, we are assuming that the installation of a Full Server role will be performed for both these server machines. As stated in the earlier sections, installing Microsoft Dynamics CRM Workgroup Server 2011 on multiple servers is not supported.
To install Dynamics CRM 2011 on these two machines, perform the following steps on each of the machines independently:
Follow the steps outlined in the Installing Dynamics CRM 2011 Server recipe to install Dynamics CRM 2011 server.
On the Specify Deployment Options page, select the instance of SQL Server that will be used for the Microsoft Dynamics CRM databases (
CRMSQL). Then, check the Create a new deployment option. Click on Next and continue the setup.On the Specify Security Account page, select a domain user account (
CRMServiceAccount) that has been created previously.Click on Continue to finish the installation.
The next steps are to create a server cluster for servers CRM001 and CRM002 and to enable loading balancing between them. The recommended settings while creating the NLB are as follows:
Port Range:
0to65535(the default range)Protocols:
BothAffinity:
Single
The next step is to configure the SPN for the CRM Application Pool service account.
In this deployment, we are using a domain user account (CRMServiceAccount) to run the Dynamics CRM 2011 Application Pool. When IIS 7.0 (or higher) is used on a cluster environment, we need to set up SPN for the Application Pool account. Active Directory uses the SPN for mutual authentication of a service instance, which enables the service instance to correctly authenticate a user who attempts to access resources that are located on other domain-member computers.
Perform the following steps to configure the SPN for the CRM Application Pool Account:
Log in to the Active Directory server machines with domain admin credentials.
Launch the ADSI Edit console from All Programs | Administrative Tools | ADSI Edit.
Expand the domain and the node that starts with
DC=and then expandCN=Users.Right-click on
CRMServiceAccountand click on Properties.From the attribute list, select servicePrincipalName and then click on Edit.
In the Value to add textbox, enter
HTTP/CRMNLBName.FQDNand then click on Add.Here,
CRMNLBNameis the CRM Server's cluster name (in this case,CRMCluster) andFQDNis the Fully Qualified Domain Name of the cluster, for example,CRMCluster.MyOrg.com.In the Value to add box, enter
HTTP/CRMNLBNameand then click on Add.Click on OK the next two times.
Close the ADSI Edit window.
Now it is time to configure the NLB for this deployment. NLB will be configured using Dynamics CRM 2011 Deployment Manager. Perform the following steps to configure the NLB:
Launch the deployment manager. This is usually accessible via the following path:
Start | All Programs | Microsoft Dynamics CRM | Deployment Manager
Right-click on Microsoft Dynamics CRM, and then click on Properties as shown in the following screenshot:

Click on the Web Address tab and verify that the cluster name (in this example,
CRMCluster) appears, and then click on Advanced:
Select The deployment uses an NLB. Click on OK and then close the deployment manager:

Multiserver deployment gives performance benefits and scaling advantages. However, with Microsoft Dynamics CRM Workgroup Server 2011, the Dynamics CRM 2011 server roles cannot be installed on separate computers. Load balanced multiserver deployment, as stated in the recipe, is essentially the most likely deployment paradigm in a production environment.
It is common practice to deploy Dynamics CRM 2011 with a SQL Server clustered environment. To achieve this, create a SQL Server cluster, and then during Dynamics CRM 2011 installation, on the Select SQL Server page, type the virtual server name that was specified when we created the SQL Server cluster.
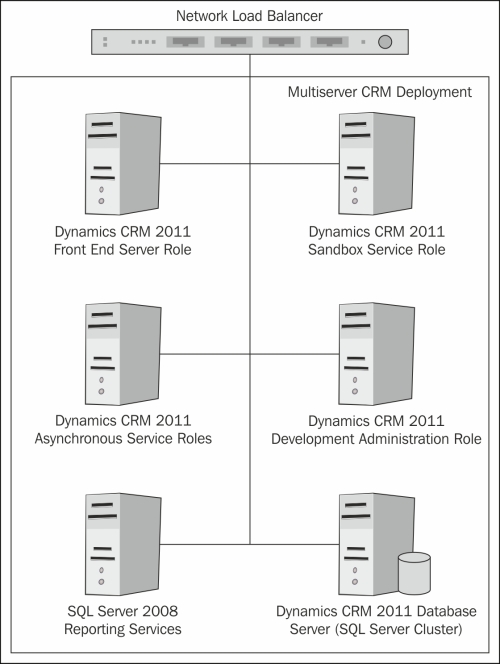
The multiserver deployment of Dynamics CRM 2011 can be more complex than what has been discussed in this recipe. One example of a complex deployment can be to deploy all server roles to separate server machines.
The following diagram describes a multiserver CRM 2011 deployment with different server roles deployed on separate server machines.
When we select a server role other than Full Server, Microsoft Dynamics CRM Server setup does not create an organization database during the installation. If the deployment does not have an organization database, we must use the deployment manager to create a new organization. The next recipe will guide us with creating a new organization in Dynamics CRM 2011.
Microsoft Dynamics CRM 2011 Deployment Manager is a wizard-based application that takes us through all the steps for creating a new organization. For multiserver deployment and while creating a multitenant CRM deployment, multiple organizations can be created for a Dynamics CRM 2011 CRM deployment.
The steps to create a new organization are as follows:
Launch the deployment manager. This is usually accessible via at:
Start | All Programs | Microsoft Dynamics CRM | Deployment Manager
Click on the Organizations link. This will list all the existing organizations deployed in this CRM environment as shown in the following screenshot:

Then, right-click on Organizations and select New Organization. The New Organization Wizard window will appear.
On the Specify the Organization Settings page, enter the following information:
Display Name: This will contain the name of the CRM Organization.
Unique Database Name: This will contain the database name for this CRM Organization.
ISO Currency Code: Click on Browse and select a base currency. Setting currencies has been discussed in the There's more… section of the Installing Dynamics CRM Server recipe.
SQL Collation: In the SQL collation list, keep the default selection or select a different database collation that the organization database will use to sort and compare data characters.
Click on Next> to proceed:

On the Help Us Improve the Customer Experience page, select whether to participate in the Customer Experience Improvement Program, and then click on Next.
On the Select SQL Server page, specify the SQL Server machine name.
If we are using the default instance of SQL Server, we need to provide the machine name of the SQL Server, and in case we are using the named instance of SQL Server, we need to enter
<machine-name>\<instance-name>.On the Specify Reporting Services Server page, specify the Reporting Server URL value.
Next appears the System Checks page, which outlines a summary of all requirements and recommendations for a successful installation. If all the previous steps have been followed, everything should be OK. Make sure no errors are reported. If there are errors, they need to be corrected before we can continue. Click on Next.
Then appears the Ready to Create page. Here, review the selections and click on Create to create the new organization.
Using this recipe, organizations within Dynamics CRM 2011 can be set up. Multiple organizations can be set up by repeating this recipe. An organization within Dynamics CRM 2011 is usually provided a meaningful name from the business standpoint. The organization name appears as part of the Dynamics CRM URL. However, there are some restricted names that cannot be used as organization names within Dynamics CRM.
A organization once set up can be renamed/modified after creation. This is a fairly easy task and can be achieved using the deployment manager. The following details of an organization can be edited:
Display name of the organization
SQL Server
SSRS Server
Please perform the following steps to edit an organization's details:
Launch the deployment manager. This is usually accessible via:
Start Menu | All Programs | Microsoft Dynamics CRM | Deployment Manager
Navigate to Microsoft Dynamics CRM | Organizations, and then right-click on the organization and select Disable.
Click on the organization name and click on Edit Organization from the Actions pane as shown in the following screenshot:

On the Edit Organization wizard screen, change the required properties and click on Next to proceed.
On the System Checks page, click on Next.
On the Ready to Apply Changes page, click on Apply.
Finally, click on Finish to complete the changes.
Once the changes are applied, the organization is updated with the new changes. Unless setup encounters any error, the changes will be published and the changes will be visible in the organization list.
Recipes in this chapter demonstrated how to install various components of Microsoft Dynamics CRM 2011. In the next chapter we would discuss the following recipes:
Backing up Dynamics CRM 2011 Server
Recovering Dynamics CRM 2011 Server failure
Monitoring Dynamics CRM 2011 Server
Optimizing Dynamics CRM 2011 Server performance
