


 Download code from GitHub
Welcome to Mastering Jenkins. In this book, we will journey into the world of build pipelines, automated testing, product delivery, and automation. Together we will discover innovative ways to integrate Jenkins into the last mile of software development, while furthering our knowledge of modern software engineering and delivery practices. We will also discover scalable solutions that will help us catch defects faster and deliver reliable software releases at higher velocities.
Our quest to master Jenkins will take us on an adventure in software engineering, quality assurance, operations, architecture, and business process. These diverse engineering and business disciplines uniquely tie together in software delivery pipelines. By thought leading an organization and evangelizing good software development practices, we can implement diversely scalable pipelines across any number of technology stacks. As a result, an organization can outpace and outmaneuver its competition.
Sprinkled throughout the pages of this book, you will discover some Zen proverbs, which will be used to enlighten our journey. In literary works and historical texts, Zen proverbs can be found in books that date back as early as the Tang dynasty [618–907 AD]. During this period, Zen proverbs and Koans were widely adopted by Buddhist monks as a way of promoting enlightenment through critical thinking and self-discovery. These were further used as a way of teaching patience, persistence, and enlightenment.
"If you are planning for a year, sow rice. If you are planning for a decade, plant a tree. If you are planning for a lifetime, educate people." | ||
| --A Chinese Proverb | ||
This proverb instills values of planning, forethought, and education. These values are key components to engineering, and encourage a plan for future sustainability. In Jenkins, we can apply this concept to the architecture of software delivery pipelines. When advocating for any cross-discipline collaborative cross-discipline practices we will need to evangelize good architecture, plan the implementation properly, define conventions, build a scalable solution, and then educate the user base. By doing this, we can prevent most long-term Jenkins management nightmares by making it easier to navigate and maintain. Due to the highly configurable nature of Jenkins, and the various moving parts of the SDLC structuring the system carefully and organizing it should be a constant consideration.
In this chapter, we will begin our journey by discovering proven Jenkins management techniques that can help us provide a stable and scalable Jenkins experience. Together we will learn to adjust Jenkins to fit unique organizational requirements and provide better performance and fewer maintenance headaches. Let's begin!
In this chapter, our focus will be on the following topics:
The Jenkins platform architecture
Jenkins on Microsoft Windows
Configuring the JVM and Java arguments
Jenkins on Linux and Unix
Running Jenkins behind an NGINX reverse proxy
Running Jenkins behind an Apache reverse proxy
Creating and managing Jenkins backups
Setting up a Jenkins mirror
Jenkins on Mac OSX
The Jenkins LTS release line
Jenkins XML configuration files
Jenkins, as you are probably aware, was built using Java. It's cross platform and supports a wide variety of engineering patterns and technologies. It can effectively support organizations of all sizes. Jenkins offers endless automation possibilities and even has a vibrant plugin ecosystem.
In this section, we will cover configuration techniques aimed at advancing our knowledge of the Jenkins architecture. Together, we will lay a foundation for reliable automation and future scalability by learning how to configure the Jenkins main operating environment.
Jenkins offers a cross-platform user experience by running on a Java Virtual Machine (JVM). A JVM is a powerful virtualization technology used to execute Java bytecode instructions, and provides a consistent software platform regardless of the host OS.
The Jenkins community has created native installation packages for Microsoft Windows, Mac OS X, Linux, and Unix. If Jenkins is not already installed (this book assumes it is), it's highly recommended that you use one of the community-provided packages if possible. If a native package is not available, Jenkins an most likely still be configured to run, providing that the host operating system supports any of the following web architectures:
Apache Tomcat v5.0+
JBoss Application Server 4.2+
IBM WebSphere 7.0.0.7+
WebLogic
The initial installation of Jenkins on Microsoft Windows is straightforward. The Microsoft Windows Jenkins MSI package comes complete with the Java Runtime Environment (JRE) prerequisite and Microsoft .NET 2.0 framework. This bundling provides a seamless Jenkins installation experience, and alleviates the need for any external prerequisite software installations.
By using the MSI installation package, the Jenkins installation wizards will automatically install itself as a Windows service. By installing Jenkins as a Microsoft Windows service it will become easier to manage and control. Windows services provide an easy way to specify what the system should do when Jenkins crashes.
Once Jenkins has been installed we will want to verify that Jenkins has properly been installed and configured as a Windows service. To do this we will need to open the Services area in the Control Panel and locate the entry for Jenkins. To navigate to the Windows services management area, go to Start-> Control Panel -> Administrative Tools -> Services.
If Jenkins is installed properly as a Windows service, we will see an entry for it listed in the Windows Services panel, as shown in the following screenshot:
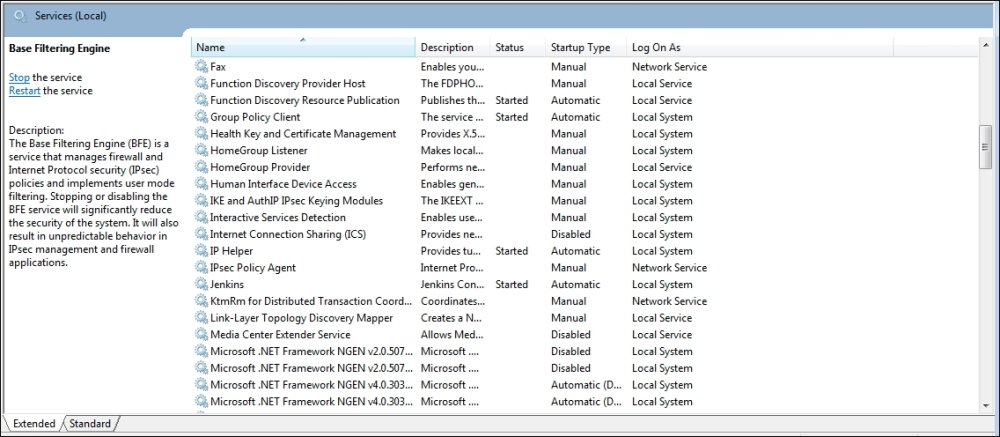
Figure 1-1: The Windows Services panel
The Windows service properties dialog displays the available options for Windows services. From this screen, we can modify how the service is started, what user account the service runs under, and even manage how Microsoft Windows recovers the Jenkins service if it encounters any problems.
To open the Windows service properties panel for Jenkins, double-click on the Jenkins entry on the main Windows Services panel. Windows will then display the Jenkins Properties dialog, as shown here:
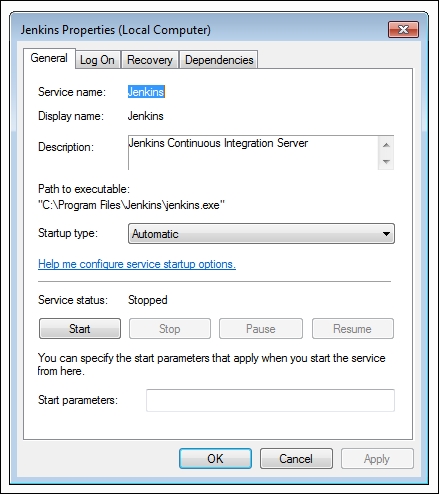
Figure 1-2: The Jenkins Properties dialog
Let's make Jenkins more fault tolerant. To do this, we need to modify the Jenkins Windows service definition and implement a more reliable way for our Jenkins service to recover from failure. Click on the Recovery tab, as shown here:
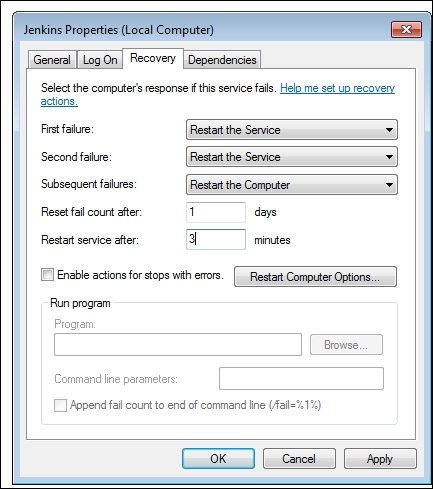
Figure 1-3: The Recovery tab in the Jenkins Properties dialog
From here, we can direct Microsoft Windows to automatically restart the Jenkins service if it fails. In the example shown in the preceding screenshot, we have implemented fault tolerance for Jenkins by updating the fields in the dialog.
To proceed update your Jenkins service to reflect the above implementation. Click on Apply and restart the Jenkins service.
Java web-ui applications, including Jenkins, run on port 8080. To change this listening port, we need to modify the Java startup configuration file.
In Microsoft Windows, we can customize all of the Java JVM options by modifying the Jenkins.xml configuration file. The primary Jenkins configuration file can be found at $JENKINS_HOME/jenkins.xml.
On Microsoft Windows, the $JENKINS_HOME directory and primary XML configuration file can usually be found in one of the following locations:
C:\Program Files\Jenkins\jenkins.xmlC:\Program Files (x86)\Jenkins\jenkins.xml
The primary XML configuration file contains a number of settings and options that pertain to the JVM. One of these settings is the listening port. Let's proceed in changing the listening port. We will walk through these steps together.
Edit the primary XML configuration file in a text editor and locate the
<arguments>node. An example of the argument node is shown here:<!-- if you'd like to run Jenkins with a specific version of Java, specify a full path to java.exe. The following value assumes that you have java in your PATH. --> <executable>%BASE%\jre\bin\java</executable> <arguments>-Xrs -Xmx256m -Dhudson.lifecycle=hudson.lifecycle.WindowsServiceLifecycle -jar "%BASE%\jenkins.war" --httpPort=8080</arguments>Change the value for
–httpPortand save the configuration file.Restart the Jenkins service and verify that Jenkins is running on the preferred port.
Now that we have completed the adjustments to the listening port, let's take a look at some of the other available JVM options.
A default Jenkins installation is allocated 256 MB of memory. The initial memory allocated is sufficient for basic operations. As a Jenkins instance grows and becomes more complex it will inevitably run out of memory. Before we start to see build failures related to Java heap space, or PermGen memory we should allocate additional memory to Java and Jenkins.
Java v1.7, and earlier, uses permanent generation memory and maximum permanent generation memory allocations. With the advent of Java v1.8, Oracle has replaced the permanent generation memory options with metaspace memory options. This has added a bit of confusion surrounding how to properly manage memory in Java. To better understand the JVM and its memory knobs, let's take a look at the following table. It describes what each of the available memory options:
|
Setting Name |
Example Argument |
Description |
|---|---|---|
|
Initial heap size |
|
Sets the initial Java heap size |
|
Maximum heap size |
|
Sets the max Java heap size |
|
Initial permanent generation memory |
|
Sets the initial available permanent generation memory |
|
Maximum permanent generation memory |
|
Sets the highest amount of PermGen memory that can be allocates |
|
Maximum metaspace |
|
Sets the max metaspace amount (similar to PermGen but dynamic by default) |
Java memory arguments and descriptions for Windows
Allocating too little memory may cause Jenkins and Java to throw memory errors. However, allocating too much memory will degrade the operating system's performance. It is important to adjust these settings carefully, and find a balance suitable for the target system. These settings will need to be customized to fit your specific hardware and operating system configuration. Here is an example to increase the maximum heap size:
<arguments>-Xrs –Xmx512m -Dhudson.lifecycle=hudson.lifecycle.WindowsServiceLifecycle -jar "%BASE%\jenkins.war" --httpPort=8080</arguments>
While customizing the Java options, there are a number of things to keep in mind. Here are a few tips and notes on allocating memory to Microsoft Windows and Java:
Microsoft Windows has a required overhead for the OS. Be sure to leave enough RAM available for the OS to function properly (more than 128MB).
The larger the initial heap and/or maximum heap memory size, the larger the permanent generation memory allocation will need to be. This is because the permanent generation memory stores data about the contents of the heap.
The metaspace switch is only available in Java v1.8 or higher versions.
The permanent generation memory has been deprecated and removed in Java v1.8.
The memory values you specify must be a multiple of 1,024 and greater than 1 MB.
Jenkins offers a wide spectrum of support for the Linux and Unix operating systems. Its cross-platform capabilities have made it a very popular automation tool. The Jenkins community has created native installation packages for most Linux and Unix distributions. Currently, there are installation packages available for the following Linux and Unix flavors:
Ubuntu/Debian
Red Hat/Fedora/CentOS
OpenSUSE
FreeBSD
Solaris/OpenIndiana
Gentoo
Docker
The easiest way to install Jenkins on a Linux or Unix system is to use a standard package manager, such as YUM, OpenCSW, IPS, or Aptitude. For the purpose of brevity, we will focus primarily on CentOS (YUM) and Debian oriented (APT) distributions.
On Linux and Unix hosts, configuring the JVM memory parameters involves modifying the service scripts that initialize the Jenkins daemon. For Debian/Ubuntu systems, the file you will need to modify is usually located in /etc/default/Jenkins.
For CentOS-based systems, the file you will need to modify is usually located in /etc/sysconfig/Jenkins.
Regardless of the operating system, the setting that lets us adjust the JVM options is the 'JAVA_ARGS=' property.
With the advent of Java 1.8, as mentioned earlier, there are some new and deprecated memory settings. The definitions of available memory options are described in table below:
|
Title |
Example Arg |
Description |
|---|---|---|
|
Initial heap size |
|
Sets the initial Java heap size |
|
Maximum heap size |
|
Sets the max Java heap size |
|
Initial permanent generation memory |
|
Sets the initial available permanent generation memory |
|
Maximum permanent generation memory |
|
Sets the highest amount of PermGen memory that can allocated |
|
Maximum metaspace |
|
Sets the max metaspace amount (similar to PermGen, but dynamic by default) |
Java memory arguments and descriptions for Linux (same as Windows)
Adjusting the memory setting for Java in Linux is simply a matter of adapting the JAVA_ARGS= property to contain the correct switches. An example of how to change the initial heap size property is shown here:
JAVA_ARGS=-Xmx=512m
Once you have completed the modifications to fit your hardware configuration, you will need to restart the Jenkins service to make it take effect.
Tip
Memory allocation tip
The larger the initial heap and/or maximum heap memory size, the larger the permanent generation memory allocation will need to be. This is because the permanent generation memory stores data about the contents of the heap. These memory settings are designed to let you customize the JVM environment that Jenkins operates in.
One of the newer web server solutions to take the Internet by storm is NGinX (pronounced Engine X). Developed in 2004 under the supervision of Igor Sysoev, NGINX was created to facilitate scalability and the load-balancing requirements of high-traffic web sites. Since its inception, this tool has gained wide acceptance and notoriety. Let's look at how to apply a reverse proxy to Jenkins. This can be accomplished in a straightforward manner. Let's take a few minutes to look at how to achieve this.
If NGINX has not already been installed on the target system, the first step will be to install it. NGINX can easily be installed onto an Ubuntu/Debian or CentOS-based system using the following terminal commands:
CENTOS#> yum install nginx
DEBIAN#> apt-get install nginx
Upon completing the installation of the NGINX web server, verify that the installation was successful by executing the nginx –v command. This will display the version information for the NGINX web server on the terminal and provide us with the assurance that it is installed properly.
Now that the NGINX web server has been installed onto the target system, the system will need to be configured to act as a reverse proxy for the Jenkins JVM. To accomplish this, simply update the nginx configuration files to contain a proxy pass. The configuration files for nginx on Ubuntu can be found in the following location:
/etc/nginx/sites-enabled/default
An example (provided at http://www.jenkins-ci.org) of a Jenkins proxy pass entry with Jenkins running under a subdomain (Jenkins.domain.com) is provided below.
server {
    listen 80;
    server_name jenkins.domain.com;
    return 301 https://$host$request_uri;
}

server {

    listen 80;
    server_name jenkins.domain.com;

    location / {

      proxy_set_header        Host $host;
      proxy_set_header        X-Real-IP $remote_addr;
      proxy_set_header        X-Forwarded-For $proxy_add_x_forwarded_for;
      proxy_set_header        X-Forwarded-Proto $scheme;

      # Fix the "It appears that your reverse proxy set up is broken" error.
      proxy_pass          http://127.0.0.1:8080;
      proxy_read_timeout  90;

      proxy_redirect      http://127.0.0.1:8080 https://jenkins.domain.com;
    }
  }
Once the configuration file has been updated, save the file to the disk, and restart nginx with the following command:
#>sudo service nginx restart
For the Jenkins UI and the NGINX reverse proxy to properly integrate, the context paths of Jenkins and the NGINX subdirectory must match. For example, if the Jenkins system is configured to use a context path of http://localhost:8080/jenkins, the proxy pass context defined in the web server's configuration file must also reflect the /Jenkins suffix.
To set the context path for Jenkins, add the --prefix= entry to the JENKINS_ARGS= property. An example of this configuration entry is provided below.
--prefix=/Jenkins
--prefix=/somecontextpathhere
The JENKINS_ARGS configuration line is located inside the Jenkins startup bash/dash script. This file is typically found in one of the following locations on the filesystem (dependent on the Linux distribution):
/etc/default/Jenkins
/etc/sysconfig/Jenkins (line 151)
Once everything has been configured, restart the NGINX and Jenkins services to finalize the implementation of the reverse proxy redirect solution.
After this has been completed, navigate from a web browser to your Jenkins URL on port 80, and verify that the Jenkins UI behaves properly.
The Apache HTTP Server Project (referred to as Apache) was first released to the public in April 1995. Apache represents a cornerstone of the Internet and is highly acclaimed. Since its initial release, Apache has become one of the most widely adopted web server platforms around the world. Apache thrives to this day, and has a vast array of modules that extend its functionality.
Running Jenkins on a nonstandard web port is a limitation that you may wish to address. It requires users to specify the port as part of the URL, which can become a hassle to manage. To address this concern, it's useful to run Jenkins behind an Apache proxy. Apache provides an extensive set of features that can benefit Jenkins users. Some benefits of this solution include:
Running Jenkins on port 80 (privileged port workaround)
Adding SSL support for your Jenkins instance
Running Jenkins from a different context, either
/Jenkinsor/ciRunning Jenkins side by side with other web apps, http://jenkins.foo.com
On Linux and Unix hosts, all TCP and UDP ports lower than 1024 are considered privileged. A privileged port is one where the services exposed are running under a privileged user account (typically, root). Running Jenkins as root is considered dangerous and is, therefore, not recommended. The prescribed user account under which the Jenkins service executes is jenkins.
The privileged port restriction can create a bit of a problem for Jenkins administrators. We may want Jenkins to be accessible on standard web port 80, but still want to run it under the Jenkins user account. By running Jenkins behind Apache, we can address this issue while still adhering to best practices.
One possible solution is to run Jenkins behind Apache and use mod_proxy to internally redirect traffic. This solution will allow us to get Jenkins to respond to requests on a privileged port without executing it as the root user, or changing its port configuration.
Apache's mod_proxy operates by forwarding incoming TCP/UDP port 80 requests to Jenkins on port 8080. Any responses from Jenkins are forwarded back to port 80. This creates a seamless experience for web users, while allowing Jenkins to remain on its original port.
To configure Jenkins to use Apache's mod_proxy module, we will need a basic installation of the Apache web server (http://www.apache.org). If Apache is not already installed on your system, you can use the standard package manager for your Linux or Unix distribution to install it. Here are some example terminal commands to install Apache on Linux:
Debian/Ubuntu
$> sudo apt-get update
$> sudo apt-get install apache2
Installs Apache2 in ->
/etc/apache2CentOS/Fedora
$> sudo yum install httpdInstalls Apache2 in ->
/etc/httpd
Once Apache is installed on the host, we will need to ensure that mod_proxy is installed and loaded also.
On RHEL-/CentOS-based systems, mod_proxy is typically installed at the same time as Apache. For Debian-based systems, you may need to install the Apache mod_proxy module specifically. You can look at your Apache modules folder on your system to see whether the mod_proxy.so and mod_proxy_http.so files are present.
To ensure mod_proxy is operating properly we need to ensure that Apache loads the mod_proxy.so and mod_proxy_http.so modules when Apache initializes. Apache's configuration file is usually httpd.conf or apache2.conf, depending on your system. Let's open up the Apache configuration file in an editor (vi, nano, and so on) and ensure that we have the proper LoadModule directives.
Next we will want to direct Apache to load our mod_proxy modules. The proper Apache configuration lines are provided below.
LoadModule proxy_module modules/mod_proxy.so
LoadModule proxy_http_module modules/mod_proxy_http.so
Tip
If the preceding lines do not exist (or are commented out) in your Apache configuration file, you will need to add them or uncomment them.
Once the LoadModule changes to the Apache configuration file have been completed, we will need to configure the port 80 VirtualHost XML block and create a reverse proxy. An example of an Apache virtual host entry for a Jenkins instance and proxy running on port 80 is provided below.
<VirtualHost *:80>
ServerAdmin  webmaster@localhost
ProxyRequests     Off
ProxyPreserveHost On
AllowEncodedSlashes On

    <Proxy *>
        Order deny,allow
        Allow from all
    </Proxy>

    ProxyPass         /  http://localhost:8080/ nocanon
    ProxyPassReverse  /  http://localhost:8080/</VirtualHost>
Now that the virtual host configuration entries have been added, save the configuration file to disk and restart Apache. Depending on the distribution, the commands necessary to restart Apache may vary slightly. Examples for CentOS and Debian are provided here:
CentOS:
$> sudo service httpd restartDebian/Ubuntu:
$> sudo service apache2 restart
For the Jenkins UI and the Apache reverse proxy to properly integrate, the context paths of Jenkins and the Apache subdirectory must match. For example, if the Jenkins system is configured to utilize a context path of http://localhost:8080/jenkins, the proxy pass context defined in the Apache configuration file must also reflect the /Jenkins suffix.
To set the context path for Jenkins, add the --prefix= entry to the JENKINS_ARGS= property. An example of this configuration entry is provided below.
--prefix=/Jenkins
--prefix=/somecontextpathhere
The JENKINS_ARGS configuration line is located inside the Jenkins startup bash/dash script. This file is typically found in one of the following locations on the filesystem that houses Jenkins (depending on your Linux distribution):
/etc/default/Jenkins
/etc/sysconfig/Jenkins (line 151)
Once everything has been configured, restart the Apache one more time as well as the Jenkins service to finalize the implementation of the reverse proxy solution. To verify everything is functioning properly navigate from a web browser to your Jenkins URL on port 80 and verify that the Jenkins UI behaves as expected.
Operating a Jenkins master from a single machine inherently creates a Single Point of Failure (SPOF). If the Jenkins master was lost for any reason, rebuilding it could be time consuming and may not be very easy. If the Jenkins master is lost or destroyed, there may be a crippling impact on your organization's ability to build, test, or release. Let's address this and create a disaster-recovery plan for Jenkins to ensure a high level of availability and quick turnaround time for any failures that may occur.
Snapshot backups of the $JENKINS_HOME directory can provide a level of fault tolerance, and offer an effective solution for system-wide backups. There are a number of Jenkins plugins that can effectively assist us in creating snapshot backups. The most popular backup plugins include BackUp, thinBackup, and SCM Sync configuration. You will need to choose the one that best suits your specific needs.
All of the above listed plugins are available from the Jenkins Manage Plugins screen. You can access this area by opening Jenkins, logging in as an administrator, and then going to Jenkins -> Manage Jenkins -> Manage Plugins -> Available plugins.
The following screenshot shows some of the available backup plugins on the Jenkins Manage Plugins screen:
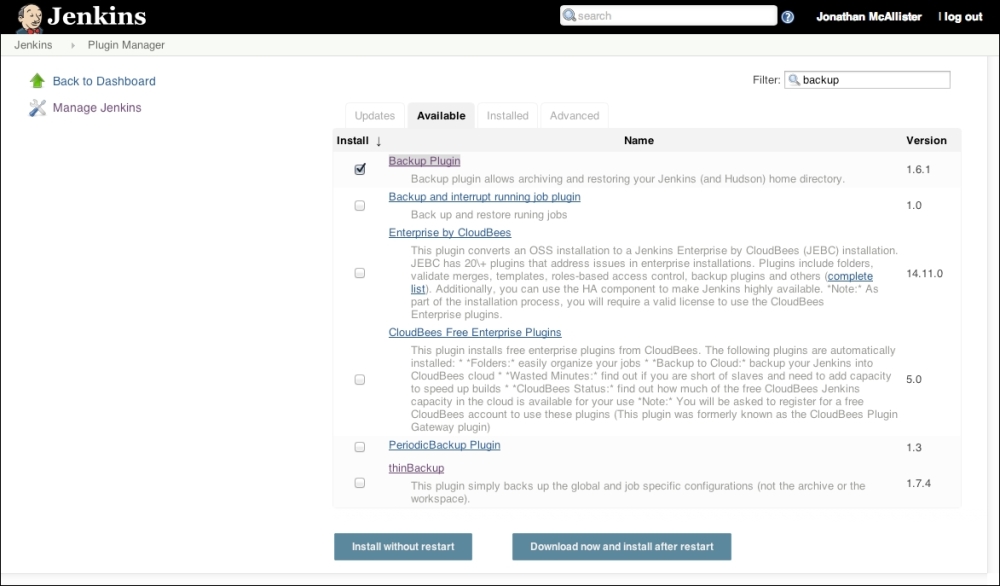
Figure 1-4: The Manage Jenkins screen
Installing any of the available backup plugins (or any plugin for that matter) can be accomplished by simply marking the appropriate checkbox and clicking on the Download now and install after restart button.
Once the plugin has been installed, it is highly recommended that you read any usage instructions and documentation. A direct link to the documentation for all Jenkins plugins can be found at https://wiki.jenkins-ci.org/display/JENKINS/Plugins.
Tip
Downloading the example code
You can download the example code files for all Packt books you have purchased from your account at http://www.packtpub.com. If you purchased this book elsewhere, you can visit http://www.packtpub.com/support and register to have the files e-mailed directly to you.
If resources are available, another disaster-recovery option might be to set up a Jenkins mirror. A Jenkins mirror replicates a primary Jenkins instance in real time onto another host. This way, if there is an outage on the primary Jenkins instance, we can simply alternate traffic over to the mirror.
To implement a Jenkins mirror, we can use rsync to create a synchronized duplicate of the $JENKINS_HOME directory structure; this includes synchronizing all content, configuration files, and data onto our mirror. The Jenkins master can then be swapped with the mirror if there is a failure, or even if the primary instance is undergoing maintenance that requires downtime.
To begin the implementation of a Jenkins mirroring solution, we will need two systems with matching configurations (OS, disk, RAM, and so on). The first system will have Jenkins installed and may already be in production use. This system will be referred to as the Jenkins-Primary.
The second system will need to be preconfigured with a basic installation of Jenkins (which will be replaced later). This system will be referred to as the Jenkins-Mirror. Once Jenkins is installed on the Jenkins-Mirror, we will need to shut down the Jenkins service.
Shutting down the Jenkins service can be accomplished by executing the following command:
$> sudo service jenkins stop
Our next step in creating a Jenkins mirroring solution is to install the rsync and openssh-clients packages on both hosts (primary and mirror). Rsync is a widely utilized file and folder synchronization tool that replicates files, folders, and data across devices. It has the ability to synchronize entire folder structures or just the deltas. This makes it an optimal tool for our implementation of the Jenkins mirroring solution. The openssh-clients package works in tandem with rsync and enables rsync to perform its synchronization tasks over the SSH protocol. Let's take a minute to get these installed on the Jenkins primary and mirror systems.
To install rsync and OpenSSH, execute the following commands for your target OS:
RHEL/CentOS:
$> sudo yum install rsync
$> sudo yum install openssh-clients
Debian/Ubuntu:
$> sudo apt-get install rsync
$> sudo apt-get install openssh-clients
Once rsync has been installed, let's verify that it is operating properly. Execute the following commands in the command-line terminal:
$> which rsync
$> rsync --version
If everything is functioning correctly, RSYNC will return an output similar to the examples provided here (for both primary and mirror):
Jenkins-Mirror:
[root@jenkinsmirror jenkins]# which rsync
/usr/bin/rsync
[root@jenkinsmirror jenkins]# rsync --version
rsync  version 3.0.6  protocol version 30
Copyright (C) 1996-2009 by Andrew Tridgell, Wayne Davison, and others.
Jenkins-Primary:
[root@jenkinsprimary jenkins]# which rsync
/usr/bin/rsync
[root@jenkinsprimary jenkins]# rsync --version
rsync  version 3.0.6  protocol version 30
Copyright (C) 1996-2009 by Andrew Tridgell, Wayne Davison, and others.
Now that we have verified that the necessary packages are installed, it is time to perform an initial pull of the $JENKINS_HOME directory from the Jenkins-Primary server over to the Jenkins-Mirror. To accomplish this, we need to use the command sudo to access the root user account on the Jenkins-Mirror, and have rsync fetch the contents from the Jenkins-Primary.
Enter the following commands into the terminal on the Jenkins-Mirror (replace jenkinsprimary in the following command with your Jenkins-Primary IP address):
$> sudo su - Jenkins
$> sudo rsync -avuh --delete -e ssh root@jenkinsprimary:/var/lib/jenkins/* /var/lib/jenkins
Note
The initial pull of the $JENKINS_HOME directory and its contents may take some time, depending on the size and network connection speed. Upon completion, you should see something similar to the following message in your terminal:
sent 3.55M bytes received 77.70G bytes 15.78M bytes/sec
total size is 79.64G speedup is 1.02
Once rsync has completed, we need to verify that the initial transfer was successful by starting the Jenkins service on the Jenkins-Mirror. We should inspect it to make sure it looks identical to the Jenkins-Primary server. Enter the following commands into the command line terminal to fire up Jenkins on the Jenkins-Mirror:
$> sudo service jenkins start
Once the initial pull of the $JENKINS_HOME directory has been verified, we need to implement SSH key-based authentication so that we can execute our rsync commands without password prompts and manual intervention.
To get SSH key-based authentication implemented we will need to create SSH keys and share them across our server solutions. This includes the Jenkins-Primary and Jenkins-Mirror hosts.
Note
It is important to mention that this step may not be necessary if your host already has the RSA or DSA keys generated for the root user account.
To connect from Jenkins-Primary to Jenkins-Mirror with SSH-key based authentication, use the following commands:
$Jenkins-Primary>sudo su – root
$Jenkins-Primary>ssh-keygen –t rsa
$Jenkins-Primary>scp ~/.ssh/id_rsa.pub root@jenkins-mirror:/tmp/
$Jenkins-Mirror>sudo su – root
$Jenkins-Mirror>cat /tmp/id_rsa.pub >> ~/.ssh/authorized_keys
To connect from Jenkins-Mirror to Jenkins-Primary with SSH-key based authentication, use the following commands:
$Jenkins-Mirror>sudo su – root
$Jenkins-Mirror>ssh-keygen –t rsa
$Jenkins-Mirror>scp ~/.ssh/id_rsa.pub root@jenkins-primary:/tmp/
$Jenkins-Primary>sudo su – root
$Jenkins-Primary>cat /tmp/id_rsa.pub >> ~/.ssh/authorized_keys
Once the SSH keys are generated, we need to create a line item in the authorized_keys file to implement SSH-keybased authentication. An example of the line item in the authorized_keys file is shown below.
ssh-rsa AAAAB3NzaC1yc2EAAAABIwAAAQEA/QIL17A1XSjDLZVqf49F0Y785Foq4A6UaBAaVQApB0yyOXVIwqu2H035nI4zDlhymgii6zfHeylHgKrjJyS2MLoiO0pFo4XEFo2UNoy8CXKPJR+Sf9WeWjSvvoX3OE0YTfiFDMb29MvIc+bfUKRoAPeCqj4s81Vf/v3f3JteT7ExQAN22AjUNceiIr2bxLbr7I8bMdN4886gtXYFPAtkQ3YXe1SWb3xlYDtL8jtAl39Cw5FSCkQM5ToLYsk95+0DAAfNAeUx/sWYVrKU+AvrkMranJdmOa86vEnuhqOaGD3r2y+AVuLGid1r3Mcg7VrJBs0oKlj4OH9vNZF68xCQdw== root@example.com
Once this step has been completed successfully, we should have the proper prerequisites in place to connect bidirectionally via SSH without being prompted for a password.
Let's test this functionality by executing the following commands on both the Jenkins-Primary and Jenkins-Mirror hosts:
$Jenkins-Mirror>ssh root@jenkins-primary
$Jenkins-Primary>ssh root@jenkins-mirror
Once the SSH key authentication has been verified, we will need to implement our synchronization solution on a schedule. Once the authentication has been verified, we will need to implement our syncing on a scheduled basis for this we will use the CRON tab. Finally, we can configure our CRON tab to execute rsync. This will enable the Jenkins-Mirror to automatically retrieve the filesystem deltas (once every 30 minutes). To achieve this, we need to open the crontab on the mirror (crontab –e) and add a directive, like the one shown here:
*/30 * * * * /usr/bin/rsync -avuh --delete -e ssh root@jenkinsprimary:/var/lib/jenkins/* /var/lib/jenkins
Once the crontab entry has been input and saved, we should see data transferred from the Jenkins-Primary server to Jenkins-Mirror every 30 minutes.
For Mac OS X users, the Jenkins community provides a native PKG installer. This installer has a similar guided installation wizard as the Microsoft Windows one, and allows us to specify the traditional installation details. For users who wish to alter the Jenkins listening port or memory options, some command-line magic will be required.
To alter the Jenkins listening port, we need to explicitly define the port in the following properties file:
/Applications/Jenkins/winstone.properties
To accomplish this we will need to create the winstone.properties file if it does not already exist on our host, and detail the httpPort parameter inside it. An example of how to set httpPort in the winstone.properties file is shown here:
httpPort=80
Once created, the winstone.properties file will automatically load and override the default Jenkins port with the one specified within.
The winstone.properties file is not limited to simply altering the Jenkins listening port. There are other options available for customization as well. These options include logfile, httpListenAddress, and more. To obtain a complete list of the available override options, you can run the following commands from your OS X terminal:
cd /Applications/Jenkins java –jar Jenkins.war --help
The JVM runtime memory settings (Heap memory, PermGen, and so on) are stored in a standard properties file format (org.jenkins-ci.plist). The launch daemon retrieves the values stored in this properties file. If no such file exists, the system will use the built-in defaults. On Mac OS X, this plist file will typically reside in the following location:
/Library/Preferences/org.jenkins-ci.plist
Adjusting the Java memory options for Jenkins involves modifying the appropriate property entries inside the org.jenkins-ci.plist file. To modify this file, we can use the OS X defaults command. This command allows us to read and write entries in the plist file without fear of corruption or improper formatting. A few example descriptions and use cases for this command are detailed in the sections below.
To view all settings in the plist file, execute the following command in the command-line terminal:
sudo defaults read /Library/Preferences/org.jenkins-ci
The output of the preceding command will look like this:
{
    heapSize = 512m;
    minHeapSize = 256m;
    minPermGen = 256m;
    permGen = 512m;
    tmpdir = "/Users/Shared/Jenkins/tmp";
}
To retrieve the value of the heapSize setting from the plist file, execute the following command in the command-line terminal:
sudo defaults read /Library/Preferences/org.jenkins-ci heapSize
The output of the preceeding command will look like this:
512m
To set the value of the heapSize setting in the plist file, execute following command in the command-line terminal:
sudo defaults write /Library/Preferences/org.jenkins-ci heapSize 1024m
If any alterations are made to the org.jenkins-ci.plist file, make sure you restart Jenkins for them to take effect. To restart Jenkins from the OS X command line terminal enter the following commands in the terminal:
sudo launchctl unload /Library/LaunchDaemons/org.jenkins-ci.plist
sudo launchctl load /Library/LaunchDaemons/org.jenkins-ci.plist
The Jenkins community recognizes that installing an edge release may be risky, and upgrading weekly (the default option) may pose a bit of an overhead in maintenance. For the more conservative users, the Jenkins Long-Term Support (LTS) release may be a more viable option. The Jenkins LTS release is delivered once every 12 weeks (instead of every week) and is selected by community vote. The Jenkins LTS release represents a community-voted selection of the most stable Jenkins release within the past 12 weeks.
In this section of Mastering Jenkins, you will learn about the Jenkins LTS release and understand how to convert an existing edge Jenkins installation over to the LTS release line. The Jenkins platform features a streamlined upgrade process, and typically provides all upgrades through the Jenkins UI. To convert a Jenkins installation over to the LTS line, there are two options available:
Uninstall and replace the existing latest and greatest installation with the LTS package (immediate, but nuclear, option)
Convert an existing installation and point it to the LTS update URL (waits for the next LTS release)
This section will focus on converting an existing installation over to the LTS release line. We can do this by pointing our Jenkins instance to the LTS update URL. This is because uninstalling and reinstalling the Jenkins platform is a straightforward process and is already documented in a number of places.
To migrate our Jenkins installation to the LTS release line, we will need to modify hudson.model.UpdateCenter.xml, located in $JENKINS_HOME, to point our Jenkins instance to the LTS release update center URL. The Hudson.model.UpdateCenter.xml file is what Jenkins uses to determine where it should look for updates to the system. The contents of this XML file are shown here:
<?xml version='1.0' encoding='UTF-8'?>
<sites>
  <site>
    <id>default</id>
    <url>http://updates.jenkins-ci.org/stable/update-center.json</url>
  </site>
</sites>
As you may have guessed already, the node in the XML that we will need to alter is the <url> node. The Jenkins LTS release has its own update center URL. Let's replace the existing update center URL with the one shown here:
http://updates.jenkins-ci.org/stable/update-center.json
Once the file is modified and saved, we need to restart the Jenkins service to complete the switchover to the LTS release line for all future updates.
Note
The LTS release comes out every 12 weeks. We will need to wait for this cycle to complete before our Jenkins instance is completely switched over.
The Jenkins LTS release is also available as a Docker container. This means that if the target setup is new, we can leverage the LTS Docker container (if desired) to perform the duties of the Jenkins master. Details on the Jenkins official LTS Docker container can be found at the following URL:
http://jenkins-ci.org/content/official-jenkins-lts-docker-image
Configuration data in Jenkins is persisted to disk via XML files. These XML files contain information describing how the Jenkins instance will behave. Understanding how Jenkins implements configuration XML files and manages the data they contain can prove to be valuable in debugging issues and keeping the system stable.
In Jenkins, persistent configuration data is serialized into XML and subsequently written to disk. The primary Jenkins subsystem serializes its data into config.xml files. These config.xml files govern the overall Jenkins system and describe how Jenkins will behave upon startup. The primary config.xml configuration file can be found in the following location:
$JENKINS_HOME/config.xml
An example of this configuration file is provided here (taken from an Apple OS X installation of Jenkins):
<?xml version='1.0' encoding='UTF-8'?>
<hudson>
  <disabledAdministrativeMonitors/>
  <version>1.0</version>
  <numExecutors>2</numExecutors>
  <mode>NORMAL</mode>
  <useSecurity>true</useSecurity>
  <authorizationStrategy class="hudson.security.AuthorizationStrategy$Unsecured"/>
  <securityRealm class="hudson.security.SecurityRealm$None"/>
  <disableRememberMe>false</disableRememberMe>
  <projectNamingStrategy class="jenkins.model.ProjectNamingStrategy$DefaultProjectNamingStrategy"/>
  <workspaceDir>${ITEM_ROOTDIR}/workspace</workspaceDir>
  <buildsDir>${ITEM_ROOTDIR}/builds</buildsDir>
  <markupFormatter class="hudson.markup.EscapedMarkupFormatter"/>
  <jdks/>
  <viewsTabBar class="hudson.views.DefaultViewsTabBar"/>
  <myViewsTabBar class="hudson.views.DefaultMyViewsTabBar"/>
  <clouds/>
  <slaves>
    <slave>
      <name>Windows 2012</name>
      <description></description>
      <remoteFS></remoteFS>
      <numExecutors>1</numExecutors>
      <mode>NORMAL</mode>
      <retentionStrategy class="hudson.slaves.RetentionStrategy$Always"/>
      <launcher class="hudson.plugins.sshslaves.SSHLauncher" plugin="ssh-slaves@1.9">
        <host></host>
        <port>22</port>
        <credentialsId>0bb868e0-2cd6-4ab2-9781-a373d914cb85</credentialsId>
        <maxNumRetries>0</maxNumRetries>
        <retryWaitTime>0</retryWaitTime>
      </launcher>
      <label>Windows Build Pool</label>
      <nodeProperties/>
      <userId>anonymous</userId>
    </slave>
  </slaves>
  <scmCheckoutRetryCount>0</scmCheckoutRetryCount>
  <views>
    <hudson.model.AllView>
      <owner class="hudson" reference="../../.."/>

    <name>All</name>
      <filterExecutors>false</filterExecutors>
      <filterQueue>false</filterQueue>
      <properties class="hudson.model.View$PropertyList"/>
    </hudson.model.AllView>
    <listView>
      <owner class="hudson" reference="../../.."/>
      <name>Build.TestApp</name>
      <filterExecutors>false</filterExecutors>
      <filterQueue>false</filterQueue>
      <properties class="hudson.model.View$PropertyList"/>
      <jobNames>
        <comparator class="hudson.util.CaseInsensitiveComparator"/>
      </jobNames>
      <jobFilters/>
      <columns>
        <hudson.views.StatusColumn/>
        <hudson.views.WeatherColumn/>
        <hudson.views.JobColumn/>
        <hudson.views.LastSuccessColumn/>
        <hudson.views.LastFailureColumn/>
        <hudson.views.LastDurationColumn/>
        <hudson.views.BuildButtonColumn/>
      </columns>
      <recurse>false</recurse>
    </listView>
  </views>
  <primaryView>All</primaryView>
  <slaveAgentPort>0</slaveAgentPort>
  <label></label>
  <nodeProperties/>
  <globalNodeProperties/>
</hudson>
As we can see, the nodes defined in the XML file provide configuration definitions for the overall Jenkins system. The nodes govern the overall behavior of the Jenkins system. Some of the configuration highlights include:
Number of executors on the master
Workspace folder definitions
Security authorization strategy
Master/slave definitions
View definitions (the tabs on the main Jenkins dashboard)
Slave agent ports
The second configuration XML we will investigate is dedicated to Jenkins jobs. These configuration files are located in $JENKINS_HOME/jobs/<JOBNAME>/config.xml. Each config.xml file belongs to a unique job defined in Jenkins. An XML DOM derived from the JenkinsExample job is provided here:
<?xml version='1.0' encoding='UTF-8'?>
<project>
  <actions/>
  <description></description>
  <keepDependencies>false</keepDependencies>
  <properties/>
  <scm class="hudson.scm.NullSCM"/>
  <canRoam>true</canRoam>
  <disabled>false</disabled>
  <blockBuildWhenDownstreamBuilding>false</blockBuildWhenDownstreamBuilding>
  <blockBuildWhenUpstreamBuilding>false</blockBuildWhenUpstreamBuilding>
  <triggers/>
  <concurrentBuild>false</concurrentBuild>
  <builders/>
  <publishers/>
  <buildWrappers/>
</project>
As we can see from the sample config.xml provided, the Project XML DOM contains persistent data about a given job, its build steps, and any related automation. This includes information related to SCM solutions, triggers, builders, publishers, buildWrappers, and more.
In this chapter, we have focused on techniques that taught us how to create and manage a Jenkins instance. This represents the foundation for automation. By mastering these configuration solutions, you have learned ways in which you can make your Jenkins system stable and scalable. In this chapter, we have discussed port changes, memory management, backups, LTS release migration, RSYNC mirroring, and configuration data.
From here, we will move on to discover the power of Jenkins slave agents, complete job management, UI administration, and much more. As we progress through our journey, we will delve into the exciting features Jenkins provides, and begin leveraging Jenkins to automate additional aspects of the SDLC.


