


Selenium automates browsers. It automates the interaction we do in a browser window such as navigating to a website, clicking on links, filling out forms, submitting forms, navigating through pages, and so on. It works on every major browser available out there.
In order to use Selenium WebDriver, we need a programing language to write automation scripts. The language that we select should also have a Selenium client library available.
In this book, we will use Python along with the Selenium WebDriver client library to create automated scripts. Python is a widely used general-purpose, high-level programming language. It's easy and its syntax allows us to express concepts in fewer lines of code. It emphasizes code readability and provides constructs that enable us to write programs on both the small and large scale. It also provides a number of in-built and user-written libraries to achieve complex tasks quite easily.
The Selenium WebDriver client library for Python provides access to all the Selenium WebDriver features and Selenium standalone server for remote and distributed testing of browser-based applications. Selenium Python language bindings are developed and maintained by David Burns, Adam Goucher, Maik Röder, Jason Huggins, Luke Semerau, Miki Tebeka, and Eric Allenin.
The Selenium WebDriver client library is supported on Python Version 2.6, 2.7, 3.2, and 3.3.
This chapter will introduce you to the Selenium WebDriver client library for Python by demonstrating its installation, basic features, and overall structure.
In this chapter, we will cover the following topics:
Installing Python and Selenium package
Selecting and setting up a Python editor
Implementing a sample script using the Selenium WebDriver Python client library
Implementing cross-browser support with Internet Explorer and Google Chrome
As a first step of using Selenium with Python, we'll need to install it on our computer with the minimum requirements possible. Let's set up the basic environment with the steps explained in the following sections.
You will find Python installed by default on most Linux distributions, Mac OS X, and other Unix machines. On Windows, you will need to install it separately. Installers for different platforms can be found at http://python.org/download/.
The Selenium WebDriver Python client library is available in the Selenium package. To install the Selenium package in a simple way, use the pip installer tool available at https://pip.pypa.io/en/latest/.
With pip, you can simply install or upgrade the Selenium package using the following command:
pip install -U selenium
This is a fairly simple process. This command will set up the Selenium WebDriver client library on your machine with all modules and classes that we will need to create automated scripts using Python. The pip tool will download the latest version of the Selenium package and install it on your machine. The optional –U flag will upgrade the existing version of the installed package to the latest version.
You can also download the latest version of the Selenium package source from https://pypi.python.org/pypi/selenium. Just click on the Download button on the upper-right-hand side of the page, unarchive the downloaded file, and install it with following command:
python setup.py install
The Selenium WebDriver Python client library documentation is available at http://selenium.googlecode.com/git/docs/api/py/api.html as shown in the following screenshot:
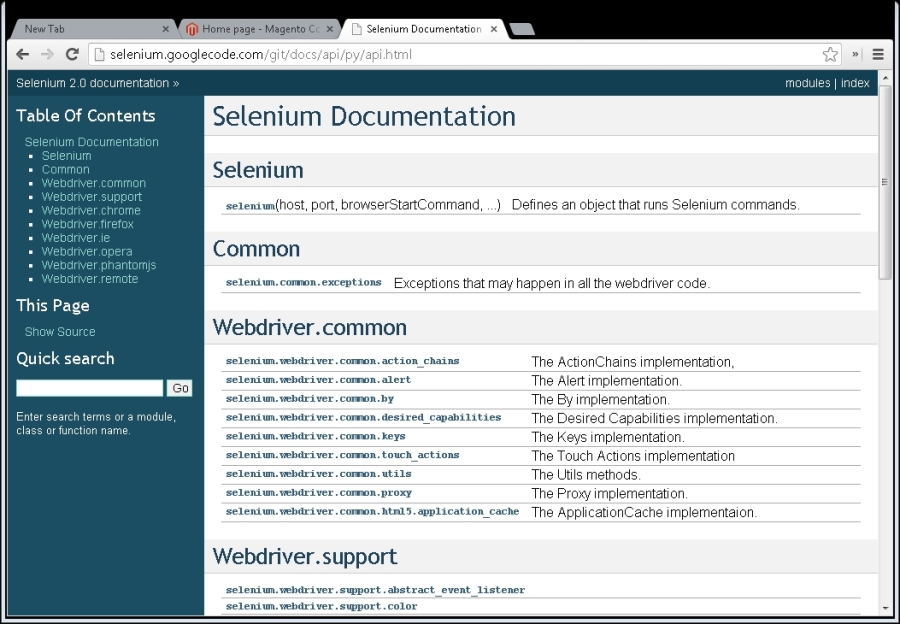
It offers detailed information on all core classes and functions of Selenium WebDriver. Also note the following links for Selenium documentation:
The official documentation at http://docs.seleniumhq.org/docs/ offers documentation for all the Selenium components with examples in supported languages
Selenium Wiki at https://code.google.com/p/selenium/w/list lists some useful topics that we will explore later in this book
Now that we have Python and Selenium WebDriver set up, we will need an editor or an Integrated Development Environment (IDE) to write automation scripts. A good editor or IDE increases the productivity and helps in doing a lot of other things that make the coding experience simple and easy. While we can write Python code in simple editors such as Emacs, Vim, or Notepad, using an IDE will make life a lot easier. There are many IDEs to choose from. Generally, an IDE provides the following features to accelerate your development and coding time:
A graphical code editor with code completion and IntelliSense
A code explorer for functions and classes
Syntax highlighting
Project management
Code templates
Tools for unit testing and debugging
Source control support
If you're new to Python, or you're a tester working for the first time in Python, your development team will help you to set up the right IDE.
However, if you're starting with Python for the first time and don't know which IDE to select, here are a few choices that you might want to consider.
PyCharm is developed by JetBrains, a leading vendor of professional development tools and IDEs such as IntelliJ IDEA, RubyMine, PhpStorm, and TeamCity.
PyCharm is a polished, powerful, and versatile IDE that works pretty well. It brings best of the JetBrains experience in building powerful IDEs with lots of other features for a highly productive experience.
PyCharm is supported on Windows, Linux, and Mac. To know more about PyCharm and its features visit http://www.jetbrains.com/pycharm/.
PyCharm comes in two versions—a community edition and a professional edition. The community edition is free, whereas you have to pay for the professional edition. Here is the PyCharm community edition running a sample Selenium script in the following screenshot:
The community edition is great for building and running Selenium scripts with its fantastic debugging support. We will use PyCharm in the rest of this book. Later in this chapter, we will set up PyCharm and create our first Selenium script.
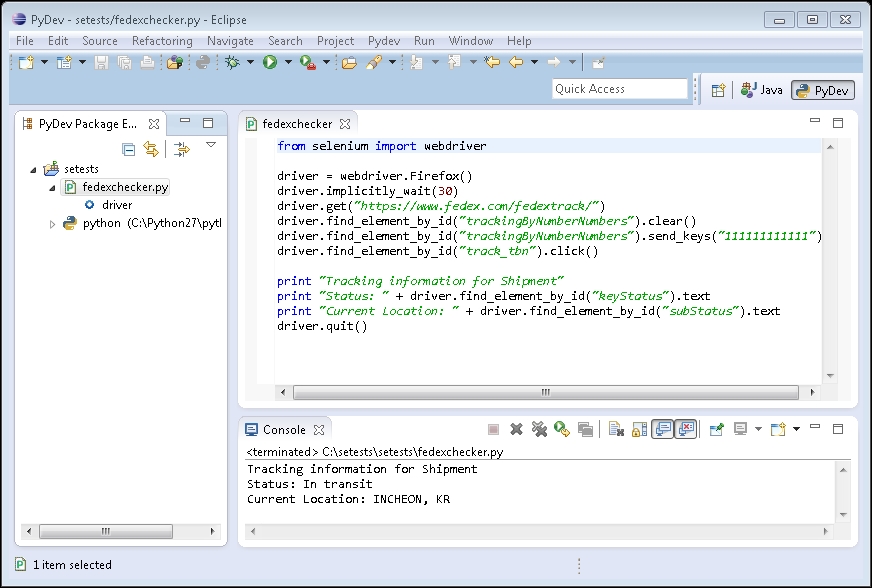
The PyDev Eclipse plugin is another widely used editor among Python developers. Eclipse is a famous open source IDE primarily built for Java; however, it also offers support to various other programming languages and tools through its powerful plugin architecture.
Eclipse is a cross-platform IDE supported on Windows, Linux, and Mac. You can get the latest edition of Eclipse at http://www.eclipse.org/downloads/.
You need to install the PyDev plugin separately after setting up Eclipse. Use the tutorial from Lars Vogel to install PyDev at http://www.vogella.com/tutorials/Python/article.html to install PyDev. Installation instructions are also available at http://pydev.org/.
Here's the Eclipse PyDev plugin running a sample Selenium script as shown in the following screenshot:
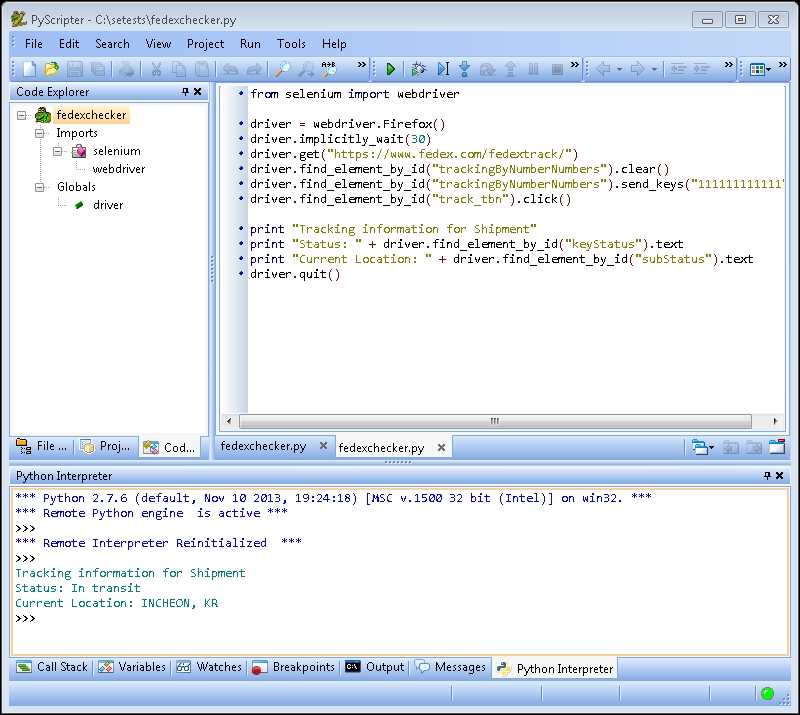
For the Windows users, PyScripter can also be a great choice. It is open source, lightweight, and provides all the features that modern IDEs offer such as IntelliSense and code completion, testing, and debugging support. You can find more about PyScripter along with its download information at https://code.google.com/p/pyscripter/.
Here's PyScripter running a sample Selenium script as shown in the following screenshot:
Now that we have seen IDE choices, let's set up PyCharm. All examples in this book are created with PyCharm. However, you can set up any other IDE of your choice and use examples as they are. We will set up PyCharm with following steps to get started with Selenium Python:
Download and install the PyCharm Community Edition from JetBrains site http://www.jetbrains.com/pycharm/download/index.html.
Launch the PyCharm Community Edition. Click on the Create New Project option on the PyCharm Community Edition dialog box as shown in the following screenshot:

-
On the Create New Project dialog box, as shown in next screenshot, specify the name of your project in the Project name field. In this example,
setestsis used as the project name. We need to configure the interpreter for the first time. Click on the button to set up the interpreter, as shown in the following screenshot:

On the Python Interpreter dialog box, click on the plus icon. PyCharm will suggest the installed interpreter similar to the following screenshot. Select the interpreter from Select Interpreter Path.

PyCharm will configure the selected interpreter as shown in the following screenshot. It will show a list of packages that are installed along with Python. Click on the Apply button and then on the OK button:

On the Create New Project dialog box, click on the OK button to create the project:

We are now ready to start with creating and running automated scripts in Python. Let's begin with Selenium WebDriver and create a Python script that uses Selenium WebDriver classes and functions to automate browser interaction.
We will use a sample web application for most of the examples in this book. This sample application is built on a famous e-commerce framework—Magento. You can find the application at http://demo.magentocommerce.com/.
Note
Downloading the example code
You can download the example code files from your account at http://www.packtpub.com for all the Packt Publishing books you have purchased. If you purchased this book elsewhere, you can visit http://www.packtpub.com/support and register to have the files e-mailed directly to you.
The example code is also hosted at https://github.com/upgundecha/learnsewithpython.
In this sample script, we will navigate to the demo version of the application, search for products, and list the names of products from the search result page with the following steps:
Let's use the project that we created earlier while setting up PyCharm. Create a simple Python script that will use the Selenium WebDriver client library. In Project Explorer, right-click on
setestsand navigate to New | Python File from the pop-up menu:
On the New Python file dialog box, enter
searchproductsin the Name field and click on the OK button:
PyCharm will add a new tab searchproducts.py in the code editor area. Copy the following code in the searchproduct.py tab:
from selenium import webdriver # create a new Firefox session driver = webdriver.Firefox() driver.implicitly_wait(30) driver.maximize_window() # navigate to the application home page driver.get("http://demo.magentocommerce.com/") # get the search textbox search_field = driver.find_element_by_name("q") search_field.clear() # enter search keyword and submit search_field.send_keys("phones") search_field.submit() # get all the anchor elements which have product names displayed # currently on result page using find_elements_by_xpath method products = driver.find_elements_by_xpath("//h2[@class='product-name']/a") # get the number of anchor elements found print "Found " + str(len(products)) + " products:" # iterate through each anchor element and print the text that is # name of the product for product in products: print product.text # close the browser window driver.quit()To run the script, press the Ctrl + Shift + F10 combination in the PyCharm code window or select Run 'searchproducts' from the Run menu. This will start the execution and you will see a new Firefox window navigating to the demo site and the Selenium commands getting executed in the Firefox window. If all goes well, at the end, the script will close the Firefox window. The script will print the list of products in the PyCharm console as shown in the following screenshot:

We'll spend some time looking into the script that we created just now. We will go through each statement and understand Selenium WebDriver in brief. There is a lot to go through in the rest of the book.
The selenium.webdriver module implements the browser driver classes that are supported by Selenium, including Firefox, Chrome, Internet Explorer, Safari, and various other browsers, and RemoteWebDriver to test on browsers that are hosted on remote machines.
We need to import webdriver from the Selenium package to use the Selenium WebDriver methods:
from selenium import webdriver
Next, we need an instance of a browser that we want to use. This will provide a programmatic interface to interact with the browser using the Selenium commands. In this example, we are using Firefox. We can create an instance of Firefox as shown in following code:
driver = webdriver.Firefox()
During the run, this will launch a new Firefox window. We also set a few options on the driver:
driver.implicitly_wait(30)
driver.maximize_window()
We configured a timeout for Selenium to execute steps using an implicit wait of 30 seconds for the driver and maximized the Firefox window through the Selenium API. We will learn more about implicit wait in Chapter 5, Synchronizing Tests.
Next, we will navigate to the demo version of the application using its URL by calling the driver.get() method. After the get() method is called, WebDriver waits until the page is fully loaded in the Firefox window and returns the control to the script.
After loading the page, Selenium will interact with various elements on the page, like a human user. For example, on the Home page of the application, we need to enter a search term in a textbox and click on the Search button. These elements are implemented as HTML input elements and Selenium needs to find these elements to simulate the user action. Selenium WebDriver provides a number of methods to find these elements and interact with them to perform operations such as sending values, clicking buttons, selecting items in dropdowns, and so on. We will see more about this in Chapter 3, Finding Elements.
In this example, we are finding the Search textbox using the find_element_by_name method. This will return the first element matching the name attribute specified in the find method. The HTML elements are defined with tag and attributes. We can use this information to find an element, by following the given steps:
In this example, the Search textbox has the name attribute defined as
qand we can use this attribute as shown in the following code example:search_field = driver.find_element_by_name("q")Once the Search textbox is found, we will interact with this element by clearing the previous value (if entered) using the
clear()method and enter the specified new value using thesend_keys()method. Next, we will submit the search request by calling thesubmit()method:search_field.clear() search_field.send_keys("phones") search_field.submit()After submission of the search request, Firefox will load the result page returned by the application. The result page has a list of products that match the search term, which is
phones. We can read the list of results and specifically the names of all the products that are rendered in the anchor<a>element using thefind_elements_by_xpath()method. This will return more than one matching element as a list:products = driver.find_elements_by_xpath("//h2[@class='product-name']/a")Next, we will print the number of products (that is the number of anchor
<a>elements) that are found on the page and the names of the products using the.textproperty of all the anchor<a>elements:print "Found " + str(len(products)) + " products:" for product in products: print product.textAt end of the script, we will close the Firefox browser using the
driver.quit()method:driver.quit()
This example script gives us a concise example of using Selenium WebDriver and Python together to create a simple automation script. We are not testing anything in this script yet. Later in the book, we will extend this simple script into a set of tests and use various other libraries and features of Python.
So far we have built and run our script with Firefox. Selenium has extensive support for cross-browser testing where you can automate on all the major browsers including Internet Explorer, Google Chrome, Safari, Opera, and headless browsers such as PhantomJS. In this section, we will set up and run the script that we created in the previous section with Internet Explorer and Google Chrome to see the cross-browser capabilities of Selenium WebDriver.
There is a little more to run scripts on Internet Explorer. To run tests on Internet Explorer, we need to download and set up the InternetExplorerDriver server. The InternetExplorerDriver server is a standalone server executable that implements WebDriver's wire protocol to work as glue between the test script and Internet Explorer. It supports major IE versions on Windows XP, Vista, Windows 7, and Windows 8 operating systems. Let's set up the InternetExplorerDriver server with the following steps:
Download the
InternetExplorerDriverserver from http://www.seleniumhq.org/download/. You can download 32- or 64-bit versions based on the system configuration that you are using.After downloading the
InternetExplorerDriverserver, unzip and copy the file to the same directory where scripts are stored.On IE 7 or higher, the Protected Mode settings for each zone must have the same value. Protected Mode can either be on or off, as long as it is for all the zones. To set the Protected Mode settings:
Choose Internet Options from the Tools menu.
On the Internet Options dialog box, click on the Security tab.
Select each zone listed in Select a zone to view or change security settings and make sure Enable Protected Mode (requires restarting Internet Explorer) is either checked or unchecked for all the zones. All the zones should have the same settings as shown in the following screenshot:

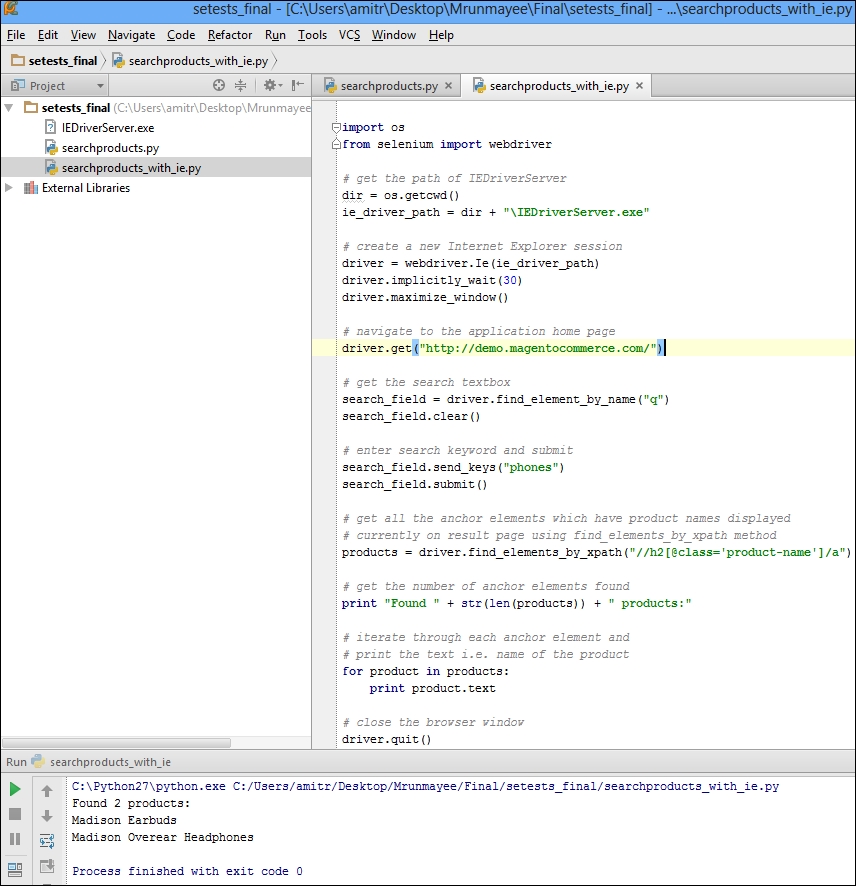
Finally, modify the script to use Internet Explorer. Instead of creating an instance of the Firefox class, we will use the
IEclass in the following way:import os from selenium import webdriver # get the path of IEDriverServer dir = os.path.dirname(__file__) ie_driver_path = dir + "\IEDriverServer.exe" # create a new Internet Explorer session driver = webdriver.Ie(ie_driver_path) driver.implicitly_wait(30) driver.maximize_window() # navigate to the application home page driver.get("http://demo.magentocommerce.com/") # get the search textbox search_field = driver.find_element_by_name("q") search_field.clear() # enter search keyword and submit search_field.send_keys("phones") search_field.submit() # get all the anchor elements which have product names displayed # currently on result page using find_elements_by_xpath method products = driver.find_elements_by_xpath("//h2[@class='product-name']/a") # get the number of anchor elements found print "Found " + str(len(products)) + " products:" # iterate through each anchor element and print the text that is # name of the product for product in products: print product.text # close the browser window driver.quit()In this script, we passed the path of the
InternetExplorerDriverserver while creating the instance of anIEbrowser class.Run the script and Selenium will first launch the
InternetExplorerDriverserver, which launches the browser, and execute the steps.The
InternetExplorerDriverserver acts as an intermediary between the Selenium script and the browser. Execution of the actual steps is very similar to what we observed with Firefox.
Note
Read more about the important configuration options for Internet Explorer at https://code.google.com/p/selenium/wiki/InternetExplorerDriver and the DesiredCapabilities article at https://code.google.com/p/selenium/wiki/DesiredCapabilities.
Setting up and running Selenium scripts on Google Chrome is similar to Internet Explorer. We need to download the ChromeDriver server similar to InternetExplorerDriver. The ChromeDriver server is a standalone server developed and maintained by the Chromium team. It implements WebDriver's wire protocol for automating Google Chrome. It is supported on Windows, Linux, and Mac operating systems. Set up the ChromeDriver server using the following steps:
Download the
ChromeDriverserver from http://chromedriver.storage.googleapis.com/index.html.After downloading the
ChromeDriverserver, unzip and copy the file to the same directory where the scripts are stored.Finally, modify the sample script to use Chrome. Instead of creating an instance of the Firefox class, we will use the
Chromeclass in the following way:import os from selenium import webdriver # get the path of chromedriver dir = os.path.dirname(__file__) chrome_driver_path = dir + "\chromedriver.exe" #remove the .exe extension on linux or mac platform # create a new Chrome session driver = webdriver.Chrome(chrome_driver_path) driver.implicitly_wait(30) driver.maximize_window() # navigate to the application home page driver.get("http://demo.magentocommerce.com/") # get the search textbox search_field = driver.find_element_by_name("q") search_field.clear() # enter search keyword and submit search_field.send_keys("phones") search_field.submit() # get all the anchor elements which have product names displayed # currently on result page using find_elements_by_xpath method products = driver.find_elements_by_xpath("//h2[@class='product-name']/a") # get the number of anchor elements found print "Found " + str(len(products)) + " products:" # iterate through each anchor element and print the text that is # name of the product for product in products: print product.text # close the browser window driver.quit()In this script, we passed the path of the
ChromeDriverserver while creating an instance of the Chrome browser class.Run the script. Selenium will first launch the
Chromedriverserver, which launches the Chrome browser, and execute the steps. Execution of the actual steps is very similar to what we observed with Firefox.
Note
Read more about ChromeDriver at https://code.google.com/p/selenium/wiki/ChromeDriver and https://sites.google.com/a/chromium.org/chromedriver/home.
In this chapter, we introduced you to Selenium and its components. We installed the selenium package using the pip tool. Then we looked at various Editors and IDEs to ease our coding experience with Selenium and Python and set up PyCharm. Then we built a simple script on a sample application covering some of the high-level concepts of Selenium WebDriver Python client library using Firefox. We ran the script and analyzed the outcome. Finally, we explored the cross-browser testing support of Selenium WebDriver by configuring and running the script with Internet Explorer and Google Chrome.
In next chapter, we will learn how to use the unittest library to create automated tests using Selenium WebDriver. We will also learn how to create a suite of tests and run tests in groups.
