


You can develop applications that seamlessly integrate with Microsoft Dynamics GP, so that the user will not be able to tell when your code is running versus the original Dynamics GP code. Creating such integrating applications first requires that you have an intimate knowledge of Dynamics GP's architecture. By architecture, we mean the design that allows the product to evolve with technological advancements and embrace the increasing demands for performance and capacity. This lasting design is a framework of interdependent components that weave together to create the application we know today. Understanding the components of Dynamics GP and how they work together will prepare you to design a solution that will evolve alongside Dynamics GP as it meets the demands of this ever-changing market.
This chapter is a 10,000 foot view of Dynamics GP, how it was built, why it was built that way, and how this affects your application. Upon completion of this chapter, you will understand the components that make up Dynamics GP and how your application fits into that architecture. This chapter will provide an overview of the following topics:
The native user interface
Dexterity overview
Components of the Dynamics GP application
SQL table and procedure names
What you see – the user interface (UI)
In developing an application exposed to the user, you must give careful consideration to the user's experience. By using objects that mimic the native user interface, the user will see your windows as if they were the native windows of the core application, and in many ways they will be. When Dynamics GP was released back in 1993, it was platform and database independent. It would run on both Macintosh and Windows clients. It would run on a Faircom Server as handily as it would run on an NT Server. In the beginning, Dynamics GP supported three database management systems: Btrieve (later named PSQL 2000), FairCom's c-tree Plus, and Microsoft SQL Server (starting with Dynamics GP release 3.15).
While today Dynamics GP only supports Microsoft SQL Server (SQL), be mindful that Dexterity continues to support the legacy databases. In building your own solution, these other databases are available for you to exploit. For instance, many developers use the c-tree database to create local temp tables. They are faster to access than SQL tables and easier to create. As an example, the On-Line Field Descriptions are held in c-tree tables on the workstation (OLFD001.dat and OLFD001.idx), as well as the AutoComplete data (AutoCmpl.dat and AutoCmpl.idx). Dynamics GP has a unique architecture that lends itself to functional enhancements created by third-party developers. In fact, third-party add-ons were encouraged from day one in order to increase the software's appeal in different industries. From the beginning, the plan was for Dynamics GP to provide the base, the foundation, and for developers to build on that base to create cohesive integrating applications. New products are released daily that expand and complement the core functionality of Dynamics GP. Today there are upwards of 5,000 third-party products that have been registered as Dynamics GP add-ons.
Customizations are typically called add-on or third-party products because they supplement Dynamics GP functionality. These add-on or third-party solutions are developed and distributed by Microsoft Partners worldwide.
While customization opportunities abound, the source code, screen designs, and report constructions are protected from permanent changes. Because of the distinctive architecture of Dynamics GP, a developer can neither see nor modify the original code, so the business logic is not directly altered. You can build a completely integrated application with no access to the source code. In other words, you as the developer cannot hurt the original code by creating add-on modules or a new version of a window or report.
Add-on solutions are broadly grouped into two categories:
Horizontal
Vertical
A horizontal add-on solution supplements one of the existing functions of Dynamics GP or adds a new function that is not targeted at a specific industry. Horizontal solutions can be used in nearly any industry and have a broad appeal. For example, an application that monitors user activity to log the user out after a certain period of inactivity, or an application that allows you to find a specific record using multiple search criteria, would be examples of horizontal solutions. Horizontal solutions work together to make Dynamics GP a feature-rich product with near-unlimited options.
A sampling of available horizontal solutions would include the following:
Collections management
Sorted lookups
Commissions management
Login management
Advanced password controls
Cross-company period close controls
Tools for finding field and table information
Navigation tools for finding windows
Search tools for locating reports
Helpers for designing user security
Task schedulers
Pop-up notes
A vertical add-on expands Dynamics GP's functionality to focus on a specific industry. Specialized applications for healthcare, manufacturing, publishing, life sciences, banking, and so on are examples of vertical add-ons. These are also known as industry-specific oriented solutions. Some vertical solutions morph Dynamics GP into looking like a program that was designed from the beginning to satisfy the razor-sharp needs of a specific trade. This ability is part of what makes Dynamics GP so fascinating to work with. You can take a generalized Enterprise Resource Planning (ERP) system and turn it into what looks and feels like it was a customized solution from the ground up.
A sampling of available vertical solutions would include the following:
Field service
Project management
Construction
Education
Government
Healthcare
Retail
Professional services
Not for profit
To find out more information about existing solutions, try Microsoft's Solution Finder at http://pinpoint.microsoft.com/. Solution Finder is an online tool you can use to search for an existing third-party application to fit your business need. Another excellent source of information is ISV-Central at http://www.isv-central.com/search/products.aspx.
ISV Central is a community resource designed to share product information between partners and customers.
Both sites will provide you with product overviews as supplied by the software publisher (no independent analysis here), links to the website of the developer, and information as to whether the software is certified for Microsoft Dynamics (CfMD). CfMD products have met Microsoft's highest standard for partner-developed products. Having the CfMD logo beside your solution is a very high achievement indeed.
Looking for an existing product is one of the steps often overlooked by even the best programmers. It's always a good idea to make sure someone else hasn't already written the application before you get too involved in coding it!
Dexterity is more than a programming language; it is a comprehensive Integrated Development Environment (IDE). Dexterity is the tool that was used to create Dynamics GP in the first place. This proprietary tool was created by Great Plains Software, Inc. in the late 1980s. While most other financial application vendors were using toolsets developed in Visual Basic, Dexterity was written in C++ with the .NET elements written in C#. This is significant because Visual Basic is only available from one vendor, Microsoft. On the other hand, C++ is a standards-based programming language. As a standards-based language, you can purchase it from any number of vendors.
C++ is compatible with C and other languages, thereby offering portability and modularity. Being a standards-based language means there is an actual ISO standard defining the C++ architecture. You can purchase a copy of the latest currently published C++ standard at http://goo.gl/DP72P.
This section describes Dexterity in general and the features comprising it.
The Resource Explorer is the home page of the development environment. You design the user interface, build the code that defines the business logic, and create reports, all from this single interface. In short, it is from within the Resource Explorer that you create every aspect of your Dexterity application. The Resource Explorer is illustrated in the following screenshot:
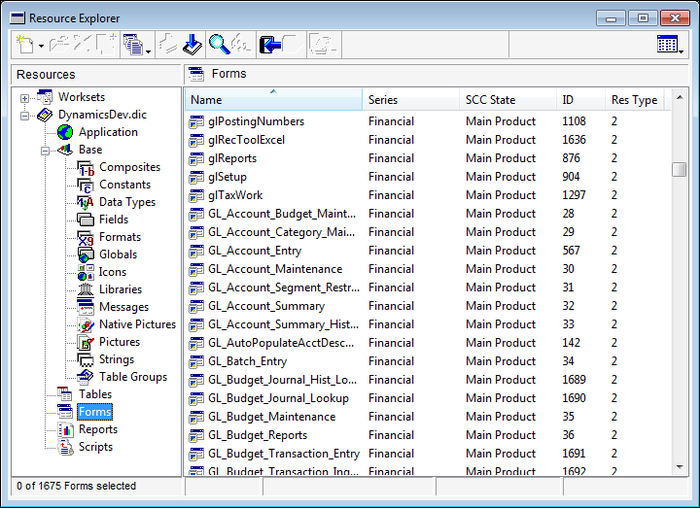
Resources are stored in a file with a .dic extension called a dictionary. Each dictionary file includes all of the resources necessary to deliver a complete application. We'll talk about Dexterity resources in more detail in Chapter 3, Getting started with Dexterity, but in general, resources include:
Application Information – the product's name and build number
Base components:
Composites – a group of fields that form a single data type
Constants – an alias for another value used in scripts for readability
Data types – the type of information displayed or stored in a field
Fields – a single element of data
Formats – defines how a data type is displayed
Globals – fields that are available to any script at any time
Icons – a picture resource
Libraries – resource libraries and COM type libraries
Messages – predefined string values with an associated numeric reference used in scripts allowing for translation and substitution
Native Pictures – images that can be displayed on only one platform
Pictures – images that can be displayed across platforms
Strings – every occurrence of a string used in a dictionary
Table Groups – logical collections of related tables
Tables – a defined group of global fields
Forms – a collection of windows, scripts, menus, commands, and related tables
Reports – displaying or printing of a result set from a database query
Function scripts – global routines using parameters to pass data that always return a value
Procedure scripts – global routines using parameters to pass data
sanScript is the internal programming language you will use to write the code that provides business logic to the application. Scripts are attached to object events such as opening or closing a window, changing the value of a field, selecting a push button, picking a menu item, and so on. Your scripts run when the user causes the object event to occur. This behavior is what makes Dexterity an event-driven language.
The function library contains hundreds of specialized functions encompassing 45 different areas that allow you to implement key functionality in the application. Actions such as adding an auto-complete value to a specified field or adding an item to a list view field are examples of functions included in the function library.
Dexterity includes a built-in process you can use to recover from and document errors that occur while your application is running. Exception handling allows you to save the current state of execution at a specified point and then switch the execution to a subroutine known as an exception handler. The exception handler attempts to resolve the exception and then returns execution to the previously saved position.
Dexterity uses the throw and catch method to handle exceptions. The exception is raised, or thrown, to the exception handler. The catch method is the exception handler taking over code execution.
Dexterity supports integration with Microsoft Visual SourceSafe and Team Foundation Server. A generic provider is also included if you want to use another source code control program. The Generic provider uses a collection of text files to implement source control. You will be setting up and using the Generic provider in Chapter 11, Upgrading Customizations.
A single-pass, banded report writer is integrated into Dexterity. You can create simple text reports and lists or you can create presentation-quality documents with graphics and colors. However, since it only passes through the data once, a single-pass report writer has some pretty big limitations. For example, if you need to calculate a sum from which you can derive a percentage that you can show in the detail band of the report, you will need to write your own function to create the sum. Also, you cannot create the simple page X of Y notation.
To help with some of the limitations of a single-pass report writer, hundreds of user-defined functions are available to you for retrieving or manipulating data in a manner that you otherwise could not. For example, the RW_AccountNumber and RW_AccountDescription functions return the account number and account description of an account according to the account index you pass to the function.
The downside is that you won't find these user-defined functions documented in the software manuals. You will need to search the Knowledge Base in CustomerSource or PartnerSource to find instructions on how to use several of the functions. Using simply RW in your search criteria will retrieve many articles with instructions for several user-defined functions.
Report Writer also includes 21 built-in (well-documented) system functions that you can use to create calculated fields. Functions such as MONTH_NAME, used for pulling the name of the month out of a date value, and STRIP, for removing trailing spaces from a string field, are both examples of system functions.
As a developer, you can write your own user-defined functions to use with the Report Writer in order to solve problems similar to the derived percentage issue discussed earlier.
Component Object Model (COM) automation is a method you can use to access features and objects across different applications and languages. An object is something that can be acted upon, such as a button or a window. When using COM, one application can cause the other application to do something by following the rules described in an Application Programming Interface (API). Dynamics GP can provide access to its objects, which can be used by other programs. When it provides access to its objects, it is acting as an automation server. Dynamics GP can also access objects exposed by other applications. When Dynamics GP accesses objects on another automation server, it is acting as an automation client. The thing that allows access to objects is a server, and the one that is accessing the objects is a client. With Dexterity's COM support, Dynamics GP can act as both.
The Graphical forms designer is a WYSIWYG (What You See Is What You Get) tool used to layout and design the visual components of the application. You will create all of the components of the user interface using the Graphical forms designer.
Dexterity includes a source-level script debugger that you can use for interactive debugging of your application. These built-in tools provide the ability for you to set breakpoints in any script, apply conditions to break points, access scripts that are currently in the call stack, step through scripts one line at a time, display and set the values of fields and variables, and otherwise examine the state of your application at breakpoint.
In addition to the internal debugging tools, a Dexterity-based suite of tools called the Support Debugging Tool is available from Microsoft that allows you to examine, with precision, the specific series of events that led up to an error in your application. With the Support Debugging Tool, you can control and monitor all aspects of script execution. And best of all, it's free! Support for this tool is located at the Support Debugging Tool Portal at http://aka.ms/SDT.
Dexterity was ahead of its time, and is still unequaled in the development world. As we said earlier, Dexterity is both platform independent and database independent. Only the runtime engine is dependent on the platform. Standalone applications you develop using Dexterity can run on the Macintosh as well as the PC. Dynamics GP itself, however, no longer supports the Macintosh.
Dexterity currently supports three different databases Pervasive Software's P.SQL 2000 (formerly known as Btrieve), FairCom Corporation's c-tree Plus, and Microsoft's SQL Server. Switching between platforms or databases does not require any changes in the business logic code. If you're using the Microsoft SQL database, you can even use Dexterity to create and call SQL Stored Procedures.
The unique design of Dexterity keeps the technology piece of the application separate from the business logic. This strategy provides a means for Dynamics GP to update its technology without changing its code. For instance, Dynamics GP updated from a 16-bit application to a 32-bit application without re-writing the business logic. Beginning with version 7.0, Dexterity added COM (Component Object Model) support. Again, no code changes were required.
As discussed earlier, if you are going to build solutions that integrate with Dynamics GP, it is critical that you know how it works. By "know how it works" we don't mean you should learn the intricacies of how to run the general ledger, but rather understand what makes this program tick. Learn how data is exchanged and how you can interact with that exchange. You need to understand the table structure and how to discover the location of the data you seek.
Remember, Dynamics GP is essentially just another database program. When working with any database application, you need to know your CRUD!
C = Create a Record
R = Read a Record
U = Update a Record
D = Delete a Record
Let's find out what it takes to launch the application – what happens when a user double-clicks on the Dynamics GP program icon?
If you look at the properties of the Dynamics GP shortcut, you'll see the expected executable file (Dynamics.exe) and something extra. The extra is a reference to the Dynamics.set file. The full shortcut on my machine looks like this:
Dynamics.set
There is no path designation for the Dynamics.set file because that file is in the same location as the runtime engine. If you place the Dynamics.set file in a different location, you would also need to provide the full path to its location.
For example, if you placed the Dynamics.set file in the folder C:\LaunchFile, the properties of your shortcut would look like this:
"C:\Program Files (x86)\Microsoft Dynamics\GP2010\Dynamics.exe" "C:\LaunchFile\Dynamics.set"
Without the Dynamics.set parameter, the Dynamics runtime engine will launch and you will get the following window:
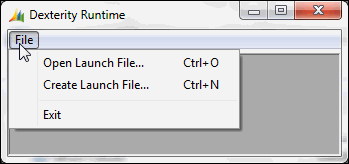
Selecting the File menu will provide you with the opportunity to either Open Launch File… or Create Launch File…. Do not select Create Launch File… as the file that is created is not usable. Instead, open the Dynamics.set file, which is Dynamics GP's proper launch file.
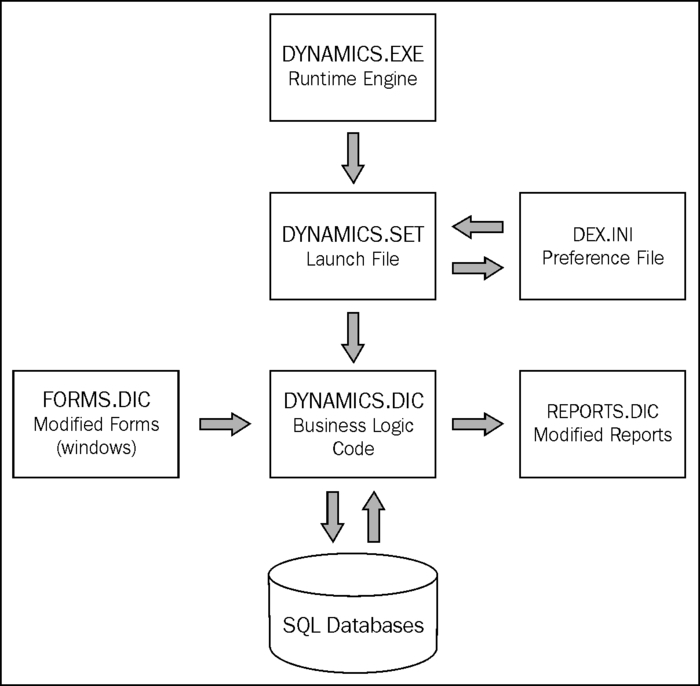
We have just identified two of the files involved in getting Dynamics GP to run. These two files are components of Dexterity. The runtime environment consists of seven main components:
The launch file (
Dynamics.set) defines each of the components included when Dynamics GP loadsThe Preferences file (
Dex.ini) stores settings such as OLE pathname and the location of the help filesThe Dexterity Runtime engine (
Dynamics.exe) interprets the resources in the dictionary to present a functioning applicationThe Application dictionary (
Dynamics.dic) holds all resources in an applicationThe Forms dictionary (
Forms.dic) stores forms modified by the userThe Reports dictionary (
Reports.dic) stores reports modified by the userThe Microsoft SQL Server databases hold all of the data elements of the system and the companies
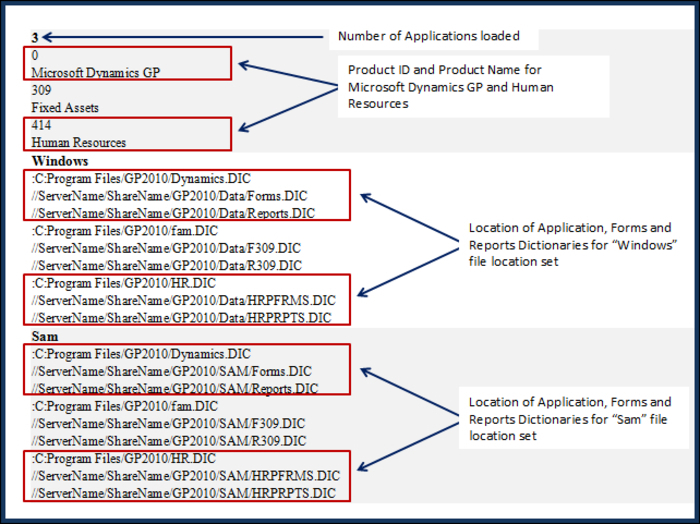
As stated earlier, the Dynamics.set file is also known as the launch file. It defines each of the components included when Dynamics GP loads. Several pieces of information are necessary for a successful launch. The combination of information in the Dynamics.set file and the Dex.ini file identify each of these components. From the Dynamics.set file we get the following information:
The total number of dictionaries used by the Dynamics GP application when launched from this workstation
The product ID assigned to each dictionary
Each product's name
The name of each set of dictionary locations in this
Dynamics.setfileThe path to and the name of the product's core Application dictionary
The path to and the name of the product's modified Forms dictionary
The path to and the name of the product's modified Reports dictionary
The following screenshot shows the various elements of a Dynamics.set file:
The path locations must be listed in the same order that they appear in the top section of the file. The elements should be in the following order:
Application dictionary
Modified Forms dictionary
Modified Reports dictionary
The Dynamics.set file illustrated earlier contains two dictionary location IDs, Windows and Sam. The Workstation2= switch in the Dex.ini file indicates which set of paths should be used by the workstation. We'll talk about the Dex.ini file in the next section.
The product ID is assigned to the developer by Microsoft; no two products can have the same ID. The dictionary names are determined by you, the developer, but can be changed by the user without ill effect. Any time you refer to an application dictionary in your code, you identify it by the product ID, not the name. The Dynamics.set file is a simple text file and can be read and edited using Notepad.
The dictionaries are accessed by Dynamics GP in the order that they are listed in the Dynamics.set file. The products may be listed in any order with the exception that the Dynamics.dic file must always be listed first, and always has the product ID of zero.
Dynamics GP may respond differently if the order of the products is changed. Be aware of this possibility as you test your add-on application.
If there is a deviation in the order across different products' dictionaries, Dynamics GP will not launch. If there is a deviation in the order of the dictionaries for the same product (Application dictionary, Forms dictionary, Reports dictionary), Dynamics GP will launch, but upon accessing the resources, an error message will display. Study the position of products and dictionaries in the Dynamics.set file carefully if unusual errors are presented at launch.
The Dex.ini file lives in the Data folder inside of the GP2010 folder. In releases 9 and before, the Dex.ini file was located in the same folder as the Dynamics.exe file.
The location of the Dex.ini file in a default 32-bit installation is as follows: C:\Program Files\Microsoft Dynamics\GP2010\Data\Dex.ini.
The location of the Dex.ini file in a default 64-bit installation is as follows: C:\Program Files (x86)\Microsoft Dynamics\GP2010\Data\Dex.ini.
The Dex.ini file is also known as the Preferences file. It works the same as all other .ini files in that it stores settings that are later read by the application in performing some task. Like the Dynamics.set file, you can read and edit the Dex.ini file using Notepad, as it is also a simple text file.
The Dex.ini file is divided into sections by a bracketed word and each section contains zero or more lines of switches that control Dynamics's behavior. Some switches are mandatory and are typically added by the application itself; other switches are optional according to user preferences; still other switches are included by the application that do nothing at all. The bracketed section names should never be changed, but you have a wide variety of switches to choose from.
An excerpt of a typical Dex.ini file is shown in the following screenshot. Explanations will be included for each of the Dex.ini switches enclosed in a box. An extensive list of Dex.ini switches is available at http://dynamicsconfessions.blogspot.com/2010/07/dexini-switches-now-available-to.html.

When set to TRUE, the SQLLogSQLStmt switch causes the system to create (or append to) a text file named DEXSQL.LOG and logs all SQL statements being sent to the SQL Server. This file is created in the same folder that holds the Dex.ini file; the DEXSQL.LOG file is used to troubleshoot errors in the application.
When set to TRUE, the SQLLogODBCMessages switch causes the system to create (or append to) a text file named DEXSQL.LOG and logs all ODBC messages returned from the SQL Server. This file is created in the same folder that holds the Dex.ini file. The DEXSQL.LOG is used to troubleshoot errors in the application.
The SQLLogAllODBCMessages switch is one of those settings that appears in the Dex.ini file that does nothing at all. The only setting you need for ODBC logging is SQLLogODBCMessages=TRUE. Nearly every technology support person will tell you that this has to be set to TRUE if you want to include ODBC messages in the Dexsql.log and that is just wrong. You can delete this setting from the Dex.ini file if you want.
The Synchronize switch
indicates whether Dynamics Utilities has aligned the Dynamics.dic to the account framework
. The account framework was defined when Dynamics GP was initially installed. FALSE signifies that the Dynamics.dic has been synchronized. TRUE indicates that synchronization is needed. You use the Dynamics Utilities application to accomplish synchronization. The account framework is stored in the DYNAMICS database and is not consistent across installations.
The Workstation switch was used to read the Location Translation table (DYNAMICS.dbo.SY03600) to determine if any string substitutions needed to be made to the pathnames listed inside the Dynamics.set file. You will find this entry in every Dex.ini file, but Dynamics GP will launch just fine without it. Although WINDOWS
is populated as the default setting on windows workstations, the entry was not dependent on the operating system. You could have changed it to CLARK and as long as you had CLARK defined in the Location Translation table, the program would have been just fine. The Location Translation table exists in the DYNAMICS database as table SY03600.
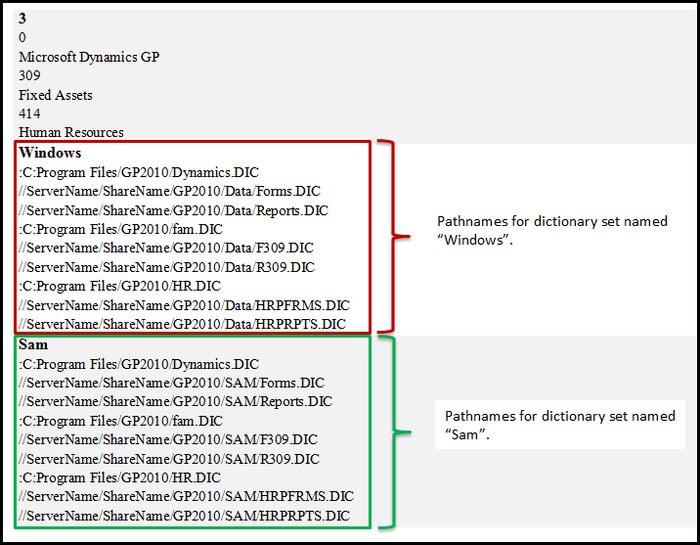
The Workstation2 switch identifies which set of dictionary locations listed in the Dynamics.set file should be used by the runtime engine. Though rarely implemented, the Dynamics.set file could contain several sets of file locations. Revisiting our earlier Dynamics.set file (refer to the following screenshot), we see that there are two sets of dictionary locations defined: Windows and Sam. If Workstation2=Sam were used in the Dex.ini file, any modified reports would come from the Reports.dic file at //ServerName/ShareName/GP2010/SAM/Reports.dic. Conversely, if the Dex.ini file setting was Workstation2=Windows, modified reports would come from the Reports.dic file at //ServerName/ShareName/GP2010/Data/Reports.dic.
The Workstation2 switch is required in order to launch Dynamics GP. If it is missing, you will be presented with the following dialog box asking you to select a dictionary location ID. Notice that the system reads the Dynamics.set file in order to determine the available choices.
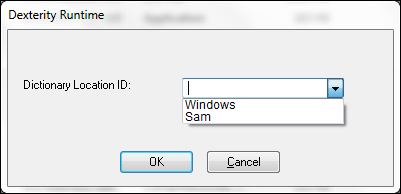
Upon selecting a Dictionary Location ID, Dynamics GP will launch normally. The default setting for the Workstation2 switch is Windows.
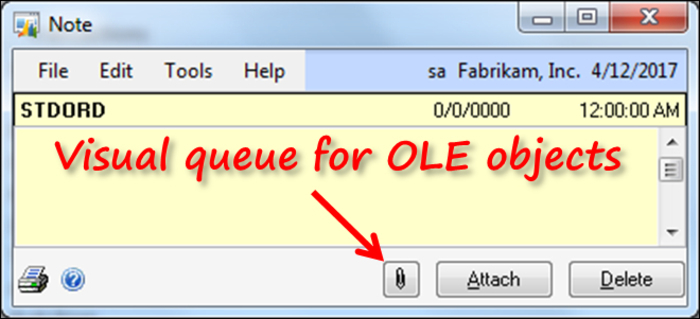
The OLEPath switch is used to indicate where the OLE object container is located. A user can attach and/or link documents to certain record types in Dynamics GP. The ability to take advantage of this functionality is dependent on the OLEPath switch properly pointing to the location of the OLE container. This is an often-overlooked switch. It is either absent, and therefore no OLE support exists, or it is improperly set. You should include some logic in your application to check for this switch if you need to interact with OLE objects.
If the switch is missing, the user is not even aware that OLE attachments are a possibility because the visual queue is missing from the window, as shown in the following screenshot:
If the switch is set to a local path (that is the default), then only one workstation can access the objects. If each user on the system should have the ability to read the OLE objects, then OLEPath should point to a shared location.
If the shared location is a mapped network drive, then each user's profile on each machine they use to access Dynamics GP must include the same drive mapping. While drive mapping may involve a little more diligence in creating the appropriate network login scripts, its advantage is that the directory structure necessary to store OLE notes will be created automatically by the application the first time the OLE container is accessed.
If the shared location is indicated by a Uniform Naming Convention (UNC) path then the full directory structure supporting OLE notes for each company must exist before the workstation attempts to attach or access OLE objects.
That's a lot of rules for a simple switch, but this switch opens up a very powerful feature in Dynamics GP that should be exploited.
To illustrate what the full directory structure looks like, let's assume your installation has two company databases, DB1 and DB2. Let's further assume that you want to store the OLE Notes in \\ServerName\ShareName\GP2010\Data\ and you want to use a UNC reference for the OLEPath switch in the Dex.ini file. Since the note folders will not be created automatically if you use the UNC reference, you must create the folders yourself. The following structures are needed:
\\ServerName\ShareName\GP2010\Data\DB1\OLENotes\
\\ServerName\ShareName\GP2010\Data\DB2\OLENotes\
If you create these folders manually, your UNC reference in the Dex.ini file will work.
The RememberUser switch indicates whether the checkbox on the Welcome to Microsoft Dynamics GP window (the Welcome window) is available.
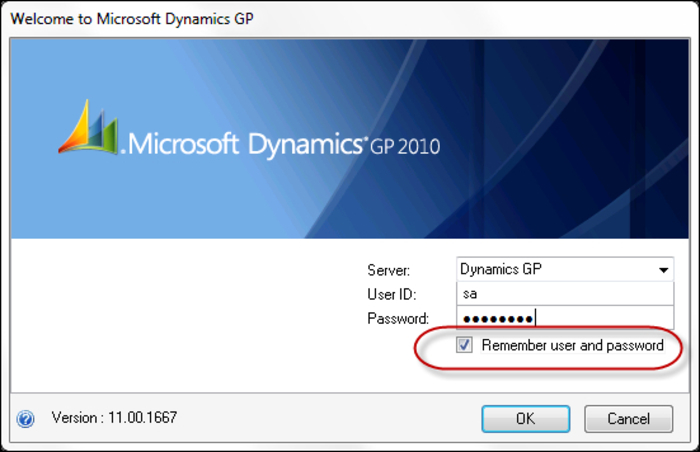
If the setting is TRUE, then the checkbox on the Welcome window will be active and you can click on it and mark it. If it is set to FALSE, then the field will be disabled.
Your ability to click in the box, however, does not change whether the user and password are in fact remembered. If the option Remember the user and password has not been selected in the System Preferences window, the fact that you checked the box on the Welcome window has no impact on system behavior. When you close Dynamics GP, the Dex.ini setting is changed to FALSE if the System Preferences object has not been checked. It's odd behavior, but it's good to know that changing the Dex.ini setting doesn't cause the user and password to be stored.
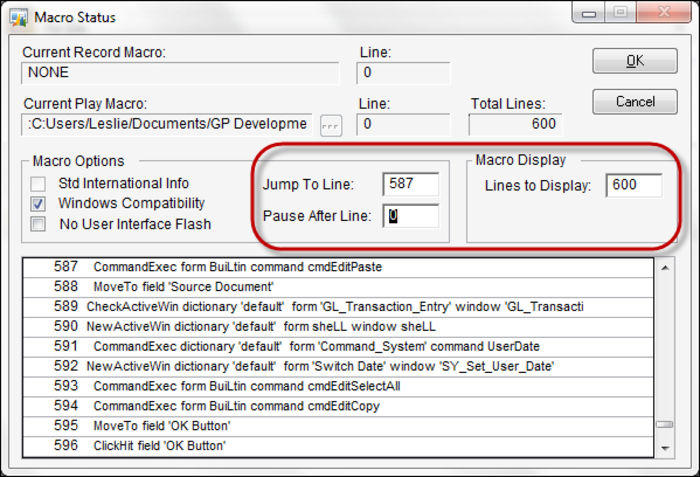
When the ShowAdvancedMacroMenu switch is set to TRUE, an Advanced menu item is revealed under Microsoft Dynamics GP | Tools | Macro that contains several additional utilities which you can use to work with Macros. Refer to the following screenshot:
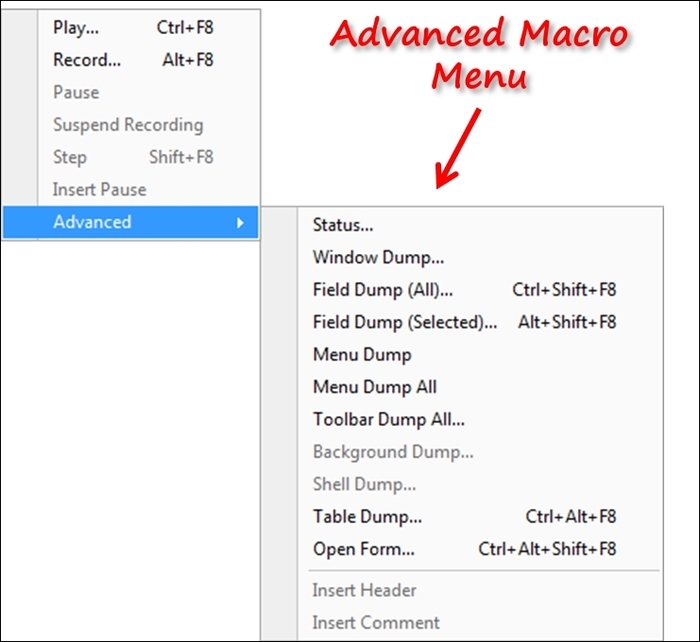
Since the macro language built into Dynamics GP is used extensively in testing, it is definitely something you should learn to use. ShowAdvancedMacroMenu = TRUE should be automatically added every time you set up your Dynamics GP environment.
One of the handiest Advanced Macro utilities gives you the ability to jump to a specific line in a macro. This is especially helpful if your macro should fail (imagine!). The dialog that comes up tells you what line it failed on; if it's line 587, it could be a long day trying to count down to that line. The Macro Status tool lets you jump to that specific line to inspect your macro.
When the ExportOneLineBody switch is set to TRUE, any fields in the body of a report in Report Writer come out as a single line when printing the report to a file. It isn't displayed on the window like that, but in the file it is. This is very helpful if you want to save a report to a spreadsheet-friendly format, such as a tab-delimited file for instance. The Report Writer layout window is only as wide as the paper size set under Printer Setup. It is very easy to run out of space if you have to set the fields horizontally across the layout. An old trick to get more space was to load print drivers for a plotter because plotter paper was so much wider. With this switch in the Dex.ini file, you can simply list the fields vertically and they will come out as a single row once the report is printed to a file.
There are some benefits to using Report Writer to export data. One, it doesn't require that you have access to a SQL tool, and two, you can make use of data in temporary tables, and you can embed Excel formulas into the report.
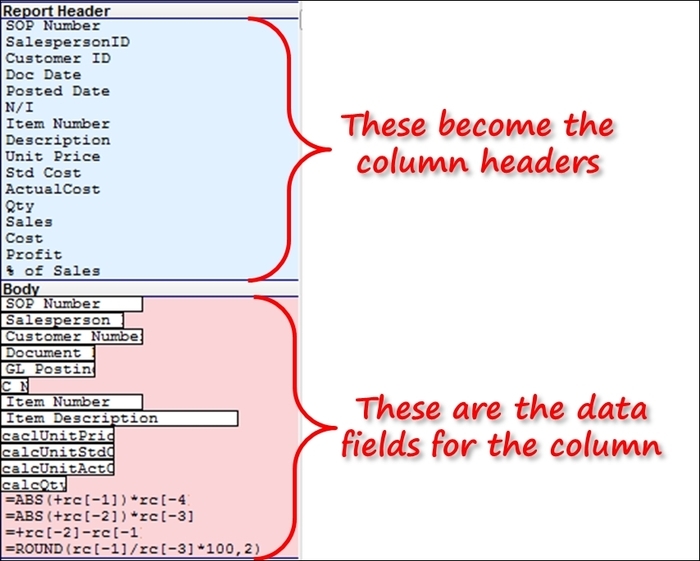
The following screenshot shows the Report Writer view of a short sales report. Notice that the last four lines of the screenshot are really Excel formulas. When the report is printed to the screen, it looks much like the layout, only with data. However, if you look at the file, all of the fields come out in a single row per record. If you open this file using Excel with the R1C1 reference style, the hardcoded fields become valid Excel formulas.
The following screenshot represents what the report looks like when printed to the screen. The screen output follows the same form as the report layout.

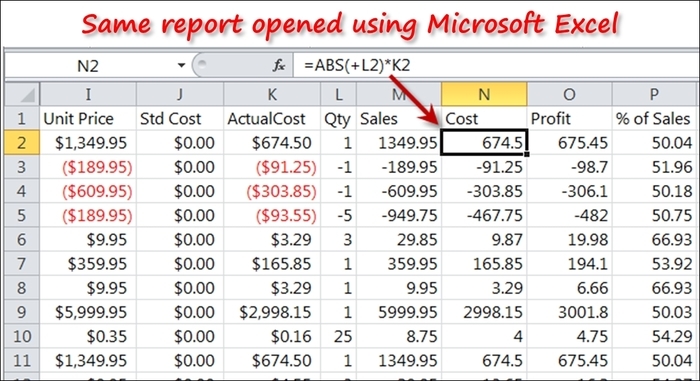
The following spreadsheet is the result of opening the tab-delimited file produced by the report. Notice how the formula =ABS(+rc[-2])*rc[-3] coded into the report layout resolves to the formula =ABS(+L2)*K2 in cell N2.
As you can see, these simple .ini switches can be used to your advantage when working with Dynamics GP. It's worth your time to find them and engage them to help cut down the time you spend navigating through the complexities of the application. Even better, develop some of your own .ini switches to store settings or reveal functionality for your application.
The Dynamics.exe file is the runtime engine. Information from the Dynamics.set and Dex.ini files locate the Dynamics.dic file. The Dynamics.dic file contains all of the resources and scripting that results in the functioning application when interpreted by the runtime engine. Resources include all of the fields, forms, windows, tables, scripts, reports, buttons, boxes, formats, strings, procedures, functions, and so on. In short, everything, that is the application, you have come to know is Dynamics GP.
Two additional dictionary files, Reports.dic and Forms.dic, are generated if the user launches the Report Writer (for reports) or the Modifier (for forms). Remember, only user-created (or modified) resources live in these dictionaries. All of the original resources remain in the Dynamics.dic.
The following diagram presents the components of Dynamics GP if only the core modules were loaded. In reality, a typical Dynamics GP installation includes nearly 20 dictionaries. We have seen implementations that are comprised of over 40 dictionaries. Each module has its own modified forms and reports dictionaries. You determine what these dictionaries, if created, are named when you build your application's chunk file. The chunk file is a self-installing data dictionary file that extracts to become the application dictionary of your customization.
A typical installation of Dynamics GP adds roughly 500 tables to the DYNAMICS database and each company can generate another 2,000 tables. In addition to the tables, there are over 400 views and 20,000 stored procedures per company. That's right, 20,000. This is a big data model to navigate! What makes it even more challenging is that there are no foreign keys defined for the tables. Without foreign keys you cannot easily discern which tables are related to which other tables. As you can see in the following screenshot, a quick scan of SQL Server Management Studio doesn't yield much more information:
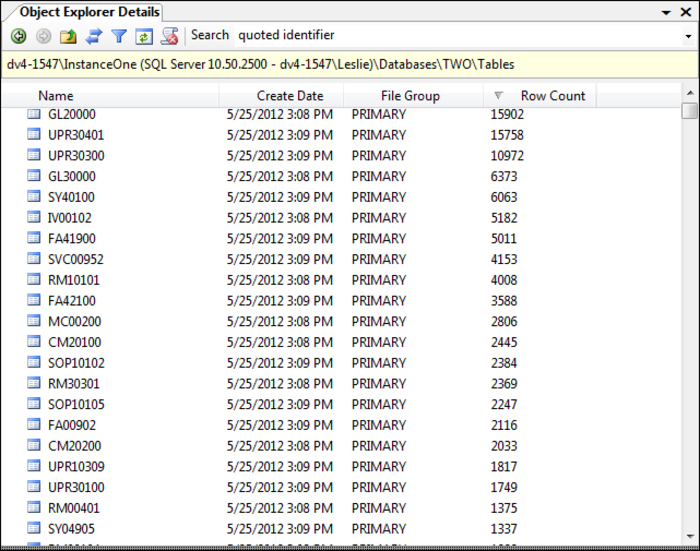
It is no surprise when clients tell me they are very confused by the seemingly cryptic table names. We're so used to those legacy table names that we don't appreciate what a wonder it must be for a new user or developer.
Any effort that involves manipulating data or creating reports will sooner or later result in the question How do we know which table to use? This query spawns much gnashing of teeth and all sorts of unusual behavior. So, what do the table names mean?
There is actually a very good naming convention for Dynamics GP data tables. However, this is only a convention. While you will not be arrested by the table-naming police for not following the convention, adhering to a standard makes it easier on everybody. The published naming conventions were followed by the Dynamics GP programmers pretty diligently, but not so much by many third-party developers. Here are the basics: the first two or three characters will indicate the module name, and the remaining numbers indicate the type of table.
Some of the more popular module prefixes are listed in the following table:
|
Prefix |
Module |
|---|---|
|
AA |
Analytical Accounting |
|
AF |
Advanced Financial Analysis |
|
AHR |
Advanced Human Resources |
|
APR |
Advanced Payroll |
|
ASI |
SmartList Favorites |
|
BM |
Bill of Materials |
|
CM |
Cash Management (Bank Rec) |
|
DD |
Direct Deposit |
|
DTA |
Multi-dimensional Analysis |
|
ECM |
Enhanced Commitment Management |
|
EDCML |
Multilingual Checks |
|
EDCVAT |
VAT Daybook |
|
EHW |
Employee Health and Wellness |
|
ENC |
Encumbrance Management |
|
ERB |
Excel ReportBuilder |
|
EXT |
Extender |
|
FA |
Fixed Assets |
|
GL |
General Ledger |
|
HR |
Human Resources |
|
IV |
Inventory |
|
IVC |
Invoicing (NOT Sales Order Processing) |
|
LK |
Linked Transactions |
|
MC |
Multicurrency |
|
ME |
EFT (Electronic Funds Transfer) |
|
MX |
Electronic Signatures / Audit Trails |
|
PA |
Project Accounting |
|
PM |
Payables Management (Accounts Payable) |
|
POP |
Purchase Order Processing |
|
RM |
Receivables Management (Accounts Receivable) |
|
RVLP |
Payables Document Management |
|
SLB |
SmartList Builder |
|
SOP |
Sales Order Processing |
|
SVC |
Field Service |
|
SY |
System or Company |
|
UPR |
US Payroll (Canadian payroll is CPR) |
|
WDC |
Field-Level Security (Advanced Security) |
After the prefix, the number indicates the table type. Knowing these numbers will help you zero in on the correct table. The following table sets out the numbering convention used to indicate the table type.
Developers often put their company's initials at the beginning of the table name. For instance, table WDC41101 is the Advanced Security Setup table, which is part of the Advanced Security module. The Advanced Security module was developed by Winthrop Dexterity Consultants (WDC).
|
Table number |
Description |
Abbreviation |
|---|---|---|
|
00000 |
Master tables |
MSTR |
|
10000 |
Work tables |
WORK |
|
20000 |
Open tables |
OPEN |
|
30000 |
History tables |
HIST |
|
40000 |
Setup tables |
SETP |
|
50000 |
Temp tables |
TEMP |
|
60000 |
Relation tables |
REL |
|
70000 |
Report Options tables |
ROPT |
|
80000 |
Posting Journal Reprint tables |
REPRINT |
|
90000 |
A mixed bag. There is no consistency in this group |
An explanation of how data flows through the WORK, OPEN, and HIST tables deserves its own section; the remaining table types are covered next.
Master tables are mostly what you find under the "Cards" area. These are your Customers, Vendors, Inventory Items, GL Accounts, and the like. For instance, the information you see on the Customer Maintenance window is stored in the RM00101 table.
Setup tables include choices you have made to initiate a module. For instance, the information entered on the Payables Management Setup window is stored in the PM40100 table.
Temp tables are tables that are used temporarily by the system and the records in those tables can normally be deleted without issue. For instance, the Net Profit Temporary table or AF50000 table is used by the Advanced Financial Analysis module to hold the Net Profit amount that will be used on one of the financial statements. Once the statement has been printed, the number is irrelevant.
Relational tables are used to store information that spans more than one module. For instance, the SOP/POP link table (SOP60100 table) holds the information about POP documents linked to SOP documents. Another example is the Sales Customer Item Cross Reference (SOP60300 table). This table stores how customer item numbers relate to regular item numbers. There are not that many tables in the 60000 range.
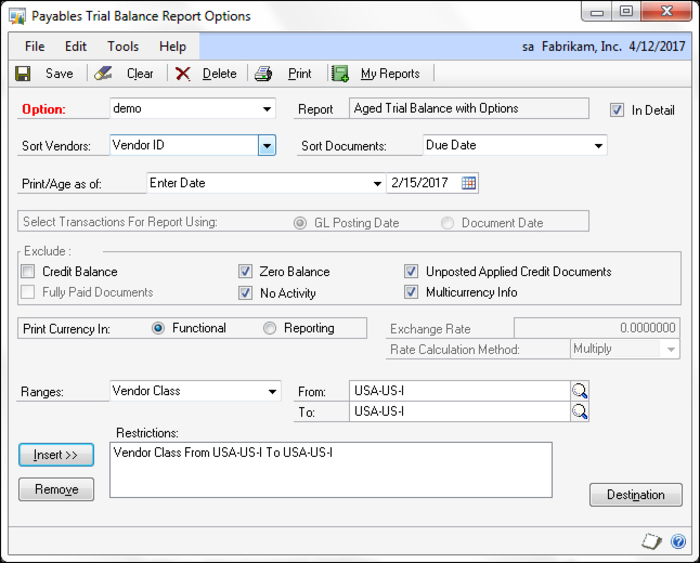
Report Options tables contain all of the information you enter in any of the report options windows that defines what information you would like to appear on a particular report. The following screenshot comes from the Payables Trial Balance Report Options window; information recorded on this window would be stored in the Report Options series of tables (PM70500).
Posting Journal Reprint tables contain all of the information you need to reprint the posting journals. So, don't feel like you MUST print all of those reports the system generates after posting a transaction. The data is waiting for you in these tables, should you ever need to reprint them.
The Miscellaneous tables group is a mixed bag of information. To give you an idea of what kind of information is included in the 90000 tables, take a look at the following table. There you can see the Display names of several 90000 tables.
|
Physical name |
Display name |
|---|---|
|
CM90000 |
CM Transmission Log |
|
CM90001 |
Checkbook EFT Log |
|
CN90000 |
Collections - User Preferences |
|
ERB90100 |
Data Connection Products |
|
ERB90200 |
Data Connection Series |
|
ERB90300 |
Data Connections |
|
ERB90400 |
Data Connection Restrictions |
|
ERB90450 |
Data Connection Restriction Values |
|
PA91301 |
PA Contract Segment Override Header |
|
PA91304 |
PA Contract Segment Override Detail |
|
PA92301 |
PA Contract Template Seg Override Header |
|
PA92304 |
PA Contract Template Seg Override Detail |
|
PDK90003 |
PDK File Error Log |
|
PDK90100 |
PDK Security |
|
PP900000 |
Deferral Opened Periods |
|
PTO90000 |
PTO Pending Master Conversion |
|
SE90001 |
Account Rollups Account List Accelerator |
|
SE988977 |
Account Rollups Options Columns |
|
SLB90000 |
Third Party GoTo Types |
|
SY90000 |
SY_User_Object_Store (Dynamics User Object Store) |
|
SY90100 |
Default Chart of Accounts |
If your customization will be interacting with transactions, you need to understand how the transactions flow through the transaction tables. Generally, there are three phases to a transaction: Work, Open, and History. How transactions move through each of these phases varies by module, with no two modules working exactly the same way, but the concepts are the same.
With a broad brush we will paint the Work phase
of a transaction as an unposted transaction. In my world, the term posted means to be committed to the ledger. Once a transaction is posted, it cannot be deleted nor can it be unposted. Before it is posted, you can still work on it. Therefore, work transactions are not posted. Transactions in the Work phase are stored in the 10000 tables. For example, if you were looking for an unposted inventory adjustment, you would start by looking in the IV10000 table.
The next phase of a transaction is the Open phase. What we know about an Open transaction is that it has been posted, but it is not yet in history. Examples of Open transactions include a vendor invoice that has not been paid by the company or an amount due from a customer as an account receivable. Often, transactions that are in the Open phase are called outstanding transactions. Open transactions are stored in the 20000 tables. If you were hunting down an unpaid vendor invoice, you would look in the PM20000 table.
The final phase of a transaction is the History phase
. A transaction in history has been closed and settled. No amounts are outstanding, nothing is unapplied, and it is a fully completed transaction. How a transaction moves to history is different for each module; whether a transaction can come out of history and move back into the Open phase also varies by module. What we do know about a transaction in history is that it has been posted and is no longer considered open. History transactions are stored in the 30000 tables. A void sales order would be found in the SOP30200 table.
Victoria Yudin has some great information on the popular tables from each module at http://victoriayudin.com/gp-tables/.
You can find a more thorough explanation of how transactions flow through the Work, Open, and History tables at http://tinyurl.com/d5townx.
Whenever Dexterity is used to create a SQL table, a number of stored procedures are automatically created and are used to optimize database performance when performing table operations. The names of most of the auto-generated stored procedures that apply to normal table operations typically begin with zDP_, followed by the table's physical name and a suffix that indicates the purpose of the stored procedure. The following table lists the purpose and numbers of these procedures:
|
Suffix |
Purpose |
Quantity |
|---|---|---|
|
F |
First record |
One per key |
|
L |
Last record |
One per key |
|
N |
Next record |
One per key |
|
SD |
Delete a record |
One per table |
|
SI |
Insert a record |
One per table |
|
SS |
Select a record |
One per key |
|
UN |
Unpositioned Next |
One per non-unique key |
For example, the following table shows that the stored procedures are auto-generated for the PM Class Master file (PM00100). This table has three keys; keys 1 and 2 are unique, key 3 is not.
|
Stored procedure |
Function |
|---|---|
|
|
Get the first record using key 1 |
|
|
Get the first record using key 2 |
|
|
Get the first record using key 3 |
|
|
Get the last record using key 1 |
|
|
Get the last record using key 2 |
|
|
Get the last record using key 3 |
|
|
Get the next record using key 1 |
|
|
Get the next record using key 2 |
|
|
Get the next record using key 3 |
|
|
Delete a record from the table |
|
|
Insert a record into the table |
|
|
Select a record using key 1 |
|
|
Select a record using key 2 |
|
|
Select a record using key 3 |
|
|
Unpositioned next for key 3 which is a non-unique key. Keys 1 and 2 are unique keys |
Other automatically generated stored procedure prefixes include:
|
Prefix |
Purpose |
|---|---|
|
|
System Manager stored procedures found in the DYNAMICS database |
|
|
General Ledger |
|
|
General Ledger Posting |
|
|
General Ledger Multicurrency Posting |
|
|
Microsoft Dynamics GP Utilities |
|
|
Microsoft FRx |
Back in the Dark Ages, we had only eight characters to work with for naming tables and fields. Who needed more than eight characters, right? By following the strict but sensible naming convention described in the previous section, thousands of integrating products have been created including tens of thousands of tables. Using the old naming convention, very few duplicate table names have cropped up.
The new table naming convention includes real words and abbreviations that we all can understand instead of the eight characters we were limited to before. Sounds good, but can you imagine working with an application containing 3,000 tables that are not named in any consistent manner? As with most things, when it comes to naming database tables, consistency is a virtue.
While there is still no table-naming-convention police that will visit your office, we think you will find the table-naming convention described next to be a best practice. This new naming convention is both easy to understand and easy to implement. Dexterity programmers will recognize this as the table's Technical Name .
Table names will comprise of a module abbreviation, followed by a term that describes the contents of the table, followed by a subtype abbreviation (if appropriate), and then by a main type abbreviation:
MODULE_Contents_SUB_MAIN
So the General Ledger chart of accounts would be translated to:
GL_Account_MSTR
The common module abbreviations are the same ones described in the Original table-naming convention section. It's from this table that you would get the GL portion of the previous table name.
The following table shows common subtable abbreviations and the type of subtable. For the Asset Financial Detail Master table of the Fixed Assets module, the new physical name would be FA_Financial_DTL_MSTR. The DTL portion of the name would come from the following table:
|
SUB table abbreviation |
Subtype |
|---|---|
|
ADDR |
Address |
|
BHDR |
Batch Header |
|
DTL |
Detail |
|
HDR |
Header |
|
HTAX |
Tax Header |
|
LINE |
Line Item |
|
LTAX |
Line Item Tax |
|
SERL |
Serial/Lot Number |
|
DIST |
Account Distributions |
The following table shows common Main table abbreviations. For the Invoicing Transaction History table, the physical name would be IVC_HDR_HIST. The subtype of HDR comes from the previous table and the Main table type of HIST comes from the following table:
|
MAIN table abbreviation |
Main type |
|---|---|
|
MSTR |
Master tables |
|
WORK |
Work tables |
|
OPEN |
Open tables |
|
HIST |
History tables |
|
SETP |
Setup tables |
|
TEMP |
Temp tables |
|
REL |
Relation tables |
|
ROPT |
Report Options tables |
|
REPRINT |
Posting Journal Reprint tables |
Although SQL allows a table name of 128 characters, the Dexterity limit is 80 characters. Adhering to the most restrictive case of 80 characters will help ensure the portability of integrating applications. As a side note, if we need more than 80 characters for a table name, perhaps we need to reconsider our approach.
The previous tables certainly do not represent the exhaustive list of all possible table abbreviations, but they will get you off to a good start. Your fellow developers will thank you for your consistency. Don't forget to add your company's initials at the beginning of the name; this will both help reduce duplicate table names, and make your module's tables easier to spot.
If you intend to create a user experience, you need to know the design standards so that you can build your interface to appear and behave exactly like the native Dynamics GP windows. Changing from the Dynamics GP native windows to your windows must be seamless. The "look and feel" must be identical.
Just how tall is that Save button? How wide is it supposed to be? What is expected from a scrolling window or a lookup window? Have you provided for the addition of a record note or a Linked Lookup? Can you add records "on the fly"? Did you include scroll buttons and expansion buttons?
Not only must your application be bug free, it also needs to be free of distractions such as fat buttons and strange icons. Fortunately, you do not have to guess the answers to the earlier questions. Dynamics GP has each of the properties spec'd out for you. In Appendix F of the Dexterity Basics training manual, the user interface guidelines are covered in detail. Depending on the enhancement plan you've signed up for, you can download the Dexterity Basics training manual from http://tinyurl.com/btpbnk7. Contact your partner regarding how to acquire the Dexterity Basics training manual if you cannot download it.
For now, let's review some of the more common window elements that users expect to find on a window. The following image shows the Vendor Maintenance window with some of its window elements highlighted.
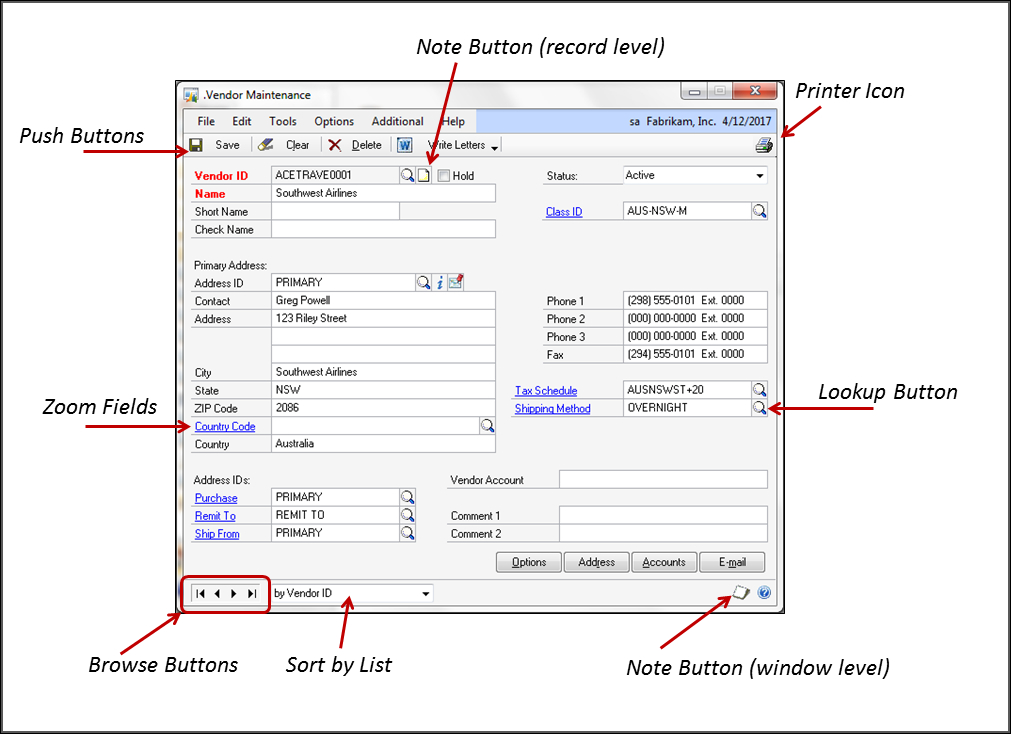
A description of each of the highlighted controls is as follows:
Push buttons appear in the window's control area. Push buttons define actions that you can perform on the record displayed. Depending on the type of window, the buttons expected are as follows:
|
Window type |
Buttons |
|---|---|
|
Maintenance |
Save, Clear, Delete |
|
Transaction |
Save, Delete, Void, Post |
|
Inquiry |
OK, Redisplay |
|
Non-modal Dialog |
OK, Cancel |
|
Modal Dialog |
OK |
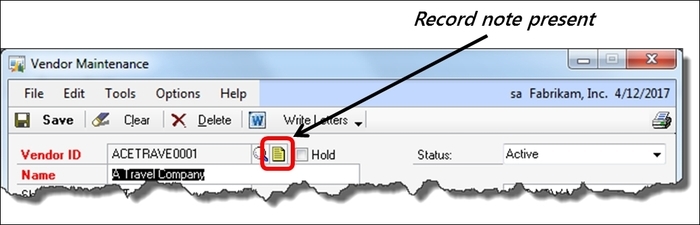
Record-level notes are big text fields that will hold up to 32,000 characters. The note icon will change appearance to indicate the presence of a note (as shown in the following screenshot). Record-level notes pertaining to all records are typically centrally stored in the company database in the Record Notes Master table (SY03900).
For any given window, a button should typically be available that will print a list report containing the contents of the window. This is the same report that prints from the File | Print command when navigating the user interface.
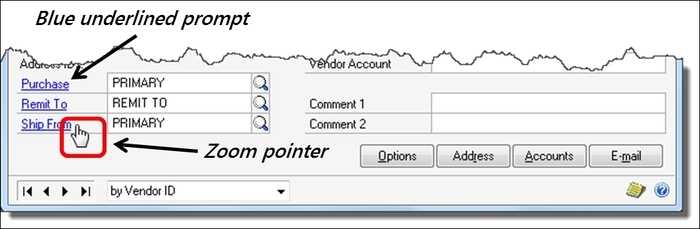
These fields allow a user to drill down to a lower level of detail from the current window. You can identify a zoom field by the blue underlined prompt. When the mouse passes over a zoom field it turns into a zoom pointer. If the field is a master record, the zoom typically goes to a setup or maintenance window for that item. If the zoom field is a financial field, the zoom navigation is normally from a summary level to a more detailed level.
The following screenshot highlights the zoom pointer and the blue underlined prompt:
Pressing a lookup button should open a lookup window that contains a listing of records. You select a record on the lookup window and that value will be returned to the originating window. For example, the Lookup button next to the Customer Number on the Customer Maintenance window will open the Customers Lookup window. Selecting a customer from the lookup list will bring the selected customer's information back into the Customer Maintenance window.
Browse buttons provide a means of navigation between records in the table. The left-most button will take you to the first record in the table. The right-most button will take you to the last record in the table. The two inner buttons will navigate forward or backward one record at a time.
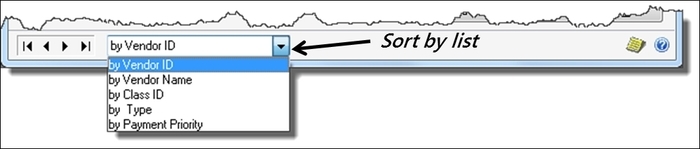
Next to the browse buttons, you will normally find a list field that is used to sort by a stated criteria . There is usually one record listed for each key in the table. Choosing a specific sort-by will set the table so that the records scroll according to the key you have selected, and the records will be listed in that order when displayed in the lookup window.
The following screenshot highlights the sort-by list:
Window-level notes provide a place to store information regarding a window. The notes are stored by company so that two companies do not share the same set of window notes even though they each have a similar window. For example, each company has a Vendor Maintenance window, but the two windows do not retrieve the same notes.
Window notes provide an excellent place for the user to document instructions on the proper way to fill out a window, to document naming conventions such as Vendor, Customer IDs, and so on. While this element may not directly relate to the functionality of your application, it's one of the elements a Dynamics GP user has come to expect. The icon changes to an image with lines on it when a window note is present.
The following screenshot highlights what the icon looks like when a note is present:

The following screenshot shows the Sales Transaction Entry window with several window elements highlighted:
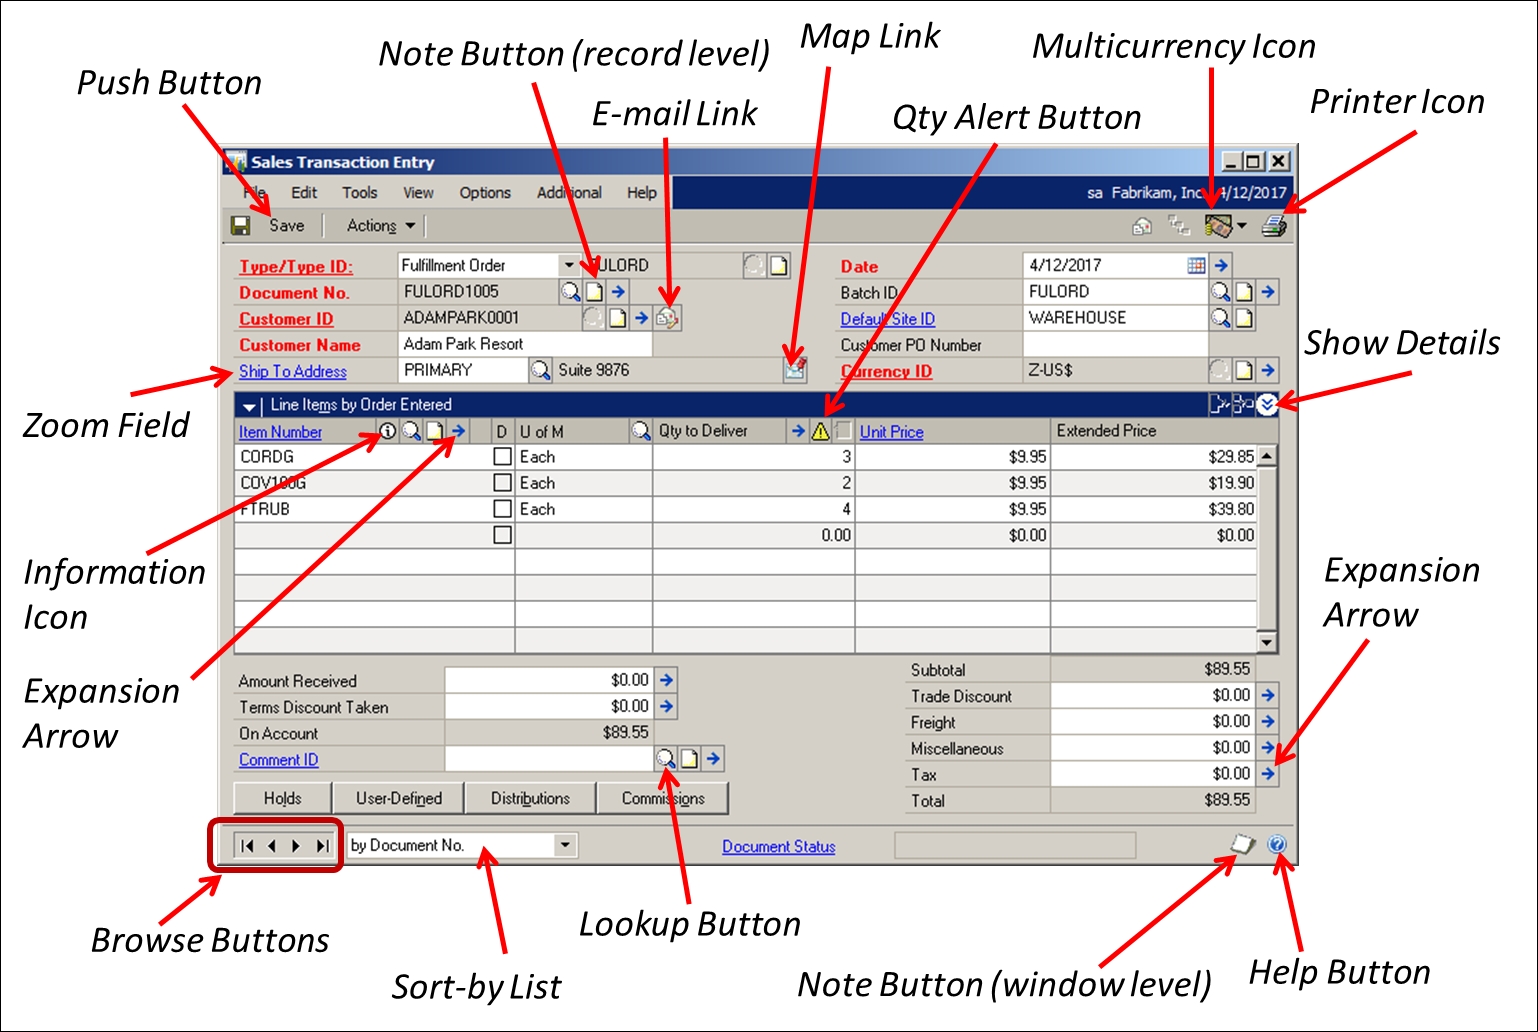
A description of the selected controls is as follows:
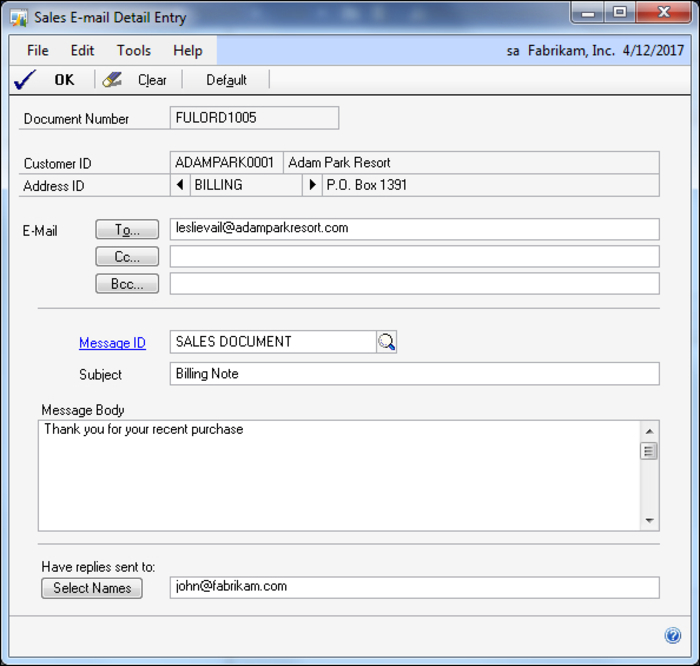
Selecting the E-mail Link button opens the Sales E-mail Detail Entry window as shown in the following screenshot:
Pushing the Map Link button will launch Bing Maps and throw it the address listed on the window. This is a very handy feature. If you use an address in your application, it should include this behavior, as it is an expected piece of functionality.
You do not have to use Bing Maps if you don't want to. Mariano Gomez has an article on his blog regarding how to change the default map services. Use this URL to access the article: http://tinyurl.com/c6vosoy.
The quantity alert icon will appear next to a line-item quantity if you still have a process to complete regarding that quantity amount. For instance, if you have not fully allocated the quantity on an invoice, the icon will show up on that line. By selecting that line and then pushing the Quantity Alert button, you will be greeted with a message telling you what the system is unhappy about.
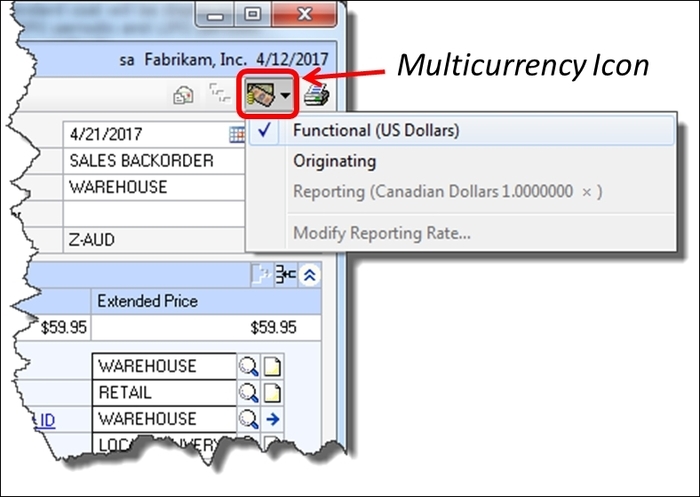
By pressing the multicurrency button, you can switch the display between the originating and functional currency. You can also modify the reporting currency rate if applicable. The following screenshot shows you what the window looks like when the multicurrency button is pressed:
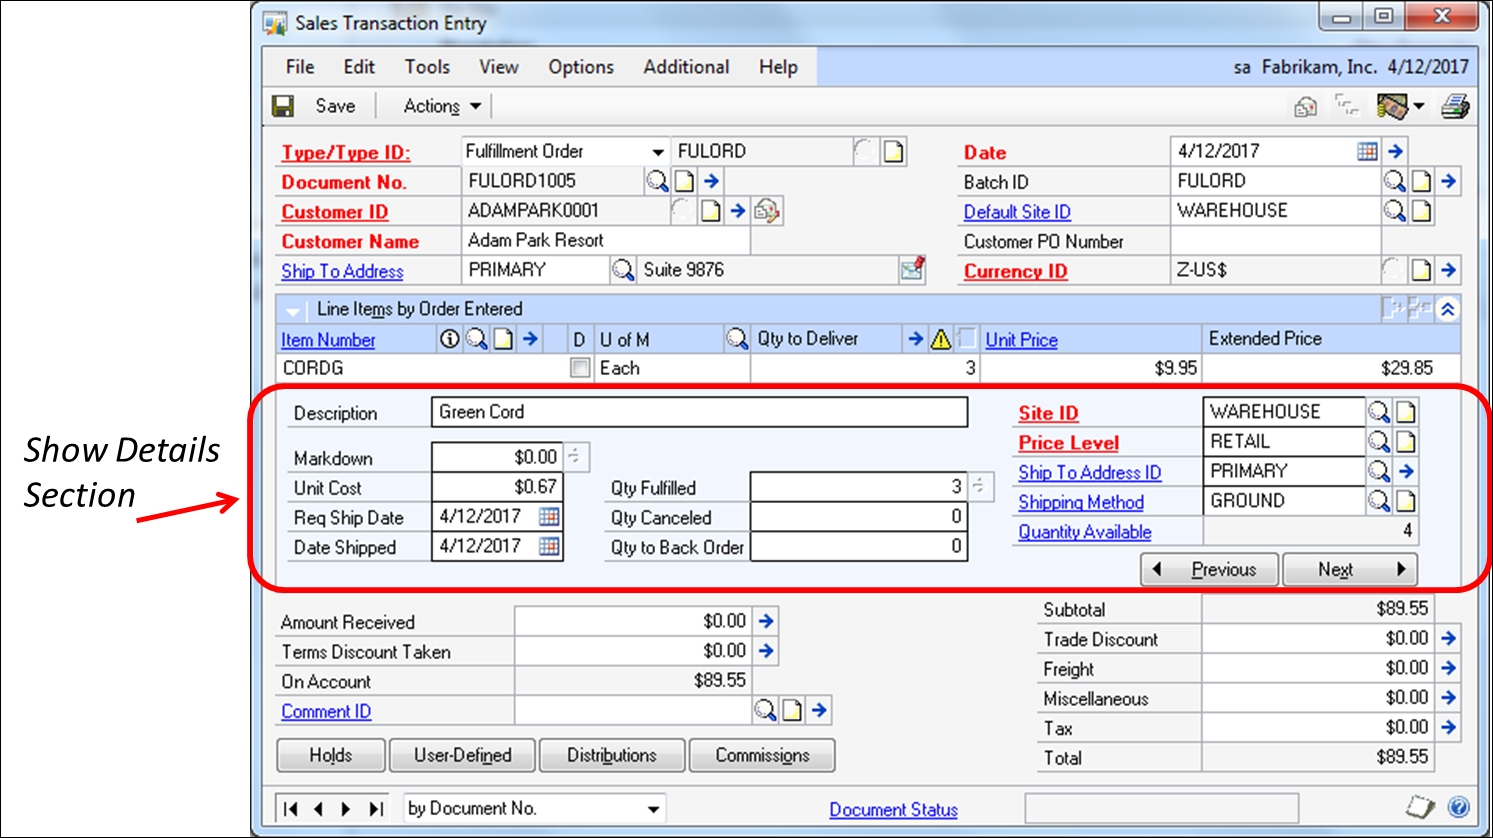
The Show Details button always shows additional information about the line item selected. These buttons are used to expand and shrink the view of a scrolling window. Sometimes the grid view is just expanded to show more lines of information for a single record. Other times, you'll see a larger area that doesn't look anything like a scrolling window.
In the case of the Sales Transaction Entry window, much more than just another row of information is revealed, as shown in the following screenshot. Lately, the Show Details view has been used in this way to deliver information using a more attractive layout.
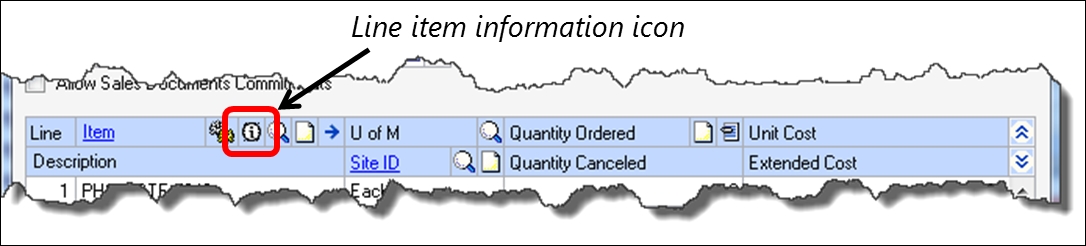
This button is more fully described as the "line-item information" button. It's used on the Sales Transaction Entry and Purchase Order Entry windows. This button is identified in the following screenshot:
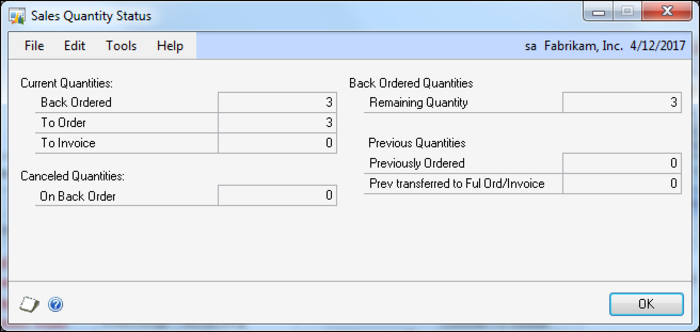
Pressing this button on the Sales Transaction Entry window or the Purchase Order Entry window opens a Sales Quantity Status window with information pertaining to the line item selected. The following is a screenshot of both the Sales Quantity Status window and the Purchasing Quantity Status window.
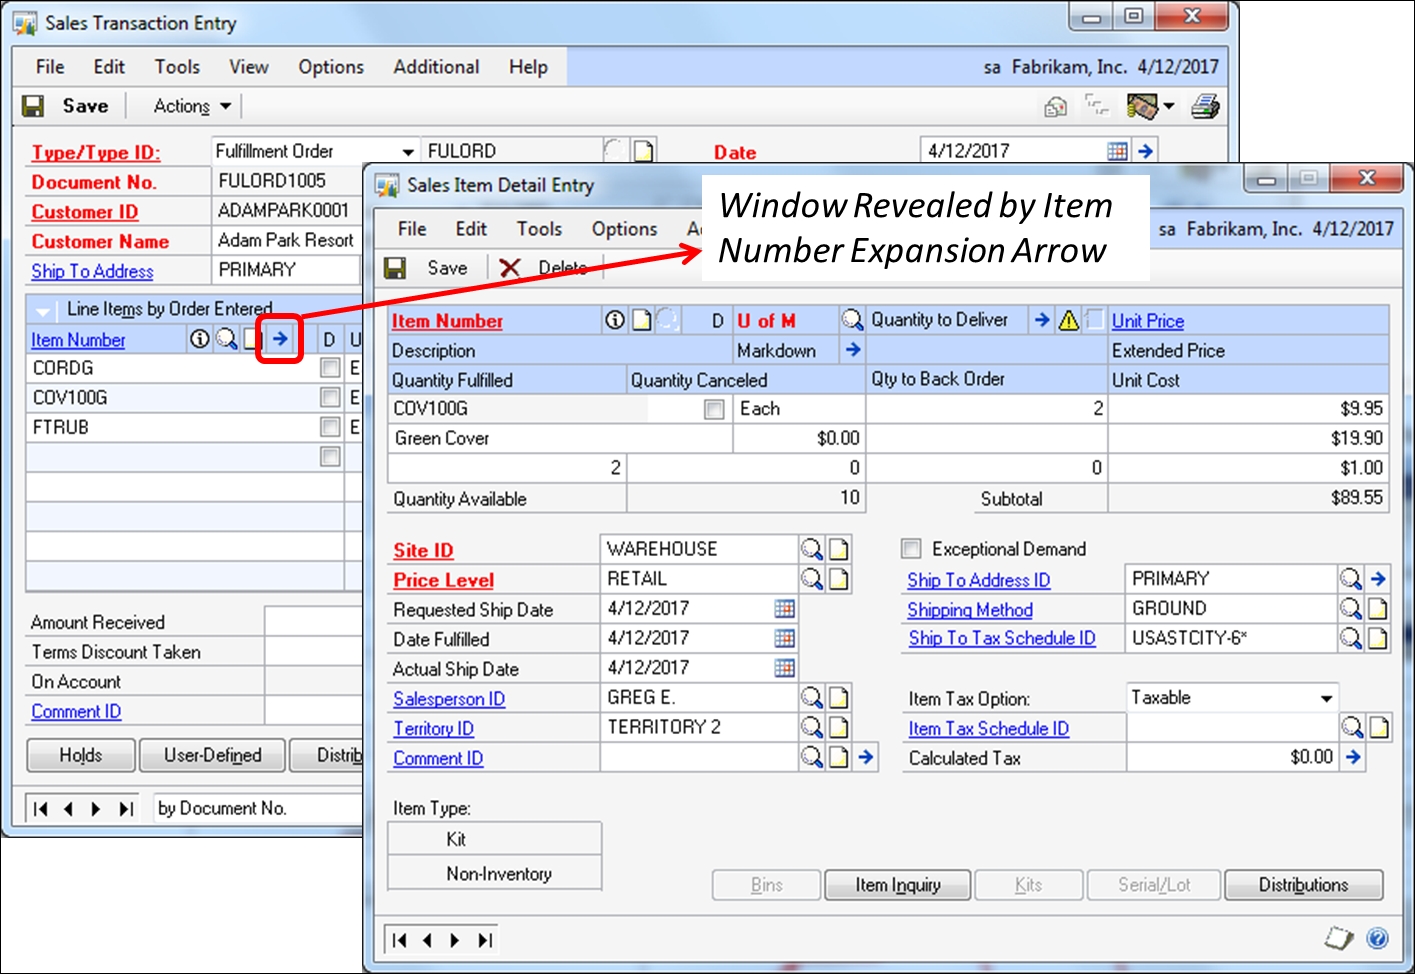
Expansion arrows can reveal a whole host of information. You can take a straightforward-looking window such as the Sales Transaction Entry window and stuff a massive amount of information in it via the use of expansion arrow buttons. Indeed, the Sales Transaction Entry window contains thirteen expansion arrow buttons.
If you need a lot more information about a particular record and want to keep your user interface clean, expansion arrow buttons are a good solution for you.
The following screenshot shows the window that you open when you press the Item Detail expansion arrow on the Sales Transaction Entry window:
By pressing the Help button in the lower right-hand corner of the window (or F1), you launch a context-sensitive help screen, as shown in the following screenshot:
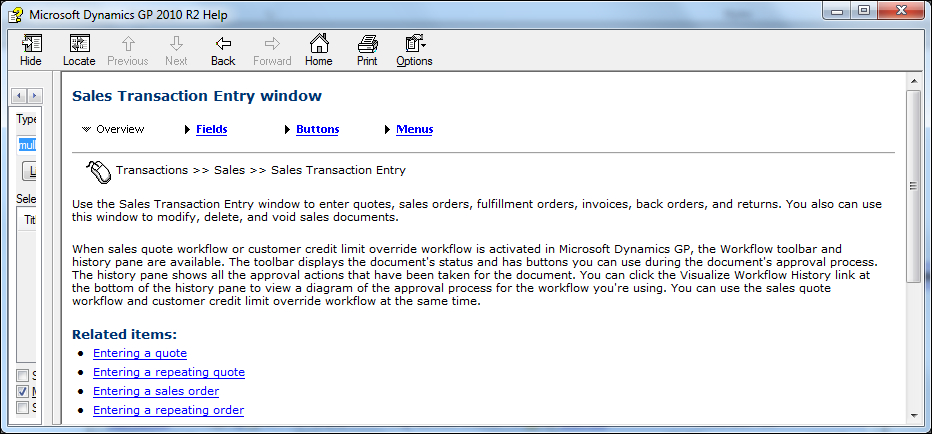
The Help window includes four sections: Overview, Fields, Buttons, and Menus. Each of these sections reveals information specific to the selected window. For example, the Fields section of the Sales Transaction Entry window defines, in alphabetical order, each field that appears on the window.
Your help file should also be context sensitive and include similar information.
In this chapter, we learned that Dynamics GP was designed as a platform- and database-independent application. We were introduced to the foundation that Dynamics GP is built upon and how from the beginning, developers have been enriching its functionality by creating a wide array of integrating applications. We explored the features of the Dexterity toolset and how we can create our own custom applications using the very toolset Dynamics GP was written with.
We learned about the seven main components of the Dynamics GP runtime environment and how they interact. We know the details of what happens when Dynamics GP is launched. We also have a new collection of switches we can use with the Dex.ini file to achieve more functionality or change the behavior of Dynamics GP.
The table-naming conventions have been demystified as well as the general flow of transactions through those tables. We know the purpose and naming conventions for the auto-generated stored procedures and that they aid in optimizing the performance of table operations. Finally, many of the standard window elements were introduced, such as zooms and note buttons.
In the next chapter, we will learn the fundamentals of integrating applications.

