


Swift is a relatively new programming language designed by Apple Inc., and was initially made available to Apple developers in 2014—primarily intended as a replacement for the aging Objective-C language that was the foundation of OS X and iOS software development at the time.
Unlike many object-oriented languages, which are based on older procedural languages—for example, C++ and Objective-C are based on C—Swift was designed from the ground up as a new, modern, object-oriented language that makes programming faster and easier, and helps developers produce expressive code that's less prone to errors than many languages.
While not based on an older language, Swift, in the words of its chief architect, Chris Lattner, " was inspired by drawing ideas from Objective-C, Rust, Haskell, Ruby, Python, C#, CLU, and far too many others to list." (Chris Lattner home page: http://nondot.org/sabre/).
Swift was initially a proprietary language, but was made open source software in December 2015 as of its version 2.2. While Swift remains primarily used by developers targeting the Apple macOS and iOS platforms, Swift is also fully supported on Linux, and there are unofficial ports under development for Windows as well.
The objective of this lesson is to learn the fundamentals of using the Swift programming language. In this lesson, you'll learn basic Swift syntax and program structure. You'll also learn how to use Swift built-in data types and enums, and how to declare and use Swift variables and constants. Let's get started.
In this first section, we'll look at the basic language syntax for Swift, and you'll write your first fully functional Swift program.
Like many modern programming languages, Swift draws its most basic syntax from the programming language C. If you have previous programming experience in other C-inspired languages, such as C++, Java, C#, Objective-C, or PHP, many aspects of Swift will seem familiar, and many Swift concepts you will probably find quite familiar.
We can say the following about Swift's basic syntax:
Programs are made up of statements, executed sequentially
More than one statement are allowed per editor line when separated by a semicolon (;)
Units of work in Swift are modularized using functions and organized into types
Functions accept one or more parameters, and return values
Single and multiline comments follow the same syntax as in C++ and Java
Swift data type names and usage are similar to that in Java, C#, and C++
Swift has the concept of named variables, which are mutable, and named constants, which are immutable
Swift has both struct and class semantics, as do C++ and C#
If you have prior experience in other C-inspired languages, such as Java, C#, or C++, Swift has some improvements and differences that will take some time and practice for you to become accustomed to:
Semicolons are not required at the end of statements—except when used to separate multiple statements typed on the same line in a source file.
Swift has no main() method to serve as the program's starting point when the operating system loads the application. Swift programs begin at the first line of code of the program's source file—as is the case in most interpreted languages.
Functions in Swift place the function return at the right-hand side of the function declaration, rather than the left.
Function parameter declaration syntax is inspired by Objective-C, which is quite different and often at first confusing for Java, C#, and C++ developers.
The difference between a struct and a class in Swift is similar to what we have in C# (value type versus reference type), but not the same as in C++ (both are the same, except struct members are public by default).
For those coming to Swift from Java, C++, C#, and similar languages, your previous experience with other C-inspired languages will help accelerate your progress learning Swift. However, be sure to study the language syntax carefully and be on the lookout for subtle differences.
When learning a new language, it's traditional for a first program to make sure the development environment is installed and properly configured by writing a program that outputs something to the screen. That's what we'll do next.
Now, let's use an Xcode playground to create a simple Swift program to display the string Hello, World to the playground console, by following these steps:
Begin by launching Xcode. You should be presented with a Welcome to Xcode screen with the following commands listed on the left:
Get started with a playground
Create a new Xcode project
Clone an existing project
Since we'll be writing code but not building an application in this lesson, choose the Get started with a playground option to open an interactive code window.
Choose Blank as the playground template, and then press the Next button.
Next, Xcode will prompt where to save the playground. This will save your code in a file with a playground file extension. Name the playground HelloWorld, and save it to your desktop.
When Xcode creates a new playground, it adds some default code to the editing window. Press ⌘ A on your keyboard and then the Delete key on the keyboard to delete the sample code.
In the now-blank editor window, add the following two lines of code:
let message = "Hello, World."
print(message)
Congratulations! You've just written your first Swift program. If you see the text Hello, World. output in the bottom pane of the playground window, your program has worked.
Before we move on, let's look at the structure of the playground window:
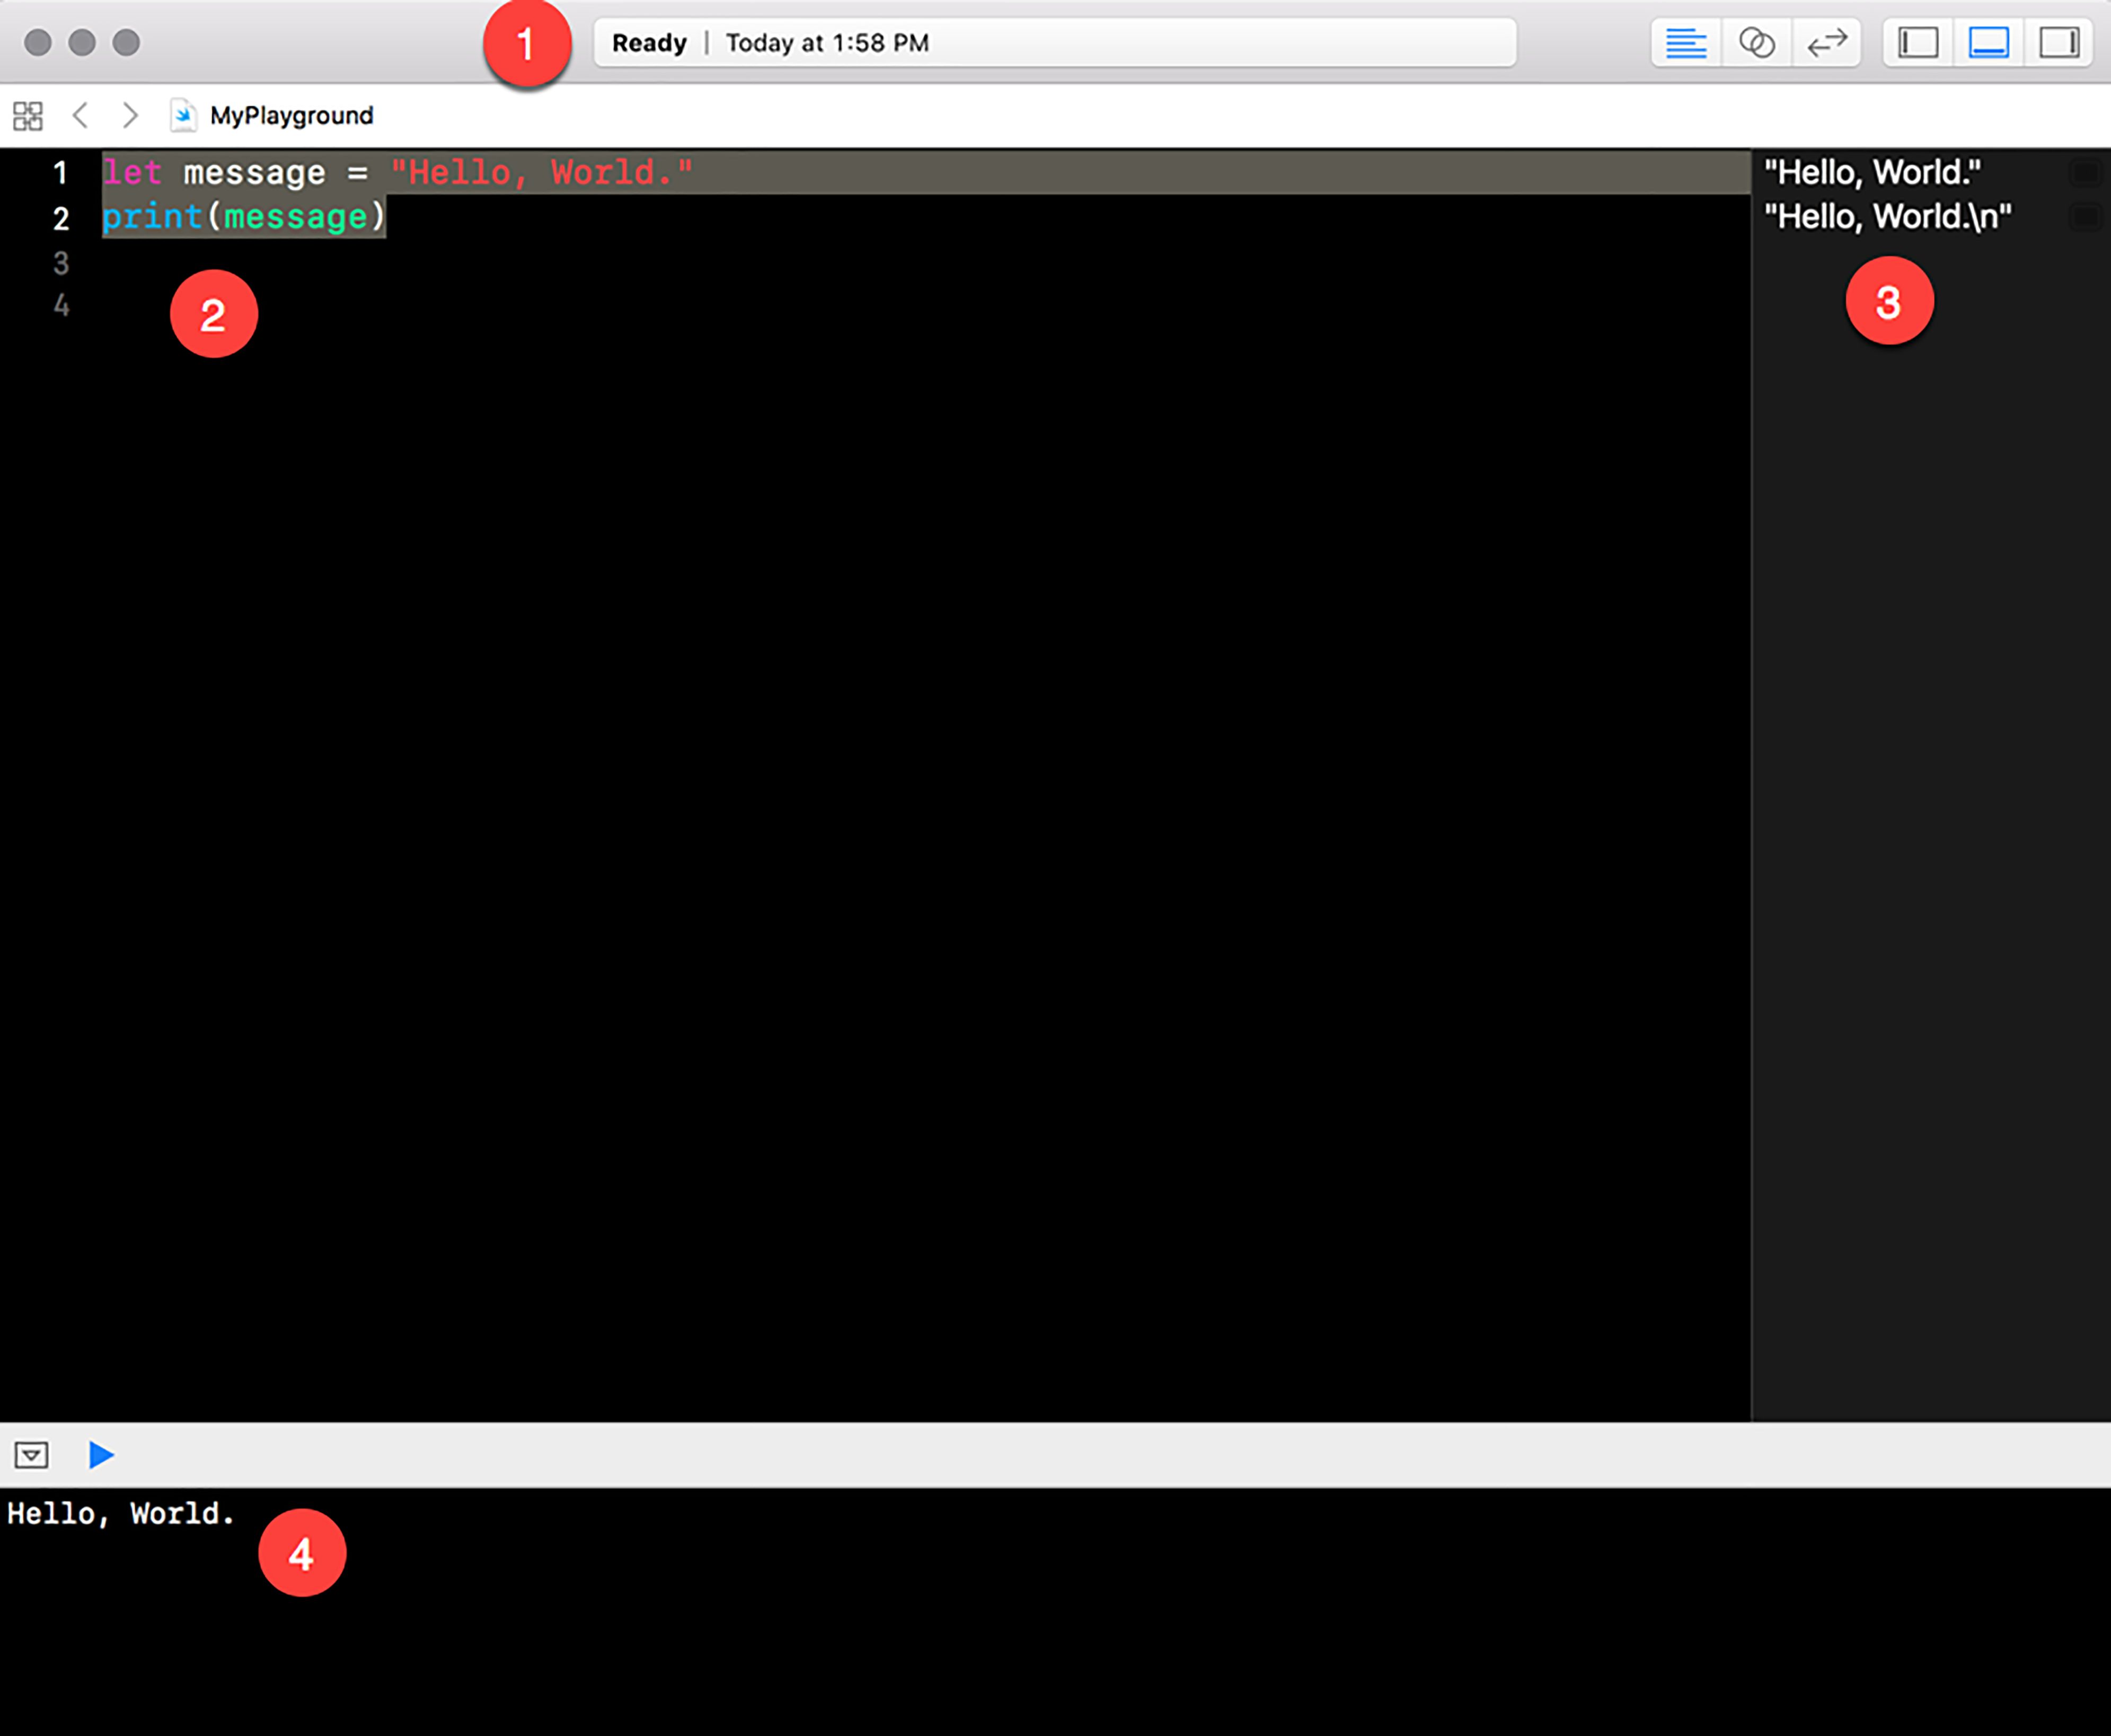
Note the following regions in the playground window, as indicated by the numbers within the red circles:
1: At the top of the window is a status bar which tells you the state of the playground.
2: The editing pane of the window is where you type the code to run in the playground.
3: The right-hand pane of the playground window shows information about the effect of each line of code. In this simple program, it shows the value message has been set to ("Hello, World."), and the text that was sent to the console ("Hello, World.\n"). Note the right pane discloses that the print() function added a newline (\n) character to the output.
4: The output pane of the playground window shows the debug console, which in this case displays what the Swift program has output. If your code has errors, the debug console will output information about those errors as well.
Now that we have a development environment up and running where we can create and run Swift code, let's move on to learning about and using the Swift language.
Virtually all programming languages include the ability for programmers to store values in memory using an associated name chosen by the programmer. Variables allow programs to operate on data values that change during the run of the program.
A Swift variable declaration uses the following basic syntax:
var <variable name> : <type> = <value>
Given this syntax, a legal declaration for a Pi variable would be the following:
var pi : Double = 3.14159
This declaration means: create a variable named Pi , which stores a Double data type, and assign it an initial value of 3.14159.
You may want to store a named value in your program that will not change during the life of the program. In the previous example, the value of Pi should never change during the course of a program. How can we ensure that, once defined, this named value can never be accidentally changed by our code?
Swift variables are declared using the var keyword, while Swift constants are declared using the let keyword, for example:
var pi1 = 3.14159
let pi2 = 3.15159
In this code, the named value pi1 is a variable, and its value can be changed by the code after it is declared. The following line of code later in the program would be legal, even though it would result in an invalid value for pi1:
pi1 = pi1 * 2.0
On the other hand, since pi2 was declared as a constant, using the let keyword, the following line of code later in the program would result in a compile-time error, since changing a let constant is illegal:
pi2 = pi2 * 2.0
Generally, any time you create a named value that will never be changed during the run of your program, you should use the let keyword to create a constant. The Swift compiler enforces this recommendation by creating a compile-time warning whenever a var is created that is not subsequently changed.
In the previous example, we created the variable pi1 without specifying its data type. We took advantage of a Swift compiler feature called type inference.
When you assign the value of a variable or constant as you create it, the Swift compiler will analyze the right-hand side of the assignment, infer the data type, and assign that data type to the variable or constant you're creating. For example, in the following declaration, the compiler will create the variable name as a String data type:
var name = "George Smith"
As a type-safe language, once a data type is inferred by the compiler, it remains fixed for the life of the variable or constant. Attempting to assign a non-string value to the name variable declared above would result in a compile-time error:
name = 3.14159 // Error: "Cannot assign value of type 'Double' to 'String'
While Swift is a type-safe language, where variable types are explicit and do not change, it is possible to create Swift code that behaves like a dynamic type language using the Swift Any data type. For example, the following code is legal in Swift:
var anyType: Any
anyType = "Hello, world"
anyType = 3.14159
While this is legal, it's not a good Swift programming practice. The Any type is mainly provided to allow bridging between Objective-C and Swift code. To keep your code as safe and error-free as possible, you should use explicit types wherever possible.
Swift variables and constants have the same naming rules as most C-inspired programming languages:
Must not start with a digit
After the first character, digits are allowed
Can begin with and include an underscore character
Symbol names are case sensitive
Reserved language keywords may be used as variable names if enclosed in backticks (for example, `Int`:Int = 5)
When creating variable and constant names in Swift, the generally accepted naming convention is to use a camelCase naming convention, beginning with a lowercase letter. Following generally accepted naming conventions makes code easier for others to read and understand (https://swift.org/documentation/api-design-guidelines/#follow-case-conventions).
For example, the following would be a conventional variable declaration:
var postalCode = "48108"
However, the following would not be conventional, and would be considered incorrect by many other Swift developers:
var PostalCode = "48108"
var postal_code  = "48108"
var POSTALCODE = "48108"
Unlike many other programming languages, Swift is not restricted to the Western alphabet for its variable name characters. You may use any Unicode character as part of your variable declarations. The following variable declarations are legal in Swift:
var helloWorld = "Hello, World"
var 你好世界 = "Hello World"
var 😊 = "Smile!"
Note
Just because you can use any Unicode character within a variable name, and can use reserved words as variables when enclosed in backticks, it doesn't mean you should. Always consider other developers who may need to read and maintain your code in the future. The priority for variable names is that they should make code easier to read, understand, and maintain.
In this section, you'll use an Xcode playground to create a variable and constant, and observe the difference between them. So, let's get started.
To work with variables, follow these steps:
Launch Xcode as before, and create a new playground named Create a Variable.playground.
Add the following code to the playground to create a constant (that is, an immutable variable) named name, and a variable named address:
let name = "John Doe"
var address = "201 Main Street"
print("\(name) lives at \(address)")
In this code, both name and address store string text in named memory locations. And we can include them both in the print statement in the same way.
Now add the following code to change John Doe's address and print the new information to the console:
address = "301 Fifth Avenue"
print("\(name) lives at \(address)")
In the console output, the address is changed as expected.
Finally, let's try to change the string stored in the name variable:
name = "Richard Doe"
In this case, the Swift compiler generates a compile-time error:
Cannot assign to value: 'name' is a 'let' constant
By declaring name as an immutable variable with let, we let the compiler know no code should be allowed to change the content of the variable after its value is initially set.
One of Swift's unique language features is its inclusion of tuples. By default, variables and constants store a single value. Tuples allow a variable or constant name to refer to a set of values. While tuples do not exist in many languages, you can think of them as compound values, and they function almost identically to a structure, which is a single named object which can store more than one variable embedded within it.
By using a tuple, we could take the following variable declaration:
var dialCode = 44
var isoCode = "GB"
var name = "United Kingdom"
We could combine it to the following:
var country = (44, "GB", "United Kingdom")
Then we can access the individual members of the tuple as follows:
print(country.0)  // outputs 44
print(country.1)  // outputs GB
print(country.2)  // outputs United Kingdom
Tuple members can also be given individual names, as follows:
var country = (dialCode: 44, isoCode: "GB", name: "Great Britain")

print(country.dialCode)  // outputs 44
print(country.0)              // also outputs 44!
print(country.isoCode)   // outputs GB
print(country.name)       // outputs United Kingdom
Swift functions can accept multiple input parameters, but return only one value. A common use case for a tuple variable type is to include more than one value from a function:
func getCountry() -> (dialCode: Int, isoCode: String, name: String) {
    let country = (dialCode: 44, isoCode: "GB", name: "United Kingdom")
    return country
}

let ret = getCountry()

print(ret)
A second way to return multiple values from a function is to use inout parameters, which allows a function to change the value of an input parameter within that function.
While there are valid use cases for changing inout parameter values, returning a tuple has the advantage of returning a value type—rather than modifying input values.
Note
Tuples behave much like structures—which are predefined compound data types in Swift and many other languages. You may be tempted to use tuples rather than making the extra effort to create structures since they provide similar utility. Be careful not to overuse tuples. They are convenient for ad hoc, lightweight composite data types, but when used in complex programming, use cases can result in code that's more difficult to understand and harder to maintain. Use tuples as they're intended, as a means to bundle a few related components of a data element.
Let's look at creating a tuple. We'll use an Xcode playground to create and use a tuple. Here are the steps:
Launch Xcode as before, and create a new playground named Create a Tuple.playground.
Add the following code to the playground to create a tuple containing a person's name, address and age:
let person1 = ("John Doe", "201 Main Street", 35)
print("\(person1.0) lives at \(person1.1) and is \(person1.2) years old.")
This code is very similar to the previous , except that we've used a tuple to group together values describing John Doe—rather than using separate variables for each element.
While this syntax is legal, acceptable, and common, it can begin to result in difficult to understand and maintain code—especially when a tuple contains more than two simple values. To make a tuple more maintainable, you can give variable names to each of its components.
Add the following to the playground:
let person2 = (name: "Jane Doe", address: "301 Fifth Avenue", age: 35)
print("\(person2.name) lives at \(person2.address) and is \(person2.age) years old.")
In this second approach, each member of the tuple has a descriptive name, making it easier for the reader of the program to understand and maintain the code.
Another unique language feature Swift provides is the optional. In most programming languages, all variables and constants must hold some value. But, in the real world, sometimes a value is unknown. For example, an address may or may not contain a second address line, and more than 60 countries in the world don't use postal codes. Optionals allow variables to indicate whether their value is missing (that is, not assigned), or is truly a blank value.
Note
When variables are declared optional in Swift, they behave very similarly to column values in SQL database such as Oracle, SQL Server, and MySQL.
Optionality for Swift variables is optional (pun intended). To declare a variable as an optional, add a question mark (?) to the end of its data type (or assign another optional variable's value to it so the optional property is inferred from the existing variable).
The following variable name is not an optional:
var name: String = "Hello"
This next variable name is an optional, and has an initial value of nil:
var name: String?
The presence of the question mark intuitively expresses that the variable may—or may not—contain a string. If the optional is not assigned a value, it will automatically be set to nil, meaning it has no value.
Earlier in this lesson, we declared variables with initial values assigned. These variables are not optional, have a value, and can never be assigned a nil value, or an unwrapped optional variable's value.
In this section, we define a variable as an optional by adding a question mark to the type name, which makes it subject to the Swift compiler's optional validation rules.
A third possibility is to declare a force unwrapped variable—a variable that can be nil, but is not optional. This type of variable is declared by placing an exclamation point (!) after the type (rather than the question mark (?) for the optional), for example:
var customerAge: Int!
When a variable is declared in this fashion, the compiler will allow the variable to be assigned a nil value at any time, but will not warn the programmer at compile time when the variable's value is (or could be) assigned a nil value.
There are limited circumstances where this technique is required, and in general it should be avoided.
Note
Why don't we make all variables optional? Optional is a powerful Swift feature, but working with optional variables requires more code as they are used, primarily to check for nil values before accessing the optional value. In general, you should use optional variables when variables may be missing values, but not use optional variables when you know a variable will always have a value.
As mentioned, the simplest way to declare a variable as an optional is to append the data type with a question mark, for example:
var name: String?
Because of Swift's type inference, the following line of code will create a second variable of optional type:
var nameCopy = name
The syntax to assign a value to this variable is the same as it would be if the variable was not declared as optional:
name = "Adam Smith"
The difference between optional and non-optional variables is primarily when you access the value of an optional, which we'll cover next.
Optional variables in Swift can be directly compared to the absence of value (nil) and assigned a nil value. For example, in the following two statements, variable a initially has a value of 4, then is assigned a nil value, and then is checked for having a nil value:
var a: Int? = 4
a = nil
if a == nil {
  print("a is nil")
}
While the presence or absence of a value within an optional can be directly tested, extracting and using the value contained within an optional requires that the optional (the envelope) be unwrapped, and the content (value) extracted. We'll learn how to do this next.
Think of an optional as a value wrapped in an envelope. You cannot access the contents of an envelope without opening it (unwrapping it), and then removing the contents.
You can primarily unwrap an optional and use its value in two ways:
Force unwrap
Conditional unwrap
We'll learn each of these techniques next.
Look at the
two optional
Int variables:
var a: Int?
var b: Int = 4
You could attempt to assign a to b, for example:
b = a
But this would result in a compile-time error:
Value of optional type 'Int?' not unwrapped; did you mean to use '!' or '?'?
As the error indicates, accessing the value of an unwrapped optional variable is (always) illegal. One approach to solving this problem is to force unwrap the variable as we use it. To force unwrap a variable, simply place an exclamation mark (!) after the variable name, for example:
b = a!
Force unwrapping is similar to using a type cast in many languages. In Swift, a force unwrap tells the compiler to assume that the optional contains a value.
However, a force unwrap shifts all the responsibility to the programmer for ensuring optionals actually have values. The above example, b = a!, would allow the code to compile, but would generate the following runtime error, and the application will crash:
Fatal error: Unexpectedly found nil while unwrapping an Optional value
Because variable a is an optional with no value, there is no value to extract from it to assign to b.
Note
Force unwrapping should not be viewed as a way to get around compiler type-safety features. Only use force unwrapping when you're absolutely certain that it's impossible for an optional variable to contain a nil value. In the following code, a force unwrap would be acceptable:
var a: Int? = 2
var b: Int = 4
b = a!
While there are times when force unwrapping variables is safe, you should typically take advantage of Swift's type-safety features by using conditional unwrapping.
With conditional unwrapping, we ask the compiler to first check whether the optional has a value, and return the value if present, or nil if not.
For example, to assign the value of optional a to a new, non-optional variable b, we can use the following code:
var a: Int? = 4
if let b = a {
   print(b)
}
This code snippet would print the value 4 to the console. If we had not assigned the initial value 4 to a, then nothing would have been printed.
Use an Xcode playground to create and use an optional, by performing the following steps:
Launch Xcode as before, and create a new playground named Using Optionals.playground.
Add the following code to the playground to create an optional containing a person's name:
var name: String? = nil
Now add the following code to check whether the optional is nil:
if name == nil {
    print("name is nil")
} else {
    print("name is not nil")
}
Of course, since we assigned the value nil, it is nil.
A more common way to check for a non-nil optional is to use the if/let syntax covered previously.
Add the following code to assign a value to the optional content, then print it to the console:
name = "John Doe"
if let n = name {
    print(n)
} else {
print("the name is still nil")
Because you assigned a value to the variable name, the string John Doe is printed to the console.
Finally, comment out the variable assignment. The output will now change to the name is still nil, because the if/let syntax detected that the variable name contains no value.
It's very
common that Swift functions should only execute when parameters passed to them are in an expected state. In early versions of Swift, the conditional unwrapping technique was often used to provide this type of safety checking. For example, a function that accepts an optional
Int value, but should only proceed when the parameter is not nil might look as follows:
func doubleValue(input: Int?) -> Int? {
   if let i = input {
      return i * 2
   }
   return nil
}
While this function is only a few lines of code, imagine if the work done on the unwrapped variable was more complex. To allow parameter and other data state checking to be concisely done at the beginning of functions, Swift includes a guard keyword.
The following is a version of doubleValue that uses the guard syntax to place data state checks at the top of the function:
func doubleValue(input: Int?) -> Int? {
   guard let i = input else { return nil }
   return i * 2
}
This is the end of this section. Here, we have had a deep look at how to declare variables and constants in Swift. We also worked with tuples and optionals.
In Swift, variables are declared before being used. Variables can be declared in various ways, and may not even need to have their type explicitly stated when the compiler can infer data type from initial assignment.
Use an Xcode playground to practice how to declare variables, constants, and tuples.
Launch Xcode as before, and create a new playground named Topic B Summary.playground.
Add the following code to the playground to create three variables storing values related to the weather conditions in Berlin:
let cityName = "Berlin"
var humidityPercentage: Double?
var temperatureCentigrade: Double?
Note that cityName is a constant, non-optional variable, with an initial string value. Since we know the name of the city in advance, and it doesn't change for this program, it's most appropriate to use let to declare this value as a constant.
humidityPercentage and temperatureCentigrade are declared as optional, since we do not yet know the weather conditions in Berlin at the start of this program.
Next, add the following line of code to create a tuple to collect the weather report data into a single variable named weather:
var weather = (city: cityName, humidityPercentage: humidityPercentage, temperature: temperatureCentigrade)
Recall that providing reference names for each tuple member is optional, but is included here to make the remaining part of the program clearer to other programmers who may need to read this program later.
Next, set the value of humidity within the tuple:
weather.1 = 0.70
Note that even though you created a reference name for humidity (humidityPercentage), you can still set the value using the ordinal position within the tuple. The following line of code would probably be better in this case:
weather.humidityPercentage = 0.70
Now print the tuple to the console. On noticing that the variable provided is a tuple, the console print() function prints all members of the tuple—along with the reference names provided:
print(weather)
The output of the print statement is as follows:
(city: "Berlin", humidityPercentage: Optional(0.69999999999999996), temperature: nil)
Finally, print each of the tuple's components, each on its own line:
print("City: \(weather.city)")
print("Humidity: \(String(describing:weather.humidityPercentage))")
print("Temperature: \(String(describing:weather.temperature))")
The output of this code is as follows:
City: Berlin
Humidity: Optional(0.69999999999999996)
Temperature: nil
Like most programming languages, Swift includes a full complement of built-in data types that store numbers, characters, strings, and Boolean values.
Note
In the
previous section, we covered the use of Swift optionals, and worked through several examples declaring an
Int variable as optional and non-optional. Keep in mind that any Swift variable, of any type, can be declared as an optional.
Like most programming languages, Swift provides built-in numeric data types that represent either integer or floating-point values.
While it's
likely you'll develop Swift applications exclusively on 64-bit platforms, it's important to know that Swift is available on both 32-bit and 64-bit platforms. When using a generic integer numeric type (
Int or
UInt), the generic type will be mapped to an underlying, specific equivalent that matches the current platform's word size. For example, on a 64-bit platform,
Int is mapped to
Int64; on a 32-bit platform, the same
Int type is mapped to an Int32.
The following table summarizes the available Swift numeric data types:
|
Type |
Min value |
Max value |
|---|---|---|
|
|
-128 |
127 |
|
|
-32768 |
32767 |
|
|
-2.1 x 10⁹ |
2.1 x 10⁹ |
|
|
-9.2 x 10¹⁸ |
9.2 x 10¹⁸ |
|
|
0 |
255 |
|
|
0 |
65535 |
|
|
0 |
4.3 x 10⁹ |
|
|
0 |
1.8 x 10¹⁹ |
|
|
-1.8 x 10308 |
1.8 x 10308 |
|
|
-3.4 x 1038 |
3.4 x 1038 |
Conceptually, a
UInt64 variable will consume four times more RAM than a
UInt8 variable, so you may ask, "
Should I tune my variables by selecting the smallest number of bits needed to meet requirements?"
While it may seem intuitive to
select the numeric type that uses the least RAM to store the variable's expected range of values, it's usually preferable to use the generic integer types (for example,
Int when declaring integers and
Double when declaring floating-point numbers).
Note
This is a reference from The Swift Programming Language (Swift 4): " Unless you need to work with a specific size of integer, always use Int for integer values in your code. This aids code consistency and interoperability." Visit https://developer.apple.com/library/content/documentation/Swift/Conceptual/Swift_Programming_Language/ for the official documentation.
Integer
values may be instantiated using base 10 (decimal), base 2 (binary), base 8 (octal), or base 16 (hexadecimal) literal values, or by assigning another
Int variable of the same type to the new variable.
For example, assigning
the number 100 to a new
Int variable holding a duration in minutes can be done in any of the following ways:
let minutes = 100         // decimal
let minutes = 0b1100100   // binary
let minutes = 0o144       // octal
let minutes = 0x64        // hexadecimal
Floating-point numbers
are represented by either
Float or
Double data types. In general, you should use
Double—and employ Float only when specific circumstances require using the smaller, 32-bit numeric variable.
Declaring and assigning
value to floating-point variables follows the same syntax rules as with integer variables. For example, the following statement creates a new
Double variable interestRate, and assigns an initial value to it:
var interestRate = 5.34
When assigning constant values to numeric types, Swift provides a handy format to make code more readable: the underscore character is ignored when parsing numeric literals.
This feature is most commonly used to provide groupings of thousands in a large integer or floating-point assignments, but actually can be used to provide any grouping separation that makes code more readable. For example, the following statements all assign the value 100,000 to the variable minutes:
var minutes = 100000
var minutes = 100_000
var minutes = 10_00_00
var minutes = 0b110_000110_101000_00
Using the underscore for readability can also be used for floating-point literal values. For example, the following statements are equivalent:
var balance = 10000.44556
var balance = 10_000.44_556
Like many fully compiled languages, Swift is a strongly typed language, and requires explicit type conversions (or casts) when assigning the value from one variable type to a variable of a different type.
Many new Swift programmers find that Swift is even stricter than languages they've used before. In many programming languages, the compiler will implicitly convert between data types during an assignment so long as the value contained within the variable being assigned (on the right of the equals sign) could not overflow the variable being assigned to (on the left of the equals sign).
In other words, in many languages, the following code would be legal, since an
Int8 is known to always
fit into an
Int16 without a numeric overflow:
Int8 smallNumber = 3;
Int16 mediumNumber = smallNumber;
However, this equivalent code in Swift would result in a compile-time error:
var smallNumber: Int8 = 3
var mediumNumber: Int16 = smallNumber
This code would generate the following error:
error: cannot convert value of type 'Int8' to specified type 'Int16'
In Swift, it's always the programmer's responsibility to ensure that assignments have the same data type on the left and right of the assignment operator (that is, the equals sign). The following code corrects the compile-time error:
var smallNumber: Int8 = 100
var mediumNumber: Int16 = Int16(smallNumber)
Note
This requirement for explicit type assignment is one reason why most Swift programming uses the generic numeric variables
Int and
Double, except when specific usage requires tuning for numeric range or memory storage size.
Now, let's see how to use various numeric variable types by following these steps:
Launch Xcode as before, and create a new playground named Topic B Using Numeric Types.playground.
Add the following code to the playground to create three
Intvariables, using binary, base10, and base16 literal notation, respectively:var base2 = 0b101010 var base10 = 42 var hex = 0x2A
Now add the following three corresponding lines to print the data type and value for each of the variables you just created.
print("Printing \(type(of: base2)): \(base2)")
print("Printing \(type(of: base10)): \(base10)")
print("Printing \(type(of: hex)): \(hex)")
Examining the output, note that the three variables all have the same data type (
Int) and same value (42 in base 10).Add the following lines of code to create two more variables, and to print the types and values for each:
var scientific = 4.2E+7
let double = 4.99993288828
print("Printing \(type(of: scientific)): \(scientific)")
print("Printing \(type(of: double)): \(double)")
Note that both variables were created as Double types—even though the value of the first is actually an Integer. Swift's inference system doesn't always look at the actual value. In this case, the presence of scientific notation in the literal value caused Swift to assume the value should be a Double.
Now add the following lines to cast and round the variable named double to an
Int:var castToInt = Int(double) var roundToInt = Int(double.rounded()) print("Printing \(type(of: castToInt)): \(castToInt)") print("Printing \(type(of: roundToInt)): \(roundToInt)")As you probably expected, the castToInt discarded the fractional value of the original double variable. For the roundToInt variable, we called the .rounded() function on the variable double, and then cast that value. Since 4.999 was rounded up to 5 before being cast, the Int contains the rounded value.
Finally, add the following lines to create a very large unsigned integer and then print its type and value:
var bigUnsignedNumber:UInt64 = 18_000_000_000_000_000_000
print("Printing \(type(of: bigUnsignedNumber)): \(bigUnsignedNumber)")
This code works as expected—printing an integer with 20 digits (the underscore is added to help count how many digits there are).
Note that in this case, we specified
UInt64should be the data type for this variable. Had we not made the type explicit, Swift's type inference rules would have assigned the smaller Int data type to the variable, and it would have overflowed.
Again, keep in mind the inference engine examines the format of a constant perhaps more than the value of the numeric value being assigned. You should rely on the inference engine by default, but keep in mind you may sometimes need to be explicit when you know more about how a variable will be used than Swift can infer.
In Swift, the Boolean data type is Bool, and stores a value of true or false. As with other data types, in the case that a Bool value is not yet known, a Bool can be declared as optional, for example, Bool?.
For example, the following code declares a Boolean in Swift, and then changes its value:
var isChecked = false
isChecked = true
Testing for the value of a Bool value is similar to how we do it in other C-inspired languages, for example:
if isChecked {
   // statements to execute if isChecked is true
}
if isChecked == true {
   // statements to execute if isChecked is true
}
if !isChecked {
   // statements to execute if isChecked is false
}The Character data type in Swift is an extended grapheme cluster.
What does that mean?
An extended grapheme cluster is an ordered sequence of one or more Unicode scalars (that is, values) that, when taken together, produce a human-readable character.
Most important to understand is that, unlike ASCII or ANSI character representations many programmers have worked with before, a Character in Swift may be made of more than one Unicode value.
In Swift 4, the underlying complexities of Unicode, scalar values, and extended grapheme clusters are largely managed for you, but as you begin to work natively with Unicode characters and strings, bear in mind that the Swift Character/String architecture was developed from the ground up around Unicode character representation—not ANSI/ASCII as many other languages were.
The following are two examples creating new Character variables, and assigning literal values:
let ch1:Character = "A"
let ch2:Character = "😎"
Note the following regarding this assignment:
In Swift, a Character literal is delimited by a double quote, rather than the single quote that's common in most C-inspired languages.
Because the Swift compiler's type inference rules will assume double quotes around a literal imply a string variable, the above ch1 assignment must explicitly declare the variables as Character type—otherwise the Swift compiler will create ch1 as a string.
To construct a Character type using Unicode values, you can assign an escape sequence, or use the UnicodeScalar struct to create a Character using numeric Unicode values as input.
The following line of code creates a UnicodeScalar from the value 65 (the ASCII value for the English letter A), and then assigns it to the immutable variable ch1:
let ch1 = Character(UnicodeScalar(65))
In this case, there is no ambiguity with regards to double quotation marks, so it's not necessary to explicitly assign the Character type during this assignment.
It's also common to construct a Character using a UnicodeScalar escape sequence within double quotation marks. The following creates a character variable containing an emoji character represented by the UnicodeScalar 1F601:
let ch3 = "\u{1F601}" // sets ch3 to "😁"While Unicode scalars are conceptually similar to ASCII/ANSI value encoding, Swift Characters may be made of more than one numeric value, while ASCII and ANSI use only one numeric value to represent each character.
For example, an accented Western letter is expressed by providing a UnicodeScalar containing two character values.
We can construct the Unicode representation of an accented e character as follows:
let ch4 = "e\u{301}" // éThe expression on the right of the assignment contains the literal letter e, followed by the escaped value for the accent modifier (301). The Swift compiler combines these two elements into a single extended grapheme cluster.
Strings in Swift are very similar to strings in other programming languages. As string handling is so central to any application development project, we'll dedicate an entire subsequent lesson to Swift's powerful string handling capabilities. In this section, we'll discuss the basics for declaring and using a string.
Fundamentally, strings are arrays of the Character types, supporting the familiar assignment operator (=), substrings, concatenation, and C-inspired escape characters.
Instantiating a string variable is highly intuitive. The following statements create string variables:
var alphabet = "ABCDEFGHIJKLMNOPQRSTUVWXYZ"
let macCharacters = "⌘⌃⌥⇧ ⏎⌫⇪⎋⇥"
let emoji = "😎😂🎃🐳🍎😜😆"
As in many languages, Swift strings can be concatenated using the plus (+) operator:
let alphaMac = alphabet + macCharacters
String also supports the unary addition operator:
alphabet += macCharacters
One difference between Swift strings and strings in many languages is how individual elements of strings are accessed. Specifically, the following syntax with Swift strings is illegal:
let ch = alphabet[4]
error: 'subscript' is unavailable: cannot subscript String with an Int, see the documentation comment for discussion
In Swift, the input to the subscript operator (that is, what's between the [] characters) is expected to be of type String.Index, not
Int.
In practice, you will construct an Index, then pass the index to the substring operator, for example:
let idx = alphabet.index(alphabet.startIndex, offsetBy: 4)
let ch = alphabet[idx]  // ch is assigned the character "E"
Obtaining the length of string is quite easy—simply call the count property of a string:
var alphabet = "ABCDEFGHIJKLMNOPQRSTUVWXYZ"
let alphabetLength = alphabet.count  // 26
We have now reached the end of this section. Here, we worked with the different data types in Swift, specifically numeric, Boolean, character, and string data types.
Now that you've learned about the various data types available with Swift, let's put this knowledge into practice by using various types together, and also using the Apple Foundation framework.
Use an Xcode playground to practice various data types. You'll be using numeric data types, formatting them as strings, and using string interpolation to print string values from various data types.
Launch Xcode as before, and create a new playground named Data Type Summary.playground.
Add the following code to the playground to create an immutable
Doublewith an initial value:let dVal = 4.9876
Next, create a Boolean mutable variable with an initial value of true, and another variable set to the
Doublevariable after rounding to a whole number:var iValRounded = true var iVal = Int(dVal.rounded())
Next, we're going to use a class from Foundation to create a string representation of the
Doublevalue, rounded to two digits. If you're not familiar with NumberFormatter, don't worry. This is just one of the many utility classes Apple provides in its expansive SDK for macOS and iOS:var formatDigits = 2 let nf = NumberFormatter() nf.numberStyle = .decimal nf.maximumFractionDigits = formatDigits let formattedDouble = nf.string(from: NSNumber(value: dVal)) ?? "#Err"
Because NumberFormatter.string returns an optional, we need either to check it (with if/let, or as here, provide a default value ("#Err") in case the function does return nil.
Now add the following line to print a statement about the values we've created:
print("The original number was \(formattedDouble) (rounded to \(formatDigits) decimal places), while the value \(iValRounded ? "rounded" : "unrounded") to Integer is \(iVal).")The output of this code is as follows:
The original number was 4.99 (rounded to 2 decimal places), while the value rounded to Integer is 5.
Finally, add the following lines to change the rounding strategy, and print a sentence about the result of the new string conversions:
formatDigits = 0
nf.maximumFractionDigits = formatDigits
formattedDouble = nf.string(from: NSNumber(value: dVal)) ?? "#Err"
iValRounded = false
iVal = Int(dVal)
print("The original number was \(formattedDouble) (rounded to \(formatDigits) decimal places), while the value \(iValRounded ? "rounded" : "unrounded") to Integer is \(iVal).")
The output of this second sentence is as follows:
The original number was 5 (rounded to 0 decimal places), while the value unrounded to Integer is 4.
Enums are frequently used in Swift to create custom data types that have a predefined set of possible values to select from. Enums serve to make code more readable and maintainable, and also provide compile-time checking for parameters and value assignments which yield higher quality, more robust code.
Many languages provide built-in enum features, and Swift's implementation of the enum is very similar to other languages. Swift does have some unique enum features, which we'll cover in this section.
Consider the following code, which creates and uses a basic enum:
enum DayOfWeek {
    case monday, tuesday, wednesday, thursday, friday
}

var today = DayOfWeek.wednesday

if today == .friday {
    print("Today is Friday")
} else {
    print("Today is not Friday")
}
Defining the enum DayOfWeek declares a new data type, which can be used just like any other data type. Because the variable today is of the type DayOfWeek, which can only be assigned one of the seven listed values, we could not assign anything else. For example, the following code would generate a compile-time error, because Saturday is not included in the predefined values:
Var today = DayOfWeek.saturday
The preceding example illustrates the two most important advantages of enums:
Possible values are restricted to a predefined list, making assignment of invalid values something that is tested at compile time rather than at runtime.
Code that uses enums become self-documenting and easier to understand.
In the preceding enum example, the enum values (.monday, .tuesday, and so on) have no underlying data type. For example, we might want to calculate the day of week by subtracting the ordinal number for the today variable from .monday.
However, with the enum as defined, there is no numeric value associated, so the following code will fail to compile:
var nthDay = today - DayOfWeek.Monday
This code generates the following error:
Binary operator – cannot be applied to two 'DayOfWeek' operands
This is by design, because unlike some languages, a Swift enum need not be mapped to a native data type (and should not be, if there's no reason to do so).
However, Swift enums
can be mapped to any underlying data type. In the following revision, we map the day of week to the
Int data type, which enables the
nth day of the week calculation mentioned above:
enum DayOfWeek: Int {
    case monday, tuesday, wednesday, thursday, friday
}

var today = DayOfWeek.Wednesday // DayOfWeek.wednesday
var nthDay = today.rawValue - DayOfWeek.monday.rawValue + 1 // 3
var tomorrow = DayOfWeek(rawValue: today.rawValue + 1) // DayOfWeek.thursday
In this case, all
we needed to do was add a native data type (Int) to the enum declaration. The Swift compiler then holds a .rawValue property. When an enum has an underlying value, it also becomes possible to create an enum member by passing it to the rawValue: parameter of the enum initializer.
Note
Use care with raw values. Passing a rawValue: to an enum initializer that does not match a defined case within the enum results in the creation of a nil optional.
In the preceding example, we used
Int as the raw value for the revised DayOfWeek enum. Swift allows any data type to serve as the underlying value of an enum. For example, we could use String instead of
Int to enable the following use case:
enum DayOfWeek: String {
    case monday = "Monday"
    case tuesday = "Tuesday"
    case wednesday = "Wednesday"
    case thursday = "Thursday"
    case friday = "Friday"
    case saturday = "Saturday"
}

var today = DayOfWeek.Wednesday // DayOfWeek.wednesday
let dayString = today.rawValue  // "Wednesday"
In this section, we have looked at enums in detail. We saw its syntax and how to define an enum with raw values. We will now work through an activity where we will use enums to implement error codes.
Enumerations are a powerful construct available in many programming languages. Enumerations make code more robust and easier for others to understand and maintain.
Use Xcode to define error codes using conventional error number techniques, and alternatives that use Swift enums.
Launch Xcode as before, and create a new playground named Activity D - Using Numeric Types.playground.
Add the following lines of code to create a set of error codes using simple integer values:
// Store an error condition as an integer
let success = 0
let ioFailure = 1
let timeoutFailure = 2
Now create the same set of error codes using an enum without a raw value:
// Store an error condition as an enum type
enum Result {
    case success
    case ioFailure
    case timeoutFailure
}
Finally, create the same set again, this time using an enum with a raw Integer value associated with each result code:
// Store an error condition as an enum type with raw value
enum ResultWithRawValue: Int {
    case success = 0
    case ioFailure = 1
    case timeoutFailure = 2
}
Now let's use these error values by creating a new variable, assigning the ioFailure error condition to each one:
let error1 = ioFailure
let error2 = Result.ioFailure
let error3 = ResultWithRawValue.ioFailure
Finally, use the console print function to output the content of each error variable. Note how each one is represented to the console:
// Now print out the error result from each case.
print("File access resulted: \(error1)")
print("File access resulted: \(error2)")
print("File access resulted: \(error3)")
print("File access resulted: \(error3.rawValue)")
In this lesson, we've learned the basic language structure and syntax for the Swift programming language. We've now understood the following concepts:
The fundamental structure of Swift programs, and how to use an Xcode playground to develop simple and complex programs
How to create and use mutable and immutable Swift variables
The built-in data types available to Swift programs, and how to select the appropriate data type depending on circumstance
Swift's powerful optional construct for detecting and branching program flow when data values are not available
Swift's type inference and strict type safety syntax and usage
Now that you have the basics well in hand, we're ready to move on to the next lesson, where we'll learn how to use these language elements in complex Swift programs. Specifically, we'll look at the control flow structures and operators offered by Swift.