


In this chapter, we will say "hello!" to the Backbase Client Framework. We will explain how to download the framework and how to install it. Then, we will discuss how to set up a new application that'll show "Hello World!". At the end of this chapter, we will also show a simple page layout using a Backbase panelSet widget. We will expand this page into a client web application in later chapters.
In each chapter, we will cover some background information that will help you understand how the Backbase framework works. In this chapter we will look at the following subjects in more detail:
What are Backbase, AJAX, and RIA?
Setting up your development environment, downloading the Backbase Client Framework, and installing it
The Backbase Explorer
The Backbase page skeleton that is needed to load the client runtime of the framework
"Hello Backbase" examples
Namespaces and how they are used in the Backbase framework
A basic page with a
panelSet
The Backbase Client Framework is a standards based, server independent, cross-browser solution to creating web applications, ranging from traditional to desktop-like. It uses AJAX technologies to easily develop and deploy Rich Internet Applications.
This is a mouthful of a definition. Let's look at the meaning of those terms first:
Standards based: XHMTL, CSS, XML, and JavaScript are used according to defined standards.
Server independent: The Backbase Client Framework is server agnostic, as it does not know which server or which server language it is communicating with.
AJAX: Asynchronous JavaScript and XML is an enabling technology for creating Rich Internet Applications. We will provide an overview in Chapter 4.
RIA (Rich Internet Applications): This is what you can build using the Backbase Client Framework—web applications that have a rich user interface, and allow a user to interact with the application. In addition to AJAX as a communication enabler, there is also an extensive library with UI widgets available.
In addition to the Client Framework, Backbase offers a set of extensions for the Java environment. It includes a JavaServer Faces (JSF) extension, a generic connector for JSP or Struts, and a Data Services extension. These extensions are not discussed in this book.
If you are like us and like many web developers, you may have started writing simple HTML when developing web applications. After a while, you may have decided to separate presentation from structure and to give your web pages a better look using CSS. The next thing in your evolution as a web developer would have been making your pages more user friendly and interactive, by creating tool tips, pop-up windows, tab boxes, and by validating forms before submitting. Maybe you did this using little pieces of JavaScript downloaded from the Web or by building your own JavaScript function libraries. On top of this, you may have tried to give your web applications the look and feel of a desktop application by using AJAX, requiring more JavaScript everywhere.
Now, what happened to the source code of your web pages? Again, if you are like us, over time the HTML code became littered with many pieces of JavaScript. It became difficult to see what the structure of the page was, even more so when you tried to generate the HTML code from PHP or JSP or some other server-side scripting language. Perhaps, you found out too that it is really hard to make a web page that will show well in all major browsers.
Would it not be nice if there was...
A framework that has the tool tips and the tab boxes readily available for you and will allow you to code these widgets as if they were HTML tags?
A framework that has AJAX support almost transparently built in?
A framework that allows you to bind data from a database to widgets on your page, such as a data grid with paging, sorting, and more?
A framework that allows you to extend the provided widgets or build your own widgets, and then use these widgets in exactly the same way as the widgets provided with the framework?
And finally, a framework that runs in standard browsers without requiring a plugin?
The Backbase Client Framework is such a framework. We will call it Backbase most of the time, which is also the name of the company that built the framework. Backbase can be used freely. There is no difference between the commercial and the community edition, except for the license, which states that you should not deploy it commercially on a server with more than two processors.
This book is intended to make you an expert in using the Backbase framework. We will cover just enough of AJAX, XML, XHTML, namespaces, XPath, CSS, and the Document Object Model (DOM) to make the Backbase framework easier to use, and to understand why Backbase is built like it is. While doing so, we hope that we can increase your knowledge of the core client web technologies and how they relate to each other. With this knowledge, you can evaluate Backbase against other frameworks and decide which one suits your purpose the best.
To round off this introduction, let's summarize the advantages of using the Backbase Client Framework:
The framework is written in JavaScript. Therefore, it runs on all modern browsers and requires no plugin or prior installation.
The framework is XML based. This means that you can define your GUIs using XML tags. This is very important for clarity of code and design, and is more familiar to UI developers.
The widgets that are built-in or that you create are objects, in the meaning of being object oriented. This means that you can use object-oriented design methods effectively to design a Backbase application.
The framework itself is built using a Model-View-Controller (MVC) architecture. You are encouraged to similarly design your applications using MVC.
The framework is standards based and provides cross-browser functionality. This means that the Backbase framework allows you to use standards, such as DOM 3 events or SMIL that may not be available in all browsers.
Another transparent feature is the AJAX communication built into several UI widgets. For example, you do not need to create
XMLHttpRequestobjects to submit a form. The framework will do this automatically for you if and when you tell it where the response should go.There is an Eclipse IDE plugin available to help with the syntax of UI widgets.
The framework easily integrates with third-party widgets.
Let us first take a look at what the Backbase framework contains. On the Developer Network site of Backbase, there is a set of demos that you can view online or download for further inspection. The URL for this site is http://bdn.backbase.com/client/demos.
These demos include Sample Application Layouts, a Progressive Enhancement Demo, a Rich Forms Demo, and Coexistence Demos. You can take a look at those and run them online, but according to our opinion, they are only mildly interesting, except for the Backbase Explorer.
The Backbase Explorer allows you to view all UI widgets from the Backbase Tag Library ( BTL); you can see the source code that is needed to show the example, and you can change the source code to see what happens. For example, if you click on Windows & Dialogs | window management | windowArea, you can see something like this:

The Backbase Explorer is an interesting and useful application that can be used to learn more about the Backbase framework and about the widgets it offers.
Also, take a look at the Sample Application Layouts on the same online demo page. This will give you an idea of the kind of layouts you can easily make using Backbase. We will use a simplified version of one of these as the starting point for the example application that we will be developing throughout the book.
Each of the demos is downloadable and contained in a ZIP file. When unzipped, it can execute immediately on your local PC because the essential parts of the Backbase framework are included with it.
Before we start looking at the Backbase Client Framework, you may want to consider the setting up of a development environment that you will need to execute the examples provided in the book or to develop your own applications. We assume that you already have experience with web application development. Therefore, we will keep it short.
To try out the application we are developing, you will need a web server, a language environment that you can use to develop the server side of your application, and a browser in which you can execute your application.
To serve web pages locally, you need to have a web server installed on your local PC. You can use any web server you like in combination with the Backbase framework. For example, popular web servers are Apache and IIS.
Also, you will need a server scripting language, such as JSP or PHP. Backbase will work with all server languages, therefore the choice is yours. Just remember that Backbase can communicate with any web server and any server scripting language that outputs the right XHTML to the browser.
If you already have a local development environment set up, then that is fine. Keep using it! Otherwise, you could obtain the XAMPP package, which you can download from: www.apachefriends.org. This package is really easy to install and includes Apache, PHP, MySQL, PHPMyAdmin, and more. It is available for several operating systems including various types of Linux, Mac OS, and Windows.
Examples in this book that require communication with a server will mostly use PHP because that is the easiest environment to set up, and also easy to understand, even if you are not familiar with it.
Note
There exists a JSF version of Backbase framework, which offers tight integration with JavaServer Faces (JSF). We are not discussing the JSF version of the Backbase framework in this book.
To execute and view the application we are developing, you need a browser. The browser landscape is changing very fast. A year ago, there would have been only one recommendation that we would have made here: use Mozilla Firefox! Not only because it is a good browser, but mainly because of Firebug, the debugging plugin for Firefox. Firebug gives you the ability to edit, debug, and monitor CSS, XHTML, JavaScript, and network traffic live in any web page viewed in the browser. You can find Firebug at http://www.getfirebug.com.
Today, there are a lot more browsers that do a good job at implementing web standards and that offer good debugging facilities such as Google Chrome, Safari, and Microsoft Internet Explorer 8.
A handy plugin to use for Microsoft Internet Explorer prior to version 8 is the MSIE Developer Toolbar. It provides a variety of tools for quickly creating, understanding, and troubleshooting web pages in the MSIE browser. Search for Developer Toolbar at http://www.microsoft.com/downloads/.
We should specifically mention the Backbase debugger. This is a Firebug style debugger that will work across all supported browsers. It will start automatically in the Backbase development environment when something goes wrong. It will help you to debug applications in browsers for which no good tools are available.
Note
Although many examples shown in this book and in the Backbase documentation do not really require communication with a server, you may not be able to execute them locally by typing the file location as URL in the browser because of security restrictions in the browser you are using.
Note
Firefox is an example of such a browser. You can lift this restriction in Firefox by placing a file with the name user.js (if it does not exist) in the defaults/pref folder of the browser and adding the following line:
pref("security.fileuri.strict_origin_policy", false);
If you are a Windows user, you may be able to find this folder here: C:\Program Files\Mozilla Firefox\defaults\pref.
Be aware of the security risks you are taking though!
You will need more than one browser to test your application. A considerable percentage of the users of your web application will be using browsers other than the one you chose to develop with, and unfortunately, even Backbase cannot guarantee that your application will look the same in all browsers. At the minimum, you should have Mozilla Firefox and Microsoft Internet Explorer available for testing.
In addition to a web server, you will need a tool that you can use to edit your application source code. Although any text editor such as Notepad is sufficient, you will be more productive if you use a suitable Integrated Development Environment (IDE). Again, if you already use an IDE that you are comfortable with, please keep using it. Otherwise, we would recommend installing the Eclipse IDE. Eclipse is an open source IDE with many plugins available for specific development tasks. One of those is a Backbase plugin that will help with code completion. This plugin is included in the package when you download the Backbase framework. However, Eclipse can be downloaded from http://www.eclipse.org. Be sure to download a version of Eclipse with web development capabilities already included. A plugin that supports PHP, of which there are several available, is useful too.
As an alternative, you could consider Aptana Studio, an Eclipse-based IDE that is targeted at AJAX developers. Among many features, it has support for Adobe Air application development. It has many plugins for all kinds of handy development tasks. You can download Aptana as a standalone application or as an Eclipse IDE plugin from http://www.aptana.com.
Your development environment is now set up; therefore, it is time to download Backbase Client Framework from http://www.backbase.com/download.
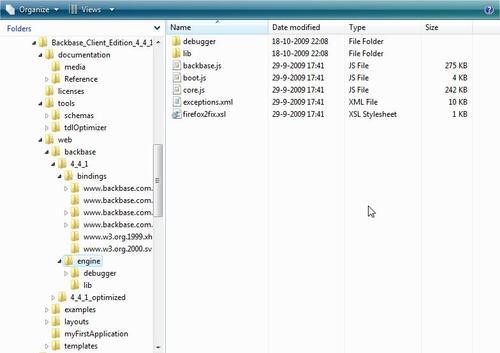
Once you have downloaded the package, which comes as a ZIP file, you can unzip it to a convenient location. The unzipped package should look similar to this:
Note
Warning: What we describe here is the structure of the Backbase package as you can find it on the Web at the time of writing. Changes have occurred in the past and may happen again.
In order to use the Backbase framework, your web server must send it to a browser. Therefore, we must copy the framework to a location where the web server can find it. Your web server serves its pages from its document root. Its default location for the document root can be very different depending on the web server you are using and by configuring the web server, you can have multiple roots at almost any location in the file system on the host of your web server.
Let's assume that your development web server is Apache from the XAMPP package and that you have installed it on the C: drive. The default document root is then: c:\xampp\htdocs. The easy way to install the Backbase framework is to copy the backbase folder found in the web folder and paste it as a subfolder of htdocs. For the time being, you can delete the 4_4_1_optimized folder that you just copied. You will need the optimized version of the framework only when you are actually deploying your application on a publicly visible server.
There is one more thing we would like to take care of before we really start. It will save a lot of useless book space if we can explain what a typical starter page for the Backbase framework looks like and then forget about it. Of course, the examples that are supplied with this book are all ready to execute and therefore this source code will repeat the skeleton page code where required.
For any Backbase enabled page, you need an HTML file, usually named index.html, which looks like this:
<!-- -->
<!DOCTYPE html PUBLIC "-//W3C//DTD XHTML 1.0 Strict//EN"
"http://www.w3.org/TR/xhtml1/DTD/xhtml1-strict.dtd">
<html xmlns="http://www.w3.org/1999/xhtml" xmlns:xi="http://www.w3.org/2001/XInclude">
<head>
<meta http-equiv="Content-Type" content="text/xhtml; charset=UTF-8" />
<title>The Title of your Application</title>
<script type="text/javascript" src="../../backbase/4_4_1/engine/boot.js" >
</script>

</head>
<body>
<script type="application/backbase+xml">
<xi:include href="../../backbase/4_4_1/bindings/config.xml">
</xi:include>
<!-- YOUR APPLICATION CODE GOES HERE -->
</script>

</body>
</html>
Note
The version number of the Backbase Client Framework release is specified in the [version] folder name (for example, 4_4_1). If your version of the Backbase Client Framework is different from the one shown here, you must adapt the code samples accordingly.
There are some interesting points:
If you are including third-party libraries or your own JavaScript libraries, you should include them in the
headsection of the HTML document, as usual.At the place where it says:
<!-- YOUR APPLICATION CODE GOES HERE -->, you can put your application code. We will call this a Backbase area. The code that you can put here can be ordinary XHTML, widgets that are provided by Backbase, or widgets that you have built yourself.The
<!-- YOUR APPLICATION CODE GOES HERE -->part is contained within script tags withtype="application/backbase+xml". The type attribute signals the Client Runtime that it should process the contents. The xml part of the type attribute says that the contents should be proper XML.There can be multiple Backbase area's areas. In fact, there can be as many areas as you like. This is convenient if you are converting an older web application to a Backbase application or when you have large chunks of conventional HTML in your application. As the Backbase framework takes some overhead to process this HTML, there is a performance advantage to put code that does not require processing by the Client Runtime outside a Backbase area.
The code in a Backbase must adhere to XHTML standards and most importantly, all tags must be properly closed. This can be a source of errors if you are converting an older application where for example
<input>and<img>tags are often not closed. Another XHTML violation to watch out for is that attribute values in tags must be enclosed in quotes and all attributes specified must have a value. For example, you should codeselected="selected"instead of justselectedin aselectbox.The Backbase JavaScript engine in
boot.jsis loaded in the header of the HTML page. It is very important to make sure that you have a proper path specification here. Many times, when you set up a new application, you get an empty page at your first try to see your application. The cause is almost always that your path specification is wrong. If this happens to you, it is convenient to use a tool like Firebug to see what the server returns and why it cannot find the Backbase libraries.To use the Backbase widgets, you must include the configuration files, also called implementation bindings for the tags:
<xi:include href="../../backbase/4_4_1/bindings/config.xml">
</xi:include>
The
config.xmlfile contains an additional include for the specific skin you want to use. The default is the chameleon skin. As an alternative, you can use the system skin. Similar to the earlier point, your path specification must be correct; otherwise your page will most likely stay empty.The inclusion of the configuration files is done with the statement:
xi:include. We make use here of XInclude, or XML Inclusions, which is a W3C standard for merging XML files. This facility makes it possible to code your web pages in a more modular way by dividing your code in smaller chunks, which can be combined at runtime. See http://www.w3.org/TR/xinclude/ for details. Backbase has implemented the XInclude standard in its framework according to the standard and you see it used here to include the configuration files. We will see more of it later in this chapter.The HTML tag contains two namespace declarations—
xmlns="http://www.w3.org/1999/xhtml"andxmlns:xi="http://www.w3.org/2001/XInclude". The XHTML namespace is the default namespace and therefore you do not need to add a prefi x in front of the XHTML tags. The XInclude namespace is declared with the xi prefi x, which you saw used in front of the include statement that was used to include the Backbase confi guration files. For now, just remember that you need them and that it is important to declare namespaces appropriately in your code. Later in this chapter, there is a section that explains what you really need to know about XML, XHTML, and namespaces. The Backbase Client Framework uses several specifi c Backbase XML namespaces in addition to providing implementation for several standard ones like the XInclude. We will see some examples in the next section.
The document starts with: <!-- -->. This is done to enforce quirks mode in the Microsoft Internet Explorer browser. This is a requirement for the Backbase Tag Library widgets to allow box elements to be rendered consistently across browsers.
As we said earlier, the startup index.html file is very similar for all applications. All you have to do when you set up a new application is copy the starter skeleton to a proper place in the file system where your server can find it, and adjust the path settings in such a way that the Backbase libraries can be found. Also, give your HTML document the proper title and meta-information in the head section.
Note
From now on, we will usually take for granted that you know how to surround our example code shown in the book with the right skeleton code.
In the previous sections, we talked about downloading the Backbase package and about trying out the demos on the Developer Network site of Backbase. We also showed what a Backbase starter page looks like, so finally, we can show real Backbase code.
It is time to say "Hello Backbase!" We will do so by showing typical "Hello World" examples as follows:
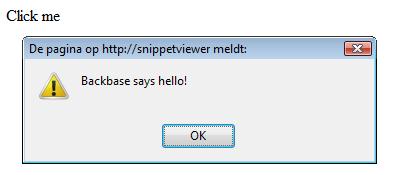
The first example shows a simple alert when you click on the Click me text. It serves to make sure that we have the right setup for our applications.
The second and third examples are a bit more interesting: a balloon from the Backbase Tag Library is shown, with the text that you typed in an input field. The difference between the two is the use of JavaScript or the XML Execution Language, as you will see.
The fourth example is an AJAX example. It involves communication with a server, which echoes the text typed in, together with a timestamp. The response is added to earlier responses without refreshing the page.
Note
Downloading the example code for the book
Visit http://www.packtpub.com/files/code/9126_Code.zip to directly download the example code.
The downloadable files contain instructions on how to use them.
We assume that you have a web development environment set up now and that you have put the Backbase libraries at the right place. We will take a follow-along approach for explaining the "Hello World!" examples, but of course you can also just execute the ready-to-run downloaded source code instead of typing the code yourself.
Start with creating a new folder named bookApps, or whatever name you like better. Next, create a subfolder of the bookApps folder named helloWorld.
Create an HTML file named hello1.html and put this file in the helloWorld folder. Copy the skeleton file that we saw in the previous section into hello1.html. Remember the following:
In this file, we made sure that the Backbase Framework Client Runtime will be loaded because of the
<script>tag in the head section of the HTML document.The
<script>tag in the body section of the HTML document has a type declaration,application/backbase+xml, which tells the client runtime to process whatever is contained within the tag.The first thing that the client runtime is asked to process is the inclusion of the
config.xmlfile, which contains the bindings that define the UI widgets.
The position where <!-- YOUR APPLICATION CODE GOES HERE --> is placed tells the runtime that it should process whatever we replace this with.
Namespace declarations are needed for all the namespaces used, in the tag where they are used, or a parent tag within the document.
Replace <!-- YOUR APPLICATION CODE GOES HERE --> with the following content:
<div>
<e:handler
xmlns:e="http://www.backbase.com/2006/xel"
event="click" type="text/javascript">
alert('Backbase says hello!');
</e:handler>
Click me
</div>
To see your first "Hello" example in action, you can either double-click on hello1.html in the Windows explorer (if you are running Windows), or, if you have started your local server, you can open a browser and type something like this in the address bar: http://localhost/bookApps/helloWorld/hello1.html.
After clicking on the Click me text, you should see a result that is similar to what is shown in the following picture:
What if you do not see anything? The most common problem that could be the cause is that the path to boot.js or config.xml is not correct. If you are running with a server, check that it is running properly, and that it can find your hello1.html.
When all is well: Congratulations! The Backbase Client Framework is running successfully.
Let us look at the code:
The interesting part of the code is the event handler for the
divelement that contains the Click me text. Thee:handlertag is part of the XML Execution Language (XEL), a custom markup language that is provided with the Backbase Client Framework, and that can be used as a replacement for JavaScript in many cases.The namespace that we need for using XEL is declared in the
e:handlertag itself; it could also have been declared in the<div>or<html>tags.Between the start and end
e:handlertags, you can code either JavaScript, as in this example, or XEL, as we will see in the next "Hello World!" example.
You could have coded the example also as "Hello World" without the Backbase event handler: <div onclick="alert('Backbase says hello!');"> Click me! </div>. At first sight, this is shorter, so why would we need Backbase for this? Well, usually, you need more in the event handler than just a short alert. In such case, you have two choices: either clutter your page with hard to read JavaScript or create a JavaScript function that you put in the head section. Before you know it, you will have many of these functions, which become hard to maintain and organize. In the case of the XEL event handler, you can write well-formatted and well-structured JavaScript code that stays local to the widget where you put the event handler. Of course, you can define more global functionality as well and you will see examples of this in several variations later in the book.
Note
XML namespaces! In this first example, you saw again a new XML namespace, this time for XEL. We already saw the XHTML and the XInclude namespace declaration in the page skeleton; in the next section you will see the Backbase Tag Library, the Commands, and the Forms namespace. Yes, that is a lot of namespaces and we will see a few more in the rest of the book. We promise that you will find out how useful these are and that you will get used to it.
This was a very simple example that made sure the Backbase framework is working right. In the next three examples, we will expand your knowledge by demonstrating a personalized "Hello World", using a tag from the Backbase Tag Library. The last "Hello World" example will demonstrate the AJAX functionality of the Backbase Client Framework by showing a form with one input field, which, when submitted, causes a response to be displayed somewhere in the page without a page refresh.
This section contains a pair of examples showing how to create a BTL balloon that is filled with custom text.
Note
The balloon widget displays an image similar to that of a dialogue box in a comic book. The balloon can contain text, images, or other widgets. The user can click on the x icon in the balloon to close it or the balloon can be displayed for a limited amount of time. The balloon is positioned in relationship to its parent widget.
The balloon widget is similar to a toolTip because they represent information that becomes available only after an action is performed. Most often, these widgets are used to present contextual information about a widget in your application.
This is not the easiest example for showing a Backbase GUI widget from the Backbase Tag Library. However, we have chosen it because we wanted to show an example that illustrates the power of using pre-built widgets.
The example is done twice, to show that BTL can be coded in two ways, either by using an event handler with JavaScript content, or by using no JavaScript at all. The second version of the example shows the Backbase-specific XML Execution Language (XEL) and Backbase Commands instead of JavaScript. Any combination of these two styles is also possible, as many examples in the Backbase documentation and in this book will show.
Below is a picture of what the result of trying the example will look like:
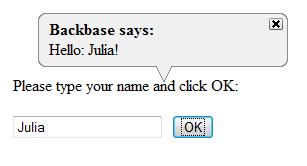
The user will type a name, and after clicking OK, the balloon will appear. The user can click on the x to close it. Otherwise, it will disappear automatically after a while.
The first balloon example uses JavaScript in the event handler of the button, similar to the previous example, which had an event handler on the div element using the XML Execution Language.
We saw the XEL namespace before. The Backbase Tag Library (BTL) namespace is new; we need it because the balloon widget belongs to it.
Create a file in the helloWorld folder that you created in the first tutorial, name it hello2.html, and then add a copy of the starter skeleton as content. Make sure that you understand what the contents of the hello2.html file represent. Look back if needed.
Because we need more namespace declarations than in the previous example, it is more convenient to add them to the <html> tag of the skeleton page:
xmlns:b="http://www.backbase.com/2006/btl" xmlns:e="http://www.backbase.com/2006/xel"
Replace the part where it says <!-- YOUR APPLICATION CODE GOES HERE --> in the starter page skeleton with the following code:
<div style="margin: 80px 0 0 20px; width: 300px;">
<p> Please type your name and click OK: </p>
<input id="myInput" type="text" />
<button style="margin-left: 10px;">
OK
<e:handler event="click" type="text/javascript">
var oBalloon = bb.document.getElementById('myBalloon');
var oInput = bb.document.getElementById('myInput');
var sValue = bb.getProperty(oInput,'value');
bb.command.setText(oBalloon, 'Hello: ' + sValue,'replaceChildren');
oBalloon.setAttribute('open', 'true');
</e:handler>
</button>
<b:balloon label="Backbase says:"
id="myBalloon" mode="top-center"
timeout="10s" width="250px" />
</div>
Save your work and type this in the address bar: http://localhost/bookApps/helloWorld/hello2.html. After typing your name in the input field and clicking OK, you should see the balloon appear.
Let's examine the code:
You will see that there are two namespace prefixes present: the
e:prefix for XML Execution Language that we saw before and theb:prefix for the Backbase Tag Library, which contains the balloon widget. We chose this time to add the namespace declarations to the<html>tag.There is a
b:balloonwidget on the page. Initially, you do not see it because theopenattribute isfalseby default. We need the event handler on the OK button to set theopenattribute totrue.The balloon will stay visible for 10 seconds after it appears and will be positioned at the top left of its parent widget, the
divin this case. We specified a margin for thediv, to give theb:balloonenough space.The balloon in our code has a label, but no content. We want to build the content of the balloon dynamically, using the value in the input field at the time the OK button is clicked.
The event handler for the click event of the button is specified in the same way as in the "Backbase says hello!" alert example, except that it contains a lot more JavaScript code. Now the usefulness of the XEL event handler becomes more convincing—if you would have placed the code in a single
onclick="..."line, it would have become rather unreadable. By the way, you can still use your old ways of coding JavaScript if you prefer.The
bbobject that is used in the code is of particular interest. The Backbase Client Runtime creates an additional DOM-like layer that shields you from browser incompatibilities. You can address the Backbase elements on this layer in the same way as the elements in the original DOM layer by using thebbobject. Thebbobject is instantiated when the Client Runtime is loaded.In our example, we need to find two elements by ID in the Backbase space. To do so, you should use the
bb.documentobject provided by the Client Runtime, instead of thedocumentobject provided by the browser. The variableoBalloonreceives a reference to the balloon, by looking up its ID usingbb.document.getElementById().Although the
inputwidget looks like a normal HTML widget, it is in fact also a Backbase widget because it is placed in the Backbase area. Therefore, we use thebbobject again to find it by ID.We find the value of what is typed in the input field by using
bb.getProperty. The next line requires some explanation: we need to have the text that is displayed in a text node. We create the text node by using the command functions,bb.command.setText.Finally, the
openattribute is set totrueand the balloon will be shown.
We will have more information about the bb object and the commands later in the book. For specific details, the Backbase documentation is a good source, in particular, the Backbase Reference at http://download.backbase.com/docs/client/current/Reference.chm.
You have now seen that the BTL widgets can be used and extended in a straightforward way using JavaScript. The next example looks exactly the same when you try it out, but the event handler now uses XEL instead of JavaScript.
As in the previous example, create a file in the helloWorld folder and this time name it hello3.html. Add a copy of the starter skeleton as content and replace <!-- YOUR APPLICATION CODE GOES HERE --> with the following content:
<div xmlns:b="http://www.backbase.com/2006/btl"
xmlns:c="http://www.backbase.com/2006/command"
xmlns:e="http://www.backbase.com/2006/xel"
style="margin: 80px 0 0 20px; width: 300px;">
<p> Please type your name and click OK: </p>
<input id="myInput" type="text" />
<button style="margin-left: 10px;">
OK
<e:handler event="click">
<c:setText
select="concat('Hello: ',
id('myInput')/property::value,'!')"
destination="id('myBalloon')"
mode="replaceChildren" />
<c:setAttribute
with="id('myBalloon')"
name="open"
select="'true'" />
</e:handler>
</button>
<b:balloon label="Backbase says:"
id="myBalloon" mode="top-center"
timeout="10s" width="250px" />
</div>
In this example, using the Backbase Tag Library (BTL), XML Execution Language (XEL), and Command Functions libraries may look daunting to you. While in the later chapters of the book we will fill in the details, we want you to look at the code here, see that it is more compact than the JavaScript version and that it is pure XML instead of JavaScript encapsulated within XML tags. We will explain now what is going on from a higher level:
In this example, the
<div>tag contains the namespace declarations that we put at the<html>tag in the previous example. This is done not only to show you that you can put namespace declarations in any parent tag of the tag where the namespace is used, but also to prepare ourselves for modularization of the code. We could carve out the<div>tag with its contents and put it in a separate file. We could then put an XInclude instead. If you do this, the declaration on the<html>tag would be useless, while the declaration on the<div>tag would be just what you need, except that you would have to add the default namespace for XHTML again to make the file a self-contained proper XML.The
e:handlertag does not have atypeattribute here because using XML as content is the default.When the button is clicked, the value in the text node is concatenated from three string parts, where the middle part is an XPath expression that extracts the value from the input field.
The destination of the newly created text node is the balloon.
A
setAttributefunction from the Backbase Command Functions language is used to open the balloon.The
b:balloonitself is the same as in the previous example.
We have now said "Hello!" using real Backbase BTL widgets and we peeked into XEL to see how we can code event handlers in a more structured way, choosing between JavaScript and XEL. You can use either, depending on your preferences.
The next example is a real AJAX example: we will communicate with a server asynchronously, and the updates are placed on the page doing a partial page reload, without refreshing the whole page.
To many people, AJAX is almost synonymous with XMLHttpRequest, the API that allows client programs to communicate asynchronously with a server. This example page shows the "Hello World" example communicating via AJAX using a Backbase form. If you are using the Backbase AJAX framework, it is possible that you will never use an XMLHttpRequest object directly, because its use is made transparent to you. If you wish however, it is possible to use it.
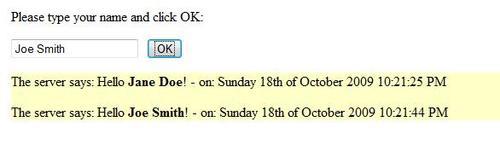
Here, we will look at using an ordinary looking form, still the most common means to enter information to be sent to a server. Instead of refreshing the whole page, AJAX is used when you tell the framework that you want to put the response to the form submitted at a particular spot on your page, by using the bf:destination attribute. As a server scripting language, we use PHP in our example because we assume that the majority of developers will be able to understand it. In addition, we show what the response file that PHP generates looks like. You can see from its structure how you could code an AJAX response in other languages.
Below you can see a snapshot of what the result could be of executing the example:
By now, you know the drill: create a file in the helloWorld folder, name it helloServer.html, and add a copy of the starter skeleton as content of this file.
Replace the part where it says <!-- YOUR APPLICATION CODE GOES HERE --> in the starter page skeleton, with the following code:
<div style="margin-left: 20px;">
<p>Please type your name and click OK:</p>
<form xmlns:bf="http://www.backbase.com/2007/forms"
action="response.php"
bf:destination="id('server-response-area')"
bf:mode="appendChild" method="post">
<input id="name" name="name" type="text" />
<input type="submit" style="margin-left: 10px;"
value="OK" />
</form>
<div id="server-response-area" style="background: #FFFFC8;"></div>
</div>
This form is not very interesting, except a few things that are as follows:
Adding a
bf:destinationattribute to the form will cause the submitted data to be sent asynchronously. Instead of refreshing the complete page, the contents of the response will be put at the defined destination by the Client Runtime, at thedivelement with IDserver-response-areain our example.We have also coded a
bf : modeattribute with the valueappendChild. This means that the response of the server will be put as the last child node of thedivelement. Every click of the OK button will add one more response line to the page, leaving intact what was there before. TheappendChildvalue is the default. Therefore, we could have omitted it here.
We will be looking at the server side next.
From the action that is specified in the form, you can see that response.php will be invoked when the form is submitted. Therefore, you should create a file in the helloWorld folder and name it response.php. Add the following as content:
<?php
header('Content-type: application/xml');
echo '<?xml version="1.0" encoding="UTF-8"?>';
?>
<div xmlns="http://www.w3.org/1999/xhtml">
<?php
$myname = $_POST['name'];
echo " <p>";
echo "The server says: Hello <strong>$myname</strong> ! - on: ";
echo date('l jS \of F Y h:i:s A');
echo " </p>\n";
?>
</div>
To see this "Hello Server" example in action, open a browser and type something like this in the address bar: http://localhost/bookApps/helloWorld/helloServer.html. Type something in the input field and click on OK. Change the input field and click on OK again. Repeat this a few times. You will see the list of responses grow, while the rest of the page is not touched. Some points to note are:
This time you cannot execute the example from the file system by double clicking on the
helloServer.htmlfile, because the web server needs to be activated to interpret the PHP script.The server script that receives the request should be aware that it should not send a complete page in return, and that the response should be valid XHTML.
In order for the browser to recognize that it is XML that it receives, the response header must be set appropriately. Using PHP, you can do this as follows: header('Content-type: application/xml');. If your scripting language is JSP, you could code: response.setHeader("Content-Type", "application/xml");.
For those of you who are not so familiar with PHP, we show here an example of a response file that might have been generated by response.php, as an actual response file:
<?xml version="1.0" encoding="UTF-8"?>
<div xmlns="http://www.w3.org/1999/xhtml">
<p>
The server says: Hello <strong>John Doe</strong>! - on:
Friday 30th of May 2008 12:50:43 PM
</p>
</div>
The server response includes a timestamp of when the response is sent. We did this to show that the page really stays put and is only partially changed. By entering new information in the input field and clicking the Submit button, a new line will be appended in the yellow box where the server messages are shown.
If you know HTML, you also know XML, the Extensible Markup Language—just think of it as HTML where you can invent and specify your own tags.
To be more specific, XML is a general-purpose markup language, which means that you can describe and annotate the structure or formatting of text with it. HTML is a particular example of XML used to describe the structure and formatting of a web page.
Using XML, you can define a set of tags that together form a vocabulary for a specific subject. This is great if in all XML documents you would only need tags from one vocabulary, but probably you can imagine that this would be rather restrictive.
In this section, we give some background for the use of XML namespaces in the Backbase framework. As the W3C standard puts it, XML namespaces provide a simple method for qualifying element and attribute names used in Extensible Markup Language documents by associating them with namespaces identified by URI references.
When XML was invented, there was no such thing as a namespace concept. The steadily increasing volume of XML data that was exchanged between different groups of people and different companies revealed a series of problems. One was that it was difficult to properly combine parts of different XML documents into new documents. Basically, these are the causes:
An XML vocabularies collision problem. This means that two XML documents could have tags with the same name, while in each document this tag could have a different meaning or structure. For example, a
<language>tag could have an attributeversionif it is a programming language, or else an attributeregion, to indicate where this particular form of natural language is spoken.An intended content recognition problem. This means that if I see a tag in a document that has tags from more than one vocabulary, I need to know to which vocabulary it belongs. For example, if you see a
<title>tag, is this the title of a book, the title in an HTML document, or the title of a person, such as "Mrs." or "professor"? Similarly, is a<border>the border of a country or a border of an element on a web page?
In order to solve these issues, the mechanism of namespaces was introduced into XML. If you are familiar with a programming language like Java, the namespace concept is similar to the package concept in that language. It enabled authors to determine, on markup, vocabularies for their content and facilitated governance.
You can recognize an XML namespace when you see an attribute that starts with xmlns. The part of the attribute that follows xmlns: is called a prefix. It is that part of the namespace declaration that actually sets up a link between a convenience token and a namespace. The namespace declaration scope is limited to the element where it was done and to the element's sub-tree. The names of these attributes are reserved: you cannot use an xmlns attribute or prefix for another purpose.
Let's consider a sample XML document that uses namespaces:
<?xml version="1.0"?>
<catalog
xmlns="http://www.library.com/ns/catalog"
xmlns:isbn="http://www.isbn.com/ns/isbn">
<book isbn:id="1847196705" id="1">
<title>Learning jQuery</title>
<author>Karl Swedberg</author>
<author>Jonathan Chaffer </author>
<isbn:datePublished>February 2009</isbn:datePublished>
</book>
<book isbn:id="1847191444" id="2">
<title>Joomla! Template Design</title>
<author>Tessa Blakeley Silver</author>
<isbn:datePublished>June 2007</isbn:datePublished>
</book>
<!-- More books -->
</catalog>
The catalog could serve as a description of books in a local library. The meaning and structure of the tags can be whatever the local library thinks is practical. In this document there is also the isbn namespace, which is used for tags that are relevant to the worldwide book register that the International Standard Book Number (ISBN) represents.
The Backbase Client Runtime processes all the tags that are placed between script tags that have type="text/backbase+xml" as attribute. To the Backbase Client Runtime, the combination of the namespace and the tag name will determine what the engine will do to interpret the tag.
We call a set of tags that belong to a specific namespace a markup language. In the Backbase point of view, XHTML is just another markup language. It belongs to the http://www.w3.org/1999/xhtml namespace, which you must declare just like the specific Backbase namespaces.
We have already seen several namespaces in our examples. Below is a list of namespaces you can expect to be using with Backbase, together with their preferred prefixes:
xmlns = "http://www.w3.org/1999/xhtml"
xmlns:xi = "http://www.w3.org/2001/XInclude"
xmlns:xs = "http://www.w3.org/2001/XMLSchema"
xmlns:smil = "http://www.w3.org/2005/SMIL21/"
xmlns:b = "http://www.backbase.com/2006/btl"
xmlns:c = "http://www.backbase.com/2006/command"
xmlns:d = "http://www.backbase.com/2006/tdl"
xmlns:e = "http://www.backbase.com/2006/xel"
xmlns:bf = "http://www.backbase.com/2007/forms"
Although it is legal to use different prefixes bound to the same namespace URI in different documents as well as within the same document, it is often convenient to stick to using similar ones.
For each markup language in your application, you must add a namespace declaration. For example, if you are using BTL UI widgets, you will need to add a BTL namespace declaration to your document.
The engine does recognize namespace declarations placed outside its processing space. This means that the best place to declare namespaces for all languages processed by the Client Runtime is as high as possible in the DOM tree, for example the <html> tag.
Note
Each XML document, even if it will be included into another document, must contain appropriate namespace declarations.
Here is an example of namespace declarations that you could use with some of the Backbase markup languages:
<script xmlns="http://www.w3.org/1999/xhtml"
xmlns:b="http://www.backbase.com/2006/btl"
xmlns:e="http://www.backbase.com/2006/xel"
xmlns:xi="http://www.w3.org/2001/XInclude"
type="application/backbase+xml">
<div>
Given the correct widget prefixes,
the Client Runtime can now
process all XHTML, BTL, XEL, and XInclude elements.
XHTML is the default namespace, so we don't have to give a
prefix to the parent div tag.
</div>
</script>
Using namespaces in your application can be confusing at first and can be a source of problems for a Backbase beginner. A good piece of advice is to check your namespaces if you have an error that you do not understand. Soon, adding the right namespaces will become second nature.
After having installed the Backbase framework and after having said "Hello World!" so many times, we would like to finish this chapter by doing real work.
Every web application page design starts with a basic page layout. This layout usually involves a part where menu items are shown, sometimes a row of tabs at the top of the page, sometimes a list of links as a column on the left, sometimes both.
In the olden days, we would partition a web page using HTML frames, where you could have a table-like layout. The advantage of using frames is that each frame contains its own document, allowing you to make your application more modular. This was a big disadvantage at the same time because the communication between multiple frames can become a problem and also you cannot easily print such a page.
As an alternative, you could use a pure HTML table layout. That is still the easiest way to design a page if the page is simple, but if you use a number of nested tables to layout your page, things can become tricky when you try to change something. Nowadays, most people say that tables should be used to display tables and that CSS should be used for layout. If you ever struggled with div elements floating in ways you could not imagine, you may still agree in principle, but hope for something better in practice.
The Backbase panelSet widget and related elements are designed to offer the best of both worlds—easy layout as with tables and modularity as with frames.
Note
The panelSet widget partitions the screen layout into rows and columns. When subdividing the panelSet, you use the panel element, or you can use another panelSet widget to further subdivide that row/column. You can specify a panelSet to have rows, columns, or both. By using the splitter="splitter" attribute/value pair, you can add a resizable border to your panelSet.
The Backbase framework has a set of example layouts that use panelSets available for you to use. You can find them in the demos folder of the Backbase package, or you can view them online at http://demo.backbase.com/layouts/.
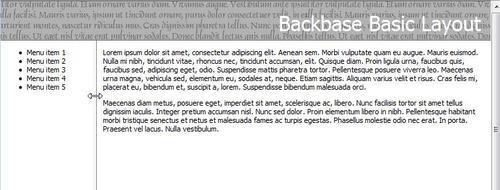
If you would like to use one of these as a starting point for your own application, you will find you need to strip the application first. This is because they contain a lot of static information that is there to show what the page could look like. We made a very simple page layout that is inspired by these example layouts. However, we will start from the ground and work our way up so that we can expand the page to evolve to a real web application page later in the book. Below is a picture of this sample application:
We will put our application in a new folder. Create a subfolder of the bookApps folder named myApp1, or whatever name you like better. Create a file in the app1 folder, name it index.html, and add a copy of the starter skeleton as content.
Add a CSS file reference to the head section in order to keep the styling we use:
<link rel="stylesheet" type="text/css" href="resources/app.css" />
The CSS file is not very interesting at this point. We suggest that you copy it from the downloaded source and put it into its own resources folder.
Replace <!-- YOUR APPLICATION CODE GOES HERE --> with the following content:
<div xmlns="http://www.w3.org/1999/xhtml"
xmlns:b="http://www.backbase.com/2006/btl"
xmlns:e="http://www.backbase.com/2006/xel">
<div id="appHeader">
<div class="appHeaderText">Backbase Basic Layout</div>
</div>
<b:panelSet columns="260px *" splitter="true">
<b:panel>
<xi:include href="menu.xml" />
</b:panel>
<b:panel class="btl-border-left">
<xi:include href="content.xml" />
</b:panel>
</b:panelSet>
</div>
You see a simple panelSet, where its structure is clearly visible because the menu and the real content are included with the XInclude mechanism. This allows you to make a very modular setup of your application.
There are two files that are included by the XInclude mechanism: menu.xml and content.xml. For now, these files contain nothing interesting. Remember though that these files must have proper namespace declarations because their contents are loaded into Backbase space. Therefore, the menu.xml file looks like this:
<div xmlns="http://www.w3.org/1999/xhtml">
<ul>
<li>Menu item 1</li>
<li>Menu item 2</li>
<li>Menu item 3</li>
<li>Menu item 4</li>
<li>Menu item 5</li>
</ul>
</div>
What is interesting is that when we expand this application in the following chapters, the index.html file will stay the same, while the development effort can concentrate on various modularized parts of the application.
Even if modularizing your application using XInclude from Backbase will be the only facility you'd use, this will be an important step in writing better applications. You could argue that you can achieve the same effect by using the include() function of PHP, or a similar function in another server scripting language. You should realize though, that this will make your client application dependent on the server language you are using.
Another disadvantage you may think of is that it requires extra communication with the server to use XInclude in this way. That is true, but if you have a performance problem with your application, probably something else is the cause. Kent Beck, the well-known inventor of Extreme Programming, says on this issue: "First make it right, then make it fast".
The code we have put in menu.xml and content.xml is just dummy text. Therefore, we are not repeating it here. In later chapters, we will start putting meaningful content into our basic application.
Your web directory structure could look as follows:
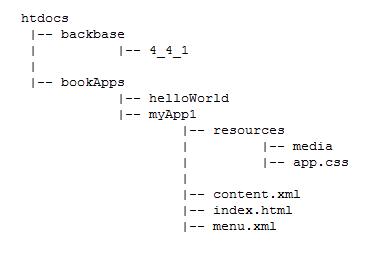
In your whole application, there is only one file that contains references to your Backbase installation. That makes it a lot easier to set up a new application and to upgrade your Backbase installation for a new release.
To conclude this section, look back at what we have achieved. With very little code we have set up a structure for an application that we can easily extend or use as a skeleton for new applications.
What have we done so far?
We have made sure that our development environment is right.
We have downloaded and installed the Backbase framework.
We have seen what we have to add to an HTML page to make it Backbase framework enabled.
We have seen the famous "Hello World" in many variations: with only basic JavaScript, with a Backbase Tag Library widget and basic JavaScript, with a Backbase Tag Library widget and the Backbase XML Execution Language, and finally, using AJAX communication with a server script.
We have started on a basic page layout for our web application using a
panelSet.We learned something about XML and namespaces.
With only these few concepts and just a few Backbase widgets, you will be able to develop new web applications with improved results.
In the next chapter, we will expand our knowledge and take a look at the GUI widgets that are available in Backbase.


