Download code from GitHub
Cloud is a buzzword that has been around for a long time, and it can in fact have many different meanings. Generally, it is considered as a process where remote computers are used to provide services possibly over the Internet, rather than using local computer servers or personal computers. A cloud can be public when computing resources are provided and hosted by a third party over the Internet and shared by all the paying subscribers, or private when computers and servers are hosted and owned by a company or business. A cloud can be Software as a Service (SaaS), Infrastructure as a Service (IaaS), or even Hardware as a Service (HaaS). Microsoft's strategy seems to be pushing towards a cloud infrastructure, and SQL Server 2014 has some features that make hosting your data and/or infrastructure in the cloud easy to work with, set up, and manage. In this chapter, you will explore the options that are available when working with SQL Server in the cloud—Microsoft Cloud in particular. We will also look at setting up and configuring Microsoft Azure Storage to house your SQL Server data files and creating your own Microsoft Azure SQL Server virtual machines. You can find out more information about this at http://azure.microsoft.com/en-us/services/sql-database/.
In this chapter, you will learn about creating databases in Microsoft's cloud solution. This is called Microsoft Azure SQL Database, previously known as SQL Azure.
Microsoft has both an SaaS and an IaaS offerings, and we will look at each of these offerings in the following paragraphs.
SaaS is a centrally managed and hosted piece of software that you pay for like a utility bill. Usually, the data used or consumed is used to calculate how much you pay. The more you use, the more you pay. Windows Azure SQL Database (formerly known as SQL Azure) is an example of SaaS.
IaaS is a service offered by a cloud provider whereby the hardware is hosted by the provider and you pay for what you use, much like the utility bill analogy used previously. The physical infrastructure is managed by the cloud solution provider, but you do have some control over how the virtual machine running your software is set up. You don't need to worry about managing and maintaining the physical hardware, and IaaS can make it a simple process to scale out your environment. Microsoft Azure also allows you to host your own virtual machine, with the Windows Server operating system and SQL Server 2014 installed. Amazon offered IaaS, providing virtual machines with SQL Server installed for a long time. Microsoft has recently followed suit with Microsoft Azure Virtual Machines. You can host Active Directory services in the cloud too. This means your off-premise Microsoft Azure Virtual Machines can be integrated nicely with your one-premise physical or virtual machines.
To create a Microsoft Azure database, we need a Microsoft Azure account, which you can get as a free trial if you want to experiment with Microsoft Azure. However, you will need to enter some credit card information, even if you only want the free trial. To create your account, visit http://azure.microsoft.com/en-us/ and follow these steps:
When you have created your Microsoft Azure account, you will need to log in to the management portal. You will come across a screen that looks similar to the following screenshot:

Click on the SQL DATABASES option from the menu on the left-hand side. If you don't have any SQL databases created, you will have a screen that looks similar to the following screenshot:

Click on the New button to start the Create Database wizard. You need to make some choices from the screen shown in the following screenshot:

In this wizard, the database helpdesk has been called upon. The edition of the Windows Azure SQL Database defines what features are available and how much it costs. For the purposes of this example, a web edition database has been chosen. With the web edition of Windows Azure SQL database, you can have a database storage limit of up to 5 GB. If you chose the business edition, you can have a database storage limit of up to 150 GB. The next step is to choose the collation for your database, which in this case has been set to the default setting, as well as the subscription type that you wish to use to pay for your SaaS database. As a SQL database for Microsoft Azure is yet to be chosen, you need to select the New SQL database Server option. You then need to click on the next arrow button.
On the next screen, you will need to enter some server settings and then create a login name; in this case, I entered
Gethynand a safe and secure password. I chose my region as Western Europe.
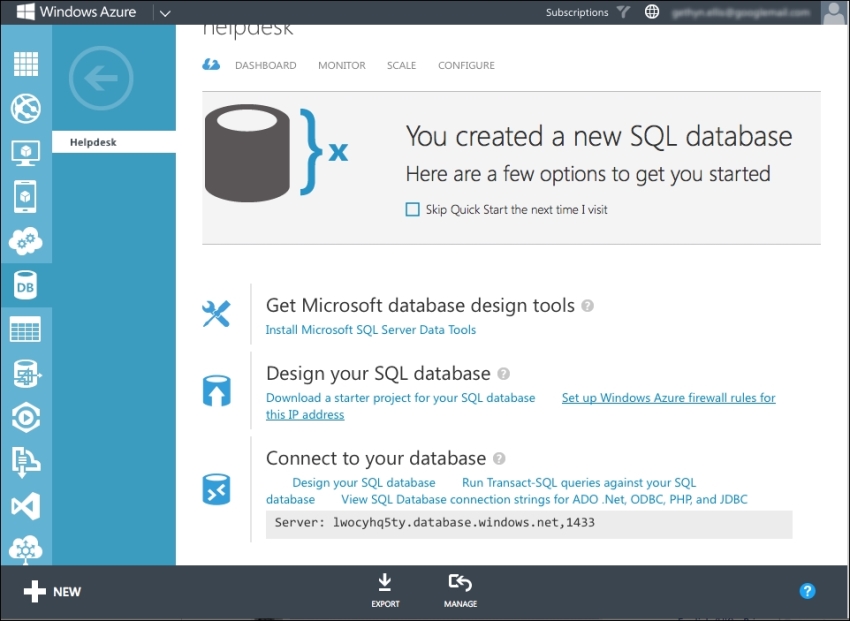
Click on the check box to create the Microsoft Azure database. Once the database has been created successfully, you can view it under the SQL DATABASES section in the Microsoft Azure management portal.

Now that a Windows Azure SQL database has been created, the next step is to connect the database in order to begin the design process, which involves creating tables to store your important business data. SQL Server 2014 comes with Management Studio, which is a robust tool for both administrators and developers to code and administer SQL Servers and SQL Server databases. We can use this tool to work with our SQL Azure Database.
SQL Server 2014 Management Studio has been installed in this case; you can install Management Studio from the SQL Server installation media if it is not installed already. Installing SQL Server Management Studio is outside the scope of this book. The management portal will provide us with a Microsoft Azure server name, and you can connect it to the server using the username and password created in the earlier steps.
Before you connect, you will need to set up firewall rules to allow your laptop to connect. Click on the Set up Windows Azure firewall rules for this IP address link.
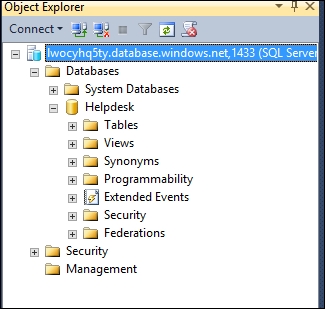
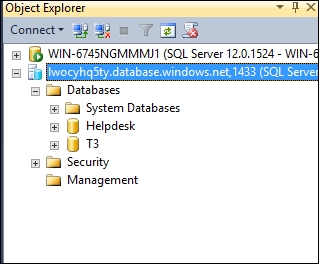
The firewall rule can take a few minutes to take effect. Fire up SQL Server Management Studio 2014 and connect it to the Windows Azure SQL Database. You will need to specify the server name given to you when you created your Windows SQL Azure Database and also the login name and password. Once you click on Connect, you will then be connected to your Windows SQL Azure Database. You will see that Object Explorer looks different in comparison to a local SQL Server instance connection. You have three folders available: Databases, Security, and Management. This is all you need.
If you have an existing database on a local instance of SQL Server, there is a wizard you can use to help migrate a database to a Windows Azure SQL Database. In my case, I have a database called T3 that currently sits on my local SQL Server 2014 instance. You can then use the management studio wizard to move the database to Microsoft Azure.
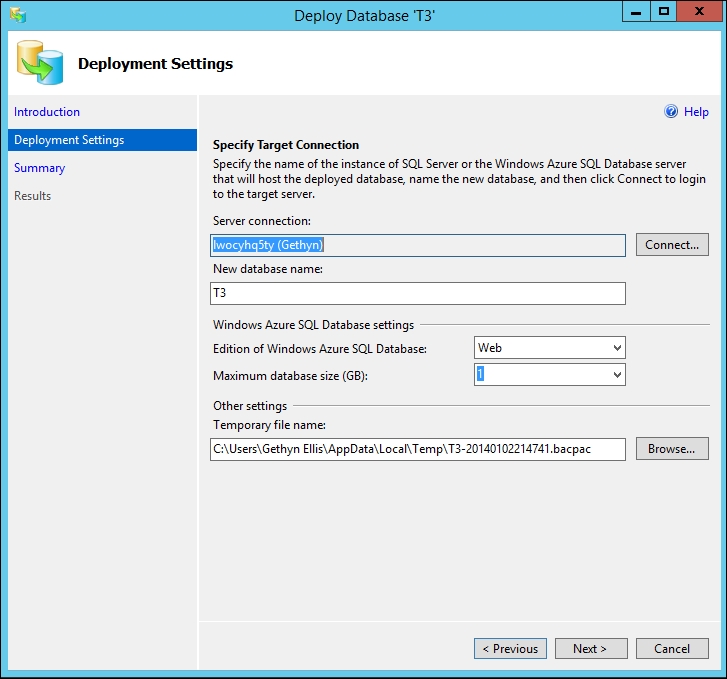
You need to connect to the local SQL Server 2014 instance in Management Studio. To start the wizard, right-click on the database to move. Select the Tasks option and click on Deploy to Windows Azure SQL Database to start the wizard. The first screen of the wizard explains what the wizard will implement; you can safely click on Next on this screen.
You will then specify the Windows Azure SQL Database server name; for this example, I will use the credentials I created earlier as shown in the following screenshot:
You will need the Microsoft data-tier application framework installed for your SQL Server 2014 wizard to successfully deploy your database to a Windows Azure SQL Database. A free tool to do this can be downloaded from the Microsoft website at http://www.microsoft.com/en-gb/download/details.aspx?id=40735.
When you have successfully deployed your on-premise database to a Windows Azure SQL Database, you will get a confirmation screen that reports whether the operation has been successful or not. You will be able to view the newly deployed SaaS database by connecting to the cloud-based SQL database in Management Studio.
SQL Server 2014 offers you the ability to store your SQL Server data files in Microsoft Azure. This will allow you to combine on-premise and cloud-based storage solutions for your SQL Server 2014 databases. The files are stored as blobs in Microsoft Azure. This offers the DBA a number of benefits, some of which are listed as follows:
In order to use Microsoft Azure Storage for your SQL Sever database files, you will need to create a Microsoft Azure Storage account, and you will need to create a storage container.
To create a database that uses Microsoft Azure Storage, you need to follow the ensuing steps:
To use Microsoft Azure Storage for your SQL Server database, an account and a blob storage container will need to be created. Because you have already created your Microsoft Azure Account, you will now need to create a storage container for the databases' data files.
From the management portal, select the STORAGE option from the left-hand menu, which is shown in the following screenshot:

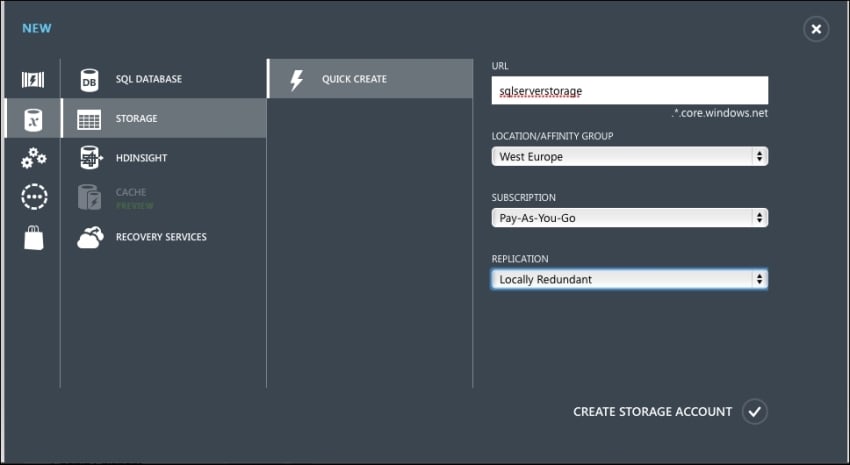
Click on the New button at the bottom of the screen and run through the wizard. The most important thing to note here is that you need to disable geo-replication. When geo-replication is set, the write order is not guaranteed, and this can lead to database corruption. Geo-replication allows you to keep multiple durable copies of data across different sites, but how the technology writes data to disk does not lend itself to how SQL Server will write data to the disk. Therefore, when using Microsoft Azure Storage for your database, you will not be able to use this option.
Click on the CREATE STORAGE ACCOUNT button to create the account as shown in the following screenshot. The storage account will take a minute or two to do this.
In the management portal, click on the newly created account that will be used for the storage configuration screen. At the top of the screen, you will see a list of options that contains Dashboard, Monitor, Configure, and Containers. Click on Containers, and click on the option to create a container. Give your container a name; I called mine sqldata.
The first step is complete; we then need to create a policy followed by SAS.
To simplify this process, Azure Storage Explorer is going to be used, which provides a nice graphical interface. You can download the software from the CodePlex website for free at http://azurestorageexplorer.codeplex.com.
After you have downloaded the Azure Storage Explorer, the following steps will guide you in using it to create a Shared Access Signature:
Install the
.msipackage on your computer, open up the Azure Storage Explorer, and connect to your storage container using the credentials supplied in the management portal. You will need the storage account that you created previously as well as a storage access key. Click on the storage account and then click on the Manage Access Keys icon. This can be found at the bottom of the storage container. You will need the key to connect.When you have successfully connected to your storage account, the Azure Storage Explorer will look similar to the following screenshot:

When successfully connected to the storage account, you will see the SQLDATA container on the left-hand side; click on the security button.
When the security dialog box opens, you will need to first create a new policy. Click on the Shared Access Policy tab.
Click on the New button and give the policy a name. To keep things simple, I called mine
sqldataand gave policy permissions to read, write, list, and delete; along with this, you can also give it a start date, a start time, an end date, and an end time.You then need to click on the Save Policies option. Following this, click on the Shared Access Signature tab, which is in the middle tab of the Security dialog box.
The Container name textbox should be completed. Leave the blob name text box blank and then choose the policy that was just created from the drop-down list. After this, click on the Generate Signature button. You will need this when setting up the credential in the next section.
Connect to the local SQL Server instance in Management Studio that will be used to house the database that will make use of the Microsoft Azure Storage to execute the following CREATE CREDENTIAL statement:
CREATE CREDENTIAL [https://gresqlstorage.blob.core.windows.net/sqldata]
WITH IDENTITY='SHARED ACCESS SIGNATURE',
SECRET = 'sr=c&si=SQLDATA&sig=PtQi1NXUuJz%2BGCUkpdgEBS4o4Lo60FjTbfJ2dNx3XX8%3D'
Tip
Downloading the example code
You can download the example code files for all Packt books you have purchased from your account at http://www.packtpub.com. If you purchased this book elsewhere, you can visit http://www.packtpub.com/support and register to have the files e-mailed directly to you.
The CREATE CREDENTIAL statement uses the full Uniform Resource Identifier (URI) of the storage container for the credential name, including https:// address. The identity is mandatory and needs to be set as SHARED ACCESS SIGNATURE. The secret is the SAS that we created previously but not the full URI—everything up to the first ? needs to be removed.
To create a database that makes use of Microsoft Azure Storage, you will have to connect to the local database instance where the database will be created using Management Studio and Object Explorer. So, open a new query window and run the following CREATE DATABASES statement:
CREATE DATABASE TestDB1
ON
(NAME = TestDB1_data,
   FILENAME = 'https://gresqlstorage.blob.core.windows.net/sqldata/TestDB1Data.mdf')
 LOG ON
(NAME = TestDB1_log,
    FILENAME = 'https://gresqlstorage.blob.core.windows.net/sqldata/TestDB1Log.ldf')
GO
This command will create a database that appears to be an on-premise database housed on the SQL Server 2014 instance, but the storage of the data and log files is in fact on Microsoft Azure Storage. This is a true hybrid database that spans both on- and off-premise technologies.
In this next section, we look at Microsoft's cloud-based Infrastructure as a Service offering. It is possible to quickly create a fully blown Windows Server 2012 virtual machine with SQL Server 2014 installed. Instead of building a virtualized environment on your premises, you rent a virtual machine from Microsoft. This approach does mean that you will have to undertake more of the administration tasks when it comes to managing the guest operating system, but you don't need to buy additional hardware.
The following steps will create a Microsoft-Azure-hosted virtual machine:
First, you will need a Microsoft Azure account to be able to create a SQL Server virtual machine in it. You can usually sign up for a free trial, so it won't cost you anything to test this out. Assuming that you have the account set up and you are signed in, you will be able to create your own virtual machine.
From the Microsoft Azure Management portal, you need to click on the Virtual Machine tab on the left-hand side menu. Click on the New button. Ensure that the virtual machine option is selected and then click on the From Gallery button as shown in the following screenshot. Microsoft supplies a list of templates that you can make use of in order to quickly deploy a virtual machine of your choice.

When you have clicked on FROM GALLERY, you can choose the template that you want to use. In this case, the SQL Server option has been chosen, so choose SQL Server 2014 on Windows Server 2012 R2. Then, click on the Next button as shown in the following screenshot:

Give the virtual machine a name. In my case, I have named my virtual machine
GRESQL2014. Once you have chosen a name, specify an account username and password that will allow you to connect to the new virtual machine. Click on Next to continue.You will then set up the configuration of the virtual machine. In my case, I'm going to accept the defaults offered here, but you can change them if you wish to. After this, click on Next.
In the next screen, you get to specify which endpoint should be created for your virtual machine; that is, you get to specify how you want to connect to and work with the new virtual machine. The defaults are Remote Desktop and PowerShell. Again, in my case, I am happy with both of these, so I will accept the defaults. However, you can add additional endpoints here if you want, too.

It will take a few minutes for Microsoft Azure to provision the virtual machines for you. When the machine is set up, you can set the remote desktop to the new virtual machine from your laptop or computer. From that point onwards, it's like working on any virtual or physical machine remotely. You can start Management Studio and connect it to your new SQL Server 2014 instance. You can create and manage databases just as you would with a server hosted in your data centers.
This chapter covered the new features of SQL Server 2014 that allow you, as the database administrator, to work with SQL Server on Microsoft's cloud platform. With the introduction of Microsoft Azure Storage for SQL Server database, the line between on-premise and off-premise has become blurred. Windows Azure SQL Databases offer a fully managed solution for housing your database. If you prefer, you can make use of SQL Server 2014 VM that is hosted in Microsoft Azure so that you, as the DBA, have more control and a greater ability to manage the server while the server is still hosted in the cloud.
In the next chapter, we will be looking at how the new features of SQL Server 2014 will help us develop a more comprehensive disaster and recovery strategy, and it's no surprise that there has been greater cloud integration in this area too.