


Are you a PHP programmer? Do you feel the need to incorporate search in your applications? Are you aware of Apache Solr? Do you feel it is a very tedious job to integrate Solr into your PHP applications? This book will make the integration easy for you. We will be looking at an end-to-end integration of Apache Solr with PHP. We will start with Solr installation. We will look at how Solr can be integrated with PHP. We will then explore the features provided by Solr through PHP code. After going through the book, you should be able to integrate almost all features provided by Solr into your PHP applications.
This chapter will help us in installing Apache Solr in two major environments: Windows and Linux. We will also go ahead and explore installation of Solr as part of Apache Tomcat Server. We will discuss the options available for talking to Solr via PHP and also learn how to set up the Solarium library for Solr PHP integration.
We will be covering the following topics in this chapter:
What is Solr?
Downloading and installing Solr on Windows and Linux
Configuring Tomcat to run Solr.
Executing ping queries on Solr using PHP
Discussing different libraries for Solr PHP integration
Installing Solarium on Windows and Linux
Connecting PHP to Solr using Solarium
Running ping queries using PHP and Solarium
Checking Solr logs
You are PHP programmers and you build websites such as a job site, an e-commerce website, a content website, or others. You need to provide a search box for searching either jobs or products or other content in your website. How do you go about it? Do you do a "like" search in your database or probably use the full-text search available in MySQL—if you are using MySQL. Would you prefer to use some other platform that does the search for you and also provides you a huge set of features to tune the search as per your requirements?
Solr is an open source Java application providing an interface to the full-text search library known as Lucene. Both Solr and Lucene are a part of the Apache Lucene project. Apache Solr uses Apache Lucene as its core for search. Apache Lucene is an open source search API built in Java. In addition to full-text search, Solr also provides a huge set of features such as hit highlighting and faceted search.
Solr requires the presence of Java on your system. To check the presence of Java on your system, run java –version in Linux console or Windows command prompt. If the version of Java is greater than 1.6 then we are ready to go. It is preferable to use the official Java Runtime Environment rather than the one provided by OpenJDK.
c:\>java -version
java version "1.6.0_18"
Java(TM) SE Runtime Environment (build 1.6.0_18-b07)
Java HotSpot(TM) Client VM (build 16.0-b13, mixed mode, sharing)
Let us download the latest Solr. For this book we are using Solr Version 4.3.1, which can be downloaded from the following link:
http://lucene.apache.org/solr/downloads.html
To install Solr on Windows or Linux simply unzip or extract the solr-4.3.1.zip file into a folder. The installation process for Windows and Linux is as follows:
For installation on Windows, simply right-click on the zip file and extract it into the
C:\solr-4.3.1folder. To start Solr, go to the Windows command prompt Start | Run. In the Run window, typecmd. On the Windows command prompt type the following:cd C:\solr-4.3.1\example java –jar start.jar
For installation on Linux, simply extract the zip file in your home folder. Follow these commands to extract and run Solr using your console:
unzip solr-4.3.1.zip
cd ~/solr-4.3.1/example
java –jar start.jar
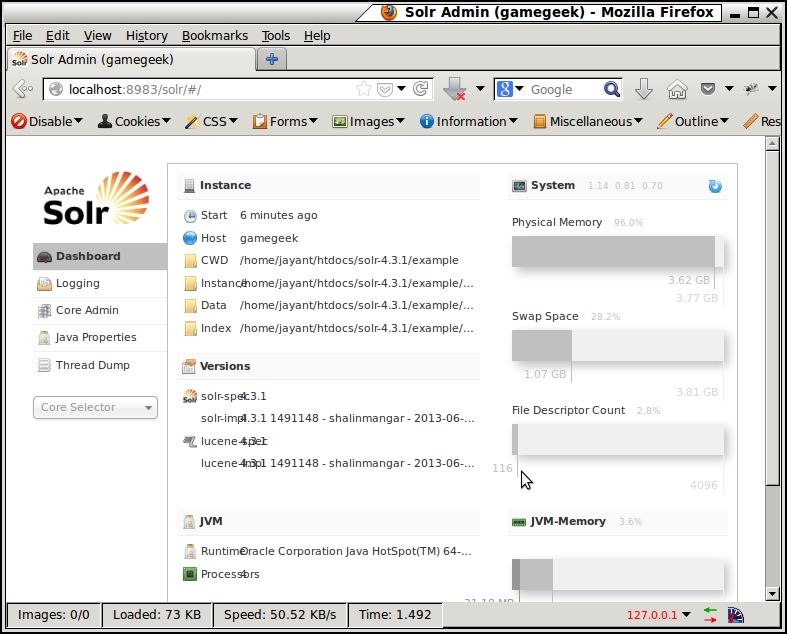
When we start Solr with the java –jar start.jar option, Solr runs on the port 8983. It uses a built-in web server known as jetty. To see Solr working, simply point your browser to the following address:
http://localhost:8983/solr/
You will be able to see the following interface. This means that Solr is running fine. The following screenshot shows the Solr Admin interface:
The web server jetty used by default Solr is meant for development purposes only. For production environment, we would want Solr to run as a part of a more convenient setup involving a more reliable web server. Solr can be configured to run on any J2EE container such as IBM Websphere or JBoss or any other server. Apache Tomcat is the most commonly used server. Let us see how to set up Solr as a part of Apache Tomcat web server. We have Apache Tomcat installed on our Windows or Linux environment.
To run Solr as a part of Apache Tomcat web server, you need to create a context for /solr in the configuration. The following solr.xml file needs to be put at the appropriate location in Windows and Linux inside the Tomcat configuration folder at <tomcat_home>/conf/Catalina/localhost.
<?xml version="1.0" encoding="UTF-8"?>
<Context docBase="/home/jayant/solr-4.3.1/example/webapps/solr.war" >
<Environment name="solr/home" type="java.lang.String" value="/home/jayant/solr-4.3.1/example/solr" override="true" />
</Context>
Change docBase to <solr_path>/example/webapps/solr.war and the value attribute in Environment to <solr_path>/example/solr. The environment named solr/home tells Tomcat the location where Solr configuration files are to be found. In addition to this, let us change the configuration of Solr in the <solr_path>/example/solr/solr.xml file. Search for hostPort and change it to match Tomcat's port 8080. Similarly search for hostContext and change it to solr.
Note
Windows users, use \ instead of / in your configuration XML files for path variables. Do not change the / in solr/home.
Restart your Tomcat server and you should be able to go to the following URL to see Solr working along with Tomcat:
http://localhost:8080/solr/
Tip
If you see an error "404 not found" on the preceding URL, it may be because of some libraries of Solr that Tomcat is not able to find. You can check the exact error in Tomcat error logs in the <tomcat_home>/logs/catalina.out folder. To resolve the missing library issue, copy all JAR files from the <solr_home>/example/lib/ext to <tomcat_home>/lib folder.
You can also enable advanced logging in your Tomcat logs by copying the log4j.properties file from the <solr_home>/example/resources folder to your <tomcat_home>/lib folder.
Ping queries are used in Solr to monitor the health of the Solr server. Let us first see how the ping query works on the Solr Admin web interface:

Let us check the version of PHP installed. We need Version 5.3.2 and above. To check the version, run php –v on the Windows or Linux command line as follows:
c:\>php -v
PHP 5.4.16 (cli) (built: Jun  5 2013 21:01:46)
Copyright (c) 1997-2013 The PHP Group
Zend Engine v2.4.0, Copyright (c) 1998-2013 Zend Technologies
To get ping working from our PHP code, we will need a utility called cURL. For Linux environments, we need to install the curl, libcurl, and php5-curl packages. On Ubuntu distribution of Linux it can be installed using the following command:
sudo apt-get install curl php5-curl
For enabling cURL on windows, we need to edit the php.ini file in our PHP installation. Search for the extensions directory setting and change it to where php_curl.dll is located. Also, uncomment the line which loads php_curl.dll:
extension=php_curl.dll
extension_dir = "C:\php\ext"
The following URL is the URL that is being called for executing the ping query. On going to this URL, we can see the response that contains the response header and the status, which is OK.
http://localhost:8080/solr/collection1/admin/ping
We can see that the response is in XML. To convert the response to JSON, simply add wt=json to the earlier URL:
http://localhost:8080/solr/collection1/admin/ping/?wt=json
Linux users can check the response of a curl call using the following command:
curl http://localhost:8080/solr/collection1/admin/ping/?wt=json
{"responseHeader":{"status":0,"QTime":7,"params":{"df":"text","echoParams":"all","rows":"10","echoParams":"all","wt":"json","q":"solrpingquery","distrib":"false"}},"status":"OK"}
A direct call to Solr via PHP requires us to call the ping with a JSON response URL via cURL and decode the JSON response to show the result. Here is a piece of code to do the same. This code can be executed using the PHP command line:
$curl = curl_init("http://localhost:8080/solr/collection1/admin/ping/?wt=json");
curl_setopt($curl, CURLOPT_RETURNTRANSFER, 1);
$output = curl_exec($curl);
$data = json_decode($output, true);
echo "Ping Status : ".$data["status"]."\n";
On executing the preceding code via command line, we will get the output as follows:
Ping Status : OK
Tip
Downloading the example code
You can download the example code files for all Packt books you have purchased from your account at http://www.PacktPub.com. If you purchased this book elsewhere, you can visit http://www.PacktPub.com/support and register to have the files e-mailed directly to you.
Every call to Solr for executing any task is eventually a URL which needs particular parameters depending on what we need to get done. So, adding documents to Solr, deleting documents from Solr, and searching of documents can all be done by building URLs with parameters for their respective commands. We can call these URLs using PHP and cURL and interpret the response in JSON. However, instead of remembering every command to be sent in the URL, we can use a library to create the Solr URL and interpret the response. Some of the libraries available are as follows:
Solr-PHP-client
Apache Solr-PHP extension
Solarium
Solr-PHP-client can be obtained from the following location:
https://code.google.com/p/solr-php-client/
It can be seen that the latest release for this library was in November 2009. There have been no developments on this library since 2009. This is a very basic client and does not support a lot of features that are now available in Solr.
Apache SolrPhp extension can be obtained from the following location:
http://pecl.php.net/package/solr
The latest release for this library was in November 2011. This is a comparatively better library. And is also the library suggested for integrating with Solr on www.php.net. It is intended to be very fast and lightweight compared to others. The complete API of the library can be obtained from following location:
http://php.net/manual/en/book.solr.php
Solarium is the latest library for Solr PHP integration. It is open source and is continuously updated. It is fully object oriented and provides features almost as soon as they are made available in Solr. It is fully flexible where you can add a functionality that you feel is missing. Also custom parameters can be used to achieve almost any task. On the downside, the library is somewhat heavy as it has many files. Solarium replicates the concepts of Solr to some extent. And it is being actively developed. We will install Solarium and explore the comprehensive list of features of Solr via PHP code using the Solarium library.
Solarium can be downloaded and used directly or it can be installed using a package manager for PHP called Composer. If we download the Solarium library directly, we will have to get other dependencies for installation. Composer, on the other hand, manages all dependencies by itself. Let us have a quick look at installing Composer on both Windows and Linux environments.
For Linux, the following commands will help in installation of Composer:
curl https://getcomposer.org/installer | php
mv composer.phar composer
These command downloads the Composer installer PHP script and passes the output to the PHP program for interpretation and execution. During execution, the PHP script downloads the Composer code into a single executable PHP program composer.phar (PHP Archive). We are renaming the composer.phar executable to Composer for ease of use purposes. On Linux, Composer can be installed at a user level or at a global level. To install Composer at user level, simply add it to your environment path using the following command:
export PATH=<path to composer>:$PATH
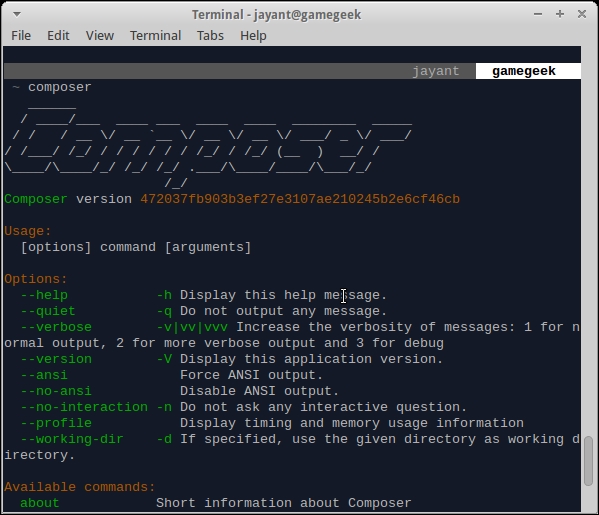
To install Composer on a global level simply move it to the system path suchas /usr/bin or /usr/local/bin. To check if Composer has been installed successfully, simply run Composer on your console and check the various options provided by Composer.
Windows user can download composer-setup.exe from the following link:
http://getcomposer.org/Composer-Setup.exe
Double-click on the executable and follow instructions to install Composer.
Note
We will need to install a web server—mostly Apache and configure it to enable the execution of PHP scripts on it.
Alternatively, we can use the built-in web server in PHP 5.4. This server can be started by going to the directory where all HTML and PHP files are and by using the php –S localhost:8000 command to start the PHP development server on port 8000 on our local machine.
Once Composer is in place, installing Solarium is pretty easy. Let us install Solarium on both Linux and Windows machine.
For Linux machines, open the console and navigate to the Apache documentRoot folder. This is the folder where all our PHP code and web applications will reside. In most cases, it is /var/www or it can be changed to any folder by changing the configuration of the web server. Create a separate folder where you want your applications to reside and also create a composer.json file inside this folder specifying the version of Solarium that needs to be installed.
{
  "require": {
    "solarium/solarium": "3.1.0"
  }
}
Now install Solarium by running the composer install command. Composer automatically downloads and installs Solarium and its related dependencies such as symfony event dispatcher. This can be seen in the output of Composer.

For installation on Windows, open up your command prompt and navigate to the Apache documentRoot folder. Create a new folder inside documentRoot and run composer install inside the folder.
We can see that during installation, symfony event dispatcher and solarium library are downloaded in a separate folder named vendor. Let us check the contents of the vendor folder. It consists of a file called autoload.php and three folders namely composer, symfony, and solarium. The autoload.php file contains the code to load Solarium library in our PHP code. Other folders are self explanatory. The solarium folders is the library and the symfony folder contains a dependency known as event dispatcher, which is being used by Solarium. The composer folder contains files which help in loading all the required libraries in PHP.
For using the Solarium library, we need to load the Solarium library in our PHP code. Let us see how to execute the same ping query that we fired earlier using PHP and Solarium.
Note
We have installed Solarium inside the code folder in our Apache documentroot. Apache documentRoot points to ~/htdocs (inside our home folder).
First include the Solarium library in our code using the following line of code:
include_once("vendor/autoload.php");Create a Solarium configuration array that defines how to connect to Solr.
$config = array(
  "endpoint" => array("localhost" => array("host"=>"127.0.0.1",
  "port"=>"8080", "path"=>"/solr", "core"=>"collection1",)
) );
Solarium has the concept of endpoints. An endpoint is basically a collection of settings that can be used to connect to a Solr server and a core. For each query that we execute via Solarium, we can specify an endpoint using which we want to execute the query. If no endpoint is specified, the query is executed using the first endpoint, which is the default endpoint. The benefit of using endpoints is that we need to create a single Solarium client instance irrespective of the number of servers or cores we use.
Create the Solarium client with the configuration we created earlier. And call the createPing() function to create the ping query.
$client = new Solarium\Client($config);
$ping = $client->createPing();
Finally execute the ping query and get the result using the following command:
$result = $client->ping($ping);
$result->getStatus();
It can be seen that the result is an array. But we can also call the getStatus() function to get the ping's status. We can execute the code using PHP command line or call the following URL to see the result:
http://localhost/code/pingSolarium.php
Solarium provides us with the flexibility of adding multiple Solr servers as endpoints and using a single Solarium client to fire query on any Solr server. To add another endpoint to our Solarium configuration for Solr running on another port 8983 on our localhost and to use it to execute our query, we will use the following code:
$config = array(
  "endpoint" => array(
    "localhost" => array("host"=>"127.0.0.1","port"=>"8080","path"=>"/solr", "core"=>"collection1",),
    "localhost2" => array("host"=>"127.0.0.1","port"=>"8983","path"=>"/solr", "core"=>"collection1",)
  ) );
$result = $client->ping($ping, "localhost2");
The Solarium client provides functionality of adding and removing endpoints using the addEndpoint(array $endpointConfig) and removeEndpoint(string $endpointName) functions. To modify an endpoint during runtime, we can call getEndpoint(String $endPointName) to get the endpoint and the use functions such as setHost(String $host), setPort(int $port), setPath(String $path), and setCore(String $core) to change the endpoint settings. Additional settings provided for endpoints are:
The
setTimeout(int $timeout)setting is used for specifying a timeout for a Solr connectionThe
setAuthentication(string $username, string $password)setting is used for providing authentication if your Solr or Tomcat requires HTTP authenticationThe
setDefaultEndpoint(string $endpoint)setting can be used to set the default endpoint for a Solarium client
We have now been able to execute a ping query on Solr using the Solarium library. To see how this works, open up Tomcat logs. It can be found at <tomcat_path>/logs/solr.log or <tomcat_path>/logs/catalina.out. On Linux, we can do a tail of the log to see fresh entries as they appear:
tail –f solr.log
On running the cURL-based PHP code that we wrote earlier, we can see the following hits in the log:
INFO  - 2013-06-25 19:51:16.389; org.apache.solr.core.SolrCore; [collection1] webapp=/solr path=/admin/ping/ params={wt=json} hits=0 status=0 QTime=2
INFO  - 2013-06-25 19:51:16.390; org.apache.solr.core.SolrCore; [collection1] webapp=/solr path=/admin/ping/ params={wt=json} status=0 QTime=3
On running the Solarium-based code, we get similar output but with an additional parameter omitHeader=true. This parameter causes the response header to be ignored in the output.
INFO  - 2013-06-25 19:53:03.534; org.apache.solr.core.SolrCore; [collection1] webapp=/solr path=/admin/ping params={omitHeader=true&wt=json} hits=0 status=0 QTime=1
INFO  - 2013-06-25 19:53:03.534; org.apache.solr.core.SolrCore; [collection1] webapp=/solr path=/admin/ping params={omitHeader=true&wt=json} status=0 QTime=1
So eventually, Solarium also creates a Solr URL and makes a cURL call to Solr to fetch the results. How does Solarium know which Solr server to hit? This information is provided in the endpoint settings in the $config parameter.
What about systems that do not have cURL installed? Solarium comes with a concept of adapters. Adapters define the way in which PHP will communicate with the Solr server. The default adapter is cURL, which we used earlier. But in the absence of cURL, the adapter can be switched to HTTP. CurlAdapter is dependent on the curl utility, which needs to be installed or enabled separately.
HttpAdapter on the other hand uses the file_get_contents() PHP function to get a Solr response. This uses more memory and is not recommended when the numbers of queries on Solr are very large. Let us see the code to switch adapter in Solarium:
$client->setAdapter('Solarium\Core\Client\Adapter\Http');
var_dump($client->getAdapter());
We can call getAdapter() to check the current adapter. There are other adapters available—the ZendHttp adapter that is used with Zend Framework. There is a PeclHttp adapter, which uses the pecl_http package to make HTTP calls to Solr. The HTTP, Curl, and Pecl adapter support authentication, which can be used by the setAuthentication() function discussed earlier. CurlAdapter also supports the usage proxy. You can also create a custom adapter using the adapter interface if required.
We have successfully installed Solr as a part of Apache Tomcat server. We saw how to communicate with Solr using PHP and cURL but without using a library. We discussed a few libraries and concluded that Solarium is feature rich and an actively developed and maintained library. We were able to install Solarium and were able to communicate with Solr using PHP and Solarium library. We were able to see actual queries being executed on Solr in the Solr logs. We explored some features of the Solarium client library such as endpoints and adapters.
In the next chapter we will see how to use the Solarium library for inserting, updating, and deleting documents in Solr using our PHP code.
