


 Download code from GitHub
In this chapter, we will cover the following topics:
Generating a WSDL-first web service using SoapUI tool integration
Developing a SOAP web service test-first
Updating a SOAP project using a WSDL
Updating SOAP projects using WSDL refactoring (Pro)
Generating and developing a RESTful web service stub test-first
Generating SoapUI tests with REST discovery (Pro)
Web service stubs (and mocks—see Chapter 3, Developing and Deploying Dynamic REST and SOAP Mocks) are often developed in the early stages of a project, to quickly provide limited functionality to the client application while the full web services are implemented. This chapter shows how SoapUI can help you quickly test and develop simple Java REST and SOAP web service stubs and generate tests by recording interactions with existing web services. The web service stub implementations that you'll develop will only involve a few lines of Java code and can be run as Java executables. Apart from providing a quick warm up on basic SoapUI testing, the service interfaces and implementation examples will be reused as the basis for more advanced topics later in this book.
You will learn the following topics:
How SoapUI can help you test, update, refactor, and develop a simple stub SOAP web service using its WSDL
How SoapUI can help you test and develop a simple stub REST web service
How SoapUI's discovery features can help you generate tests
To use Apache CXF to generate, implement and run basic JAX-RS and JAX-WS web service stubs
You will need the following software:
Note
New to SoapUI?
While this chapter demonstrates how to set up basic SoapUI REST and SOAP projects, tests, and assertions, it doesn't cover the typical 'getting started' installation, setup, and overview of SoapUI. So if you are completely new to SoapUI, it might also be worth taking a look at the online SoapUI docs, for example, Getting started at http://www.soapui.org/.
This recipe shows how to configure SoapUI (Apache CXF) tool integration to generate a runnable Java web service with an empty implementation using its WSDL. This could be useful if you need a quick menu-driven way to create a SOAP web service that can be implemented and deployed separately to SoapUI.
The WSDL that we are going to use defines a simple invoice service. It has only one operation to retrieve a basic invoice document using its invoice number:
Operation:
getInvoiceRequest:
invoiceNo : stringResponse:
InvoiceDocument (invoiceNo : string, company : string, amount : string)Location:
http://localhost:9001/ws/invoice/v1
The WSDL can be found at soap/invoicev1/wsdl/invoice_v1.wsdl in this chapter's sample code.
We'll need the Apache CXF web service framework to generate the web service stub using SoapUI tooling. Download the latest version from http://cxf.apache.org/download.html (I have used version 3.01).
Tip
Apache CXF Version
Despite the tool menu stating version 2.x, you can go for the latest version, which, at the time of writing, is 3.01 (requires JDK 1.7+). Otherwise, choose version 2.7.x for JDK 1.6+ support, or version 2.6.x for JDK 1.5 support.
To build and run the service Java code, the minimum you will need is a suitable JDK. I have used JDK 1.7.0_25. Optionally, you may also want to use an IDE like Eclipse to make easy the work of exploring, building, and running the generated web service code.
Tip
Other SoapUI Tools
While you are free to choose any alternate framework supported by SoapUI tools (see http://www.soapui.org/SOAP-and-WSDL/code-generation.html), note that although the principles will stay the same, the command details and the resulting generated web service artifacts will of course vary.
First, we need to configure SoapUI to be able to generate and build the invoice web service. Then, we can run it as a standard Java executable. Perform the following steps:
In SoapUI, go to Tools | Apache CXF, and when the Apache CXF Stubs window appears, click on the Tools button to bring up the SoapUI Preferences window. Here, browse to the location where you downloaded Apache CXF, select the
bindirectory, and then click on OK:
Next, we need to configure the generation options under the Basic tab. The main points are:
WSDL location: For example,
<chapter1 samples>/soap/invoicev1/wsdl/invoice_v1.wsdl.Output directory: This is where the generated source code will end up; for example;
<chapter1 samples>/soap/invoicev1/src/main/java.Package Structure: This is for the generated source code; for example,
ws.invoice.v1.Artifact Options: Only tick Server and Implementation. However, the client and Ant build file options are also available. We will be using SoapUI as our client and won't require Ant.
To automatically compile our generated service code, under the Advanced tab, do the following:
Tick Compile.
Supply a Class Folder value for the resulting Java class files, for example,
<chapter1 samples>/soap/invoicev1/target/classes.Tick Validate WSDL (optional) under the advanced tab to check the structure and get basic WS-I compliance checks on your WSDL. Note that the
invoice_v1.wsdlshould not produce any output with this option.Leave all other fields and checkboxes unchanged.
Under the Custom Args tab, enter
–wsdlLocation invoice_v1.wsdlin Tool Args. This tells the web service code where to look for the WSDL file at runtime. Setting the value like this means thatinvoice_v1.wsdlis expected to be the root of theclassesdirectory. More on this in the next section.Now, we are ready to click on Generate! If all goes well, you should see an output similar to the following:

You should also see the following generated Java source files in your output folder, for example:
<chapter1 samples>/soap/invoicev1/src/main/java/ws/invoice/v1/

InvoiceDocumentType.java
InvoicePortType_InvoicePort_Server.java
ObjectFactory.java InvoicePortImpl.java
InvoiceRefType.java package-info.java
InvoicePortType.java InvoiceServiceV1.java
The corresponding class files in your class folder, for example:
<chapter1 samples>/soap/invoicev1/target/classes/ws/invoice/v1/
Before we run the server, we need to copy
invoice_v1.wsdlinto the classes folder location, for example, into<chapter1 samples>/soap/invoicev1/target/classes. Otherwise, when the server is run, you will see an error like[failed to localize] cannot.load.wsdl(invoice_v1.wsdl).Finally, we are ready to start the server:
cd <chapter1 samples>/soap/invoicev1/target/classes
java ws.invoice.v1.InvoicePortType_InvoicePort_Server
Starting Server
Server ready...
To confirm whether it's actually working, open a browser and go to http://localhost:9001/ws/invoice/v1?wsdl, and you should see the (invoice_v1.wsdl) WSDL displayed. Our generated server is up and running.
All that SoapUI is actually doing is building command-line parameters for the various web service frameworks to do the generation. In this example, those happy with the command line could just run <Apache CXF Home>/bin/wsdl2java directly.
Note
Apache CXF wsdl2java script
For more info on the wsdl2java options, see http://cxf.apache.org/docs/wsdl-to-java.html.
Let's take a quick look at the generated source files. The main points are as follows:
Running the
wsdl2javaoption generates Java standard JAX-WS web service code with types and methods derived from the WSDL.The Java JDK ships with an implementation of JAX-WS:
There's no need for any additional compile or runtime libraries, for example, Apache CXF libs.
No servlet container is required to publish the web service, for example, Tomcat or Jetty. If you look in
InvoicePortType_InvoicePort_Server.java, you can see that the service is published using JDK's default HTTP server provided by thejavax.xml.ws.Endpointclass. The staticEndpoint.publish(…)binds our generated service implementation (InvoicePortImpl.java) to the endpoint address so that invoice requests are handled by ourgetInvoice(…)method.
The service is very portable; that is, only a Java JRE is needed to run it.
The WSDL file is required at runtime. The
wsdlLocationparameter supplied in step 4 sets an attribute of the@javax.jws.WebServiceannotation in the classInvoicePortImpl.java.The server endpoint and timeout (the default value is 5 minutes) are easy to change. Edit
InvoicePortType_InvoicePort_Server.java:Endpoint:
String address = "http://localhost:9001/ws/invoice/v1";Timeout:
Thread.sleep(5 * 60 * 1000);Requires recompile
If the generated web service stub is to be used as the basis for on-going service development, then managing the generation, build, and deploy cycle externally to SoapUI using a build framework such as Ant, Maven, or Gradle will probably be a better option. To help with this, Apache CXF has a good Maven plugin to provide similar code generation; refer to http://cxf.apache.org/docs/maven-cxf-codegen-plugin-wsdl-to-java.html.
For those who want a quick and high-level way to generate a working web service for testing purposes, I would expect SoapUI's excellent mocking features to be a more convenient option than code generation in many cases (See Chapter 3, Developing and Deploying Dynamic REST and SOAP Mocks).
The SOAP web service stub journey will be continued in the next recipe when we add simple SoapUI tests and a basic implementation to pass them.
To access the Java 1.6 JAX-WS tutorial, go to http://docs.oracle.com/javaee/6/tutorial/doc/bnayl.html
SoapUI is often used to retrofit tests around web services that are already at least partially developed. To follow a test-first or test-driven development (TDD) approach requires that we first set up failing tests and then provide a service implementation in order to pass them. In this recipe, we'll see how SoapUI can be used to facilitate test-first development for the invoice web service generated in the previous recipe.
We'll need the WSDL from the previous recipe to set up our SoapUI project (<chapter1 samples>/soap/invoicev1/wsdl/invoice_v1.wsdl).
The Java code for the completed web service implementation can be found at <chapter1 samples>/soap/invoicev1_impl.
The project can be found at <chapter1 samples>/invoice-soap-v1-soapui-project.xml.
Firstly, we'll set up a couple of simple failing tests to assert what we expect back from the getInvoice operation and then provide basic implementation to pass them. Next, we'll update the invoice WSDL definition to provide an additional createInvoice operation, write new failing tests, and finally provide basic code to pass those. Perform the following steps:
To create the SoapUI project and generate the initial
PortBinding,Test Suite,TestCase, andTest Request TestStep, right-click on yourWorkspaceand select New SOAP Project. In the window, enter/select the following and click on OK:Project Name:
InvoiceServiceInitial WSDL:
chapter1 samples>/soap/invoicev1/wsdl/invoice_v1.wsdlLeave Create Requests ticked and also tick Create TestSuite
In the Generate TestSuite window, select the following options and click on OK:
Leave Style as One TestCase for Each Operation
Change Request Content to Use existing Requests in Interface
Accept the suggested
TestSuitename asInvoicePortBinding TestSuitein the pop up and click on OK. All expected SoapUI test artifacts should now be generated in your project.Now, we can write a simple failing test to assert what we expect a successful
getInvoicerequest to return. Under the firstTestStepoption, double-click ongetInvoiceand you should see the SOAP request:<soapenv:Envelope xmlns:soapenv="http://schemas.xmlsoap.org/soap/envelope/" xmlns:inv="http://soapui.cookbook.samples/schema/invoice"> <soapenv:Header/> <soapenv:Body> <inv:getInvoice> <inv:invoiceNo>?</inv:invoiceNo> </inv:getInvoice> </soapenv:Body> </soapenv:Envelope>Change the
invoiceNo(?) value to something more memorable, for example,12345.Now, start the stub invoice service generated in the previous recipe and submit the request by clicking on the green arrow. You should see a stubbed response, like the one shown in the following code:
<S:Envelope xmlns:S="http://schemas.xmlsoap.org/soap/envelope/">
   <S:Body>
      <InvoiceDocument xmlns="http://soapui.cookbook.samples/schema/invoice">
         <invoiceNo>12345</invoiceNo>
         <company/>
         <amount>0.0</amount>
      </InvoiceDocument>
   </S:Body>
</S:Envelope>
Next, let's create some SoapUI
Assertionsto specify the invoice property values we expect to see:invoiceNo=12345company=Test Companyamount=100.0
Since we're dealing with SOAP XML, let's add 3 XPath Assertions to check these values in the response. SoapUI Pro users will find this easy, thanks to the convenient XPath builder. Open source users can either be 'hardcore' and write them from scratch or just copy the details provided.
Tip
XPath Help
Even the Pro version's XPath builder is of less use when you cannot directly retrieve a response XML to build from, that is, when there is no service at all! As a workaround, you can get SoapUI to generate a sample response XML by going to Add Step | SOAP Mock Response TestStep from the TestCase, and then copy the response XML into a helpful XPath tool to write the XPath expression, for example, http://www.freeformatter.com/xpath-tester.html. Paid-for tools such as XML Spy will also help a lot in these areas. You may also find http://www.w3schools.com/XPath/xpath_syntax.asp helpful.
So let's add 3 XPath Assertions. Edit the REST Request TestStep, under the Assertions tab and right-click on Add Assertion and add a new XPath Assertion to check the response's invoiceNo=12345, company=Test Company, and amount=100.0:
|
Response |
Assertion name |
XPath Expression |
Expected Result |
|---|---|---|---|
|
|
|
|
|
|
|
|
|
|
|
|
|
|
|
Have a look at the following screenshot for better clarity:

Running the TestCase should now fail 2 of the assertions. Note that InvoiceNoShouldBe12345 will work, thanks to Apache CXF passing through the request's invoiceNo to the response (see InvoicePortImpl.java)! It is still worth asserting the invoiceNo value, as it is a requirement.
Tip
Server timed out?
If you instead see a connection refused error, then check whether your server hasn't exited after 5 minutes. It's easy to change this timeout (see the previous recipe).
Now, we can add a very basic service implementation to pass this test. We just need to implement the getInvoice(…) method in InvoicePortImpl.java. The simplest implementation option is to just edit InvoicePortTypeImpl.java and hardcode the expected values:
try {
    java.lang.String companyValue = "Test Company";
    company.value = companyValue;
    java.lang.Double amountValue = 100.0d;
    amount.value = amountValue;
} catch (java.lang.Exception ex) {
    ex.printStackTrace();
    throw new RuntimeException(ex);
}
Tip
TDD
Strictly speaking, we should first write a unit test before implementing the method, for example, using JUnit.
Next, recompile this and restart the server:
cd <chapter1 samples>/soap/invoicev1
javac src/main/java/ws/invoice/v1/*.java -d target/classes/
And start it again:
cd <chapter1 samples>/soap/invoicev1/target/classes
java ws.invoice.v1.InvoicePortType_InvoicePort_Server
Rerun TestCase, which should now pass!
This recipe builds on all the same JAX-WS web service code explained in the previous recipe. This time, we add a very simple stub implementation to return the minimum necessary to pass the test. For those who haven't seen JAX-WS before, the use of the javax.xml.ws.Holder wrapper object means that we don't have to explicitly set the invoiceNo, as it is passed through the request (for more information, see http://tomee.apache.org/examples-trunk/webservice-holder/README.html).
As mentioned in the previous recipe, SoapUI mocks (see Chapter 3, Developing and Deploying Dynamic REST and SOAP Mocks) can often provide a convenient and often quicker alternative if all you need is a disposable test version of your web service with basic functionality. Also, if you want your web service stub to be the basis for ongoing development, then you may want to consider using a build framework like Gradle or Maven to manage the build, deploy, and test cycle. Chapter 5, Automation and Scripting, looks at different ways to use build frameworks and scripts to run SoapUI tests (and mocks) after your web service is built and deployed. If your stub implementations become more complicated, you may also want unit tests.
The SOAP web service stub journey continues in the next recipe where we use SoapUI to help us update the project, tests, and services to add a createInvoice operation.
For more information on Gradle, go to https://www.gradle.org/
For more information on Maven, go to http://maven.apache.org/
For more information on JUnit, go to http://junit.org/
When a SOAP project's WSDL changes, SoapUI can use the new definition to:
Update the port binding
Add new operations and requests
Update endpoints in requests
This recipe builds on the previous example to show how SoapUI can help you do this when a new web service operation is added. We then provide a basic test-driven implementation to support the new operation.
The new WSDL defines a createInvoice operation and can be found in <chapter 1 samples>/soap/invoicev2_impl/wsdl/Invoice_v2.wsdl.
To save time coding the implementation, you can take either the full service code or just the Java classes you need from <chapter 1 samples>/soap/invoicev2_impl.
The SoapUI project for this recipe can be found at <chapter 1 samples>/invoice-soap-v2-soapui-project.xml.
After updating our SOAP project using the new WSDL and SoapUI's Update Definition functionality, we need to add a new failing test for the new createInvoice operation. Next, we generate an empty web service stub using the new WSDL and the approach shown in the first recipe. Finally, with our failing test, we will provide a basic implementation to pass the test.
To update our SoapUI project with the new WSDL, right-click on InvoicePortBinding and select Update Definition. Enter the following in the Update Definition window and click on OK:
Definition URL: This is
<chapter1 samples>/soap/invoicev2_impl/wsdl/invoice_v2.wsdl.Tick Recreate existing request with the new schema.
Leave the rest of the checkboxes at their default values.
Click on Yes on the Update Definition with new endpoint popup (although this didn't actually update the endpoint for me!). This should result in
InvoicePortBindingnow showing thecreateInvoiceoperation and request.Next, let's add a new
TestCaseoption forcreateInvoicecalledTestCase – Create Invoice. Also, change the order so thatTestCase – Create Invoiceis run beforegetInvoice TestCase.Add a new
TestStepoption underTestCase – Create InvoicecalledcreateInvoice, and select InvoicePortBinding > createInvoice in the operation popup and just accept default value in the Add Request To TestCase popup.Generate a new empty web service for
invoice_v2.wsdlas per the previous recipe, using Tools | Apache CXF:WSDL Location:
invoice_v2.wsdl.Change
v1tov2in all the paths, packages, and Custom Args.Copy
invoice_v2.wsdlto the root of your classes' folder, for example,<chapter1 samples>/soap/invoicev2/target/classes.
Start the generated invoice v2 server:
cd <chapter1 samples>/soap/invoicev2/target/classes
java ws.invoice.v2.InvoicePortType_InvoicePort_Server
If you now run the tests:
The
createInvoiceTestStepoperation will succeed since it doesn't have anyAssertions.The
getInvoice TestStepoperation will fail as expected because our previous implementation is not part of the newly generated invoice v2 service code.
Next, let's add
Assertionto test thecreateInvoiceoperation. Insert the same invoice values as we did in thegetInvoiceTestStepoperation into the request of thecreateInvoice TestStepoperation and addXPath Assertionto check whether the acknowledgmentinvoiceNois 12345:Name: AcknowledgementShouldContainInvoiceNo12345 XPath: declare namespace ns1='http://soapui.cookbook.samples/schema/invoice'; //ns1:Acknowledgement[1]/ns1:invoiceNo[1] Expected Value: 12345
If we now rerun
TestCase:The
createInvoice TestStepoperation will still pass, again thanks to the Apache CXF-generated code passing through theinvoiceNofrom the request to the response.The
getInvoice TestStepoperation will now not pass as expected.
Providing a simple service implementation to pass the tests by storing invoice details between requests and allowing them to be retrieved involves a little more coding than in the previous recipe. So to stay more in the scope of SoapUI, we can take what we need from a completed example service implementation in this chapter's samples. If you have generated the new empty web service stub in step 5, then all that you will need to take are:
InvoicePortImpl.java: This provides the main functionality.Invoice.java: This is a JavaBean to store invoice details.
More information on these is provided in the next section.
Next, recompile and restart the server.
Rerun the tests, and both should now pass!
The main learning of this recipe is how to use the Update Definition functionality, and what it does and doesn't update for you. Like in the previous recipe, we have only used a very basic service implementation just to pass the tests. The main points of the service implementation are as follows:
When SoapUI makes a request to the
createInvoiceoperation, theInvoicePortImpl.createInvoicemethod extracts the invoice details from the request and stores them (usingInvoice.java) in aHashMapkeyed oninvoiceNo. TheinvoiceNovalue is then returned in the acknowledgment response.When SoapUI makes a request to the
getInvoiceoperation, theInvoicePortImpl.getInvoicemethod uses theinvoiceNovalue in the request to retrieve the invoice details from theHashMap(held inInvoice.java) and return them in the response to SoapUI.
Here, we have developed a very simple non-persistent dynamic web service stub. Chapter 3, Developing and Deploying Dynamic REST and SOAP Mocks, also shows how to use in-memory H2 databases to provide a non-persistent, dynamic REST and SOAP mock service functionality. If you would like to persist the request data, then Chapter 9, Data-driven Load Testing With Custom Datasources, uses a SOAP service stub with a simple H2 database backend to persist data.
For Pro version users, the next recipe continues the SOAP web service stub journey by showing how SoapUI WSDL refactoring can help manage more complicated service definition updates.
Updating a SOAP project's WSDL will often lead to changes to test endpoints, requests, responses, and/or operations. In a simple example like that of the previous recipe, this isn't a big deal. For more complex WSDL changes that involve more tests, SoapUI Pro has a nice graphical editor that manages the migration step by step.
SoapUI WSDL refactoring can help manage the following:
Adding, removing, or renaming operations
Adding, removing, or renaming request/response fields
Resulting XPath (
Assertion) updates
We'll work on the <chapter1 samples>/invoice-soap-v2-soapui-project.xml project from the previous recipe. I have also included the project <chapter1 samples>/Invoice-soap-v3-soapui-project.xml, which is the end product after the refactoring.
The new WSDL can be found at <chapter1 samples>/soap/invoicev3/wsdl/invoice_v3.wsdl.
To illustrate the WSDL refactoring functionality, we'll refactor invoice_v2.wsdl and the tests from the previous recipe to use a new WSDL invoice_v3.wsdl. This will involve the following changes:
The
getInvoiceoperation gets renamed toretrieveInvoiceNew operations such as
updateInvoiceanddeleteInvoiceare addedThe
invoiceNofield is renamed toidA new field
dueDateis added to the invoice documentThe
companyNamefield is removed in favor of a newcustomerReffield
These changes will result in a CRUD style interface, with some basic schema changes:
Firstly, open the project (the previous recipe's project:
InvoiceSOAPv3) and right-click onInvoiceServicePortBindingand select RefactorDefinition. Enter the path to the new WSDL (invoice_v3.wsdl) and tick the options to create new requests and a backup, and then click on Next.In the Transfer Operations window, SoapUI correctly maps
createInvoiceand leavesgetInvoicein red to indicate that it has no mapping in the new WSDL. Correct this by clicking and dragginggetInvoiceon top ofretrieveInvoicein the New Schema section, to end up with a result as shown in the following screenshot:
Click on Next to proceed to the Refactor Schema window. Correct the
getInvoicerequest in a similar way as shown here:
Then, click on the red
createInvoiceoperation. Here, mapinvoiceNotoid, butcompanycannot be mapped (as we are removing it), so highlight it and click on Discard. Things should look like what is shown in the following screenshot; when ready, click on Next:
On the Update XPath Expressions window, first click on Filter unchanged paths to show only the problems. We can't fix the XPath relating to
companyName, so just fix theinvoiceNoXPath'sAssertion InvoiceNoShouldBe12345by copying the Old XPath value into the New Xpath box and changinginvoiceNotoid(as shown in the next screenshot), and then click on Finish: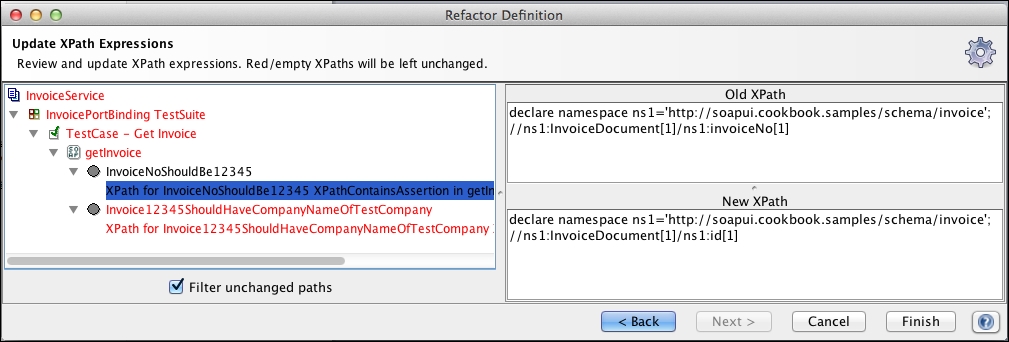
Click on Yes in the Update Definition pop up to update the requests with the new
v3endpoint. You should see the Update of interface successful message. This indicates that the refactoring is complete!
On inspection of the refactored SoapUI project, all artifacts appeared to be in order, with the following exceptions:
The endpoints in the
TestStepsneed to be manually updated to thev3endpoint.The automatic backup failed with an
IOException(on MacOSX). As a workaround, I recommend that you manually back up the SoapUI project XML file.The
AssertionInvoice12345ShouldHaveCompanyNameOfTestCompanyoption needs to be deleted manually.
Note
Passing The Tests
If you would like to see the tests pass again, you can generate a v3 invoice service as per the previous recipes. Then, add a minimal implementation to satisfy the current assertions. I have included a very basic implementation <chapter1 samples>/soap/invoicev3_impl, which can just be run in the same way as the first three recipes.
The refactoring tool obviously doesn't write the missing tests for the updateInvoice and deleteInvoice operations or create Assertions for the new fields. These need to be added manually to return to an acceptable level of test coverage.
In terms of possible uses for WSDL refactoring, three typical SOA patterns are:
Contract Standardization (see http://soapatterns.org/design_patterns/contract_denormalization)
Decomposed Capability (see http://soapatterns.org/design_patterns/decomposed_capability)
Service Normalization (see http://soapatterns.org/design_patterns/service_normalization)
Variations on the first pattern are perhaps the most common, that is, refactoring of a single WSDL, as per our example. This is also the only pattern that can be covered in a single pass of the WSDL refactoring feature.
This recipe shows how to generate and develop a simple RESTful web service stub test-first using TDD. The main SoapUI learning will be how to test a simple RESTful web service defined by a WADL that produces JSON responses. Basic JAX-RS web service development skills using Apache CXF can also be learned here.
The example service is a REST version of the SOAP invoice service from the first recipe. The service is defined by a WADL with the following main properties:
WADL
: invoice_v1.wadlService endpoint:
http://localhost:9000/invoiceservice/v1Resource:
GET /invoice/{id}Produces:
application/json
Apache CXF will be used to generate, build, and run the stub web service. See the Getting ready section in the first recipe if you need advice on how to download Apache CXF.
Tip
Eclipse users
If you are using Eclipse, you can set up Apache CXF as a runtime library that is by navigating to Project | Add Library | CXF Runtime, and run the server class as a Java application.
The invoice-v1-soapui-project.xml project for this recipe can be found in the this chapter's sample code files.
First, we'll create a REST project from the service's WADL, and add a TestStep with Assertions to check whether the response's invoice values are what we expect. Then, we'll generate an empty runnable REST web service using Apache CXF, and finally add a simple implementation to pass the test. Perform the following steps:
Create a SoapUI project from
invoice_v1.wadl. Go to File Menu | New REST Project | Import WADL, browse toinvoice_v1.wadl, and click on OK. This should generate a project with a sample request to the invoice resource that takes anidpath parameter, that is,http://localhost:9000/invoiceservice/v1/invoice/{id}.Next, create a simple
TestSuite,TestCase, andTestStepoperations withAssertionto specify what we expect back from a successful invoice resource request. We can use the Generate TestSuite option to do this:Right-click on
invoice_v1 Endpointand select Generate TestSuite.Change the style to Single TestCase with one Request for each Method and click on OK.
Accept the suggested name as
invoice_v1 TestSuite.The project should then contain
TestSuitewith one generatedTestStepoperation forinvoice/{id}.
Now, we're ready to add some
Assertionsto theTestStep. Say we're expecting a JSON representation of an Invoice document that will look like the following:{"Invoice": { "id": 12345, "companyName": "Test Company", "amount": 100 }}Then, if you've got SoapUI Pro, we can use 3
JsonPath Match Assertions:Name: IdShouldBe12345 JsonPath: $.Invoice.id expectedValue: 12345 Name: AmountShouldBe100 JsonPath: $.Invoice.amount Expected Value: 100 Name: CompanyNameShouldBeTestCompany JsonPath: $.Invoice.companyName Expected Value: Test Company
For open source SoapUI, we can add 3
Contains Assertions:Name: ShouldContainText12345 Contains Content: 12345 Name: ShouldContainTextTestCompany Contains Content: Test Company Name: ShouldContainText100 Contains Content: 100
In both versions of SoapUI we can check whether the HTTP status is 200 OK by adding a
Valid HTTP Status CodesAssertion:Name: ShouldReturnHTTPStatus200 HTTP Status Code = 200
Tip
Want to also check JSONSchema Compliance?
See the Testing REST response JSON schema compliance recipe of Chapter 4, Web Service Test Scenarios, for how to do it.
Now that our tests are ready, we're going to need to generate the actual service. We can do this using Apache CXF's
wadl2javascript to generate the Java service types and empty the implementation from the WADL.Note
SoapUI's WADL2Java menu option is not what it seems
Unfortunately, in the current version (5.0) of SoapUI, the WADL2Java functionality (http://www.soapui.org/REST-Testing/rest-code-generation.html) is written to use classic
wadl2java(https://wadl.java.net/). This version ofwadl2javaonly generates the client code from the WADL and not the service code like we need.Of course, generating web service code directly using Apache CXF is not part of SoapUI. I have included these steps for completeness and in case you find them useful. If you would rather skip this part, I have included the generated code in
<chapter 1 samples>/rest/invoicev1_gen. Otherwise, you can generate the web service code forinvoice_v1.wadlby runningwadl2java.For example:cd <apache-cxf-3.0.1 home>/ ./bin/wadl2java -d <chapter1 samples>/rest/invoicev1/src/main/java/ -p rest.invoice.v1 -impl -interface <chapter1 samples>/rest/invoicev1/wadl/invoice_v1.wadl
Tip
Classpath Issue on MacOSX/Linux
When running
wadl2javawith Apache CXF 3.01, if you see this error:Could not find or load main class org.apache.cxf.tools.wadlto.WADLToJava, then manually setting theCLASSPATHvariable withexportCLASSPATH=apache-cxf-3.0.1/lib/*fixes the problem.You should see the following output:
Aug 18, 2014 8:57:07 PM org.apache.cxf.common.jaxb.JAXBUtils logGeneratedClassNames INFO: Created classes: generated.Invoice, generated.ObjectFactory
The following Java source files generated at the location set by the
–dparameter and–pgives the package structure:rest/invoice/v1/InvoiceserviceV1Resource rest/invoice/v1/InvoiceserviceV1ResourceImpl rest/invoice/v1/Invoice rest/invoice/v1/ObjectFactory rest/invoice/v1/Service
Next, we need to compile the generated service. Note that Apache CXF's libraries are required on the classpath (the
-cpparameter):cd <chapter1 samples>/rest/invoicev1/src/main/java/rest/invoice/v1/ javac -cp "<apache-cxf-3.0.1 home>/lib/*" -d <chapter1 samples>/rest/invoicev1/target/classes/ *.java
Execute the following command to run the server:
cd <chapter1 samples>/rest/invoicev1/target/classes/ java -cp "<apache-cxf-3.0.1 home>/lib/*:." rest.invoice.v1.Server … INFO logging… … Server ready…
Give the server a quick test by browsing to
http://localhost:9000/invoiceservice/v1?_wadl, and you should see a WADL that indicates that the server is running.Now, it's time to run
TestCasethat we created in step 2:Open the
TestCaseand edit theTestStepcreated in step 2.Add an invoice ID to the
TestSteps'srequest, for example, 12345.Running the
TestCaseshould result in all theTestStep'sAssertionsfailing, and a response with HTTP status 204 no content under the Raw tab. This is expected since we have no implementation yet.
Now that we have a failing test, we are ready to implement the invoice resource:
First implement
InvoiceserviceV1ResourceImpl.javawith the following code:package rest.invoice.v1; public class InvoiceserviceV1ResourceImpl implements InvoiceserviceV1Resource { public Invoice getInvoiceid(String id) { ObjectFactory objectFactory = new ObjectFactory(); Invoice invoice = objectFactory.createInvoice(); if (id != null && id.equals("12345")) { invoice.setId("12345"); invoice.setCompanyName("Test Company"); invoice.setAmount(100.0d); } return invoice; } }Next, add the annotation
@XmlRootElement(name = "Invoice"); otherwise, marshaling from the JavaBean to the response JSON doesn't work:@XmlAccessorType(XmlAccessType.FIELD) @XmlType(name = "invoice", propOrder = { "id", "companyName", "amount" }) @XmlRootElement(name = "Invoice") public class Invoice { …Add an import statement for the annotation to the top of
Invoice.java:import javax.xml.bind.annotation.XmlRootElement;Finally, delete the
package-info.javaclass; otherwise, there will be a namespace prefix on the JSON response.
Next, recompile and restart the server as described in steps 9 and 10. Then, rerunning the
TestCaseshould pass!
Let's take a look at the main solution points:
The web service we create uses the JAX-RS standard, which is the official Java standard for RESTful web services (see https://jax-rs-spec.java.net/). One key difference with JAX-WS seen in the first recipe is that the JDK does not ship with a JAX-RS implementation; only the JAX-RS interfaces and annotations are supplied. So, we instead use the Apache CXF JAX-RS implementation; hence, we need to supply the Apache CXF libraries at compile and runtime.
Apache CXF generated the following Java classes using the WADL definition:
Invoice.java: This is a JavaBean representation of the invoice XML content. This class has binding annotations to allow the Apache CXF JAX-RS implementation to marshal invoice objects to XML content and unmarshal XML content to invoice objects:@XmlAccessorType(XmlAccessType.FIELD) @XmlType(name = "invoice", propOrder = { "id", "companyName", "amount" }) @XmlRootElement(name = "Invoice")Tip
To understand more about these binding annotations the technology to look at is Java Architecture for XML Binding (JAXB)—see https://jaxb.java.net/tutorial/.
ObjectFactory.java: This class can optionally be used to create instances of theInvoice.javaclass by calling thecreateInvoice()factory method. There is also a factory methodJAXBElement<Invoice> createInvoice(Invoice value)to create JAXB invoice XML bindings. These factory methods can be useful to separate object creation code from your service methods when dealing with more complicated schema examples, but they are not especially useful in our case.InvoiceserviceV1Resource.java:This is a JAX-RS annotated Java interface to represent the RESTful invoice service and its resource. In this example, we have the following code:@Path("/invoiceservice/v1/") public interface InvoiceserviceV1Resource { @GET @Produces("application/json") @Path("/invoice/{id}") Invoice getInvoiceid(@PathParam("id") String id); }
The annotations are used by the Apache CXF JAX-RS implementation to map HTTP requests to matching Java methods. In this case, implementations of this interface that is
InvoiceserviceV1ResourceImplwill invoke thegetInvoiceid(…)method passing in the {id} path parameter as theString idvariable if there is a HTTP GET request to the resource/invoiceservice/v1/invoice/{id}. Other annotated service methods to support POST, PUT and DELETE requests could also be added here and in the implementation. See<chapter 1 samples>/rest/invoice_crud/src/main/java/rest/invoice/crud/v1/InvoiceServiceCRUDV1Resource.javafor an example like this.InvoiceserviceV1ResourceImpl.java: This is the implementation of the preceding interface to provide the Java code to run when a matching request is made. We added code to theInvoice getInvoiceId(String id)of this class so that if the invoice (id) is 12345, then we a create a newInvoiceobject using theObjectFactory, populate it with the expected values, and return it in the response. In the background, Apache CXF is able to marshal this into JSON content before dispatching the response back to SoapUI. Unlike the JAX-WS example in the first recipe, there was no holder object, so we were responsible for creating theInvoiceobject ourselves.Service.java: This is a server class that publishes our stub service's implementation. Like in the first recipe's JAX-WS server code, the endpoint and service timeout can be set here.
Apart from using WADLs to create SoapUI projects for RESTful web services, there are also SoapUI plugins to use more modern alternatives such as RAML(http://raml.org/) and Swagger (http://swagger.io/) definitions as well—see Chapter 10, Using Plugins for more information.
RESTful web services will often be developed code-first and may not present a WADL or a structured definition to generate your SoapUI project and tests from. In these cases, you? can easily build your REST project by manually entering the service's URI, resources, methods, and parameters using their respective menu options, see http://www.soapui.org/getting-started/rest-testing.html. Or if you're a pro version user, you can use SoapUI to generate your project and tests by recording your requests to the service's API (see the next recipe). If you're an open source user, then you can also generate tests in a similar way by using the HTTP Monitor (See http://www.soapui.org/HTTP-Recording/concept.html).
For more information on WADL, go to https://wadl.java.net/
For more information on Apache CXF JAX-RS, go to http://cxf.apache.org/docs/jax-rs.html
In this recipe, we take a look at how to generate tests for RESTful web services that already exist. The pro version of SoapUI has the REST discovery functionality to allow interactions with a RESTful API to be recorded and used to generate tests.
To provide an example of a RESTful web service, I have extended the previous recipe's invoice service to have full CRUD functionality. The interface now looks like this:
Resource: http://localhost:9000/invoiceservice/v1/invoice Supported Methods: POST invoice - Create Invoice. GET invoice/{id} – Get (Read) Invoice. PUT invoice/{id} – Update Invoice. DELETE invoice/{id} – Delete Invoice.
The invoice document is as follows:
{"Invoice": {
   "id": 12345,
"companyName": "Test Company",
"amount": 100
}}The service's implementation is very basic. The create (POST) method is not idempotent, and it will create new invoice objects on each successful request with IDs of the form invN, where N is a sequence number that starts from 0, for example, inv0, inv1, and so on. The GET, UPDATE, and DELETE methods will all return HTTP status 404 if an invoice with the specified ID has not previously been created. The invoices are stored in a Java HashMap, so they will not persist when the server is restarted, and the HashMap is empty on startup.
Note
Example Service Code
We are not developing a service in this recipe. Use the prebuilt service from <chapter1 samples>/rest/invoice_crud.
Start the service in the same manner as described in the previous recipe:
cd <chapter1 samples>/chapter1/rest/invoice_crud/target/classes java -cp "<apache-cxf-3.0.1 home>/lib/*:." rest.invoice.crud.v1.Server
To test its running, open a browser and go to http://localhost:9000/invoiceservice/v1?_wadl, and you should see a WADL displayed with methods as described in the preceding code.
Tip
Port already in use
If you see this exception, then make sure that no other servers are running on port 9000, for example, the servers from the previous recipes.
The Mozilla Firefox browser is used to illustrate this recipe. Please download this if you don't already have it. If this isn't possible, other options will be described later.
Perform the following steps:
Note
Internal Browser or Proxy Mode?
SoapUI offers two options to discover RESTful web services. The first option is to use the internal browser and the second one is to use the proxy mode. I would say that the internal browser option is only useful if:
You are only testing
GETrequests, as no other methods are possible.You are discovering services via web pages like in the Swagger example in the SoapUI online help (http://www.soapui.org/REST-Discovery/api-with-internal-browser.html).
Or you need to test using HTTPS, which, at the time of writing, the proxy cannot support.
Otherwise, once set up, the proxy mode is a far more versatile option for testing in a lot of API scenarios including this recipe.
To start, go to File Menu | New Project and select options the Discover REST APIs using and SoapUI internal proxy. Click on OK, and you should see the default details of the SoapUI proxy:
Discover Using: Proxy HTTP Recorded Requests: 0 Port: 8081 Status: Running Host (Internal Clients): localhost
For this example, we are only concerned with the details for internal clients. Using an external client involves pretty much the same steps, except that it may require network setup that is beyond the scope of this book. The host (
localhost) and the port (8081) are the key values to note. These will be used by whatever REST client we choose to use to do the actual service interactions.Tip
REST Clients
There are many good and free options here. IDEs such as Eclipse and IntelliJ have a good REST client plugin. Browser-based REST clients are also very good; for Chrome, there is the Postman plugin, and for Firefox, the RESTClient add-on. When choosing which to use, consider that you will need to amend the proxy settings, at least temporarily, in order to route requests via SoapUI's proxy. You could also go for a command line option and use something like cURL (http://curl.haxx.se/docs/manpage.html). Choose whichever option is most convenient for you, but for this recipe I will illustrate the use of Firefox's RESTClient plugin.
Download the RESTClient add-on in Firefox by going to Tools Menu | Add-ons, search for
RESTClient, and click on Add to Firefox. Restart Firefox, and RESTClient should be available in the Tools menu. Click on the client to open it in a new Firefox tab.Next, we need to configure Firefox's proxy settings to point to SoapUI's proxy:
Open Preferences | Advanced | Network.
Under Connection, next to Configure how Firefox connects to the Internet, click on Settings.
Select Manual proxy configuration and enter the SoapUI proxy details as shown in the following screenshot.
Click on OK.

Now, we are ready to use the RESTClient via the SoapUI proxy. As a first test, request the WADL like before, by selecting a method of
GET, adding a URL ofhttp://localhost:9000/invoiceservice/v1?_wadl, and clicking on Send. You should see the WADL in the RESTClient response body and see the SoapUI proxy Recorded Requests incremented to 1.Tip
Nothing happened?
Make sure the service is still running; otherwise, connection refused messages will occur. The server exists after 10 minutes, which is easily adjustable in the source code for the
Serverclass.Note that other requests via the Firefox browser will also increment the recorded requests. Any unwanted requests can be filtered out later.
Before we try posting or putting any invoice data, we need to change the request's content type to
application/json; otherwise, status415 Unsupported Media Typemessages will occur. To do this:Click on the RESTClient's Headers menu and select Custom Header.
In the Request Header pop up, enter Name as
Content-Typeand Value asapplication/json,and then click on OK.You should see
Content-Type: application/jsonin the Headers section on the next page.
Now, let's do some actual requests! First, let's create an invoice. Set the following values:
Method:
POSTURL:
http://localhost:9000/invoiceservice/v1/invoiceBody:
{"Invoice": {
   "id": 12345,
"companyName": "Test Company",
"amount": 100
}}
You should see the Response Header status code
200 OKand a Response Body of:{ "Invoice": { "id": "inv0", "companyName": "Test Company", "amount": 100 } }Next, update the invoice:
Method:
PUTURL:
http://localhost:9000/invoiceservice/v1/invoice/inv0Body:
{"Invoice": {
 "id": 12345,
"companyName": "Real Company",
"amount": 200
}}
You should see the Response Header status code
200 OKand a Response Body of:{ "Invoice": { "id": "inv0", "companyName": "Real Company", "amount": 200 } }Next, get the invoice, method
GET, and URLhttp://localhost:9000/invoiceservice/v1/invoice/inv0. You should see a response of status code200 OKand the same body as earlier.Now, delete the invoice, method
DELETE, and URLhttp://localhost:9000/invoiceservice/v1/invoice/inv0. You should see a response of200 OKwithout any response body.Lastly, try to get that invoice again and you should see a response of status code
404 Not Found.Now, to generate the SoapUI test artefacts, perform the following steps:
Go back to SoapUI and click on Done. The window should change and present you with a tree view of all the requests you submitted.
Next, click on Generate services and select Services + TestSuite. Then, enter a name for the
TestSuite, for example,TestSuite Rest Discovery.Click on OK to create TestCase.
A Success pop up should be displayed; click on OK to close discovery, and you should see all the generated
requests,TestSuite,TestCase, andTestStepsfor each of the requests in a new project calledProject 1. Finished!
SoapUI sets up its own proxy to listen to all HTTP traffic routed through it. When you make a request through the REST client, SoapUI is able to extract the details and build up a list of sample requests. Then, when you have finished recording, SoapUI uses the list of requests to generate test artifacts in the same way it would if the requests had come from another source, for example, a WADL.
On inspection of the generated REST project, we can see that the REST discovery has provided a useful means of harvesting sample requests from a readymade service. You still need to create Assertions and perhaps organize the generated TestSteps. The REST discovery functionality could be useful when it comes to retrofitting tests, perhaps around a service that has been developed code-first, as in the above example. It could also be especially useful for services that don't present a WADL or similar definition and therefore cannot have test requests generated by other SoapUI means.
For more information on HTTP Monitor SoapUI Docs (open source), go to http://www.soapui.org/HTTP-Recording/concept.html


