This chapter will provide details on the setup and configuration of PrimeFaces along with the basics of the PrimeFaces AJAX mechanism. The goal of this chapter is to provide a sneak preview on some of the features of PrimeFaces, such as the AJAX processing mechanism and resource handling with Internationalization and Localization, along with the necessary steps to go through for implementing a simple web application powered by PrimeFaces, which will give a head start to the user.
PrimeFaces is a lightweight JSF component library with one JAR file, which needs no configuration and does not contain any required external dependencies. To start with the development of the library, all we need is to get the artifact for the library.
You can download the PrimeFaces library from http://primefaces.org/downloads.html, and you need to add the primefaces-{version}.jar file to your classpath. After that, all you need to do is import the namespace of the library, which is necessary to add the PrimeFaces components to your pages, to get started.
If you are using Maven (for more information on installing Maven, please visit http://maven.apache.org/guides/getting-started/maven-in-five-minutes.html), you can retrieve the PrimeFaces library by defining the Maven repository in your Project Object Model (POM) file as follows:
Tip
Downloading the example code
You can download the example code files for all Packt books you have purchased from your account at http://www.PacktPub.com. If you purchased this book elsewhere, you can visit http://www.PacktPub.com/support and register to have the files e-mailed directly to you.
<repository>
  <id>prime-repo</id>
  <name>PrimeFaces Maven Repository</name>
  <url>http://repository.primefaces.org</url>
</repository>
Add the dependency configuration as follows:
<dependency>
  <groupId>org.primefaces</groupId>
  <artifactId>primefaces</artifactId>
  <version>3.4</version>
</dependency>
At the time of writing this book, the latest and most stable version of PrimeFaces was 3.4. To check out whether this is the latest available or not, please visit http://primefaces.org/downloads.html. The code in this book will work properly with PrimeFaces 3.4. In prior versions or the future versions, some methods, attributes, or components' behaviors may change.
In order to use PrimeFaces components, we need to add the namespace declarations into our pages. The namespace for PrimeFaces components is as follows:
xmlns:p="http://primefaces.org/ui"
For PrimeFaces Mobile, the namespace is as follows:
xmlns:p="http://primefaces.org/mobile"
That is all there is to it. Note that the p prefix is just a symbolic link and any other character can be used to define the PrimeFaces components. Now you can create your first page with a PrimeFaces component as shown in the following code snippet:
<html xmlns="http://www.w3.org/1999/xhtml"
      xmlns:h="http://java.sun.com/jsf/html"
      xmlns:f="http://java.sun.com/jsf/core"
      xmlns:p="http://primefaces.org/ui">
    <f:view contentType="text/html">
        <h:head />
        <h:body>
            <h:form>
                <p:spinner />
            </h:form>
        </h:body>
    </f:view>
</html>
This will render a spinner component with an empty value as shown in the following screenshot:
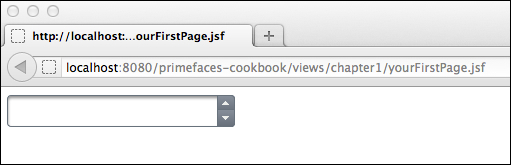
A link to the working example for the given page is given at the end of this recipe.
When the page is requested, the p:spinner component is rendered with the renderer implemented by the PrimeFaces library. Since the spinner component is a UI input component, the request-processing lifecycle will get executed when the user inputs data and performs a post back on the page.
PrimeFaces only requires Java 5+ runtime and a JSF 2.x implementation as mandatory dependencies. There are some optional libraries for certain features.
|
Dependency |
Version |
Type |
Description |
|---|---|---|---|
|
2.0 or 2.1 |
Required |
Apache MyFaces or Oracle Mojarra | |
|
2.1.7 |
Optional |
| |
|
3.7 |
Optional |
| |
|
1.0 |
Optional |
| |
|
1.2.1 |
Optional |
| |
|
1.4 |
Optional |
|
Note
Please ensure that you have only one JAR file of PrimeFaces or specific PrimeFaces Theme in your classpath in order to avoid any issues regarding resource rendering.
Currently PrimeFaces supports the web browsers IE 7, 8, or 9, Safari, Firefox, Chrome, and Opera.
This recipe is available in the PrimeFaces Cookbook Showcase application on GitHub at https://github.com/ova2/primefaces-cookbook. You can find the details there for running the project. When the server is running, the showcase for the recipe is available at http://localhost:8080/primefaces-cookbook/views/chapter1/yourFirstPage.jsf.
PrimeFaces provides a partial page rendering (PPR) and view-processing feature based on standard JSF 2 APIs to enable choosing what to process in the JSF lifecycle and what to render in the end with AJAX. PrimeFaces AJAX Framework is based on standard server-side APIs of JSF 2. On the client side, rather than using the client-side API implementations of JSF implementations, such as Mojarra and MyFaces, PrimeFaces scripts are based on the jQuery JavaScript library.
We can create a simple page with a command button to update a string property with the current time in milliseconds on the server side and an output text to show the value of that string property, as follows:
<p:commandButton update="display" action="#{basicPPRController.updateValue}" value="Update" />
<h:outputText id="display" value="#{basicPPRController.value}"/>
If we would like to update multiple components with the same trigger mechanism, we can provide the IDs of the components to the update attribute by providing them a space, comma, or both, as follows:
<p:commandButton update="display1,display2" />
<p:commandButton update="display1 display2" />
<p:commandButton update="display1,display2 display3" />
In addition, there are reserved keywords that are used for a partial update. We can also make use of these keywords along with the IDs of the components, as described in the following table:
|
Keyword |
Description |
|---|---|
|
The component that triggers the PPR is updated | |
|
The parent of the PPR trigger is updated | |
|
The encapsulating form of the PPR trigger is updated | |
|
PPR does not change the DOM with AJAX response | |
|
The whole document is updated as in non-AJAX requests |
We can also update a component that resides in a different naming container from the component that triggers the update. In order to achieve this, we need to specify the absolute component identifier of the component that needs to be updated. An example for this could be the following:
<h:form id="form1">
  <p:commandButton update=":form2:display"
action="#{basicPPRController.updateValue}" value="Update" />
</h:form>

<h:form id="form2">
  <h:outputText id="display" value="#{basicPPRController.value}"/>
</h:form>

public String updateValue() {
  value = String.valueOf(System.currentTimeMillis());
  return null;
}
PrimeFaces also provides partial processing, which executes the JSF lifecycle phases—Apply Request Values, Process Validations, Update Model, and Invoke Application—for determined components with the process attribute. This provides the ability to do group validation on the JSF pages easily. Mostly group-validation needs arise in situations where different values need to be validated in the same form, depending on an action that gets executed. By grouping components for validation, errors that would arise from other components when the page has been submitted can be overcome easily. Components like commandButton, commandLink, autoComplete, fileUpload, and many others provide this attribute to process partially instead of the whole view.
Partial processing could become very handy in cases when a drop-down list needs to be populated upon a selection on another drop down and when there is an input field on the page with the required attribute set to true. This approach also makes immediate subforms and regions obsolete. It will also prevent submission of the whole page, thus this will result in lightweight requests. Without partially processing the view for the drop downs, a selection on one of the drop downs will result in a validation error on the required field. An example for this is shown in the following code snippet:
<h:outputText value="Country: " />
<h:selectOneMenu id="countries" value="#{partialProcessingController.country}">
<f:selectItems value="#{partialProcessingController.countries}" />
  <p:ajax listener="#{partialProcessingController.handleCountryChange}"
    event="change" update="cities" process="@this"/>
</h:selectOneMenu>
<h:outputText value="City: " />
<h:selectOneMenu id="cities" value="#{partialProcessingController.city}">
  <f:selectItems value="#{partialProcessingController.cities}" />
</h:selectOneMenu>

<h:outputText value="Email: " />
<h:inputText value="#{partialProcessingController.email}" required="true" />
With this partial processing mechanism, when a user changes the country, the cities of that country will be populated in the drop down regardless of whether any input exists for the email field.
As seen in partial processing example for updating a component in a different naming container, <p:commandButton> is updating the <h:outputText> component that has the ID display, and absolute client ID :form2:display, which is the search expression for the findComponent method. An absolute client ID starts with the separator character of the naming container, which is : by default.
The <h:form>, <h:dataTable>, composite JSF components along with <p:tabView>, <p:accordionPanel>, <p:dataTable>, <p:dataGrid>, <p:dataList>, <p:carousel>, <p:galleria>, <p:ring>, <p:sheet>, and <p:subTable> are the components that implement the NamingContainer interface. The findComponent method, which is described at http://docs.oracle.com/javaee/6/api/javax/faces/component/UIComponent.html, is used by both JSF core implementation and PrimeFaces.
JSF uses : (a colon) as the separator for the NamingContainer interface. The client IDs that will be rendered in the source page will be like :id1:id2:id3. If needed, the configuration of the separator can be changed for the web application to something other than the colon with a context parameter in the web.xml file of the web application, as follows:
<context-param>
  <param-name>javax.faces.SEPARATOR_CHAR</param-name>
  <param-value>_</param-value>
</context-param>
It's also possible to escape the : character, if needed, in the CSS files with the \ character, as \:. The problem that might occur with the colon is that it's a reserved keyword for the CSS and JavaScript frameworks, like jQuery, so it might need to be escaped.
This recipe is available in the PrimeFaces Cookbook Showcase application on GitHub at https://github.com/ova2/primefaces-cookbook. You can find the details there for running the project. For the demos of the showcase, refer to the following:
Basic Partial Page Rendering is available at
http://localhost:8080/primefaces-cookbook/views/chapter1/basicPPR.jsfUpdating Component in Different Naming Container is available at
http://localhost:8080/primefaces-cookbook/views/chapter1/componentInDifferentNamingContainer.jsfA Partial Processing example at
http://localhost:8080/primefaces-cookbook/views/chapter1/partialProcessing.jsf
Internationalization (i18n) and Localization (L10n) are two important features that should be provided in the web application's world to make it accessible globally.
With Internationalization, we are emphasizing that the web application should support multiple languages; and with Localization, we are stating that the texts, dates, or any other fields should be presented in the form specific to a region.
Note
PrimeFaces only provides the English translations. Translations for the other languages should be provided explicitly. In the following sections, you will find the details on how to achieve this.
For Internationalization, first we need to specify the resource bundle definition under the application tag in faces-config.xml, as follows:
    <application>
        <locale-config>
            <default-locale>en</default-locale>
            <supported-locale>tr_TR</supported-locale>
        </locale-config>
        <resource-bundle>
            <base-name>messages</base-name>
            <var>msg</var>
        </resource-bundle>
    </application>
A resource bundle would be a text file with the .properties suffix that would contain the locale-specific messages. So, the preceding definition states that the resource bundle messages_{localekey}.properties file will reside under classpath and the default value of localekey is en, which is English, and the supported locale is tr_TR, which is Turkish. For projects structured by Maven, the messages_{localekey}.properties file can be created under the src/main/resources project path.

For showcasing Internationalization, we will broadcast an information message via FacesMessage mechanism that will be displayed in the PrimeFaces growl component. We need two components, the growl itself and a command button, to broadcast the message.
<p:growl id="growl" />
<p:commandButton action="#{localizationController.addMessage}" value="Display Message" update="growl" />
The addMessage method of localizationController is as follows:
    public String addMessage() {
        addInfoMessage("broadcast.message");
        return null;
    }
That uses the addInfoMessage method, which is defined in the static MessageUtil class as follows:
public static void addInfoMessage(String str) {
FacesContext context = FacesContext.getCurrentInstance();
    ResourceBundle bundle = context.getApplication().getResourceBundle(context, "msg");
    String message = bundle.getString(str);
    FacesContext.getCurrentInstance().addMessage(null, new FacesMessage(FacesMessage.SEVERITY_INFO, message, ""));
}
Localization of components, such as calendar and schedule, can be achieved by providing the locale attribute. By default, locale information is retrieved from the view's locale and it can be overridden by a string locale key or the java.util.Locale instance.
Components such as calendar and schedule use a shared PrimeFaces.locales property to display labels. PrimeFaces only provides English translations, so in order to localize the calendar we need to put corresponding locales into a JavaScript file and include the scripting file to the page.
The content for the German locale of the Primefaces.locales property for calendar would be as shown in the following code snippet. For the sake of the recipe, only the German locale definition is given and the Turkish locale definition is omitted.
PrimeFaces.locales['de'] = {
    closeText: 'Schließen',
    prevText: 'Zurück',
    nextText: 'Weiter',
    monthNames: ['Januar', 'Februar', 'März', 'April', 'Mai',
    'Juni', 'Juli', 'August', 'September', 'Oktober', 'November',
    'Dezember'],
    monthNamesShort: ['Jan', 'Feb', 'Mär', 'Apr', 'Mai', 'Jun',
    'Jul', 'Aug', 'Sep', 'Okt', 'Nov', 'Dez'],
    dayNames: ['Sonntag', 'Montag', 'Dienstag', 'Mittwoch',
    'Donnerstag', 'Freitag', 'Samstag'],
    dayNamesShort: ['Son', 'Mon', 'Die', 'Mit', 'Don', 'Fre',
    'Sam'],
    dayNamesMin: ['S', 'M', 'D', 'M ', 'D', 'F ', 'S'],
    weekHeader: 'Woche',
    FirstDay: 1,
    isRTL: false,
    showMonthAfterYear: false,
    yearSuffix: '',
    timeOnlyTitle: 'Nur Zeit',
    timeText: 'Zeit',
    hourText: 'Stunde',
    minuteText: 'Minute',
    secondText: 'Sekunde',
    currentText: 'Aktuelles Datum',
    ampm: false,
    month: 'Monat',
    week: 'Woche',
    day: 'Tag',
    allDayText: 'Ganzer Tag'
};
Definition of the calendar components with the locale attribute would be as follows:
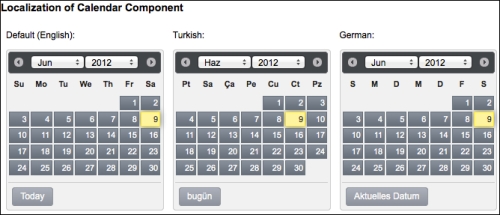
<p:calendar showButtonPanel="true" navigator="true" mode="inline" id="enCal"/>

<p:calendar locale="tr" showButtonPanel="true" navigator="true" mode="inline" id="trCal"/>

<p:calendar locale="de" showButtonPanel="true" navigator="true" mode="inline" id="deCal"/>
They will be rendered as follows:
For Internationalization of the Faces message, the addInfoMessage method retrieves the message bundle via the defined variable msg. It then gets the string from the bundle with the given key by invoking the bundle.getString(str) method. Finally, the message is added by creating a new Faces message with severity level FacesMessage.SEVERITY_INFO.
For some components, Localization could be accomplished by providing labels to the components via attributes, such as with p:selectBooleanButton.
<p:selectBooleanButtonvalue="#{localizationController.selectedValue}"onLabel="#{msg['booleanButton.onLabel']}"offLabel="#{msg['booleanButton.offLabel']}" />The msg variable is the resource bundle variable that is defined in the resource bundle definition in Faces configuration file. The English version of the bundle key definitions in the messages_en.properties file that resides under classpath would be as follows:
booleanButton.onLabel=Yes
booleanButton.offLabel=No
This recipe is available in the PrimeFaces Cookbook Showcase application on GitHub at https://github.com/ova2/primefaces-cookbook. You can find the details there for running the project. For the demos of the showcase, refer to the following:
Internationalization is available at
http://localhost:8080/primefaces-cookbook/views/chapter1/internationalization.jsfLocalization of the calendar component is available at
http://localhost:8080/primefaces-cookbook/views/chapter1/localization.jsfLocalization with resources is available at
http://localhost:8080/primefaces-cookbook/views/chapter1/localizationWithResources.jsf
For already translated locales of the calendar, see http://code.google.com/p/primefaces/wiki/PrimeFacesLocales.
PrimeFaces 3.x provides improved resource ordering to support customization. This ability could be used when Internet Explorer demands special meta tags that are expected to be placed at first or for scenarios where styling for PrimeFaces components needs to be overridden by custom styling.
Just define <h:head> by using facet definitions where necessary.
<h:head title="PrimeFaces Cookbook - ShowCase">
<f:facet name="first">
</f:facet>
...
<f:facet name="middle">
</f:facet>
...
<f:facet name="last">
</f:facet>
...
</h:head>
Note
The <h:head> tag is used by the JSF components for adding their resources into pages, thus it's a must-have tag throughout your JSF-based applications. One of the commonly made mistakes among developers is to forget putting in the head tag.
For instance, if a stylesheet gets declared in multiple CSS files, which would be linked in the middle and last facet respectively, the stylesheet definition referred to in the middle facet will be overridden by the one defined in the last facet.
With PrimeFaces' own HeadRenderer implementation, the resources are handled in the following order:
First facet, if defined
PF-JSF registered CSS
Theme CSS
Middle facet, if defined
PF-JSF registered JS
Head content
Last facet, if defined
Internet Explorer introduced a special tag named meta, which can be used as <meta http-equiv="X-UA-Compatible" content="..." />. The content of the X-UA-Compatible <meta> tag helps to control document compatibility such as specifying the rendering engine. For example, inserting the following statement into the head of a document would force IE 8 to render the page using the new standards mode:
<meta http-equiv="X-UA-Compatible" content="IE=8" />
X-UA-Compatible must be the first child of the head component. Internet Explorer won't accept this <meta> tag if it's placed after the <link> or <script> tag. Therefore, it needs to be placed within the first facet. This is a good demonstration of the resource ordering with the usage of the first facet.
This recipe is available in the PrimeFaces Cookbook Showcase application on GitHub at https://github.com/ova2/primefaces-cookbook. You can find the details there for running the project. When the server is running, the showcase for the improved resource ordering is available at http://localhost:8080/primefaces-cookbook/views/chapter1/resourceOrdering.jsf.
Spring Roo is a next-generation rapid application development tool that uses Convention over Configuration principles. It is a text-based open source tool that can be used for creating and managing Spring-based applications. It uses mature libraries such as Spring framework, Java Persistence API, Java Server Pages (JSP), Spring Security, Spring Web Flow, Log4J, and Maven. Spring Roo also provides scaffolding for web-based applications that are powered by PrimeFaces.
At the time of writing this book, the latest version of Spring Roo was version 1.2.2. It can be downloaded at http://www.springsource.com/download/community?project=Spring%20Roo. More information on Spring Roo, along with the list of commands, can be found at http://www.springsource.org/spring-roo.
Also, Maven—the Apache build manager for Java projects—needs to be installed as a prerequisite. At the time of writing this book, Maven v3.0.4 was used. For more information on this, please visit http://maven.apache.org/guides/getting-started/maven-in-five-minutes.html.
For PrimeFaces scaffolding with Spring Roo, follow these steps:
We will create the folder where the project will reside and then change directory to it.
mkdir primefaces-cookbook-roo
cd primefaces-cookbook-roo
Now we can execute the
roocommand within the folder. Linux, Unix, or Mac OS users should executeroo.sh, and Windows users should execute theroo.batfile. Then, we should see the console output as shown in the following screenshot:
Then, in the command line, we can create the sample
rooproject by specifying its name and its packaging structure as follows:roo> project --projectName primefaces-cookbook-roo --topLevelPackage org.primefaces.cookbookAfter that, we can add a persistency layer to the project structure as follows:
roo> persistence setup --provider HIBERNATE --database HYPERSONIC_IN_MEMORYWith the
persistencecommand, we are specifying the provider asHIBERNATEand stating that an in-memory database will be used for testing purposes.Create
enumfor the type of manufacturer of the car.roo> enum type --class ~.domain.Manufacturer roo> enum constant --name Volkswagen roo> enum constant --name Mercedes roo> enum constant --name BMW roo> enum constant --name Audi
Then we can create the class for the car.
roo> entity jpa --class ~.domain.Car
roo> field number --fieldName yearOfManufacture --type java.lang.Integer --notNull
roo> field string --fieldName name --notNull
roo> field enum --fieldName manufacturer --type ~.domain.Manufacturer –-notNull
After that, we can create the project and package it as a
.warfile:roo> web jsf setup --implementation APACHE_MYFACES --library PRIMEFACES --theme EGGPLANT roo> web jsf all --package org.primefaces.cookbook
Then, finally exit Spring Roo console with:
roo> quit
When we list the directory for the files, we have two files and a source directory created as follows in the Linux, Unix, or Mac OS environment:
-rw-r--r--   1 primeuser staff    834 May 21 16:45 log.roo
-rw-r--r--   1 primeuser staff  17650 May 21 16:45 pom.xml
drwxr-xr-x   3 primeuser staff    102 May 21 16:45 src
Now our project is ready to run. From the command line, we can execute jetty to get the web application context up and running.
mvn jetty:run
Now we can request for the URL on local via browser (http://localhost:8080/primefaces-cookbook-roo), which will bring up the scaffold user interface of the web application, as shown in the following screenshot: