


In this chapter, we will cover the following topics:
Installing Meteor
Finding documentation for Meteor
Getting help with questions
Setting up your project file structure
Setting up your development environment
Using the web console
Deploying a test app to Meteor
Deploying to Meteor using a CNAME redirect
Deploying to a custom hosted environment
Deploying with Meteor Up (MUP)
Using CoffeeScript
Using CSS compilers
Welcome to the wonderful world of Meteor! This chapter will walk you through some of the best practices for optimizing your Meteor workflow. From installing Meteor to deploying your finished application on your own custom server, the recipes found here will get you up and running and provide a great reference as you start working with Meteor on a daily basis.
The folks at Meteor have made installation a breeze. As long as the system you're working on (Linux or Mac OS X) is reasonably up to date, installing Meteor should be very simple. We have included it as a recipe so that when you're installing Meteor on a new machine, you have it handy. We will also include installation instructions directly from GitHub, just in case you want to use a development branch.
You must have curl installed in order to install Meteor. If you are on Mac OS X, curl is already installed. If you are on Linux, curl is usually installed. To check for curl, open a terminal window and execute the following command:
$ curl
If curl is installed, you will receive the following message:
curl: try 'curl --help' or 'curl --manual' for more information
If curl isn't installed, you will receive a message similar to the following:
-bash: /usr/bin/curl: No such file or directory
To install curl, use apt-get or yum (depending on your Linux version). The following is the command to install curl on Ubuntu. Simply replace apt-get with yum in the command to install it on Fedora, Debian, or CentOS:
$ sudo apt-get install curl
You should see an installation message, with perhaps a prompt to install. Complete the installation process; you will then be ready to install Meteor.
Open a terminal window and execute the following command:
$ curl https://install.meteor.com/ | sh
The curl https://install.meteor.com/ command is used to retrieve an installation script directly from Meteor. Once the script is downloaded, the | sh argument tells your system to execute the script, which installs Meteor at /usr/local/bin/meteor (which should be in your path). Once the entire script is executed, you will be able to run the meteor command from any location.
The preceding recipe covers the default/stable Meteor installation. If you'd like to install Meteor directly from the source code or if you'd like to install a development branch (for example, the current nightly), you can do so using git.
The Meteor repository is located at https://github.com/meteor/meteor. You can find various development branches at this location, in addition to the main Meteor repository.
Assuming you have
git installed and would like to install the main Meteor build, open a terminal window and execute the following command:
$ git clone git://github.com/meteor/meteor.git
This will clone the latest Meteor build into a subfolder named meteor. Note that this does not install Meteor globally on your machine. This means that in order to run the meteor command, you will need to navigate to (or reference) the meteor folder where you just cloned the Meteor repository.
Tip
Various other installation arguments and customizations can be used, depending on your situation. To see more comprehensive instructions, visit the Meteor GitHub main README.md page at https://github.com/meteor/meteor.
Meteor has finally reached version 1.0, and as such, it's various libraries and features are beginning to stabilize. However, there are still some parts of Meteor that are in flux. It is therefore important to have the latest documentation handy. This recipe will show you where you can find the official Meteor documentation when you need it.
Simply navigate to http://docs.meteor.com/ in a browser and bookmark the page.
That's all there is to it. The Meteor folks keep the documentation up to date, and you can be sure to find all production-ready features, along with a lot of great advice, at that location.
If you would like to have an offline copy of the documentation and still make sure you have the latest and greatest version of documentation, you can use Meteor's GitHub repository to serve up a local copy of the latest documentation.
To get the initial copy of the documentation, navigate to where you would like to store the documentation (for example, your Documents directory) and clone the latest Meteor repository with the following command:
$ git clone git://github.com/meteor/meteor.git
If you've already done this, and would like to make sure you have the latest and greatest, navigate to the meteor subfolder (created when you did the initial Git clone) and run the following command:
$ git pull origin master
This will update the Meteor repository with the latest and greatest.
Once you've got the latest documentation, you can access it via a web browser by navigating to the docs directory:
$ cd docs/
Then, run the meteor command:
$ meteor
Once the packages are updated, the Meteor documentation project will start and you will see the following in the command line:
=> Meteor server running on: http://localhost:3000/
You can now use a browser to navigate to http://localhost:3000/ and read the latest documentation.
The more you use Meteor, the more familiar the major packages will become. However, you may also want to start branching out and doing more advanced things with some of the lesser-known packages. You may also come up with an idea for a new application of Meteor. In any case, you will eventually run into a situation where you need more information than what is contained in the documentation. Here are some quick tips on where to go when you need your questions answered.
There are three major sources for getting your questions answered:
For specific technical questions or problems, head over to http://stackoverflow.com/questions/tagged/meteor. Search for questions others have already asked; if you can't find an answer, go ahead and submit a question of your own.
For general questions and comments, visit the Meteor forums at https://forums.meteor.com/.
To work in real time with multiple Meteor developers (including members of the core team), you can visit the IRC #meteor chat room on
irc.freenode.net.
Let's look at some tips on using each of the previously mentioned resources.
Stack Overflow is a very active community of developers, many of whom are eager to help others with their technical questions. For Meteor-specific help, once you've navigated to http://stackoverflow.com/questions/tagged/meteor, you can perform a search using the keywords that best describe your question, for example, if you are interested in getting Meteor to work inside a PhoneGap application, you may want to search all the tagged [meteor] questions for cordova, as follows:

This will search all the previously submitted questions tagged with the keyword [meteor], which also contain the word cordova somewhere in the question. You will want to look through the results to see whether your question has already been asked. If one of the questions (and the answer to that question) satisfies your needs, great! If your question hasn't been answered already, you can ask your own question.
Click on the button labeled Ask Question:

Fill out the details of your question. Don't forget to include tags to more easily identify and categorize your question. Submit your question and the Stack Overflow community will most likely have an answer for you very quickly.
Meteor forums are also very active, with lots of enthusiastic Meteor developers visiting the site daily. You can ask questions, view discussions, and leave comments on a lot of different Meteor-related topics. Most of the time, if you have a technical question or problem, it's best to use Stack Overflow. However, forums are also a great resource for more abstract or specific questions about Meteor.
The #meteor IRC channel is a great channel to join in and listen to. You'll be able to interact with all kinds of brilliant developers, many of whom are willing to answer your questions immediately. Do keep in mind that most questions or problems you're having (especially when you're new to Meteor) have already been addressed on Stack Overflow or the Meteor forums, and it is courteous to first check and make sure your question hasn't been answered there before asking in the IRC chat.
Keep in mind that since Meteor is still new, there are many who are struggling with questions that you may be able to answer. Also, when you find the answer to your own question, it may be worth putting it up on Stack Overflow. This will help you save time for other people who may run into the same problem.
Answering other people's questions on Stack Overflow, the Meteor forums, and even on #meteor IRC is a great way to contribute to the community.
When you spin up a new project in Meteor, the default file configuration is built to get you up and running immediately. That's great, but if you're looking to keep your code optimized and easily understood, you'll need to tweak the file structure a bit. The following recipe maps out the file structure that you can use for the majority of your projects.
You'll want to create a new base Meteor project, which we will then modify to suit our needs. In a terminal window, navigate to the folder where you would like to create the project and enter the following command to create a project called FileTemplate:
$ meteor create FileTemplate
Tip
Downloading the example code
You can download the example code files from your account at http://www.packtpub.com for all the Packt Publishing books you have purchased. If you purchased this book elsewhere, you can visit http://www.packtpub.com/support and register to have the files e-mailed directly to you. Optionally, the code samples can also be downloaded from https://github.com/strack/PacktMeteorRecipes.
This will create the base file structure. Now, navigate to the folder in the File Explorer window of your choice. For this exercise, we'll use a Mac OS X Finder window so that we can visualize the folder structure:

To set up your project file structure, proceed with the following steps:
In your root folder, delete the default
.css,.js, and.htmlfiles. FileTemplate should now appear empty, similar to the following screenshot:
Create the following subfolders in your root folder:
clientserverbothprivatepublic
Navigate to the
clientsubfolder. Create a new file namedmain.html. Edit this file and add the following code (taken fromFileTemplate.html):<head> <title>FileTemplate</title> </head> <body> <h1>Welcome to Meteor!</h1> {{> hello}} </body> <template name="hello"> <button>Click Me</button> <p>You've pressed the button {{counter}} times.</p> </template>Create a new subfolder in the
clientfolder namedscripts.Inside
scripts, create a new file calledmain.js. Edit this file, adding the following code (taken from theMeteor.isClientsection ofFileTemplate.js):// counter starts at 0 Session.setDefault('counter', 0); Template.hello.helpers({ counter: function () { return Session.get('counter'); } }); Template.hello.events({ 'click button': function () { // increment the counter when button is clicked Session.set('counter', Session.get('counter') + 1); } });Create a new subfolder in the
clientfolder namedlib. Create two subfolders namedscriptsandstyles.Inside
styles, create a new file calledstyle.css.Navigate to the
serversubfolder. Create a new file namedserver.js. Add the following code to theserver.jsfile and save the changes:Meteor.startup(function () { // code to run on server at startup });Your completed file structure should now look like the following screenshot:

We'll break down this file structure in pairs for the most part. This is because for almost every folder, there is another folder that serves the opposite purpose.
The client folder is interpreted by Meteor as code that belongs exclusively to the client. The server folder is the exact opposite and tells Meteor that any files contained inside should only apply to server-side processing.
Having separate client and server folders logically separates your code (making it easier to visualize), saves unnecessary processing, and prevents errors (client templates and rendering code will throw errors if processed by the server).
Inside of the client folder, we've placed a scripts subfolder and two files, both with the main prefix (main.html and main.js). The scripts subfolder is for our benefit, separating out HTML and JavaScript so that when we go back and review our code, it will be easy to read and segment.
The main prefix is used to tell Meteor: run this code last. When Meteor goes about processing and compiling files, it waits to process anything named main until the very end. This helps in situations where libraries or scripts need to be initialized before you can take advantage of them.
Conversely, the lib folder tells Meteor: run this code first. Anything placed inside, or as a child of, the lib folder will be run first by Meteor at runtime. This is a great place to put global variables, common libraries not already included as packages (see Chapter 2, Customizing with Packages), and of course any style sheets. This is why we've included a scripts and styles subfolder and have created an initial generic style.css file.
Using the main prefix and the lib folder together helps us maintain proper sequences and ensures that our styles load as quickly as possible.
The public folder is a repository for assets that need to be accessed globally. It's a very good place to store non-sensitive information, such as images and text files. It's also easy to remember. If you need something to be shown publicly, put it in the public folder.
The private folder is the opposite. It's a place to store assets that can only be seen by the server. This is a good place to put moderately sensitive information (you'll want additional security, such as a database, for the information you want to keep more secure). Any files placed in the private folder can be referenced by the server with no special path or navigation arguments.
The both folder stands all by itself as the folder accessible by both the client and the server. When you are creating models and collections (see Chapter 4, Creating Models) you'll want to put the declarations in a file inside of the both folder. The main reason for doing this is so that you don't duplicate code, and you can ensure that both the client and the server are working from the same model declarations.
Obviously, you don't need to create this file structure from scratch every time. You can use your favorite script engine (Grunt, Gulp, Shell Script, and so on) and create a script that can make the necessary changes with a single command. Alternatively, you can create the template once, copy the entire folder to a new location, and then use it as if it were a new project.
If you do decide to use this recipe rather than an automated script, make sure you update your base template to the latest Meteor build periodically and each time you make a copy. This can be done very easily in a terminal window. Navigate to the root folder (for example ~/Documents/Meteor/FileTemplate) and run the following command:
$ meteor update
You will either receive a message letting you know that the folder is already up to date, or Meteor will update the project to the latest version.
Chapter 2, Customizing with Packages
While you're developing your project, there are several default packages and settings that make your debugging and development work much easier. This recipe will give you suggestions to help create an ideal development environment.
You'll want to make sure you have Meteor installed (of course), and you will need a default project file structure set up. You can either use the Setting up your project file structure recipe from earlier in this chapter, or create a brand new Meteor project using the meteor create [...] command.
This recipe assumes that you have some Mongo collections and/or some kinds of user accounts set up. If you don't have a collection added, you may want to add one just for testing purposes. To do so, create a file named [project root]/both/model.js and enter the following line of code:
testCollection = new Mongo.Collection('testCollection');With a project in place and at least one Mongo collection to monitor, we're ready to start developing and debugging!
First, we want to make sure that the insecure and autopublish packages are installed, which is usually the case with a default Meteor project.
In a terminal window, navigate to the root folder of your project and enter the following command:
$ meteor listThis will list all the packages used by your project. You should receive something similar to the following:
autopublish      1.0.2
insecure         1.0.2
meteor-platform  1.2.1
…
If the
autopublishorinsecurepackages are missing, you can add them manually by entering the following commands:$ meteor add autopublish $ meteor add insecure
Next, install the
msavin:mongolsmart package. In the terminal window, enter the following command:$ meteor add msavin:mongolAfter a short installation process, you should receive a message indicating that the
msavin:mongolpackage was installed correctly.Start your
meteorproject by entering the following command in your terminal window:$ meteorOpen your app in a browser by navigating to
http://localhost:3000. Once there, press Ctrl + M and look towards the bottom-left of the screen. You will see a small expandable dashboard, similar to the following screenshot:
Clicking on any of the collection names or the Account tab will let you view, update, delete, and insert records, as shown in the following screenshot:

This comes in very handy when you're building your app, as you have instant access to your collections and user account profiles.
The following line is all that's needed to install a package:
$ meteor add msavin:mongol
This tells Meteor to go and find the msavin:mongol package, with all of its dependencies, and add the package to your project. This is a third-party package, and more details on the package can be found at https://atmospherejs.com/msavin/mongol.
Once installed, you can access it on your browser page by the Ctrl + M shortcut. Under the hood, the mongol package is monitoring for any collections, specifically filtering user-account-related collections into the Account tab. Other than that, all collections are treated the same, and this interface just simplifies your debugging/development process when you need to see what's going on inside your collections.
Mongol is very new but it is getting better all the time. You can read about all it's current features and preview upcoming features by visiting https://github.com/msavin/Mongol.
Sometimes modifying your code while debugging is just too slow. This recipe will introduce you to the web console and give you some pointers on using it.
We will need a sandbox to play in. For the purpose of this recipe, we'll use one of the default examples built into Meteor.
In a terminal window, enter the following command:
$ meteor create --example leaderboard
Once created, navigate to the leaderboard folder and start Meteor:
$ cd leaderboard
$ meteor
We can now navigate to our leaderboard example page (http://localhost:3000) using the web browser of our choice.
We need to enable the web console in various browsers. In no particular order, here's how to get to the web console on the browsers you're likely to be working with:
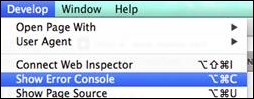
Enable the Develop menu by going to Safari | Preferences | Advanced (CMD+, shortcut if you prefer) and making sure the Show Development Menu in menu bar option is enabled:

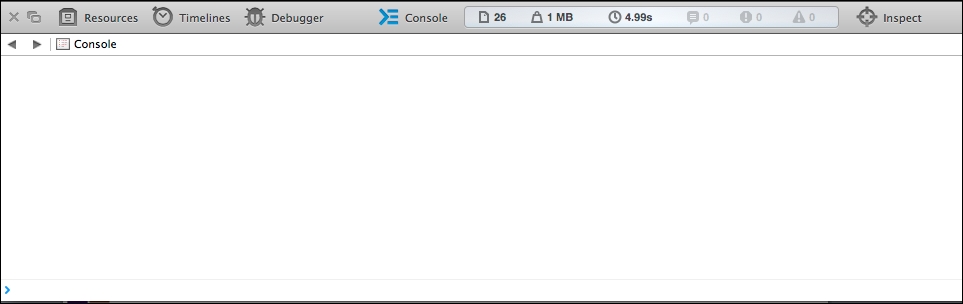
Now, on any web page, click on Show Error Console under Develop (or use the CMD + Alt + C shortcut):
This will bring up the web console, as shown in the following screenshot:


To show what's possible with a web console, let's create a new scientist, and add some points to Tesla. Because, Imma let you finish, but Nikola Tesla was the greatest scientist of all time. Of. All. Time.
If you haven't done so already, navigate to
http://localhost:3000/.Now, open the web console if it's not already open.
In the console, run the following command:
> Players.insert({name:"Stephen Hawking"})The name Stephen Hawking will now be in the list. You can select his name and add some points:

Now, let's give Tesla the love he deserves. First, let's find the
_idvalue for the Tesla record. Run the following command in the console:> Players.findOne({name:"Nikola Tesla"})Harvest the
_idvaluefrom the result and modify the score, similar to the following:> Players.update({_id:"bPDpqp7hgEx4d6Eui"}, {$set:{score:334823}})Tesla will now be placed at the top of the leaderboard:

One last manipulation, let's deselect any of the scientists mentioned in the preceding screenshot. Enter the following command in the console:
> Session.set("selectedPlayer",null)You will notice that, now no scientist is selected.
The web console acts as an extension of your code. You are able to receive log messages, call exposed methods and events, or change and instantiate global variables. You are able to do this dynamically in real time, which can have a lot of advantages as you're testing or debugging.
With a few well-composed lines of code, we were able to replicate the behavior found in the event handlers and methods that belong to the app. In other words, we were able to manually test things, rather than having to modify, save, and retest the code. This kind of impromptu testing can really save us time.
The web console and the associated development tools can perform all kinds of client-side debugging and testing tasks. You can run prewritten scripts, pause code during execution, monitor variables and the call stack, and even create your own methods and variables dynamically.
Tip
The web console varies a little bit from browser to browser, but you can find instructions that apply to nearly every web console at https://developers.google.com/chrome-developer-tools/docs/console.
As you've come to expect, Meteor makes just about everything easier to do. Testing your application on a server is no exception. This recipe will show you how to deploy your application to Meteor servers, where you can test (and show off!) your new application.
The only requirement for this recipe is that you have a working application.
Your app doesn't need to be fancy or complete, but it should at least render something on the screen so that you can verify it is running on Meteor servers.
For this recipe, we will use the default leaderboard example, which is created using the following command in a terminal window:
$ meteor create --example leaderboard
To deploy a test app to Meteor, proceed with the following steps:
First, you need to pick an application name.
The application name will appear on Meteor servers as a subdomain of the URL where your app is being served, such as
http://myproject.meteor.com.However, there are a lot of people testing applications on Meteor servers. Chances are pretty good that a generic name, such as "myproject" or "leaderboard", is already taken. So, we need to pick something unique.
For this recipe, I will use this application name
packtrecipe. You will obviously need to pick something else. I got here first!Now that we've selected an application name, we will open a terminal window and navigate to the root directory of our project:
$ cd leaderboardOnce we're in the correct folder, we will issue the
deploycommand as follows:$ meteor deploy packtrecipeMeteor will bundle and deploy your application. Upon completion, you should see something similar to the following in the terminal window:
Deploying to packtrecipe.meteor.com.  Bundling...
Uploading...
Now serving at packtrecipe.meteor.com
Navigate to the URL Meteor gave you (in this case,
http://packtrecipe.meteor.com) in a browser and you will see your newly deployed application, as follows:
It's magic! The folks at Meteor are sorcerers!
Actually, the core development team has worked very hard to make deployment as easy as possible. Under the hood, your local Meteor installation is packaging the correct files, compiling package lists and dependencies, and then sending a request to the Meteor servers. Once the Meteor servers receive the request, all the necessary error checking is done, and the packages, database, and application are created and initialized. A virtual host address is added, and voila! Your app is up and running.
There's a lot more detail (and code) involved, but this should give you a general idea of what goes into deploying to the Meteor test servers. Aren't you glad you didn't have to write all of that code?
You probably noticed that you had to create a Meteor developer account in order to deploy. This is as it should be, because if there were no login/security details, someone could come along and override your deployment with one of their own.
This requirement, however, is quite flexible, allowing you to add other users or even organizations so that multiple people can deploy or update your app.
To set up an organization, navigate to https://www.meteor.com/account-settings/organizations and click on the button labeled NEW ORGANIZATION at the bottom of the screen. You can then add individual users to the organization, similar to the following screenshot:

Once you've deployed your application, you can authorize the changes made by an individual or an organization through the meteor authorized command. Use the following syntax to add authorized accounts:
$ meteor authorized [your-url.meteor.com] --add [user/organization]
So, for example, we would use the following to add the packtmeteor organization to our deployed app:
$ meteor authorized packt.meteor.com --add packtmeteor
Likewise, if we wanted to remove authorization (for example, let's remove the strack2 account), we would enter something like this:
$ meteor authorized packt.meteor.com --remove strack2
Tip
Meteor developer accounts have other useful functions as well. To explore what you can do with your account, please visit https://www.meteor.com/account-settings.
The Building a custom package recipe in Chapter 2, Customizing with Packages
Deploying to Meteor test servers is all well and good, but what if you want to use your own custom domain name? The folks at Meteor have created a simple way for you to do just that. This recipe will show you how to take advantage of this simple, yet powerful feature.
You will need to create a CNAME redirect to origin.meteor.com on the hosting service where your domain is registered. How to do this varies pretty widely, so consult your hosting service's knowledge base on the exact steps. For this recipe, we'll use the cPanel interface of a hosting service for the packtpub.com domain.
Enter the subdomain you wish to use in your CNAME redirect (for example, meteor.packtpub.com) and set the redirect location to origin.meteor.com. Click on Add CNAME Record to submit the record:

Let's assume the subdomain we're going to use is meteor.packtpub.com. In order to deploy to the Meteor environment, perform the following steps:
Once you have your CNAME redirect properly set, open a terminal window, navigate to the root directory of your project, and enter the following:
$ meteor deploy meteor.packtpub.comMeteor will deploy your app and provide feedback as the bundling, uploading, and serving steps are completed:
Deploying to meteor.packtpub.com.  Bundling...
Uploading...
Now serving at meteor.packtpub.com
To verify the application, navigate to your application's URL (for example,
http://meteor.packtpub.com) in a browser. If everything was deployed correctly, you will see your application up and running.
This Meteor deployment feature is nearly identical to the default deployment, with just a little bit of extra code built in to interpret the origin of CNAME redirect.
When a request comes in to origin.meteor.com via a CNAME redirect, Meteor takes the CNAME redirect's original destination and uses it as the unique identifier for the application deployment. Meteor also uses future requests to origin.meteor.com from this CNAME redirect to serve the application.
In this particular case, the original CNAME destination was meteor.packtpub.com. When the request is redirected to origin.meteor.com, Meteor recognizes the CNAME redirect and uses it to direct traffic to the deployed application.
When you are ready to actually deploy your app to a production environment, you will need to convert your Meteor application to a straight up Node application. There are multiple methods to do this, all of which are (currently) manual processes and not for the beginner. A lot can go wrong. This recipe will show you how to manually deploy your Meteor application to a production server as a Node application.
As mentioned, there are multiple methods and server configurations that can successfully host a Node application. There are, however, some commonalities, all of which you will need for this recipe.
First, you will need a hosted MongoDB database.
Your MongoDB database can be hosted remotely or on the same machine from where you will deploy your Node application. For this recipe, we have deployed a default MongoDB database to the same machine where we will host the app. Our MONGO_URL value will therefore be:
MONGO_URL=mongodb://localhost:27017
Tip
Installation instructions (and tutorials) for MongoDB can be found at http://docs.mongodb.org/manual/installation/.
Free or cheap but dedicated MongoDB service hosting also exists. Run a quick Internet search for MongoDB hosting or visit http://www.mongodb.com/partners/cloud for a list of providers.
Next, your hosting environment will need the latest stable Node and npm modules.
Installation instructions for each of these programs are beyond the scope of this book. For installation instructions and advice on how to get started, visit the following:
Node (http://nodejs.org)
npm (https://www.npmjs.com/)
Tip
The latest or nightly builds of these programs will likely cause you problems in a production environment. Be sure to use the stable versions, unless you have thoroughly tested a different version.
Lastly, you will need the forever npm module installed in your hosting environment. From a terminal window on your hosted environment, run the following command:
$ npm install –g forever
Note that you may need to use the sudo command to install the package globally. This will depend on how npm was installed on your server. The preceding command will install forever on your machine, and you are now ready to prepare and deploy your application to production.
To deploy to a custom hosted environment, proceed with the following steps:
Open a terminal window in your development environment and navigate to the root folder of your Meteor project. In this root folder, execute the following command:
$ meteor build [your-build-location] --architecture [x]Replace the placeholders in the preceding line of code with your build location (for example:
~/Documents/builds/mybuild) and an architecture (the options areos.osx.x86_64,os.linux.x86_64, andos.linux.x86_32). The--architectureoption is optional if you are building this on the same server where you will deploy your app.Meteor will bundle, extract, and repackage a clean production copy of your Meteor project, preparing it to be used in your hosting environment. While it is being built, Meteor will update you with the status in the terminal window.
Once the build is finished, navigate to the build folder you specified, for example, if you specified
~/Documents/builds/mybuildas your build location, you would need to enter the following command:$ cd ~/Documents/builds/mybuildIn the build folder, you will see a
tarballfile with a name similar to[your-project-name].tar.gz.So, for example, if the name of my project was
leaderboard, the name of thetarballfile would beleaderboard.tar.gz.Make a note of the name and location because you'll need it when you copy and extract the build to your server.
For this recipe, let's assume you're using a Linux server to host your production application. Let's create a
meteorappsfolder using the following terminal command:$ mkdir /home/meteorappsNext, copy the
tarballfile from your development environment to the/home/meteorapps/folder in your production-hosted environment.If you build your application on a different machine, you can transfer it via SCP, FTP, a common file server, a Git repository, and so on. It really doesn't matter how you copy it over, as long as a copy of the
tarballfile is now in your hosted environment.Once it's copied over, run the following command on the
tarballfile:$ tar –xf [your-tarball-name].tar.gzThis will extract the file to a folder named
bundle. If you navigate to thebundlefolder, you will find aREADMEfile. The next steps in this recipe are taken from thisREADMEfile, so feel free to check them out for a more concise set of instructions. If you check the contents of the folder, you should see something similar to the following:README main.js programs server star.json
We will now install the npm packages needed to run our application. Navigate to
bundle/programs/serverand execute the following command:$ npm installNext, we will need to set the
PORTandMONGO_URLexport arguments so that Node knows how to host our application. Enter the following commands in the terminal window:$ export PORT=8080 $ export MONGO_URL=mongodb://localhost:27017
These two export commands tell your Node server what port to listen on, and where to find the
mongodbhosted instance (we're using a local instance in this example).You will also want to configure the
ROOT_URLandMAIL_URLenvironment variables. The syntax to enter them is similar to the following export commands:$ export ROOT_URL='http://[your-hostname.com]' $ export MAIL_URL='smtp://user:password@mailhost:port/'
Now, we can run our application. Instead of using the default node command, remember that we installed the npm forever package. The forever package allows us to run our Node application and will automatically restart it if we encounter an error. Run the following command in the terminal window:
$ forever start main.js
This command instructs Node to start main.js as a node application, and to restart it if there are any issues.
Tip
You can stop the application later on by issuing the following command from the bundle/ directory:
$ forever stop main.js
Now it's time to test whether your application is successfully running by opening a browser and pointing it to your host environment, on the port you specified, for example, if our production environment was hosting the meteorapp.packtpub.com subdomain, and we specify port 8080, as shown in the preceding example, we would navigate to http://meteorapp.packtpub.com:8080 in a browser.
Your app should be up and serving pages.
Node is built to run as quickly as possible. To do so, it will run a little differently on different hardware and software configurations. This means that the Node and npm packages you use in your development environment (for example, on MAC OS X) are slightly different than the corresponding Node and npm packages in your production environment (for example, Linux Ubuntu 12.4 LTS Precise). This is especially true for foundational packages, such as the npm fibers package.
Also, although Meteor is built on top of Node, it isn't a native Node application. There are some additional layers of abstraction and processing that make your life easier as a developer, but they don't make for the prettiest native Node production environment.
The meteor build command takes care of this for us and creates a build without the npm packages installed. Instead, it lists any of the npm packages as dependencies. Because the specific npm packages aren't included (Meteor listed them in a package manifest file instead), there are no compatibility issues. We simply tell Node to find and install the packages specific to the current environment, using the package manifest file as a sort of a laundry list. We did this when we issued the npm install command.
Once npm has read the manifest file, retrieved and installed all the needed packages, and informed us that the installation was completed correctly, we can run our new native Node application.
We then set some export variables (PORT, MONGO_URL, ROOT_URL, and MAIL_URL) and ran our application using the forever npm package, rather than the normal node command. Using forever helps us with not having to go back to the server every time it crashes. Ideally, we would never have an application crash, but we live in the real world, and forever is a huge time saver when an app restart is needed.
If our application is truly production-ready, we also want it to start automatically whenever the server reboots. There are various ways to do this, depending on the operating system your production server is running on, and we won't cover all of them.
We will give an example script and instructions on how to do this on Ubuntu and let you modify the script as needed for other environments.
Whenever an Ubuntu server restarts, it runs any *.conf scripts script found in the /etc/init/ folder. We'll assume that our application is located at /home/meteorapps/prodapp/bundle/, that we are going to listen on port 8080, and that we are using the local MongoDB service (feel free to adjust these settings as appropriate).
Using a terminal window with sudo privileges, add the following meteorapp.conf script to /etc/init/ to your production server:
#  prodapp configuration file
#  /etc/init/meteorapp.conf

start on (local-filesystems)
stop on shutdown
script
    cd /home/meteorapps/prodapp/bundle/
    export MONGO_URL=mongodb://localhost:27107 PORT=8080
    export ROOT_URL='http://example.com'
    export MAIL_URL='smtp://user:password@mailhost:port/'
    exec forever start main.js
end script
Let's break down what this script does.
The first two lines (start on and stop on) tell the OS when to run this script. In this case, we run it as soon as the local file systems are ready, and we stop it as soon as a shutdown request comes in.
We then have our script that will be run. We navigate to our application folder using cd /home/meteorapps/prodapp/bundle.
Then, we declare the location of our MongoDB service and the port we would like the Node to listen on.
Finally, we execute the forever command, asking it to start main.js as a Node application.
The Meteor Group is currently working on a project called Galaxy, which will make deployment to custom servers as easy as deployment to their test servers. Once Galaxy is available, it will make this recipe obsolete, but that's a good thing! As mentioned, this recipe covers only one way of deploying to production. You may find another, easier method just by browsing https://forums.meteor.com or visiting other sources for Meteor information.
The Getting help with questions recipe in this chapter
The Deploying with Meteor Up (MUP) recipe in this chapter
The Deploying apps to mobile devices recipe in Chapter 12, Creating Useful Projects
We would be remiss if we didn't add one final method of deploying Meteor apps to a production server. This method is called Meteor Up (MUP). Using a fairly simple configuration file, MUP vastly simplifies the server deployment process. And until we get to see what Galaxy (Meteor's deployment platform) looks like, MUP is the easiest way to deploy to a custom environment. This recipe will show you how to deploy your app to a custom server using Meteor Up.
To complete this recipe, you will need a working Meteor application. It doesn't need to be fancy, but it does need to be functional so you can see whether it was installed properly on your server at a glance.
MUP is installed via npm. It needs to be installed globally, so we will use the -g argument. To deploy your app to a custom server using MUP, perform the following steps:
To install MUP, open a terminal window and execute the following command:
$ npm install -g mup
This will take a bit to install, but once complete, you'll be ready to configure and use MUP to deploy your application.
To run
mup init, navigate to the root folder of your project in a terminal window and enter the following command:$ mup initYou will receive a message similar to the following:
Empty Project Initialized!This process will create two files in your project's root folder. We don't need to worry about the first file (
settings.json). We will configure our app using the second file, namedmup.json.Now, we'll configure
mup.json. Open the[project root]/mup.jsonfile in an editor. The top part of the file will have our remote server information. It should look similar to the following lines of code:"servers": [ { "host": "hostname", "username": "root", "password": "password" // or pem file (ssh based authentication) //"pem": "~/.ssh/id_rsa" } ],The
hostproperty will be the name of the server you will be accessing via SSH/SCP. If our server name wasmy-production-server.com, the host property would look similar to the following:"host": "my-production-server.com",
The
usernameandpasswordproperties are the user/pass combination you would use if you were tosshinto the remote server.The next four properties help us to configure our server. If we want MUP to install Mongo, Node, or PhantomJS (all necessary to deploy via MUP), we can specify the code as follows:
  "setupMongo": true,
  "setupNode": true,
  "nodeVersion": "0.10.33",
  "setupPhantom": true,
Tip
As of the printing of this book, the latest stable Node version is
0.10.33. You may want to check this and modify thenodeVersionproperty as appropriate.If Mongo/Node/PhantomJS is already installed, you can change the preceding properties to
false(which will speed up your deployment).Next, we specify specify what we want our app to be called. This is done by modifying the
appNameproperty:"appName": "[your-app-name-here]",
We need to specify the folder on our local machine where our to-be-deployed app is located. This is determined in the
appproperty:"app": "/path/to/the/app",
The last property we need to set is
env. This instructs Node whichROOT_URLandPORTto run our Meteor application from. If, for example, we were redirecting incoming HTTP traffic to a localhost, onport 1337(which is done using a reverse-proxy, such asnginx, or a virtual host, such asapache), ourenvconfiguration would look like the following code:"env": { "ROOT_URL": "http://localhost", "PORT": 1337 },Now let's configure our remote server with
mup setup. In the terminal window, navigate to your project's root folder and enter the following command:$ mup setupThis will install MongoDB, Node, and PhantomJS on the remote server. It will also configure our remote server environment and install some helper npm packages, such as
upstart.Let's deploy our app with
mup deploy. Once themup setupcommand is complete, we'll be ready to deploy our app. Execute the following command in the terminal window:$ mup deploy
MUP will bundle your app locally, upload the build, configure the requisite npm packages on the remote server, and then serve up your app. As it runs through this process, MUP will give you status updates in the terminal.
Once complete, your app should be up and running. Test it out by either visiting your external URL (for example, http://my-custom-server.com) or by logging in to a remote server via SSH, and testing the build with a curl command on the localhost (for example, curl http://localhost:3000).
You may have a bit of troubleshooting to do to make sure your virtual host or reverse-proxy is configured properly, but after some small adjustments, you'll find that, at present, MUP is definitely the best way to deploy to a custom server.
MUP takes all the steps we would normally have to implement manually (as in the Deploying to a custom hosted environment recipe in this chapter) and implements them automatically. There are three main parts to pulling this off successfully.
First, MUP creates a default configuration file when we execute the mup init command. We edit the newly created file with all the settings to install the right software on the remote server, configure environment variables, and upload our production build.
Second, we use mup install to install all the needed software on the remote server, as specified in the mup.json configuration file.
Lastly, our application is bundled, uploaded, extracted, initialized with environment variables, and set to run on the remote server. This is all accomplished with the mup deploy command.
MUP performs these tasks based on the configuration file we edited.
Tip
There are many additional settings we can configure and some great features of MUP that we can explore by visiting the MUP repo, which is found at https://github.com/arunoda/meteor-up.
Many people prefer CoffeeScript to the standard JavaScript syntax. If you are one of those people with a preference, Meteor has you covered. This recipe will show you how to quickly enable CoffeeScript in your development environment.
Nothing is needed to prepare for this recipe, other than having Meteor installed, and a project created so that you can begin using CoffeeScript.
To use CoffeeScript, proceed with the following steps:
Open a terminal window and navigate to the root folder of your project.
Enter the following command:
$ meteor add coffeescriptYou should see the following response in the terminal window:
coffeescript added, version 1.0.CoffeeScript is now installed and ready to go!
You can test the installation by creating a .coffee file and adding a script (for example, add test.coffee to your client folder). When you start your Meteor application with the meteor command, the script should execute as designed.
Behind the scenes, the CoffeeScript package you just installed looks for any and all *.coffee and *.litcoffee files, compiles them into native JavaScript, and then bundles them for use in your running Meteor application.
The Adding Meteor packages recipe in Chapter 2, Customizing with Packages
As any CSS junkie already knows, using standard CSS to create style sheets can be tedious, redundant work. Many designers and developers prefer to use a dynamic style sheet language or preprocessors, such as Less, Stylus, and SCSS/SASS.
Meteor not only enables the use of preprocessors, but also treats them just like any other file so that changes are reflected immediately.
This recipe will show you how to enable some of the more popular CSS compilers in your Meteor application.
Nothing is needed to prepare for this recipe, other than having Meteor installed, and a project created so that you can begin using CSS compilers.
We're going to cover three different preprocessors, as they all work in a similar way.
Open a terminal window and navigate to the root folder of your project.
Enter the following command:
$ meteor add stylusYou should see a response similar to the following in the terminal window:
stylus added, version 1.0.7Stylus is now installed and ready to be used. You can test this by creating a
.stylfile and adding a script (for example, addtest.stylto yourclient/stylesfolder).
When you start your Meteor application with the meteor command, Stylus files will be processed and proper CSS will be rendered.
Open a terminal window and navigate to the root folder of your project.
Enter the following command:
$ meteor add lessYou should see the following response in the terminal window:
less added, version 1.0.14Now the Less package is installed, and you can use the Less stylesheet syntax to create your CSS.
As with Stylus, you can test this by creating a .less file and adding some style declarations (for example, add test.less to your client/styles folder).
When you start your Meteor application with the meteor command, the Less files will be compiled by Meteor into standard CSS and rendered as usual.
SCSS and SASS files can now be used to style your CSS. Just as before, you can test this by creating a .scss or .sass file and adding some style declarations (for example, add test.sass to your client/styles folder).
When you start your Meteor application with the meteor command, the SCSS or SASS files will be compiled by Meteor into standard CSS and rendered.
When you installed any of the preprocessors with the meteor add command, it installed the corresponding npm packages tailored to work inside of Meteor.
As with other files, Meteor will monitor changes to any *.styl, .less, .scss, and .sass files, compile the changes into CSS, and render the changes immediately.
The Adding Meteor packages recipe in Chapter 2, Customizing with Packages