


Consider a typical IT company development center scenario. Different teams are working together on one enterprise project with many components. Teams are working on server-side technologies, frontend technologies, the messaging layer, mobile development and there may be a separate team responsible for Quality Assurance. Every team is working as per their schedule, developing their own component(s), unit testing and committing code, and this cycle is repeated in multiple iterations. So far, everybody is happy as they are able to meet the deadlines as per the software release dates. Then comes the integration phase, when teams have to build the complete project and deploy the software (which could be WAR, JAR, or any service) to the integration/staging environment. And then the nightmare starts.
Although every team has successfully followed many best practices of software engineering such as committing code on a daily basis, unit testing of code and verifying the working software on a developer's test environment, but in the integration or staging environment the situation has suddenly changed. The team is stuck with configuration and interoperation issues, localization issues, environmental issues, and so on.
This might be a very common scenario for any project and the situation will become worse if they are not using any automated solution for the build and deployment process. Hence the need for an automated process or we can call a Build Automation System (BAS), which automates the manual task of building the project seamlessly and delivers the software in a repeatable, reliable, and portable fashion. BAS doesn't claim that there will be absolutely no issues or errors, but with BAS, the software can be managed in a better way, minimizing the probability of repeating the same error again and again.
Gradle is one of the advanced build automation tools available in the market. In the next 10 chapters, we will explore how to mitigate these problems with Gradle and with other related technologies. However, before we start learning Gradle, we need to understand what a BAS is and why we need it.
The most common processes in building any software include compiling the source files, packaging the compiled output to a compressed format (ZIP, JAR or any other format), and adding the required resource files and configuration files to the packaging. Along with this, it may also include some other activities such as running static code analysis on the source code to provide feedback on the design and coding patterns, and another important area is Quality Assurance, which involves unit testing, integration testing, regression testing, and so on.
A BAS is part of the software life cycle, which automates the build and deployment phases of the software. The first phase is building the software, which is the process of creating the binaries or executables. The second phase is the deployment phase, wherein we need to install the software at a particular location. This phase also includes various other activities such as unpacking the bundle, localization of the software, configuring the software as per the environment and setting the environment-specific properties required to execute the software. The next important step is functional testing to check the behavior of the software. Once everything is fine, it makes a happy and smiley ending for you.
So, as a developer, writing the code and test cases is just one of the major tasks in Software Development Life Cycle (SDLC). Build and deployment is also considered as another important phase in any software life cycle. If it is not managed properly, it could lead to major downtime and client dissatisfaction.
Build automation allows us to automate the manual steps in the build process. It also helps to eliminate the redundant tasks, mitigates the risks of manual intervention, keeps the history of the builds, and saves the cost and time spent in the manual process. The goal here is to create reproducible assets every time you run the build script, which will not be the case, if you manually execute the steps every time.
Many developers relate the build automation with Continuous Integration (CI). Do not get confused. The CI allows executing the build process, performing deployment activities, and many more activities. It helps to create a workflow for build and deployment automation. It also helps to schedule the builds and provides on-demand execution of builds. The schedule could be once in every hour, once in four hours, nightly builds or on every user commit. Some of the well known CI tools are Jenkins, TeamCity, Bamboo, Hudson, Cruise Control, and so on, which are totally different from Build tools, such as Ant, Maven, and Gradle.
Imagine that all the preceding mentioned steps in building a software need to be done manually, and every developer has to perform steps on different machines. Now you can realize the amount of effort wasted in figuring out problems with build issues rather than focusing on the actual business requirements. That's one of the reasons why we need a BAS. Following are some of the major activities, which we automate for the build system:
Translating the source code into binaries
Packaging the binaries with configuration files to create deployable artifacts
Executing the test cases
Publishing the artifacts to a common repository
Deploying the artifacts to different environments (Development, QA, and Production)
Incremental builds
Status reports that summarize the current state of the build
Another reason to have a BAS is to reduce the operational complexities. If a new member joins the team and he has to perform the manual build of the software, it could be a nightmare for him, if there is no automation. Rather than concentrating on the business requirement, most of his time will be wasted on how to compile it, how to run unit tests, how to execute integration tests, and so on.
Actually, what he needs to know is where to commit the source code, where to put the resources, and what commands to execute to perform the build process. The build process should automatically perform all the tasks of compiling, packaging, running tests, uploading asserts and so on.
The more automated the build and deployment process, the faster you will get the deliverables to the client. It also helps with business continuity. In case of any system crash or network failure, you can rebuild and deploy the software on back up infrastructure in much less time.
Some developers believe that project automation is a waste of time and why should they put in extra effort as their IDE performs this job. They can build the JAR, WAR, or any other deliverable unit with the help of IDE and deploy the same. Since they can build, and test it quickly, it works very well on their local system. The problem starts when integration happens. Thus, an automated system is required to avoid any manual intervention (unless it is the only option left), and to make builds portable, predictable and efficient.
Before getting into the details of Gradle, we need to understand some of the terminologies related to the build system.
There are two types of build tools, namely imperative build tools and declarative build tools. An imperative build tool tells the system what to do and how to do it. In other words, it provides a set of action statements or commands, which the system executes in the same order and performs those actions. You can take Ant as an example of the imperative build system.
Whereas, a declarative build tool instructs the system, telling it what you would like to achieve, and system will figure out how to interpret it. With a declarative approach, the user only needs to determine the what, not the how. This is one of the key innovations Maven brought to the build world, after Ant achieved some popularity, where we don't need to write each and every step of an action, and end up creating a very large and verbose build script. With Maven we need to write some configuration parameters for the build and the build system itself decides how to interpret it. Internally, the declarative layer is based on a powerful imperative layer, which can be accessed directly as required. Ant and Maven are very good and reliable build systems. They are innovative in all the areas for which they were designed and built. Each of them has introduced key innovations into the build space.
Gradle combines the good parts of both tools and provides additional features and uses Groovy as a Domain Specific Language (DSL). It has power and flexibility of Ant tool with Maven features such as build life cycle and ease of use.
Gradle is a general purpose, declarative build tool. It is general purpose because it can be used to build pretty much anything you care to implement in the build script. It is declarative, since you don't want to see lots of code in the build file, which is not readable and less maintainable. So, while Gradle provides the idea of conventions and a simple and declarative build, it also makes the tool adaptable and developers the ability to extend. It also provides an easy way to customize the default behavior and different hooks to add any third-party features.
Primarily, Gradle is a JVM-language build tool, but it also supports C, C++, Android, and so on. You will find more information about this at https://docs.gradle.org/current/userguide/nativeBinaries.html.
It provides automation for the different phases required in a Java project, such as compile, package, execute test cases, and so on. It has grouped its similar automation tasks into plugins. When you import any plugin to a Gradle script file, they always come with a set of predefined tasks. To get started with Gradle, you need to have basic knowledge of Java. It uses Groovy as its scripting language, which is another JVM language. We will discuss Groovy in the next chapter. As the build script is written in Groovy, it tends to be much shorter, expressive, and clearer than those written in Ant or Maven. The amount of boilerplate code is much less in Gradle with use of Groovy DSL. It also leverages Maven conventions for familiarity, while making it easy to customize to the needs of your project. Developers can add new functionality or extend the existing features at any time. They can override the existing tasks or plugins to provide the new functionality.
Gradle installation is quite simple. You can download the Gradle distribution from the Gradle home page at https://www.gradle.org/downloads, which is available in different formats.
Gradle requires a Java JDK or JRE to be installed, needing version 6 or higher (to check the Java version on your machine, use java -version). Some of the features might not work with JRE, so it is recommended to have JDK installed. Also, Gradle ships with its own Groovy library; therefore, Groovy does not need to be installed. Any existing Groovy installation is ignored by Gradle.
Gradle is available in three formats:
Alternatively, you can just download gradle-[version]-bin.zip file.
Once downloaded, you need to unpack the zip file and configure it as per your operating system.
Following are the steps for installing Gradle on Windows:
When you are ready to go ahead with Gradle, verify your installation by running the gradle command with the --version or -v command-line parameter.
> gradle –version

------------------------------------------------------------
Gradle 2.4
------------------------------------------------------------

Build time:   2015-05-05 08:09:24 UTC
Build number: none
Revision:     5c9c3bc20ca1c281ac7972643f1e2d190f2c943c

Groovy:       2.3.10
Ant:          Apache Ant(TM) version 1.9.4 compiled on April 29 2014
JVM:          1.7.0_79 (Oracle Corporation 24.79-b02)
OS:           Windows 8.1 6.3 amd64
Following are the steps to install Gradle on the Mac/Linux operating system.
Reload the profile by executing source ~/.profile and execute the gradle –version command. You will be able to see a similar output as mentioned in the previous section.
Gradle shares the same JVM options set by the environment variable JAVA_OPTS. If you don't want to use this setting and want to pass arguments specifically to the Gradle runtime, you can use the environment variable GRADLE_OPTS.
Suppose if JAVA_OPTS=512MB in your system and you want to increase the default maximum heap size to 1024MB for Gradle application. You can set it like this:
GRADLE_OPTS="-Xmx1024m"
We can apply this setting in the project-specific build file. Alternatively, we can also apply this setting to all of the Gradle build by adding the variable to the Gradle startup script (this will be discussed later in this chapter).
In the last section, we learned how to install Gradle. Now it's time create our very first Gradle script. This script will print Hello Gradle- This is your first script on the console. Just open a text editor, type in the following three lines, and save the file as build.gradle.
task helloGradle << {
      println 'Hello Gradle- This is your first script'
}
Then execute the gradle helloGradle command as follows:
$ gradle helloGradle
:helloGradle
Hello Gradle- This is your first script
BUILD SUCCESSFUL
Total time: 4.808 secs
So, what have we done here?
We have a created a Gradle build script file called
build.gradle. This is the default name given to a build file. You can give any name to the build file. However, to execute the script, you must use the-boption with your filename with thegradlecommand. Otherwise,the build will fail with theTask '%TASK_NAME%' not found in root project '%PROJECT_NAME'."gradle [-b <file name>] [task1 task2 ….. taskn]error.Try the
gradle -b <buildfile_name> helloGradlecommand and you should get the same output.With the gradle command, we have executed a task called
helloGradle, which prints a line in the console. So, the parameter we passed to the gradle command is the task name. You can execute one to any number of tasks with the Gradle command and these tasks will be executed in the same order as they appear in the command line.Tip
There is a way to define the default task using the
defaultTaskskeyword, which will be executed by default, if user does not mention any specific task to execute on the build file. We'll discuss this more in Chapter 3, Managing Task.
The Gradle command initializes the script, reads all tasks mentioned on the command-line, and executes tasks. Moreover, if any task has multiple dependencies, then dependent tasks are executed in alphabetical order unless those tasks themselves enforce the order. You can find more about task ordering in Chapter 3, Managing Task.
Remember that each Gradle build consists of three components: projects, tasks, and properties. Each build has at least one project and one or more tasks. The name of the project is the parent directory name in which the build file exists.
Now that you have created the first working script, it is time to explore different command-line options supported by Gradle.
You have already seen the usage of -b option to specify a build script. We'll start with --help or -h or -? to list all the options available with the Gradle command line.
$ gradle -h
USAGE: gradle [option...] [task...]

-?, -h, --help        Shows this help message.
-a, --no-rebuild      Do not rebuild project dependencies.
-b, --build-file      Specifies the build file.
-c, --settings-file   Specifies the settings file.
--configure-on-demand   Only relevant projects are configured in this build run. This means faster build for large multi-project builds. [incubating]
--continue            Continues task execution after a task failure.
In the preceding output, -h or --help displays many more options. We have truncated the output.
You can execute the command on your systems and check all the options. Most of these are self-explanatory. We will discuss the usage of some of the most useful options in this section.
Now we'll add two more tasks, failedTask and test to the build.gradle script and save the file as sample_build.gradle. The task named failedTask is expected to always fail due to assertion failure and the test task is dependent on the previously created task helloGradle. A task can succeed (executing all statements in the task without any exception) or it can fail (due to any exception or error in any line of code mentioned in the task) thus stopping the execution of the script.
task failedTask << {
      assert 1==2
}

task test(dependsOn: helloGradle ) << {
      println 'Test case executed'
}
On executing the gradle -b sample_build.gradle failedTask test command, we observe that the test task is never executed. As Gradle executes tasks sequentially as they appear on the command-line, if a task fails to execute, all the remaining tasks will be ignored.
$ gradle -b sample_build.gradle failedTask test
:failedTask FAILED
FAILURE: Build failed with an exception.
…
BUILD FAILED

Total time: 6.197 secs
By default, Gradle stops the build process if any task fails to execute. This feature helps to get a quick feedback on the build process. If you do not want to stop execution of the build irrespective of any task failure and you want to continue with other tasks, then it can be done by using the --continue command-line option. This feature could be useful when we want to build a multimodule project, where some of the modules might fail due to compilation error or test failure. With the –continue option, we will get a complete status of all the modules.
$ gradle -b sample_build.gradle failedTask test --continue
:failedTask FAILED
:helloGradle
Hello Gradle- This is your first script
:test
Test case executed

FAILURE: Build failed with an exception.
As you can see in the preceding output, failedTask failed to execute. So the build is marked as FAILURE. However, this time the test task executed successfully. Also observe that the helloGradle task is executed before the test task. This is because we have defined the test task to be dependent on the helloGradle task. This is one of the ways you can create task dependencies. For now, don't get confused with task dependency. We will discuss the topic in detail in Chapter 3, Managing Task.
Now, what happens if the helloGradle task fails? Just add a line assert 1==2 into the helloGradle task. The assert statement forces the task to fail. When you look at the following output, you will find that the test tasks is not executed as the dependent task failed:
$ gradle -b sample_build.gradle failedTask test --continue
:failedTask FAILED
:helloGradle
Hello Gradle- This is your first script
:helloGradle FAILED

FAILURE: Build completed with 2 failures.
In the preceding scenario, the test task is dependent on the helloGradle task. This means that, every time we execute the test task, the helloGradle task will be executed by default. In case you want to avoid the execution of the helloGradle task, you can use the -x or --exclude-task option.
$ gradle -b sample_build.gradle failedTask --continue test -x helloGradle
:failedTask FAILED
:test
Test case executed
Another useful option is --dry-run or -m, which runs the build but does not execute the tasks. It is useful if you want to know the task execution order or you want to validate the script.
$ gradle --dry-run -b sample_build.gradle failedTask test --continue
:failedTask SKIPPED
:helloGradle SKIPPED
:test SKIPPED
BUILD SUCCESSFUL
Total time: 4.047 secs
Note
--dry-run executes all the statements which are not part of any tasks and are defined outside of a task block. To verify this, add a println statement anywhere outside a task block definition and observe the result.
So far, you must have noticed that each output displays extra information apart from the task output and error messages. Try the command-line option -q or --quiet to display only the task output:
$ gradle -q -b sample_build.gradle failedTask --continue test
Hello Gradle- This is your first script
Test case executed
The options --debug (-d), --info (-i), --full-stacktrace (-S), and --stacktrace (-s) display the output with different log levels and stack traces. --debug is the most detailed log level. --full-stacktrace and --stacktrace show stack traces if the build fails with an exception. Try the previously executed command with these command-line options and observe the output:
$ gradle -d -b sample_build.gradle failedTask --continue test
Now we will explore the --daemon, --stop, and --no-daemon options. On my machine, it took around 3.6 seconds to execute the preceding script. For this simple script, most of the execution time was spent in the initialization of Gradle. When we execute a Gradle command, a new Java Virtual Machine is started, then Gradle-specific classes and libraries are loaded, and finally the actual build steps are executed. Initialization and execution of Gradle can be improved using the --daemon option. This is very useful if you are working in a test-driven development where you need to execute unit tests frequently or you need to run a particular task repeatedly.
To start a daemon, you can use the --daemon option. The daemon process automatically expires after 3 hours of idle time. To check whether the daemon is running on the system, use the ps command in the UNIX environment, or the Process explorer in Windows systems. Once you have started the daemon process, again execute the same Gradle task. You will find an improvement in the execution time.
Alternatively, you can use the gradle.properties file to set the system property org.gradle.daemon to enable the daemon. In this scenario, you don't need to specify the --daemon option when executing the tasks. To try it out, create a file called gradle.properties in the same directory where you created the sample_build.gradle file and add this line org.gradle.daemon=true. Now, run the gradle command and check whether the daemon process is running. The org.gradle.daemo is a property that we have set to configure the Gradle build environment. We'll discuss more on properties and system variables in Chapter 6, Working with Gradle.
To stop the daemon process, use the gradle --stop option. Sometimes, you may not want to execute Gradle tasks with the daemon process. Use the --no-daemon option with the task to ignore any running daemons.
$ gradle -b sample_build.gradle failedtask --continue test
--daemon

$ ps -ef | grep gradle
root   25395  2596 46 18:57 pts/1  00:00:04
/usr/local/java/jdk1.7.0_71/bin/java …..
org.gradle.launcher.daemon.bootstrap.GradleDaemon 2.4
/home/root/.gradle/daemon 10800000 93dc0fe2-4bc1-4429-a8e3-
f10b8a7291eb -XX:MaxPermSize=256m -XX:+HeapDumpOnOutOfMemoryError -
Xmx1024m -Dfile.encoding=UTF-8 -Duser.country=US -Duser.language=en -
Duser.variant

$ gradle --stop
Stopping daemon(s).
Gradle daemon stopped.
Although the Gradle daemon is recommended for the development environment, it might get corrupted occasionally. When Gradle executes user build scripts from multiple sources (for example, in the Continuous Integration environment), it might exhaust the daemon process and may cause memory leakage if resources are not handled properly. Therefore, it is recommended not to enable the daemon for staging or continuous integration environment. Apart from the command-line, Gradle can be executed in the Graphical User Interface (GUI) as well. In the next section, we'll discuss the graphical user interface supported by Gradle. The other important command-line options such as –D or --system-prop, -P or --project-prop will be discussed in Chapter 6, Working with Gradle, when we explore more on building Java applications with Gradle.
Apart from the command-line arguments and tools, Gradle provides a graphical user interface. It can be launched with the help of the following command-line option:
$ gradle --gui
It launches a graphical user interface (GUI), which can be used to execute Gradle tasks directly from the GUI.
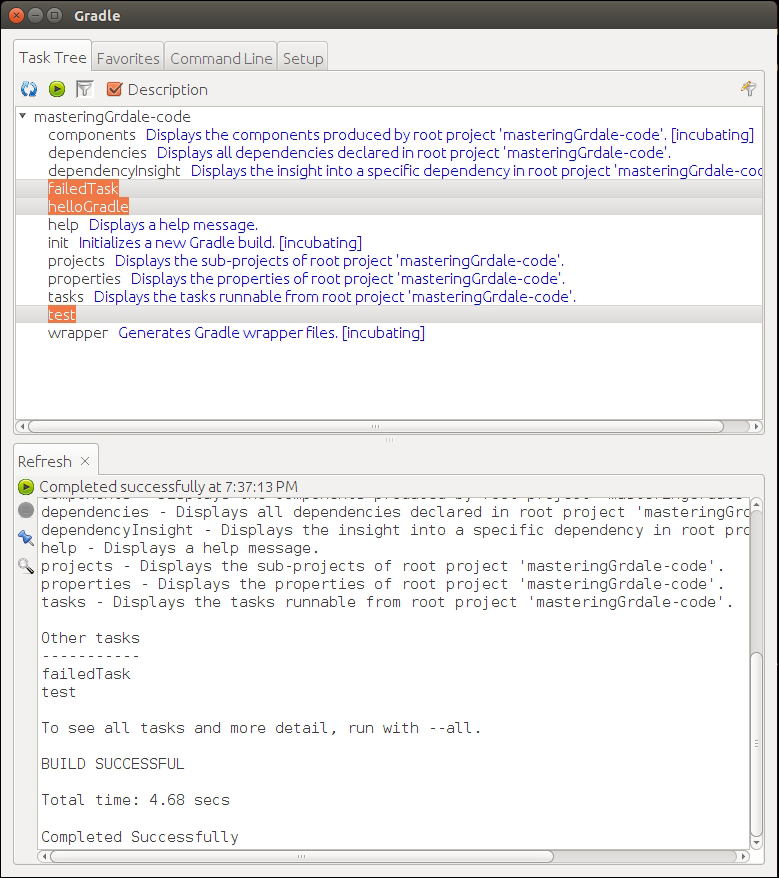
Figure 1.1
It contains four tabs, which are explained as follows:
Task Tree: The directory, under which you executed this command, is considered as the parent project directory. If the
build.gradlefile is present under this directory, task tree will list out all the tasks available in thebuild.gradlefile. If thebuild.gradlefile is not in this directory, it will list out only the default tasks. You can execute any task by double-clicking on the task name.Figure 1.1 displays
failedTask,helloGradleandtesttasks that we developed earlier along with the default Gradle tasks.Favorites: This works like your browser favorites, where you can save frequently used commands. Additionally, it provides an alias feature. In case you want to execute multiple tasks on the command line, you can add them here and give it a simple display name. For example, you can click on the plus sign and add the following tasks in the command-line textbox:
clean build.Add
initin the display name area. You will see that init appears in the Favorites area. Next time, just click on init to executeclean buildtasks.Command line: This works like the console. Here you can execute single or multiple inline commands. It will execute the command and will display the result in the lower window.
Setup: Even if you started the GUI from a specific project directory, you can change the directory using this tab. It allows you to change your current directory for executing commands. Along with that, it helps to change some general settings such as Log level, Stack Trace output, and so on. It also allows you to execute other Gradle versions through the custom Gradle Executor.
Consider this scenario, for each of your Gradle projects you have a dependency on a local in-house jar files. Additionally, you want to set some common environment variables for each of your Gradle projects (such as GRADLE_OPTS).
A simple solution is to add the jar file in the dependency closure. An alternate solution could be to create one common build file and include this common file in each of the build files.
The simplest solution Gradle provides for these kinds of problems by introducing the initialization script.
Initialization scripts are no special files, but a Gradle script with the .gradle extension. However, this will execute every time before any of your build files execute.
Some of the uses of the initialization script are as follows:
Downloading some common jars for each of your projects
Performing common environment configuration related to system details and/or user details.
Registering listeners and loggers.
So, how does Gradle find these initialization script(s)? There are multiple ways to define the initialization script which are as follows:
All the files with
.gradleextension under<USER_HOME>/.gradle/init.ddirectory are treated as initialization scripts. Gradle will execute all the.gradlefiles under this directory before the execution of any Gradle build script.Files named
init.gradleunder<USER_HOME>/.gradle/are treated as an initialization script.All the files with the
.gradleextension under<GRADLE_HOME>/init.d/directory.You can even specify any Gradle file as the initialization script with
-I <file name>or--init-script <file name>.
Following is a sample init script.
println "Hello from init script"
projectsLoaded {
  rootProject.allprojects {
    buildscript {
      repositories {
        maven {
          url "http://central.maven.org/maven2/"
        }
      }
      dependencies {
        classpath group: 'javax.mail', name: 'javax.mail-api',
          version: '1.4.5'
      }
    }
  }
}
Copy and paste the preceding code and save it as init.gradle file under any of the preceding mentioned paths. The println statement is intentionally added in this file to help you understand the execution cycle of the init script. Whenever you execute any Gradle script from a directory, you will see Hello from init script. Apart from printing Hello from init script, this script also downloads javax.mail-api-1.4.5.jar in the Gradle cache when the script is executed for the first time. It will not download this library again, unless there is a change in the file in the repository. If you don't understand what a cache is, don't worry. You will learn more about cache management in the later section of this chapter. Remember, sometimes defining too many configurations in the init script could be problematic. Specifically, debugging could be difficult because the projects are no longer self-contained.
Gradle build has a life cycle, which consists of three phases: initialization, configuration, and execution. Understanding the build life cycle and the execution phases is crucial for Gradle developers. Gradle build is primarily a collection of tasks and a user can define the dependency between the tasks. So, even if two tasks depend on the same task, for example, Task C and Task B both depend on Task A, Gradle makes sure that Task A will execute only once throughout the execution of the build script.
Before executing any task, Gradle prepares a Directed Acyclic Graph (DAG) of all tasks for the build. It is directed because a task directly depends on another task. It is acyclic because, if Task A depends on Task B and if you make Task B depend on Task A, it will result in an error, as there can't be cyclic dependency between two tasks. Before executing the build script, Gradle configures the task dependency graph.
Let's quickly discuss the three build phases.
User can create a build script for a single project as well as for a Multi-project build. During the initialization phase, Gradle determines which projects are going to take part in the build process, and creates a Project instance for each of these projects.
This phase configures the project object. All the build scripts (in case the user is executing a multiproject build), which are part of the build process are executed without executing any task. This means whatever statements you have written outside of the task in the configuration block would be executed in the configuration phase. No tasks would be executed here; only the directed acyclic graph would be created for all tasks.
The main focus of any build tool is to not only automate the build and deployment processes, but also how to manage the cache effectively. No software works in isolation. Each software depends on some third-party libraries and/or in-house libraries.
Any good build tool should automatically take care of software dependencies. It should be able to download the dependencies automatically and maintain the versioning. When Ant was released, this feature was not available and developers need to manually download the dependencies and need to maintain their versioning on its own. Though it was later resolved by extending Ant with Ivy.
Gradle automatically downloads all dependencies given in the build file. It determines all the libraries needed for the project, downloads from the repositories, and stores them in its local cache. Next time when you run the build, it doesn't need to download those dependencies again (unless required) as it can reuse the libraries from the cache. It also downloads all the transitive dependencies.
Tip
Downloading the example code
You can download the example code files from your account at http://www.packtpub.com for all the Packt Publishing books you have purchased. If you purchased this book elsewhere, you can visit http://www.packtpub.com/support and register to have the files e-mailed directly to you.
The first question arises regarding cache, in which location Gradle maintains its cache. Gradle uses <USER_HOME>/.gradle/caches as the default directory to store its local cache. It might contain more than one version directory if a developer has used multiple versions of Gradle to build the software. The actual cache is divided into two parts. All the jars that are downloaded from the repositories can be found under modules-2/files-2.1. Additionally, you will also find some binary files that will store the metadata about the downloaded binaries. If you look inside the modules-2/files-2.1 directory, it has the path in the format group/name/version/checksum, which contains the actual binary. You can find out more about dependency management in detail in Chapter 5, Dependency Management.
If you want to change the cache location to some other directory, other than default location, you need to set the following environment variables. You can set this variable in Windows as the environment variable and in the Unix/Linux in .profile file:
GRADLE_USER_HOME=<User defined location>
Now, let's discuss some of the important features of the Gradle cache.
One of the main features of Gradle cache management is to reduce the network traffic. When you build the application for the first time, Gradle downloads all the dependencies into a cache, so that next time onwards it can directly fetch it from the cache.
In case multiple repositories are configured in the build script and a JAR is found in the first repository, then Gradle won't search other repositories for the same JAR file. In another situation, if the JAR was not found in the first repository but was fetched from the second repository, then Gradle will store metadata information about the first repository, so that next time onwards the first repository won't be searched for the missing JAR, to save time and network traffic.
Whenever Gradle downloads dependencies from the repositories, it also stores the repository location in its metadata. It helps to detect the changes in case the binaries are removed from the repositories or their structure is changed.
If a developer updates the Gradle version on his machine, and he has already downloaded libraries in an older cache, then it is reused. Gradle also provides tight integration with Maven's local repository. Gradle figures out whether an artifact has changed in the remote repository by comparing its checksum with the local cache. All those artifacts whose checksum matches are not downloaded. Apart from checksum, Gradle will consider an additional parameter to compare between the remote and local artifacts; Gradle uses the value of the HTTP header parameter content-length or the last modified date.
So far, in this chapter, we have worked on creating some basic Gradle scripts. We will conclude this chapter by creating a Java application with Gradle. To create a Java application, we'll be using Eclipse IDE with the Gradle plugin.
With Integrated Development Environment (IDE), application development becomes much easier. In this section, we will explore how to install the Gradle plugin in Eclipse, create a simple Java application, explore Eclipse plugin tasks, and execute Gradle tasks from Eclipse.
Apart from Eclipse, another popular IDE is JetBrains IntelliJ IDEA. Gradle also supports IDEA plugin, which is very similar to the Eclipse plugin. However, in this book, we will focus only on the Eclipse plugin since it is freely available and is open source.
The Eclipse Integration Gradle project from the spring source (https://github.com/spring-projects/eclipse-integration-gradle/) helps the developer to work with Gradle in Eclipse. This tool offers support for:
Using
Gradle Import Wizardto import Gradle projects into EclipseUsing
New Gradle Project Wizardto create new Gradle projectsUsing
Executing Gradle tasks using
Gradle Task UIIntegration with the Groovy Eclipse via DSLD (DSL Descriptors)
Following are the steps to install this plugin in Eclipse (3.7.2 or higher) from the update site:
Launch Eclipse. Navigate to Help | Install New Software.
In the Install New Software dialog, click on the Add button to add a new site.
Enter the Location as
http://dist.springsource.com/release/TOOLS/gradleand Name asGradle. You can enter any meaningful name you want.Click on OK to add the repository.
Select the newly created Gradle repository from the repository list.
Check only the box next to Extensions / Gradle Integration | Gradle IDE. Click on Next (Refer to Figure 1.2).
On the next screen, click on Next.
Accept the terms and conditions and click on Finish. Eclipse should download and install Gradle IDE. Then restart Eclipse.

Figure 1.2
We have successfully installed Gradle plugin. Now, we'll create a simple Gradle project and we'll look into few Eclipse-related important files, for example, .project and .classpath. Then we will build the project using the Gradle Task UI.
Following are the steps to create a Gradle project:
In Eclipse, navigate to File | New | Gradle | Gradle Project.
In the New Gradle Project window, specify the project name as FirstGradleProject and select the sample project as Java Quickstart.
Click on Finish and wait for the build to be successful.
You will find the following console output:
:cleanEclipseClasspath UP-TO-DATE
:cleanEclipseJdt UP-TO-DATE
:cleanEclipseProject UP-TO-DATE
:cleanEclipse UP-TO-DATE
:eclipseClasspath
…
:eclipseJdt
:eclipseProject
:eclipse

BUILD SUCCESSFUL
The output clearly shows what is going on here. Gradle initially executes a series of clean tasks (cleanEclipseClasspath, cleanEclipse, and so on.), then downloads some jar files from the Maven repository and finally executes a few more tasks (eclipseJdt, eclipse, and so on) to complete the build process.
The autogenerated build.gradle file has the following contents:
apply plugin: 'java'
apply plugin: 'eclipse'

sourceCompatibility = 1.5
version = '1.0'
jar {
  manifest {
    attributes 'Implementation-Title': 'Gradle Quickstart', 'Implementation-Version': version
  }
}

repositories {
  mavenCentral()
}

dependencies {
  compile group: 'commons-collections', name: 'commons-collections', version: '3.2'
  testCompile group: 'junit', name: 'junit', version: '4.+'
}

test {
  systemProperties 'property': 'value'
}

uploadArchives {
  repositories {
    flatDir {
      dirs 'repos'
    }
  }
}
This build file is, quite different from what we created earlier in this chapter. The Java and Eclipse plugin declarations were added in the beginning. Project properties such as sourceCompatibility and version were added. The repository was declared as mavenCentral(). Dependencies, common-collections, and JUnit were configured on compile and testCompile respectively. We'll learn each and every component in the next chapters; now, let's concentrate on the other artifacts created by the Gradle project.
If you browse the source code (look for the src folder) of the project, you'll find that the application was prepopulated with some Java source code and JUnit test cases.
Apart from the source code and build file,a few other files, namely, .project, and .classpath and a folder, namely, .settings, were added to this Java project. These are the default files created by Eclipse. As the name suggests, the .project file contains the metadata information about the project such as name, description and build specification. The .classpath file describes the Java dependency, external library dependencies, and other project dependencies. .settings/org.eclipse.jdt.core.prefs stores information such as the Java compiler version, source, and the target Java version. All these three files were created during the build process when the eclipse task was executed.
So, we claimed that the Eclipse plugin was responsible for creating all of the Eclipse IDE-specific files. To confirm, first execute the gradle cleanEclipse command from the project of the base folder:
$ gradle cleanEclipse
:cleanEclipseClasspath
:cleanEclipseJdt
:cleanEclipseProject
:cleanEclipse

BUILD SUCCESSFUL
The cleanEclipse task executed three more dependent tasks: cleanEclipseClasspath (removes the .classpath file), cleanEclipseJdt (removes the .settings/org.eclipse.jdt.core.prefs file), and cleanEclipseProject (removes the .project file).
Check whether all the three files got deleted from the project, and, finally, execute the gradle eclipse command to recreate those files.
$ gradle eclipse
:eclipseClasspath
:eclipseJdt
:eclipseProject
:eclipse

BUILD SUCCESSFUL
Now the question is if I have a Java project, how do I import that project in Eclipse IDE?
We have learned this already and you might have guessed it. It takes just three steps: add the Eclipse plugin into the build file (apply the eclipse plugin ), execute Eclipse task (gradle eclipse), and finally import project using Eclipse File | Import.
Alternatively, you can use Gradle IDE. From Eclipse, select the project by navigating to File | Import | Gradle | Gradle Project, and then perform Build Model and finish. Use of Gradle IDE helps to avoid all the manual steps mentioned earlier.
We'll conclude this section by exploring Gradle Task UI, which enables us to execute tasks. Gradle task execution is supported by the standard Eclipse launching framework. This means that before we execute any task, we must create a standard Eclipse launch configuration. To create the launch configuration, navigate to Gradle project | Run As | and click on Gradle Build.
In the text area, enter the task names you want to execute, such as clean build. Then click on Run to execute the tasks. The launch configuration will be saved as the project name by default. In Figure 1.3, the configuration is saved as FirstGradleProject, which is the project name.
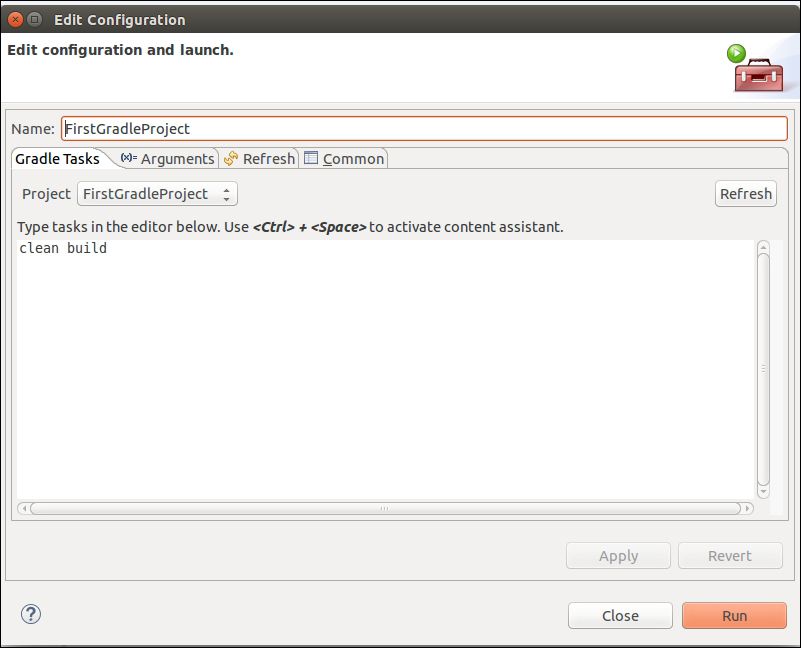
Figure 1.3
This launch configuration will be saved in Eclipse, so that it can be executed again. To launch the previously saved configuration, FirstGradleProject, you need to navigate to Run As | Gradle Build. This will once again, execute the clean build command.
In this chapter, we briefly discussed what a Build Automation System is, why do we need it, and why Gradle is a popular Build Automation System. You also learned how to install Gradle and we created our first Gradle script. Then we discussed the command-line options, GUI support, cache management, and startup scripts. Finally, we concluded the chapter working with Eclipse IDE with the Gradle Plugin to develop a simple Java application.
All the build scripts developed in this chapter were written in Groovy, but we have not talked about it. So, in the next chapter, we will learn some basic concepts of the Groovy programming language. Next chapter is meant mainly for developers who already have some basic knowledge of Java and object-oriented programming concepts.