Download code from GitHub
Understanding the Anatomy of a Blazor WebAssembly Project
Blazor has become a trend in the world of software development, due to its simplicity, productivity, and wide-ranging applicability in web, mobile, and desktop application development via .NET Multi-platform App UI (MAUI) (more about MAUI in Chapter 15, What’s Next?). Thus, it is beneficial for developers to learn about and master this framework.
This book will help you master Blazor WebAssembly by building a new project in Visual Studio until you have a fully functional app that is secure, robust, deployed online, and ready to be consumed by the public.
In this chapter, we are going to walk you through the basic structure of a Blazor WebAssembly standalone application. We will start by creating the project using the various methods available on different platforms, including the Visual Studio IDE, Visual Studio Code, and the .NET CLI. You will then learn about the general structure of the project and what each file contains and why it’s there. You will also learn about dependency injection (DI), how to register and inject services, and how to store and retrieve the configuration of your application in single or multiple environments.
By the end of this chapter, you will have a good idea of the structure of the application we will be building in the later chapters of this book.
In this chapter, we will cover the following topics:
- Creating your first Blazor WebAssembly project
- Discovering the project structure
- Dependency injection in Blazor WebAssembly
- Creating, storing, and retrieving the app configuration
- Managing application environments
Technical requirements
To follow along with this chapter and the rest of the book, you need to know the basic concepts of the C# programming language and the fundamentals of web development.
The development process will require Visual Studio 2022 Community, which can be downloaded for free for Windows devices from https://visualstudio.microsoft.com/vs/community, and for macOS devices from https://visualstudio.microsoft.com/vs/mac/.
Alternatively, you can use Visual Studio Code for any OS (Windows, macOS, or Linux) by downloading it from https://code.visualstudio.com/download.
If you are not going to be installing Visual Studio 2022, you need to make sure that the .NET 7.0 SDK is available on your computer. This SDK generally gets downloaded along with Visual Studio 2022. If you don’t have the SDK, you can install it from https://dotnet.microsoft.com/en-us/download.
In later chapters, we will mostly be using Visual Studio 2022 for Windows, but all the concepts will be applicable to Visual Studio for Mac and Visual Studio Code with the .NET CLI.
You can find the complete source code for this chapter at https://github.com/PacktPublishing/Mastering-Blazor-WebAssembly/tree/main/Chapter_01/BooksStore.
Creating your first Blazor WebAssembly project
Let us start our journey by creating our Blazor WebAssembly project using the .NET CLI, and then we will do the same using Visual Studio 2022 and will build on top of that for the rest of the book.
Using the .NET CLI
To create a Blazor WebAssembly project using .NET CLI, go through the following steps:
- Open Command Prompt on Windows or Terminal on macOS and execute the following command:
dotnet new blazorwasm -n BooksStore
The preceding command will create a new Blazor WebAssembly project in a folder called BooksStore within the directory you executed this command in, and the project will be called BooksStore.
- You can build your app using the
buildcommand after navigating to the newly created folder as follows:cd BooksStore\dotnet build
- Next, you can run the project:
dotnet run
When the app runs, you will see two URLs on the CLI: one for the https link and the other for an http link. Navigate to the https link in your browser and you will be able to see the final result of the default Blazor WebAssembly app made available out of the box by .NET 7.0:
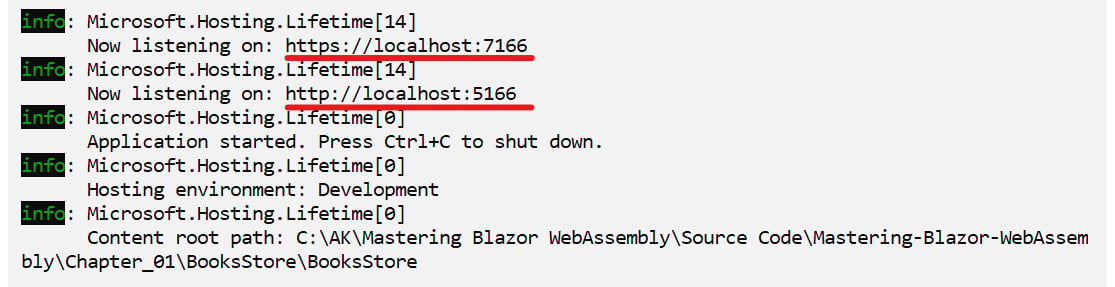
Figure 1.1 – Output after running the dotnet command in Command Prompt
Using Visual Studio 2022
Now, let’s take a quick look at how to create the same Blazor WebAssembly project using Visual Studio 2022:
- Open Visual Studio 2022 and, from the starter page, click on Create a new project. Then, search for the
BlazorWebAssemblytemplate. - Select Blazor WebAssembly App:
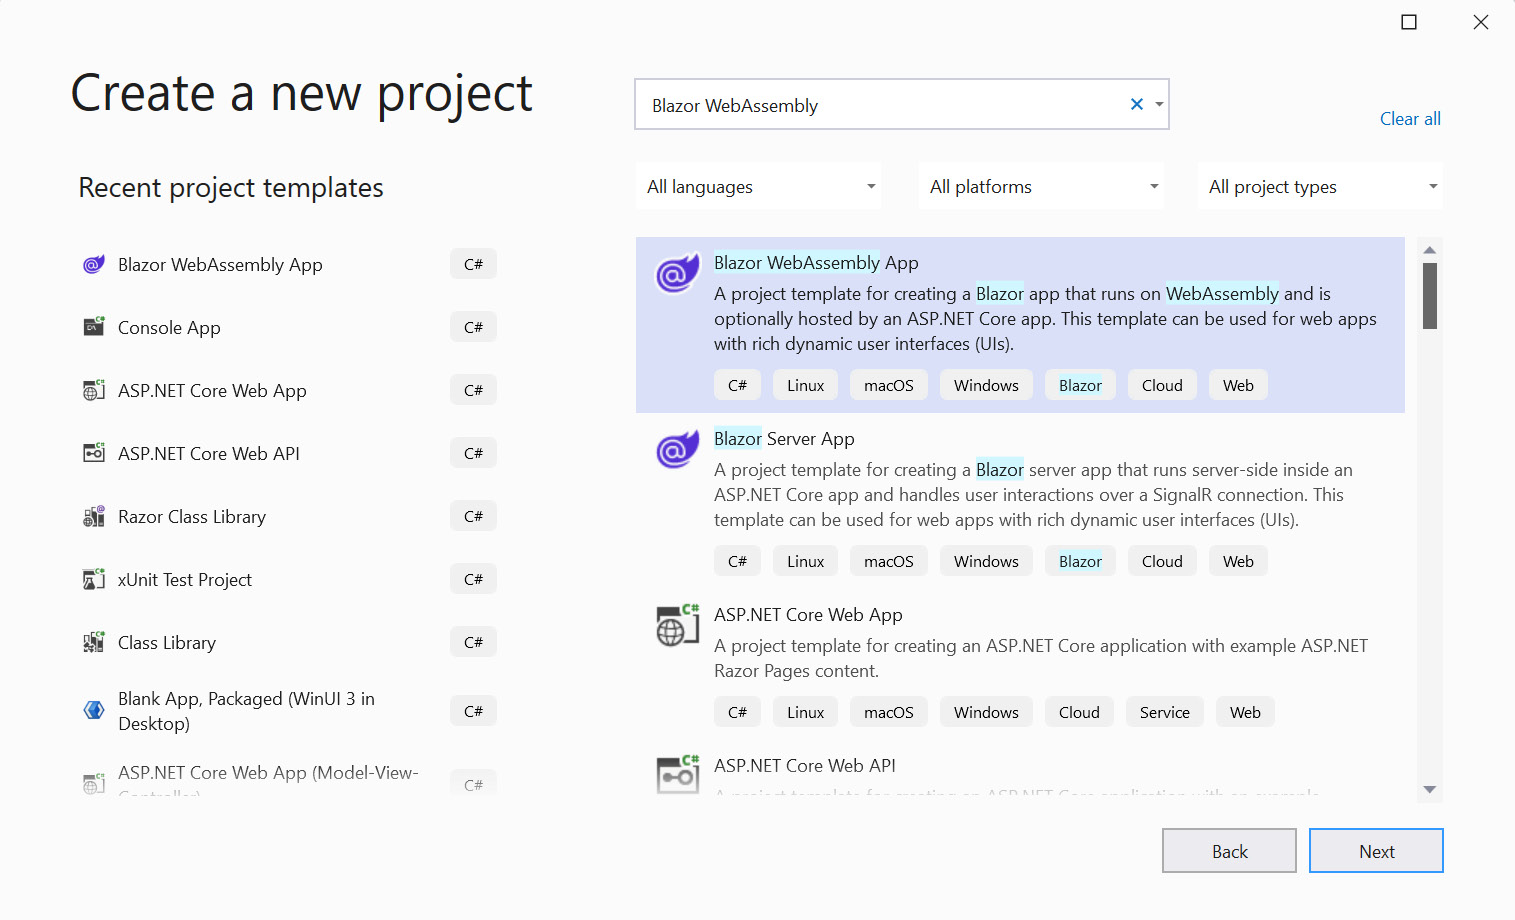
Figure 1.2 – Selecting the project template in VS 2022
- Give your project a name and choose the directory you want to store it in on your machine:
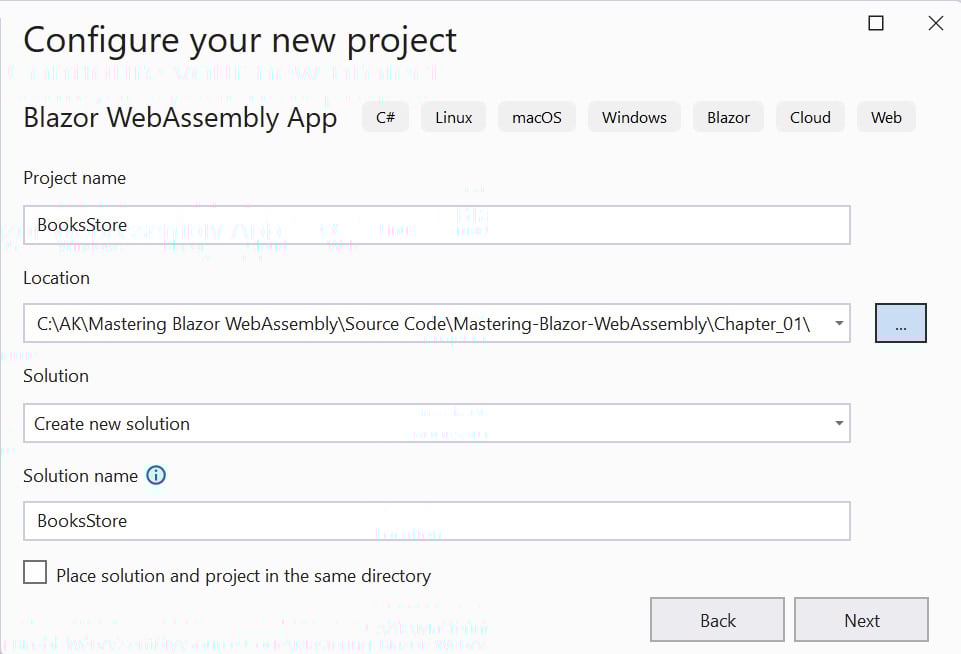
Figure 1.3 – Adding a project name and location
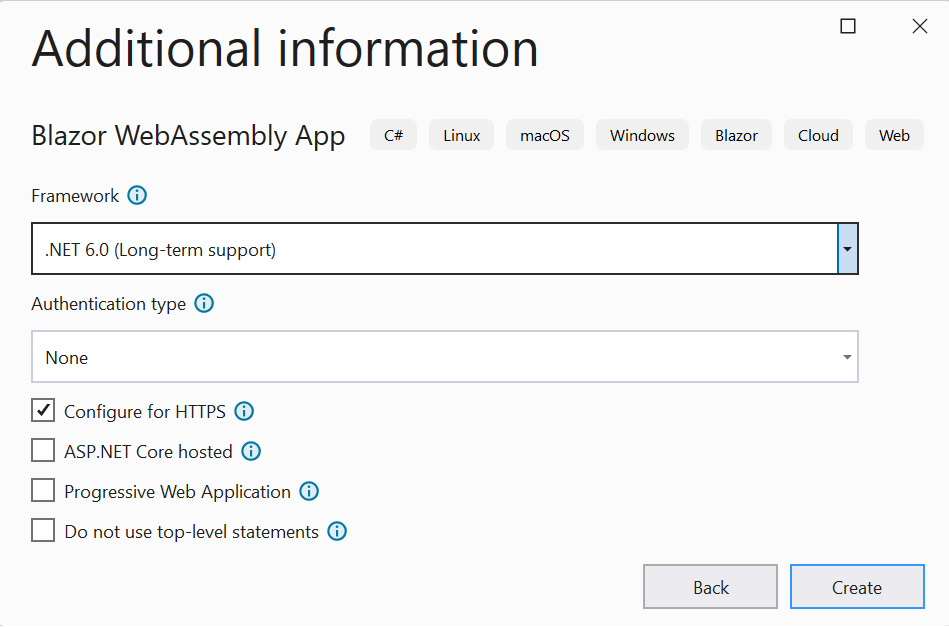
Figure 1.4 – Default project configuration in Visual Studio 2022
The project will be created, and you will see the following files and folders in your VS Solution Explorer panel:
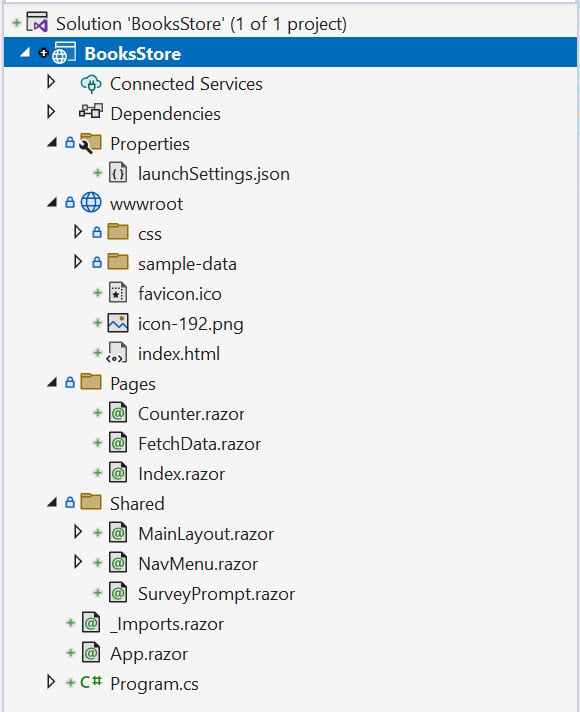
Figure 1.5 – Project files and folders in the Solution Explorer panel
Clicking the Start (F5) button while in your VS 2022 window will run the project and open the browser automatically for you, and you will see the default Blazor app.
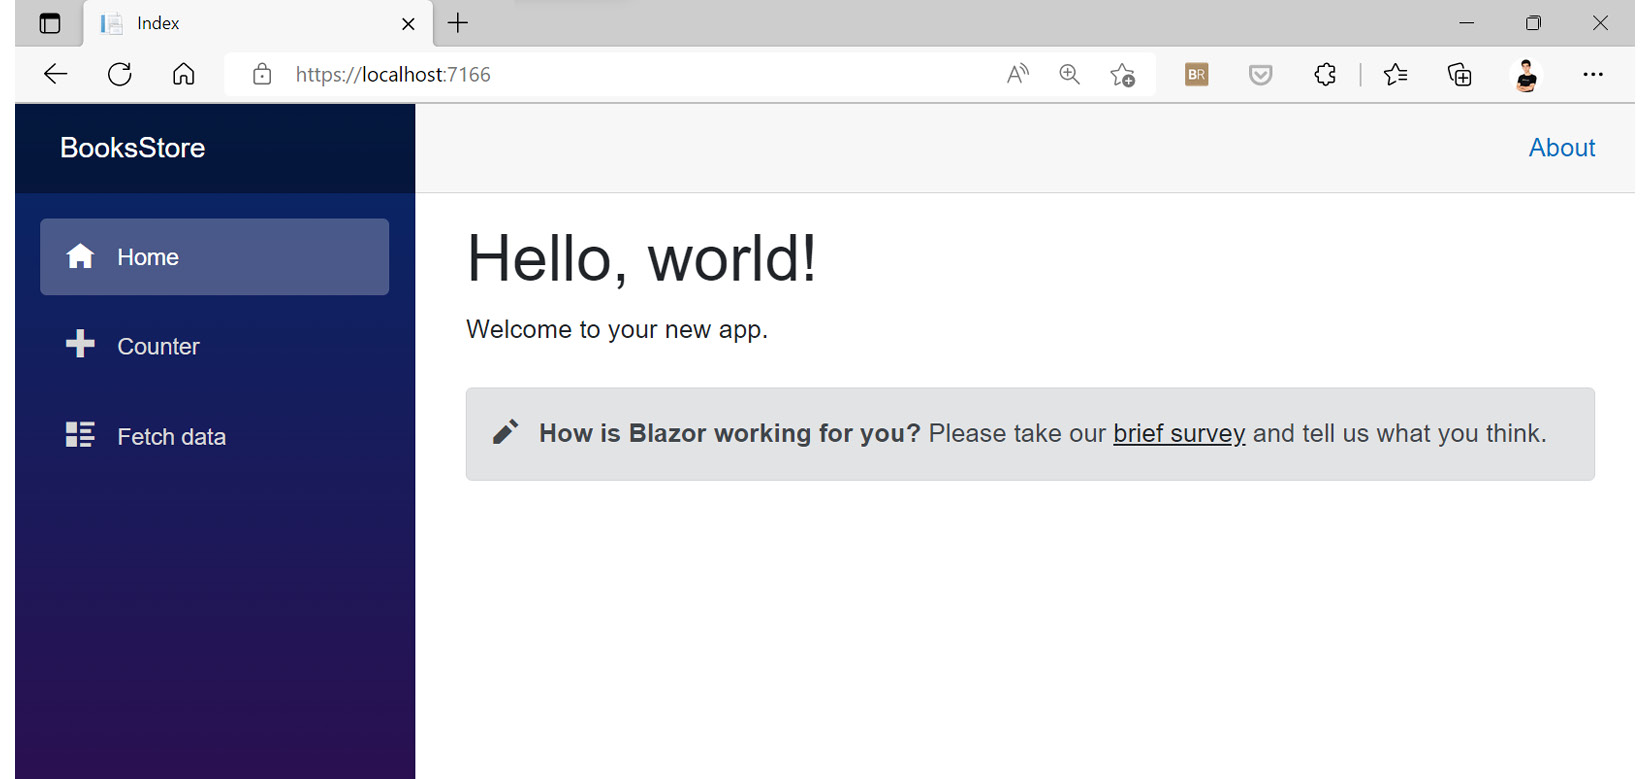
Figure 1.6 – Default running Blazor WebAssembly project
Congratulations! You have seen the famous purple UI; now, we are ready to move ahead and start discovering the purpose of each of those files and folders.
Discovering the project structure
Now we have a workspace that we can use to start building our application, but before we dive in deeper, let’s take a look at the structure of the project, including the files and folders we see. Understanding the what and why of each file in Solution Explorer is key to completing the project we will be building.
Let’s start exploring!
The wwwroot folder
The wwwroot folder is considered the root folder of your project. Root, here, doesn’t mean the root in your file explorer, which is the one that contains the Razor files and other folders. wwwroot is the place where your app's static files, including global CSS styles, the main HTML file of the project, index.html, JavaScript, and assets (images, icons, static documents, etc.), live. It’s also where you put the JSON files that represent the configuration of your app (you will read more about configuration in the next section of this chapter, Dependency injection in Blazor WebAssembly).
By default, the wwwroot folder contains the following:
- The
cssfolder: This folder comes with Bootstrap CSS files and the default font. The folder also includes theapp.cssfile, which carries the global styles of the app. - The
sample-datafolder: This folder contains a JSON file with sample data pertaining to a weather forecast. This is used as a data source for the Fetch data page, which will be mentioned soon. favicon.ico: This refers to the default icon of the app that you see at the top left of the browser tab of your application, in the favorite sites list in the browser, and in some other places.Icon-192.png: This is the Blazor icon PNG file that’s referenced in the components.index.html: The name of this file should be familiar to you. Most of the time,index.htmlis the default HTML file that will be opened when we access a static website. This main HTML file contains our app. The browser downloads this file and opens it with all its references from CSS and JavaScript, most importantlyblazor.webassembly.js.
The body of index.html contains, by default, a div with the ID app (this is basically where all the UI that you see in any Blazor app resides), and another div with the ID blazor-error-ui, which is a simple design div that shows up when an unhandled exception occurs (you will learn more about this in Chapter 10, Handling Errors in Blazor WebAssembly).
While developing your apps, you are going to make changes to this file mostly to add style references or some JavaScript files later in this book.
The following is the code for the default body elements (app div and blazor-error-ui div) within the index.html file:
<html lang="en">….
<body>
    <div id="app">Loading...</div>
    <div id="blazor-error-ui">
        An unhandled error has occurred.
        <a href="" class="reload">Reload</a>
        <a class="dismiss">🗙</a>
    </div>
    <script
      src="_framework/blazor.webassembly.js"></script>
</body>
</html>
Note
The term Single-Page Application (SPA) seems a bit weird when you open the app and start navigating from one page to another. However, technically SPAs consist of a single HTML page and Blazor or any other JavaScript framework (ReactJS, Angular, etc.) dynamically updates the content of that page. As you have seen, in the wwwroot folder, there is only one HTML page in our whole application, called index.html.
The Pages folder
Pages is the default folder where Microsoft puts its default pages that come with the template. You can use Pages as the container for your app’s page components. However, it’s not mandatory to put your components in this folder and you can even delete it. Pages comes with three sample pages that cover different concepts, such as calling a shared component, updating the DOM using a button, and fetching data from a data source:
Counter.razor: This is a Razor component that you can access through the route/counter. This is also an example of calling a C# method from an HTML button and binding an HTML<p>element’s content to a C# variable to show the result.FetchData.razor: You can access this component by navigating to/fetch-data. This page contains an HTML table that shows weather forecast data and demonstrates how to fetch data using theHttpClient. By injecting the object and making an HTTPGETrequest to grab the JSON data from theweather.jsonfile in thewwwrootfolder, the data is rendered within the component.Index.razor: This is the default component that you will see when you run the project. It shows you how to call other shared components such asSurveryPromptand pass theTitleparameter to it.
The Shared folder
As the name indicates, this folder holds some shared components across the app. You can override this structure, but we are going to follow the same structure through the rest of this book and will use this folder to contain the components that will be shared across all the pages (app layout, nav menu, authentication components, etc.). By default, the Blazor template comes with three shared components:
MainLayout.razor: This comprises the default layout of the project and is a special kind of component. It defines what the app looks like and allocates the content components (pages) to the right place.
By default, this component references the NavMenu component and contains a <main> HTML tag that renders the @Body property. This property holds the content of the pages based on the navigated route (more about layout components will be covered in Chapter 3, Developing Advanced Components in Blazor).
NavMenu.razor: This component contains the menu items of the app (a set of URLs to navigate between the pages mentioned in thePagesfolder).SuveryPrompt.razor: This is a simple component to demonstrate how to create a reusable component that accepts parameters. TheIndexpage references this component and passes a value for itsTitleparameter.
The _Imports.razor file
In C# classes, you always need to use classes existing in different namespaces. So, basically, we reference a namespace by declaring a using statement at the top of the C# file so we can reference the required classes and nested namespaces. The _Imports.razor file is there for this purpose, and you can use it to reference common namespaces across the majority of your components. So, there is no need to add a using statement at the top of each Razor file to access the required code. By default, the component references some common .NET namespaces that you will use across your components, such as System.Net.Http and the namespace of your assembly and the shared folder.
The following is the code for the _imports.razor file with the shared referenced namespaces:
@using System.Net.Http…
@using Microsoft.JSInterop
@using BooksStore
@using BooksStore.Shared
The App.razor file
The App component is the parent and the main component of the Blazor app. It basically defines the infrastructure required for your application to function, such as the Router component, which matches the URL entered in the browser and renders the associated component in your app. The App component also defines the default layout component (MainLayout, mentioned in the Shared folder). More about layout components will be covered in Part 2, Chapter 3, Developing Advanced Components in Blazor. Further, the App component contains the NotFound section, which you can use to render specific content if the requested address was not found.
The Program.cs file
In any C# application, there is an entry point and Program.cs represents the entry point of your Blazor app. This entry point sets up the Blazor WebAssembly host and maps the App component to the corresponding div within the index.html file (by default, the div with the ID app). We also use the file to register any service that we need to use throughout the application’s lifetime in the DI container.
Now you should be able to navigate easily within the solution after understanding what every file does and why it’s there; the next step in this chapter is looking at the concept of DI.
Dependency injection in Blazor WebAssembly
Modern software development is all about scaling, separation, and testing, so when you write the code, you should feel confident about its behavior and reliability. To achieve that goal, you need to keep the SOLID principles in mind throughout your development journey. The principle represented by the letter D is dependency inversion. This basically refers to hiding the implementation of your services behind interfaces. For example, for each service class you have, you can create an interface that contains the methods of that class, and make the class implement the interface. Then, while consuming this service, you reference the interface instead of the class directly. This strategy decouples the components or code pieces that use a service from its implementation by depending on the service’s abstract layer, which is the interface.
All this is amazing, but there is one missing part: how to initialize the object of a service that will be used in more than one place. This is where DI comes into play. It’s simply a technique that allows you to register your services that are used in other services or components in a centralized container, and that container will be responsible for serving those objects to the components that require them.
How dependency injection works
The following diagram shows the flow of a ConsoleLoggingService class:

Figure 1.7 – The flow of the dependency injection container and associated services
In the preceding figure, the ConsoleLoggingService class implements the ILoggingService interface. Then, in the DI container, we register an instance of ILoggingService with a new object of its implementation: ConsoleLoggingService. Whenever Component A requires logging logic, it uses ILoggingService (the abstraction layer of ConsoleLoggingService).
Instead of initializing a new object instance ourselves, the DI container is serving ILoggingService to Component A, which adds many benefits as it keeps the code separated. Further, the implementation logic for the full service could be changed at any time without touching Component A, which depends on the base interface of that service. For example, if we want to log the data to a server instead of the console to start using the new service, we can just write a new implementation of ILoggingService and register that instance in the DI container, without changing anything in Component A or any other client code.
Note
To learn more about the SOLID principles and software development, check out the following link: https://en.wikipedia.org/wiki/SOLID
Using dependency injection in Blazor WebAssembly
Blazor WebAssembly comes with a DI container out of the box. You can start by registering your services in the Program.cs file and then inject those services into the client components or services as well.
Let’s implement or write our first service, ILoggingService, as mentioned in the preceding section, with the Log method, and create an implementation to log the messages to the console window of the browser. Then, we will inject this service into the FetchData component and log the count of the weather data that the FetchData component gets. To implement the service, go through the following steps:
- In Solution Explorer, right-click on the project, and click on Add | New Folder. Name the folder
Services.
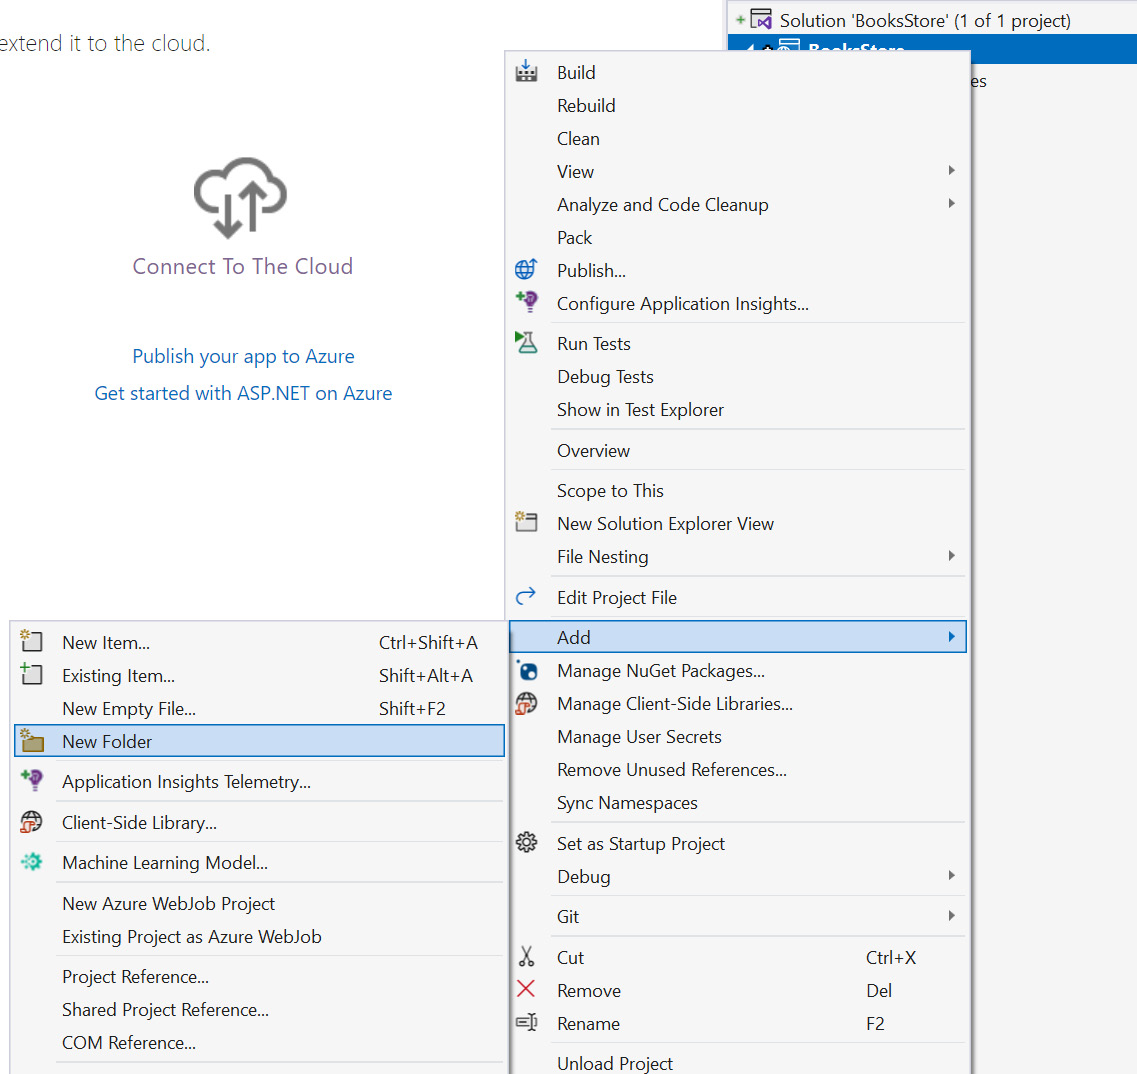
Figure 1.8 – Adding a new folder through Solution Explorer
- Right-click on the newly created folder and choose Add | New Item.
- From the dialog that shows up, choose Interface as the item type, and give it the name
ILoggingService. Then click Add. - The interface has been created, and the goal is to create the
Logmethod. As you know, in the interfaces, we only define the signature of the method (its return data type and its parameter), so we will define that method as follows:public interface ILoggingService{ void Log(string message);} - After creating the interface, we should create the implementation that logs that message to the console, so repeat step 2, but instead of creating an interface, let’s create a
classand give it the nameConsoleLoggingService. - After creating the class, let’s implement the
ILoggingServiceinterface and write the logic of that method as follows:public class ConsoleLoggingService : ILoggingService{ public void Log(string message) { Console.WriteLine(message); }}
The Log method calls the WriteLine method in the Console class, but in Blazor WebAssembly the Console.WriteLine method doesn’t act the same as it does in other .NET apps by printing a string in a console app. It prints the string in the console window within the developer tools of the browser.
You can access the developer tools in your browser as follows:
- Microsoft Edge: F12 in Windows or ⌘ + ⌥ + I for Mac
- Other browsers: Ctrl + Shift + I
The last thing to get this service ready to be injected into other components is registering it in the DI container.
- Go to the
Program.csfile and register the service using theAddScopedmethod:...using BooksStore.Services;var builder = WebAssemblyHostBuilder.CreateDefault(args);...builder.Services.AddScoped<ILoggingService, ConsoleLoggingService>();await builder.Build().RunAsync();
Our first service right now is ready to be used and injected within any other components. The following example will show you how to inject this service in the FetchData component and achieve the required target of logging the count of weather forecast items to the console window of the browser:
- Open the
_Imports.razorfile and add ausingstatement to theServicesnamespaces:@using BooksStore.Services
We add references to the Services namespace in the imports because those services will mostly be used across many components, so we don’t have to add that using statement in every component.
Open the FetchData component in the Pages folder and inject ILoggingService by using the @inject Razor directive in the component:
@page "/fetchdata"...
@inject ILoggingService LoggingService
<PageTitle>Weather forecast</PageTitle>
<h1>Weather forecast</h1>
....
- Our service is ready to be used and we can call the
Logfunction from the object instance in the C# code to log the count of the items as follows:.... </tbody> </table>}@code { private WeatherForecast[]? forecasts; protected override async Task OnInitializedAsync() { forecasts = await Http.GetFromJsonAsync<WeatherForecast[]> ("sample-data/weather.json"); LoggingService.Log($"Number of items retrieved is {forecasts.Count()}"); } …
If you run the project and navigate to the Fetch data page after the data is retrieved, you can open the console window in your browser and you should see the message Number of items retrieved is 5.
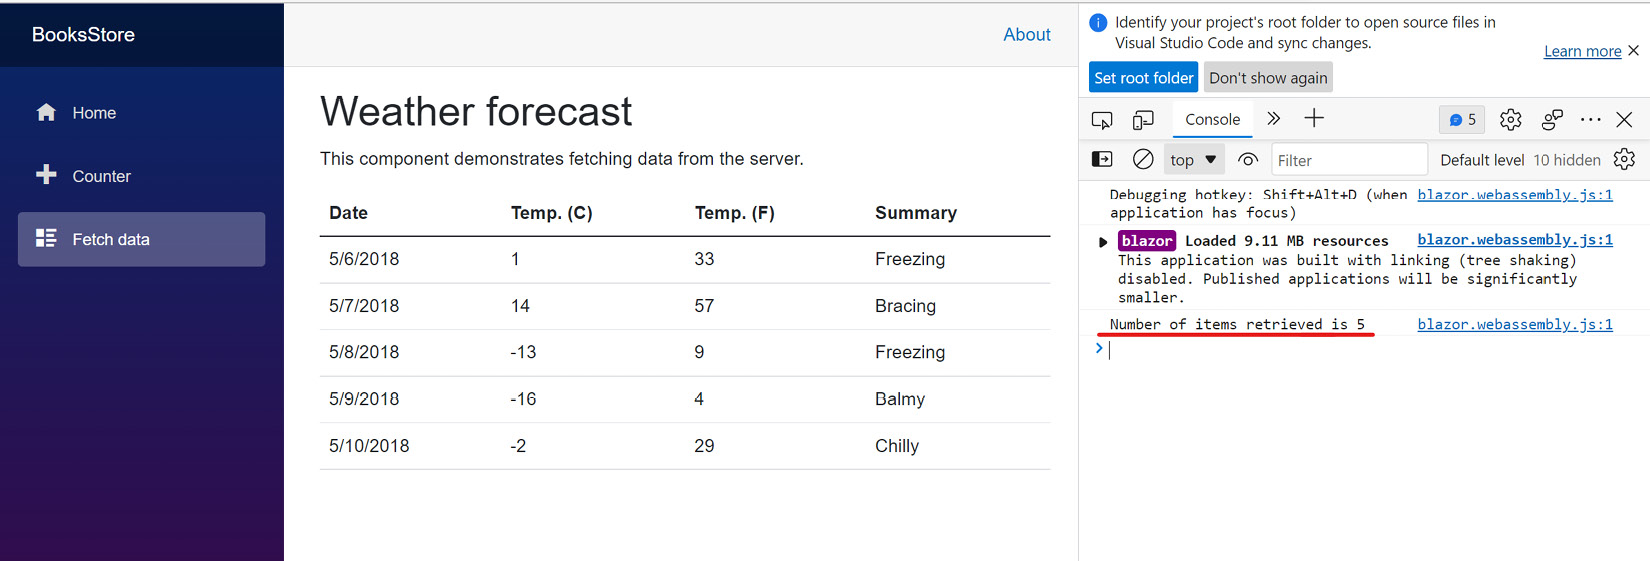
Figure 1.9 – A screenshot of the console window with the printed sentence
Tip
To learn more about the DI concept in Blazor, you can check the following link: https://learn.microsoft.com/en-us/aspnet/core/blazor/fundamentals/dependency-injection?view=aspnetcore-7.0.
Now we have implemented a full cycle, from creating the service abstract layer to its implementation, registering the service in the DI container, and finally injecting and consuming that service from a separate component.
Learning about DI and how it works will help you understand many aspects of the application, such as writing maintainable, decoupled services. Also, you will be able to consume built-in services such as the HttpClient to make API calls and the IConfiguration service, which we are going to use in the next section to read and consume the application configurations.
Creating, storing, and retrieving the app configurations
Configurations are a set of settings that your application uses throughout its lifetime. App configurations help you avoid hard-coding some values within your app that could change from time to time. Also, the process is very important when dealing with multiple environments. For example, you can store the URL of the API that your app is communicating with. While on the dev machine, the URL is the localhost, in the production environment it refers to the online hosted API (more about environments will be covered in the next section).
Blazor WebAssembly already supports configuration out of the box from JSON files that could be created in the wwwroot folder. The file must be called appsettings.json and to have a configuration file for each environment, you can specify further, for example, appsettings.{ENVIRONMENT}.json or appsettings.Development.json.
Important note
You can add additional sources for configuration but appsettings files are enough as the Blazor WebAssembly app is running fully on the client side. Connecting the app, for example, to the Azure Key Vault service means the connection string will live on the client and be under threat of being exposed easily.
So, for general configurations, appsettings is a great choice. Other kinds of secrets are highly recommended to be stored server-side and we should architect our app in a way that the client doesn’t need to fetch or use them.
We will create a configuration file and store some settings such as the URL of the API that we will use. Then, we will print that value with the Index component. Let’s get started:
- Right-click on the
wwwrootfolder and add a new item of type JSON file and call itappsettings.json. - Add a property called
"ApiUrl"and give it a value of"http://localhost:44332/"as follows:{ "ApiUrl": "http://localhost:44332"}
After saving the file, you can access this setting value directly using the IConfiguration service by injecting it into any component or service and referring to the index of your property name.
In the following example, we will inject the IConfiguration service in the Index component and print the value of the ApiUrl property:
- Open the
Index.razorfile within thePagesfolder and inject theIConfigurationservice as shown:@page "/"@inject IConfiguration Configuration<PageTitle>Index</PageTitle>...
- After the service is injected, you are ready to access the required value by using the indexer of the
Configurationinstance. We are going to add a<p>tag and display the following: Api Url: {API_URL_VALUE_IN_SETTINGS}:...<h1>Hello, world!</h1>Welcome to your new app.<p>Api Url: @Configuration["ApiUrl"]</p>...
After running the application, you should see the following result in your browser window:
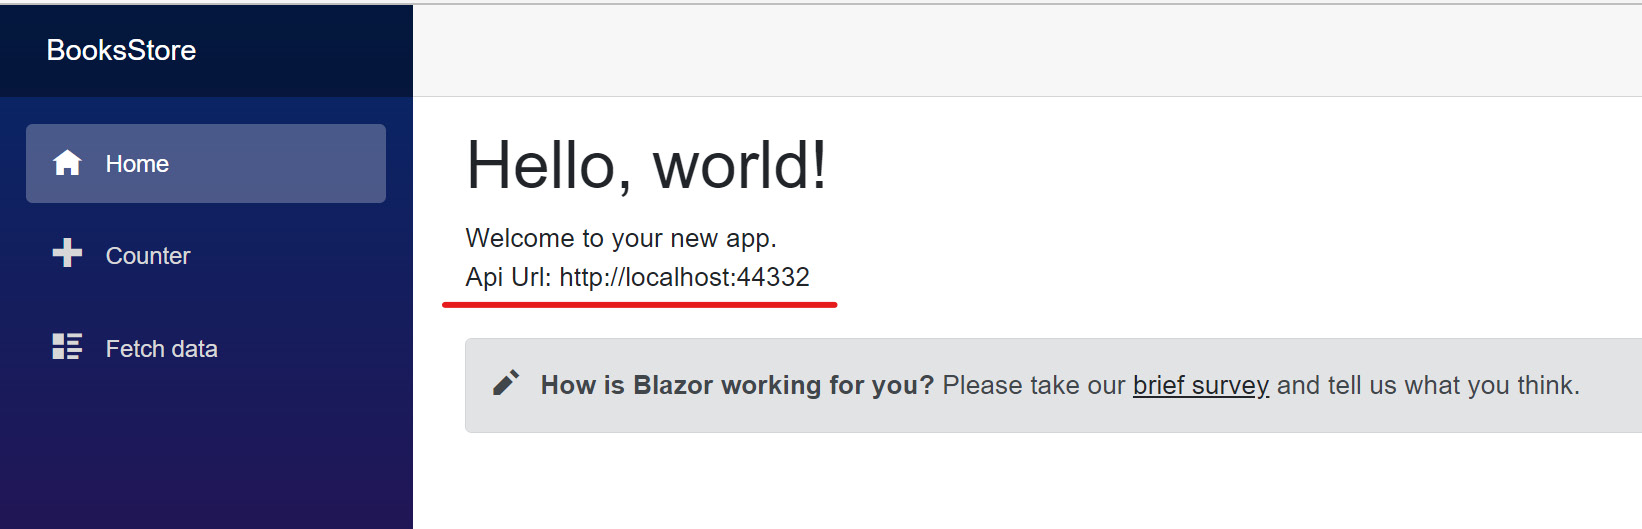
Figure 1.10 – The value of the configuration ApiUrl from appsettings.json
Configurations are important to you in your learning journey, and while developing our real-world application we are going to use them from time to time. After the example we have given, you should have a clear understanding of how to add configurations and how to retrieve their values in the runtime of the app.
In the next section, we will be introducing new environments to our application, and we will add a new configuration file that we will use only while running the app locally on the dev machine using the dotnet run command or by debugging the app from within VS 22.
Managing application environments
Software development goes through various stages. In the beginning, we may start with pure development and testing, but after we start rolling out our application to production, many challenges will appear. One of these challenges is having different environments for your app run to on.
For example, imagine your application is communicating with an API and this API is developed by another developer or team. The application is hosted on Azure App Service with two deployment slots (Dev/Production). During development, you are going to use the URL of the dev API, which won’t make changes to the production database, and after committing your changes, in the production environment, you need to use the URL of the Production slot.
In this scenario, it will be tough to change the API URL before you push to production and then retrieve it after finishing. Thus, many mistakes may be made, which will make the development process frustrating. This is where managing environments comes into play, where you can write code, render a specific UI, or retrieve special configurations based on the environment that your app is running in without making too many mistakes that delay development and production.
By default, when you run the Blazor app through the debugger, it runs within the development environment, and after publishing it, it runs within the production one.
In this section, we will see how we can set up and retrieve the current environment of the application and retrieve the configuration based on that.
Creating a configuration file based on the environment
To create a configuration file that will be used only in the development phase, you can create another appsettings.json file but with the name of the environment before the extension, such as appsettings.Development.json. To implement this, take the following steps:
- Right-click on the
wwwrootfolder and click on Add | New Item. Choose a JSON file and give it the nameappsettings.Development.json. - Add the same
"ApiUrl"property that exists inappsettings.jsonand the value"Development"as follows:{ "ApiUrl": "Development"}
When you run the application, you will notice that the value of Development will show up on the screen instead of http://localhost:44332. You should follow the practice of separating the settings based on the environment from the very beginning, so it makes the development process smoother and easier.
Reading the environment within the components
In your development process and where there are many environments for your app (development, preview, and production, for example), you need a specific piece of UI or certain logic to make the app behave differently in different environments. A major implementation to achieve this kind of responsiveness is showing a specific feature in preview but hiding it in production.
To achieve the mentioned behavior, you need to fetch the value of the current environment in your code and use an if condition to determine how the UI or logic behaves within that environment.
In the following example, we are going to use IWebAssemblyHostEnvironment by injecting it within the Index component and remove the SurveyPrompt component if the app is running on the development environment:
- Open the
Indexcomponent within thePagesfolder and inject theIWebAssemblyHostEnvironmentservice within the component, but of course, you need to reference the namespace that contains the service, which isMicrosoft.AspNetCore.Components.WebAssembly.Hosting, as shown in the following snippet:@page "/"@using Microsoft.AspNetCore.Components.WebAssembly.Hosting...@inject IWebAssemblyHostEnvironment Host<PageTitle>Index</PageTitle>...
- The next step is to use the
IsDevelopmentmethod, which returns a bool if the current environment is equal toDevelopment:...<p>Api Url: @Configuration["ApiUrl"]</p>@if (!Host.IsDevelopment()){ <SurveyPrompt Title="How is Blazor working for you?" />}
After running the application on your machine in debugging mode, the SuveryPrompt component will be shown in the production environment. This example demonstrates the responsiveness of environment features, which is very useful.
Tip
IWebAssemblyHostEnvironment contains multiple methods like IsDevelopment(). It also contains IsStaging() and IsProduction(). You can also customize the name by using IsEnvionment("CUSTOM_ENVIORNEMNT_NAME").
One of the topics to be covered is setting the current environment explicitly. We are going to cover this in Chapter 14, Publishing Blazor WebAssembly Apps, after publishing the project, but you can go deeper by reading and discovering more about environments at https://learn.microsoft.com/en-us/aspnet/core/blazor/fundamentals/environments?view=aspnetcore-7.0.
Summary
Over the course of this chapter, we have learned the fundamentals of each Blazor WebAssembly application, from setting up the development tools to creating the first application using the .NET CLI and Visual Studio 2022. We also discovered the anatomy and the structure of the application by defining the purpose of each file and why it’s there. We looked at DI, created our first service, injected it within a component, and explored the reasons why it’s important in modern software development.
Configurations are an essential part of each application. To avoid hard-coded values within your code, you need to keep the environment that your application is running on in consideration. This extra care can make your development experience easier, especially after publishing an application to production while other features are still under development. Managing the environments and configurations helps with overcoming inconsistencies in development and managing the part under development.
In the next chapter, you will start the real action with Blazor by exploring and developing the basics of app components, which are the main building blocks of a Blazor app.
Further reading
- Application structure: https://learn.microsoft.com/en-us/aspnet/core/blazor/project-structure?view=aspnetcore-7.0
- Dependency injection: https://learn.microsoft.com/en-us/aspnet/core/blazor/fundamentals/dependency-injection?view=aspnetcore-7.0
- Configuration in Blazor: https://learn.microsoft.com/en-us/aspnet/core/blazor/fundamentals/configuration?view=aspnetcore-7.0
- Application environments in Blazor WebAssembly: https://learn.microsoft.com/en-us/aspnet/core/blazor/fundamentals/environments?view=aspnetcore-7.0