


Welcome to the power and wonder of the world of KnockoutJS. In this chapter, we will start down the road to win with AJAX HTML applications AJAX HTML applications. This chapter will focus on:
Installing KnockoutJS
Understanding what MVVM means
Binding elements with the Knockout library
Accelerating and simplifying coding using developer tools in modern browsers
Creating functions for consumption with Knockout
Automating the computing of values directly with Knockout
Working with functions outside of Knockout
First, make sure you have a working website set up on a server. It can be as simple as plain old HTML if you only want to learn those features or any of the productive web platforms out there (ASP.NET, ColdFusion/Railo, NodeJS, PHP, Python, Ruby, and so on); just make sure the service is running before installing Knockout. However, there is one exception. If you are using Knockout for an HTML application like PhoneGap or something along those lines, then you do not need a web server for internal functionality.
There are a number of ways to install Knockout. You need to choose the one that works right for you. The book files have been packaged into a ZIP file at http://knockout.developers.zone/books/knockout-js-web-development/. Click on the link to download the current stable release of the product. We will keep it up to date with fixes if any are needed. We will also be creating a video on that page to show how to get things installed at least on Mac and Windows.
If you download the page directly from the Knockout site at http://knockoutjs.com, copy the text and paste it into a JS file within the folders for your website.
Now, there are others who may be using fancier tools in the future. There are several package installers that pull the files needed. If you are using one of those for this book then check that the version of KnockoutJS is 3.2 or later. I would suggest not using those at this time unless you are already familiar with them. They are worth getting to know but not needed to get running with Knockout.
My examples include the Bootstrap library as I wanted to improve the presentation and give a distinct personality on the pages of this book, which is another way of saying it made creating this resource for you more fun for me.
I have links to all the examples and exercises in this book linked from the root of the web folder. I would suggest learning to use Knockout there, and using this knowledge if you are moving to web-based app development.
With the files loaded, you should be able to click through a couple of the examples. One of my goals was to set the course up so you could use this as a quick reference document after completing the course when you need to look up how to do different things with Knockout.
Your work pages should go in the appropriate folder matching the chapter numbers of this book. I have created complete working examples in the done folder and yours should go into the do folder under the matching chapter number.
MVVM is a design approach to building software. The name is a little confusing, and it makes you wonder if they were trying to be clear or if they just liked the symmetry that the letters created. The design pattern was used extensively in Microsoft and Apple development products.
MVVM stands for Model View ViewModel.
Let's start with the View. It is where the HTML is converted to Document Object Model (DOM).
The View interacts with an object called a ViewModel. The ViewModel is where the presentation logic is stored. The Model is the part that stores the data and business logic. This is commonly passed to the browser as a JSON object.
Let's clear up a confusing point right now. When charted out, most people draw out the relationship as View-ViewModel-Model, which would be VVMM. Don't get caught up in the semantics; just take a look at the following diagram to understand what they mean by MVVM:

Your data gets stored in the Model, but you do not interact with the data directly. You use the ViewModel to interact with the data. You should also note that you don't need to be an expert with the MVVM pattern, as the concepts in practice are very simple. The evidence of this is the simplicity of binding elements to the ViewModel.
There are two basic ways to bind your View elements to the ViewModel. You can either bind it through the element data-bind attribute or by using friendly code in JavaScript. Let's begin by creating a page in the \ko\ko-1\do\ folder using the name binding.htm. The following is the basic standard code for your do pages throughout the book:
<!DOCTYPE html>
<html lang="en">
<head>
</head>
<body>
<script src="/share/js/knockout.js"></script>
<script type="text/javascript">
var viewModel = {
}
ko.applyBindings(viewModel);
</script>
</body>
</html>
Tip
Downloading the example code
You can download the example code files from your account at http://www.packtpub.com for all the Packt Publishing books you have purchased. If you purchased this book elsewhere, you can visit http://www.packtpub.com/support and register to have the files e-mailed directly to you.
The first part of using Knockout is to include the library JS file. Then we need to create the ViewModel. At this time, the ViewModel is similar to a class file as it does not do anything until we bind it using Knockout's applyBindings method. The name of the Model does not matter to Knockout as long, of course, as it does not conflict with JS or some other currently running library.
To bind the text to the ViewModel, use the following steps:
Add the following code to the ViewModel:
var viewModel = {
  myVariable: ko.observable()}
We will use the
data-bindattribute to tell Knockout how to bind our data through the ViewModel. We bind the text attribute of this DOM element to the ViewModel variablemyVariable. After thebodytag, add this code:My first KnockoutJS uses text binding: <span data-bind="text: myVariable"></span> <hr>
We are now ready to run the code. When you look at the code in the browser nothing appears to happen. That is because there is no value assigned to the ViewModel variable, so nothing gets injected into the View. It gives us the following text in the browser window:

Let's add one more line below the line where we bind the ViewModel in our script:
ko.applyBindings(viewModel);
viewModel.myVariable("Awesome simple!");
The code gives us a value to be assigned, and when we run the page it shows the data bound to the DOM element. The following text is the output in the browser window:

Here, we see that the text attribute of the HTML DOM element updated when the variable was updated. There was no need to directly update the HTML DOM element as the ViewModel feature of Knockout automates this feature. In large and complex data sets, Knockout has been tested as the fastest data bound library. Of course, this consideration might change over time.
To bind HTML to the ViewModel use the following steps:
Add the HTML code to the ViewModel:
var viewModel = {
  myVariable: ko.observable(),
  myHTML: ko.observable()
}
Set the value of the
myHTMLvariable after the binding of the ViewModel:viewModel.myVariable("Awesome simple!"); viewModel.myHTML("<strong>Awesome</strong> simple!");Now, we need to bind the HTML attribute of the DOM element. As you can see, the syntax is very similar to the text binding we used in the last binding:
My second KO uses HTML binding: <div data-bind="html: myHTML"></div> <hr>
If we pass HTML through to the text element, it does not display correctly, and that is why DOM has a particular HTML attribute for appropriate tags. When we use the text approach, Knockout escapes the results and using HTML, places the results the way it would look in an editor. The HTML attribute does not exist every time the text attribute exists, but it is pretty safe to assume that the text does exist any time we find the HTML at this point. When we render again, Knockout renders the text as shown here:

To bind CSS to the ViewModel go through the following steps:
Add the myLeft and myRight variables to the ViewModel:
var viewModel = { myVariable: ko.observable() ,myHTML: ko.observable() ,myLeft: ko.observable() ,myRight: ko.observable() }Set the values of the
myLeftandmyRightvariables after the binding of the ViewModel:viewModel.myVariable("Awesome simple!"); viewModel.myHTML("<strong>Awesome</strong> simple!"); viewModel.myLeft("pullLeft"); viewModel.myRight("pushRight");Use the CSS attribute to the
data-bindsetting to manage CSS dynamically through the ViewModel. This could be changed at any time, and the elements would reflect the CSS settings based on how, of course, the individual browser responds to those CSS settings.<div data-bind="css: myLeft">LEFT </div> <div data-bind="css: myRight"> RIGHT</div> My third KO uses CSS binding: <hr>
When we render again, Knockout renders the text as shown here:

The following steps will explain how to bind numbers to the ViewModel:
Add the following code to the ViewModel:
var viewModel = { myVariable: ko.observable() ,myHTML: ko.observable() ,myLeft: ko.observable() ,myRight: ko.observable() ,myBalance: ko.observable() }Set the value of the
myBalancevariable after the binding of the ViewModel:viewModel.myVariable("Awesome simple!"); viewModel.myHTML("<strong>Awesome</strong> simple!"); viewModel.myLeft("pullLeft"); viewModel.myRight("pushRight"); viewModel.myBalance(-47.23);
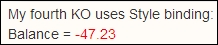
Here, we explore our first data-bind where we are binding to more than one setting at the same time via the HTML markup. Notice that we also wrapped the element with an additional outer element to allow us to set the color for the balance based on whether it is negative or not. When we are doing this, we can insert a bit of JavaScript into the setting. When using JavaScript, we refer to myBalance as a function and not as a variable because that is how we interact with it in JavaScript. Take a look at the following code:
My fourth KO uses Style binding:<br>
Balance = <span data-bind="style: { color: myBalance() < 0 ? 'red' : 'black' }"><span data-bind="text:myBalance"></span></span>
<hr>When we render again, Knockout renders the text as shown here:
To manage visibility of the elements in the ViewModel, use the following steps:
Add the following code to the ViewModel:
var viewModel = { myVariable: ko.observable() ,myHTML: ko.observable() ,myLeft: ko.observable() ,myRight: ko.observable() ,myBalance: ko.observable() ,isVisible: ko.observable() }Set the value of the
isVisiblevariable after the binding of the ViewModel:viewModel.myVariable("Awesome simple!"); viewModel.myHTML("<strong>Awesome</strong> simple!"); viewModel.myLeft("pullLeft"); viewModel.myRight("pushRight"); viewModel.myBalance(-47.23); viewModel.isVisible(true);Scripting can be a very powerful technique to use as your skills with Knockout advance. It can add a sense of automation and value to the user experience. Insert the following code after the
bodytag:My fifth KO uses visible binding: <div data-bind="visible: isVisible">Warning, the visible property is set to true.</div> <hr>
When we render again, Knockout renders the text as shown here. Try, of course, changing the value to false and run it again to see that it is working correctly for you.

The ViewModel does not need to be updated this time as the technique we are discussing is managed from the HTML DOM element side. We need to set the value of the data-bind variable for both color and text as follows:
viewModel.myVariable("Awesome simple!");
viewModel.myHTML("<strong>Awesome</strong> simple!");
Here, we explore our first data-bind where we are binding to more than one setting at the same time via the HTML markup. Using the bracketed form, we nest a slight amount of JavaScript right into the markup. Again, keep in mind that when you are using the JavaScript functionality you have to deal with the ViewModel attribute as a function and not as a variable. It is good to watch out for this as it is a common thing for new Knockout developers to overlook. Here is the code to add after the body tag:
My sixth KO uses multi-binding:
Balance = <span data-bind="style: { color: myBalance() < 0 ? 'red' : 'black' },text:myBalance"></span>When we render again, Knockout renders the text shown here:

Try changing the number and running it to get the number to show both black and red depending, of course, on having the right number setting in the code. You could even change the logic if you choose to.
I suggest using the tools in Google Chrome for this book. The first tool that did a real good job was the Firefox tool called Firebug. Firebug is still a great tool, and the built-in developer tools in Firebug have made tremendous advances. You should also enjoy using the tools in Safari if you are a Mac user. If you are a die-hard fan of Internet Explorer, they have done a good job with the developer tools there as well. My point is, it is better to use developer tools everywhere, so don't make excuses to not use the developer tools in whatever browser you are using.
Note
If you happen to be working on or wanting to learn to build Chrome extensions and apps then here's how to enable developer mode. In the Chrome browser, click on the menu button next to the address bar. It is an icon with three lines stacked on top of each other. Under the selections on the side, click on Extensions, and you will see a checkbox at the top-right for Developer mode. Search on Google for more details as this is just a tip to whet your appetite.
When in Chrome, all you need to do to load the developer tools is press F12 on a PC, and on a Mac use Command + Alt + I. You can also find them by looking under the Chrome menu. This button can be found on the right of the address bar as three stacked lines. Under More tools you will see the option for developer tools.
You can see it there for Windows, Mac, and even for the browser on the Chrome OS. When you click on it, the following window appears at the bottom of the browser:
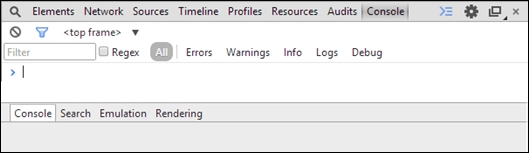
We will not get into all the features of this tool because that would demand an entire book. We are just going to focus on a few key features, making it easier to debug your code while learning Knockout. You may want to undock the tools from the bottom of the browser. To do so, click on the pair of stacked boxes right next to the close (x) button at the upper right. This makes the tools appear in a separate window.
The console is the main thing we are interested in at the moment, so if you do not have it selected, click on it in the top bar of the developer tools. This gives you a prompt that looks very similar to a command-line prompt. When you start typing text, if there are variables or structures active in the browser DOM, it will bring it up with code hinting.
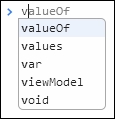
Select viewModel and then press the period. Notice that in the hinting there are all the model properties you created, listed with a few other variable settings. Select viewModel.myHtml and hit Enter. What you see is a function. To get the results you need to add parentheses to the end of the variable—for example, viewModel.myHtml()—and try again. You could retype it all, but you can also use the up and down arrows to cycle through recent command prompt entries if desired. This returns the value currently held in the ViewModel variable setting.
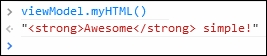
Now we take it to the next level and use the same variable to change the value right from the command prompt. What we need to do is to watch the screen closely as we press the Enter key because we can see the power of having the data bound to the View through the ViewModel. Enter the following in the command prompt:
viewModel.myHTML("Knockout is <strong>Awesome</strong>!")What you should see is the HTML of the second binding we entered updated automatically. That is a much easier way to work with the View than traditional JavaScript. For those who are wondering, it is also very compatible with jQuery. It can be used with all kinds of libraries though you should be careful to check them before considering them a match to make sure it is a good pair.
Note
You should also note that while we have been naming our ViewModel viewModel, it could be named any valid variable name. We are doing this just to help drive in the concept that this is our variable for the ViewModel.
Now let's use the balance in the calculation from the command console. Let's try entering the following:
viewModel.myBalance()*2
When we do, we should get -94.46 as the result, or another number if you entered in something different.
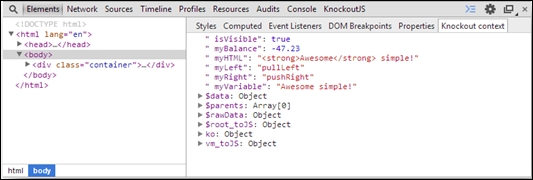
This is what the Knockout context shows when you are in the Elements view:
The add-in is available at the Chrome Web Store. It is a great store, and lots of the items worth getting are free. One of these items is the KnockoutJS context debugger which is released under an MIT license. The source code of this tool is on GitHub, which is very useful if you get large nested ViewModels. It has several features and provides great benefits when learning Knockout and building sites with it. To download this add-in use the following steps:
Type
knockoutin the search box.Under Extensions you should see Knockoutjs context debugger by timstuyckens.
Another thing that would help when working with Knockout or any data-binding library is the ability to trace what is going on. But this tool expands our reach beyond that ability. Select KnockoutJS from the top of the developer tools and you will see a button that says Enable Tracing. Click on it and go to the Console tab. Now enter the following code, and you will see all the changes to your DOM being dumped in the console window:
for(i=0;i<10;i++){viewModel.myBalance(1.1*i);}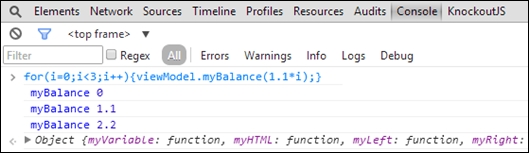
While this may be a big gain for those who have never fired up the developer tools in a browser, let's look at a few things that could make working with the tools even better. One of those things is shortcuts. Right beside the button to open the tools in their own window or put them back in the footer section of the browser window, there is a Settings button. Click on it and you will see three side menu items. The last one is Shortcuts. Skim through this and it will help all shortcut lovers to do things even faster. You can also find a full list of the shortcuts at https://developer.chrome.com/devtools/docs/shortcuts, which you could print out or perhaps just bookmark the page.
In the browser window where we have the "LEFT" content wrapped in our div tag, right-click on it and select Inspect Element. (On a Mac, you can use double fingers to do the right-click.) This selects the element, and you will be able to see any data-bind attribute settings that might exist for that element as well as any other DOM features.
You can even play around with the DOM and double-click inside the elements panel to edit the DOM live. Live editing is one of my favorite features. What you need to understand is that the View binds to the ViewModel when you instantiate it via a script. You cannot change that by editing the DOM code in that panel. You can also edit the CSS and JavaScript on the page for testing and debugging in amazing ways and this, in my opinion, is a must-learn developer skill.
It is an indispensable tool for me, when working with AJAX, to see what goes out and back using the Network Tab. You can see there is an XHR item in the listing, which allows you to view individual requests that arise while working on a page.
We at SOSensible, my company, have built all kinds of web applications. One kind of web application allows the user to go offline with a web app. We needed to store the data in a browser-based database store and this tool let us inspect all those resources under the Resources tab.
In the bottom section of the developer tools, there is a section called drawer. If it is not showing, the menu buttons at the top-right have a button to hide or show the drawer. Once it is visible, you have a menu item for Emulation. This lets you refresh the screen to show a close emulation of what the view would be like on a particular device size and rotation.
There are a couple of items on the sidebar that also help with other features. There is a setting called Device to pick the device to emulate. There is a setting named Screen to manage the rotation and many other features you may want to customize. There is also User Agent to spoof the server into thinking it is a different device. Lastly, there is Sensors that allows you to set geolocation and accelerometer values.
The applyBindings method in the previously explained bindings section uses a common structure. We included that example in case you cross code written in that style. It will help you understand it if you see it someone else's code that is using that approach. Another style of coding is to declare the Model with a function declaration. The DOM markup or View code does not change for either scenario. Let's convert our binding example to a functional declaration. Copy the binding.htm file and create a new file called functions.htm in the same folder. Here is the original declaration:
var viewModel = {
  myVariable: ko.observable()
  ,myHTML: ko.observable()
  ,myLeft: ko.observable()
  ,myRight: ko.observable()
  ,myBalance: ko.observable()
  ,isVisible: ko.observable()
};Note that we could have set the values of the observables immediately along with the declaration. If we had done that it would have looked like this:
var viewModel = {
  myVariable: ko.observable("Awesome simple!")
  ,myHTML: ko.observable("<strong>Awesome</strong> simple!")
  ,myLeft: ko.observable("pullLeft")
  ,myRight: ko.observable("pushRight")
  ,myBalance: ko.observable(-47.23)
  ,isVisible: ko.observable(true)
};
We are doing this to tighten our code for the sake of the book. You should use good logic when choosing which way to do this in your code. There are times where using this style of coding is important, but often it is just a matter of the coder's style. Beware of letting your style keep you from considering which one is best as you write the code.
Now we will look at moving the code over to a functional declaration. We start, of course, with a different kind of declaration because it is a function as appears here:
function viewModel() {
// add declarations here}
It would be equally valid to declare the ViewModel as follows. There is no significant difference:
viewModel = function() {
// add declarations here}
Now, we will look at adding our ViewModel items back in. In the structured approach we just described, the items were entered as collection items with the classic comma separator. In this model, each item is a parameter and is terminated by a semi-colon:
viewModel = function() {
this.myVariable = ko.observable("Awesome simple!");
this.myHTML = ko.observable("<strong>Awesome</strong> simple!");
this.myLeft = ko.observable("pullLeft");
this.myRight = ko.observable("pushRight");
this.myBalance = ko.observable(-47.23);
this.isVisible = ko.observable(true);}
Note that we declared each of these items with the this scope declaration, which refers to the ViewModel object. When programming in JavaScript, it is common practice to alias this to avoid scope confusion. We will rewrite the previous code one more time using self rather than this as the base scope:
viewModel = function() {
  var self = this;
self.myVariable = ko.observable("Awesome simple!");
self.myHTML = ko.observable("<strong>Awesome</strong> simple!");
self.myLeft = ko.observable("pullLeft");
self.myRight = ko.observable("pushRight");
self.myBalance = ko.observable(-47.23);
self.isVisible = ko.observable(true);}
Tip
Note that we set the self variable using a var declaration. This prevents issues of external naming conflicts.
Now, if we run the page for functions.htm from our browser, it should run identical to our binding.htm file. Yet, there is a difference. This will help you understand why we introduced the developer tools where we did in the course. Open the tools and in the command prompt, enter viewModel.isHTML() to see what you get as a result:

In the previous screenshot we obtained the what you might think is an unexpected result as the View is obviously bound to the ViewModel. The issue here is an issue of the concept of closure. You are welcome to explore more about closure if you wish but just realize it means parts of an object or the item contents are there but hidden. When this type of declaration is made in this style, you cannot interact with it from JavaScript. The declaration should have been made with new to create an object from the function as follows:
ko.applyBindings(new viewModel());
If you run the browser and try to connect to the ViewModel now, you will see that it is still having the same issue with closure. We found this is the best way to work around it at my company:
vm = new viewModel();
ko.applyBindings(viewModel);
Now, we will reference the Model using vm rather than viewModel and this is the result we will get:

We see that by declaring the object outside the argument passed to our Knockout applyBindings method, we avoided the closure issue. This is not an issue when using the structured style of ViewModel declaration. Hopefully, this saves you from hours of wondering what is wrong with your code or if Knockout is broken. We will not answer how much time I burned on this the first time it occurred, but it was long after I started using Knockout. It says that even experts can make rookie mistakes. I humbled myself and asked the community for help, and the answer came pretty fast.
In this section, we will take functions to a deeper level.
In the code bundle of chapter 1 do folder (/ko_1/do/), copy the base.htm file as computed.htm for this segment. After the leading body tag, put in the following View code:
<table>
    <tr>
        <th style="width:20%;">
            Item
        </th>
        <th style="width:40%;">
            Qty
        </th>
        <th>
            Price
        </th>
        <th>
            Tally
        </th>
    </tr>
    <tr>
        <td style="width:20%;">
            <em data-bind="text:item_1">Item</em>
        </td>
        <td style="width:40%;">
            <input type="text" data-bind="value:qty_1" />
        </td>
        <td>
            <span data-bind="text:price_1"></span>
        </td>
        <td>
            <span data-bind="text:tally_1"></span>
        </td>
    </tr>
</table>
Now we are ready to create the scripted side of the Knockout ViewModel code. Place this code inside the script tag after the KnockoutJS library is included:
calcModel = function(){
    var self = this;
    self.item_1 = ko.observable('Cell Phone');
    self.qty_1 =  ko.observable(0);
    self.price_1 = ko.observable(149.95);
    self.tally_1 = ko.computed(function(){
        var rslt = (+self.qty_1() * self.price_1()).toFixed(2);
        return rslt;
    },self);
}
vm = new calcModel();
ko.applyBindings(vm);
Notice that the computed function is now doing live calculations. We also added a fixed decimal position of two places. Enter a quantity to test:

Create a second row of the table and the ViewModel that matches the features of the first row. I want you to create this on your own to make sure you are getting the skills as you go along here. You could, of course, peek at the example in the done folder, but you should try it on your own first.
Now add this row to the bottom of the table to create a row for the subtotal. You can also see we created a cell in the table to tally the number of items in qty_1 and qty_2:
<tr>
<td style="width:20%;">
</td>
<td style="width:40%;">
<span data-bind="text:t_qty"></span>
</td>
<td>
<em>subTotal</em>
</td>
<td>
<span data-bind="text:subTotal"></span>
</td>
</tr>You also need to put the script code into the correct locations:
self.item_2 = ko.observable('Cell Case');
self.qty_2 = ko.observable(0);
self.price_2 = ko.observable(19.45);
self.tally_2 = ko.computed(function(){
var rslt = (+self.qty_2() * self.price_2()).toFixed(2);
return rslt;
},self);
self.t_qty = ko.computed(function(){
return +(self.qty_1()) + +(self.qty_2());
},self);
self.subTotal = ko.computed(function(){
var rslt = (+(self.tally_1()) + +(self.tally_2())).toFixed(2);
return rslt;
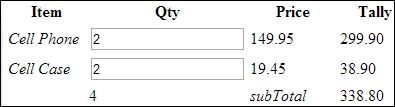
});You may have noticed that we placed an extra + before some of the variables. This is a standard JavaScript approach to making sure the number entered into the input box comes out as a number. In some browsers and some conditions the number is the string representation of the number. The addition of + solves this issue.
Now run the page and enter the quantity to ensure that all of your calculations are working:
What fun would buying things be without paying taxes? Well, either way it is a function we all need to get right. Add the following code to the table to have a row for taxes:
<tr>
<td style="width:20%;">
</td>
<td style="width:40%;">
( rate in decimal <input data-bind="value: taxRate;" /> )
</td>
<td>
<em>Tax</em>
</td>
<td>
<span data-bind="text:taxed"></span>
</td>
</tr>Now add the code here to the script section of the page to make our ViewModel run smartly. Our goal is not to write the most efficient code in all of the world but rather to expose you to learning to think the Knockout way:
    self.tax = ko.observable(.05);
    self.taxed = ko.computed(function(){
        return +(self.subTotal()*self.tax()).toFixed(2);
    });
    self.taxRate = ko.computed({
        read: function(){
            return self.tax()*100 + '%';
        },
        write: function(value){
            value = parseFloat(value.replace(/[^\.\d]/g, ""));
            self.tax(+value/100);
        }
    });
If we were coding the page with standard JavaScript or even with jQuery to get the amount of functionality we have achieved, it would take many multiples of the code we have on the page here. This approach is far more elegant and much smaller.
Notice how our taxRate is done just a little differently. Calculation functions in Knockout can read and write. You can also call other external resources because it is standard script code. Note that in our scripted code we have to place the values in parentheses to do the assignments as we did to the tax value.
You should also notice that we are converting the value in and out of decimal format and adding a percentage to the displayed value of the taxes in the input box. It also smartly strips the percent mark off if you enter it when updating the tax rate.
Tip
Regular expressions like the one used in our write method are a way to supercharge your apps. Make it a point to learn at least basic regular expressions. If you do not know how to do the advanced stuff, you can often find what you need either in a Google search, or some "happy guru" will volunteer to assist you with a winning answer in some online forum.
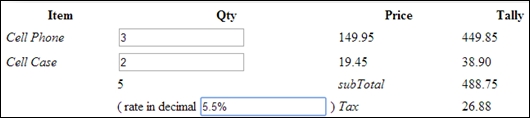
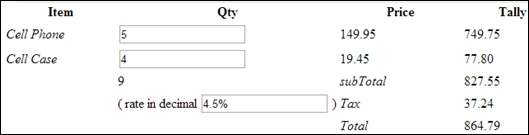
Refresh the page with the updates, and you will see that even the actual tax amount has been calculated in the Tally column:
Here we have the final segment of the View code for our calculation example:
<tr>
<td style="width:20%;">
</td>
<td style="width:40%;">
</td>
<td>
<em>Total</em>
</td>
<td>
<span data-bind="text:total"></span>
</td>
</tr>The last piece of script code should be added to the ViewModel. There is nothing fancy about this section of code other than its ability to complete our functionality. We add in the value of the taxed item here, and again, we wrap the numbers with a parentheses and use the toFixed function to set the answer to two decimal places.
    self.total = ko.computed(function(){
        var rslt = (+self.subTotal() + self.taxed()).toFixed(2);
        return rslt;
    });
Now we can run the code and play with the entry boxes to see that everything is working as expected. For new developers, it may not surprise you to see how little code it takes to make a page like this work. It used to take so much code that hardly anyone anywhere would take the time to attempt building tools like this. It was compounded because things worked differently from one browser to the next. While this is still true, libraries like Knockout remove many of those pains and let us concentrate on the results instead of the platforms.
Running the code now should give us results similar to this screen capture:
Now, we will add an external function to show an alternate way to format values in the View. You are going to make one more pass at modifying the computed.htm example we just worked on. First at the top of the script, add a function with the following code:
dollarFormat = function(value){
    return "$ "+value;
}
Now go into the View and change the final total as follows. Test it to make sure you got it right and then change all of them if you desire:
<span data-bind="text:dollarFormat(total())"></span>
This is what the page looks like with the last item formatted as a dollar amount:

We could have added an external function that is used inside a calculation to show its use inside the ViewModel. You are still left with some work to do as you will have to choose the best place to put things like that. Perhaps, in a couple of versions, these tools will just magically do it all for us. Well, even if they did, there will be new needs and we will still have a good opportunity to solve issues through code for those we serve.
You now have a taste of the benefits of KnockoutJS. This is just the beginning of the power of KnockoutJS. The benefit of Knockout is that it solves problems that libraries like jQuery do not solve, and yet has the ability to work side by side if needed. Knockout provides both binding and functional intelligence that automate and simplify HTML and coding the same way jQuery simplifies JavaScript coding.
In the next chapter we will build on this knowledge by learning how to use conditional binding, observable arrays, simplifying nested items, and some keys on how to work with collections.
