


In this chapter, we are going to assume that your experience with KnockoutJS is very minimal; here, we will introduce how to get it and start using it. We will also learn the philosophy behind this great library and the pattern, Model-View-ViewModel (MVVM).
We will learn all this while building a simple, small e-commerce web application and we will see why everything is easier when you work thinking about models instead of document object model (DOM) nodes.
By the end of this chapter you'll know:
What KnockoutJS is
What are and how to use KnockoutJS observables, computed observables, and data binding
What benefits the MVVM design pattern gives you
The magic behind this library
How to apply MVVM using KnockoutJS
If you already know how to use KnockoutJS, you can take a quick read through this chapter.
KnockoutJS is a JavaScript library that helps build web applications easily.
It's not a framework, so it's wrong to try to compare it with other web development frameworks like Angular or Ember or Backbone; with KnockoutJS you don't find anything to help you with multiple-page applications, routing, or the interface your server should have.
If you are searching for a framework to build an Single Page Application (SPA), you could have a look at DurandalJS, which extends the capability of KnockoutJS with features (like routing) that you need to build an SPA.
KnockoutJS is, at its heart, a data-binding library for the web.
It means that it helps you to keep synchronized your web pages (written in HTML) with JavaScript objects. In this way, you can think about the models you want to show and how they interact with each other, instead of thinking about the structure of the page and how to get the information from there.
The website of this library is http://knockoutjs.com/.
You can download the KnockoutJS library from this link: http://knockoutjs.com/downloads/index.html.
In this book, we are going to use the latest version available at the time the book is being written, so here is the direct link to download it: http://knockoutjs.com/downloads/knockout-3.2.0.js.
The library we use is the minified version. You can find also a non-minified one, but use it only if you want to learn better how KnockoutJS works internally; as suggested on the download page, don't use it for normal application development, because it exposes additional unsupported private APIs.
Note
Before we move on, if you haven't done so yet, please try the live tutorial on using KnockoutJS, which you can find here: http://learn.knockoutjs.com/. You will learn the basic usage of KnockoutJS, and you'll find this book easier to understand.
You have a couple of friends who enjoy making and selling jewelry, and they want your help creating a website so that they can sell online.
We start by asking them what they really need to give us an idea to build a first prototype.
They want to show all products together, and provide a way to filter them based on the category (for example, necklaces, rings, and so on), or by name; sorting by price can be a nice addition (but we will decide later if we will implement this feature or not).
Each product should have also a section with the description, with one or more big images, the price, and a buy button.
They want also a contact page, and a page with the list of the items the customer wants to buy.
If it were possible, they would also like to sell directly from the website, getting the payment in their bank account.
From these requirements we can understand that we have to realize:
A starting page with the full list of products and one/many filter(s)
A detailed page for each product
A contact page
A cart
The name of this prototype will be SimpleShowCase.
I'm sure you have seen a lot of web applications with all the JavaScript code in the main HTML page. As a web developer, I suggest you avoid this kind of behavior.
Tip
A good practice when you develop any web application is to divide the visual code (HTML) from the scripting code; one reason is that HTML pages are hard to test, and if you fill them with inner code you will have a hard time fixing bugs caused by JavaScript.
There are different ways to organize your code, and in another chapter, we will look at how can you use the RequireJS library to modularize it; but just now, for this first simple application, we don't need the overhead that library introduces.
Here, we will put all the HTML pages in the root folder, the style sheet files in a folder named css, and all the JavaScript inside a js folder.
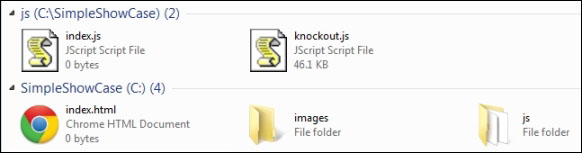
Let's start making a folder called SimpleShowCase, with these sub-folders:
jsimages
Then, in the SimpleShowCase folder, create the following files:
index.htmljs/index.js
You can save empty files just now, or, if you are using a Unix-like OS you can use the program, touch, in this way:
touch SimpleShowCase/index.html
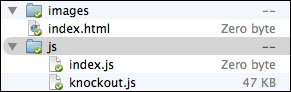
You must also put the downloaded library, knockout.js, as SimpleShowCase/js/knockout.js (download it now if you skipped this step before).
On Windows, you should have something like this:
If you have a Unix-like system (Linux, Mac OS X), you should have a structure like this:
Finally, download from the website the StartingPackage.zip for this chapter, and decompress it in the SimpleShowCase folder; you'll get all the images and a style sheet file realized by our designer.
Now, we can start with the code for the index page; put this starting markup into index.html:
<!DOCTYPE html>
<html>
<head>
  <title>Jewelry Show Case</title>
  <link rel="stylesheet" href="css/styles.css" />
</head>
<body>
  <h1>Welcome to our Jewelry collection.</h1>
  <h2>Can you find anything interesting?</h2>
  <div data-bind="foreach: jewels">
    <div class="jewel">
      <span data-bind="text: name"></span>
      <img data-bind="attr: { src: src }">
    </div>
  </div>
  <script type="text/javascript" src="js/knockout.js"></script>
  <script type="text/javascript" src="js/index.js"></script>
</body>
</html>
Here, we are asking the browser to:
Load the stylesheet file
Create a really simple DOM structure
Load the KnockoutJS library and
js/index.js, which contains our application code.
On this page, we put three different kind of data-binding attributes from the standard codebase of KnockoutJS: foreach, text, and attr.
The details about these binding handlers are as follows:
foreach: This is used with an array property and replicates the DOM structure inside the node it is applied to; it creates a node for each item in the array and assigns the context to the specific item; for example, in our application, for each jewel adivelement is createdattr: This is a hash map and binds every item inside it to the property of the node
Our view is ready, but if you try to look at the application with a web browser you'll find that nothing magical is going on. The reason is that we need another major step to get everything working: applying the bindings.
So, now we go to our application code in js/index.js and we put these lines:
var myViewModel = {
  jewels: ko.observableArray([
    { name: "White Bracelet",
      src: "images/bracelet_1_big_1.png" },
    { name: "Tear Earring",
      src: "images/earring_1_big_1.png" },
    { name: "Gold Necklace",
      src: "images/necklace_1_big_1.png" },
    { name: "Marriage Ring",
      src: "images/ring_2_big_1.png" }
  ])
};
ko.applyBindings(myViewModel);
Here, we are making our View Model object (nothing more than a normal JavaScript object, defined with the object literal syntax) with only one property: jewels.
The value of the property is ko.observableArray(); this is a helper inside the ko namespace that KnockoutJS gives us to create observable properties for the array type. You can get much more information about it at this link: http://knockoutjs.com/documentation/observables.html.
The value you pass into the call to ko.observableArray is the starting value of this object; here, we are creating it with an array with four items.
Note
The ko.observableArray value is an implementation of the Decorator design pattern. In fact, it decorates your array with some logic to detect the changes (while implementing the Observable design pattern).
Anyway, the true magic of KnockoutJS starts with the next row:
ko.applyBindings(myViewModel);
In the next section, we will see what this function does in depth, but now, to get some code running, we can simply say it binds the view model object with the DOM.
In the previous section, we put the data directly inside the View Model; this was just to show how the ViewModel works. In any normal application the source of your data is online and you get it by calling a remote service.
Anyway, as you can see if you look at the documentation of KnockoutJS, the library doesn't provide you any help to take the data. We could use plain JavaScript to do this; but to make it a little easier, we will be using jQuery to deal with our AJAX request in the rest of the book.
One of the most relevant features of KnockoutJS is its browser compatibility; it even works on ancient browsers, so you can use it if you need to support them.
When you develop a big application to be used online you have to decide which browser you're going to support; the main reason is that each browser you decide to support means:
Testing on it
Checking if your code/style sheet/HTML page can be supported, and how
For this reason, many big companies keep an eye on the browser market share data; it helps you to decide if it's time to drop support for a particular browser.
I mentioned this here because we are going to use jQuery. This library is different from KnockoutJS, because you must choose between two branches: 1.x and 2.x.
The main difference here is the compatibility; if you want to support all the browsers KnockoutJS supports you have to download the 1.x branch, otherwise you can choose 2.x.
Note
For these chapters, we will use the 1.x branch (we will use 1.11.1). You can download the latest jQuery library here: http://code.jquery.com/jquery-1.11.1.min.js.
After you download it, save it as SimpleShowCase/js/jquery.js.
Then update the index page to include it before the row where we included KnockoutJS:
    </div>
    <script type="text/javascript" src="js/jquery.js"></script>
<script type="text/javascript" src="js/knockout.js"></script>When you start to look at the documentation on KnockoutJS, before getting an explanation on what an observable is and how it works, you get the explanation of the presentation pattern that is used with KnockoutJS. You can live without this explanation, but it can help you to understand why we are using it and how you should organize your project when you use this pattern.
As you can read on the KnockoutJS website, MVVM is a design pattern for building user interfaces. Here, you can find a short description about this pattern and what each term means. Instead of repeating the same information, I suggest you check this URL before moving on: http://knockoutjs.com/documentation/observables.html#mvvm_and_view_models.
Let's discuss this design pattern in more detail in the following section. To understand what MVVM is and why someone invented this pattern, we have to discuss its origin: Model-View-Controller (MVC).
MVC is an architectural design pattern that enforces separation of concern; it isolates business data (models) from the user interface (views) using a third component (controllers) which manages the logic and the user input, and coordinates the models and the views.
It was a really well-done pattern, but then we changed context, and we needed a pattern for the web.
There are a few server-side implementations of MVC for the web, and in each of them you can find how the controllers stay on the server, managing the user input, modifying the model, and then sending a new view to the client.
The main drawback of this kind of implementation is that you can find it a bit static and not so responsive.
The first way people solved this problem was by using AJAX heavily to update the client without refreshing the page; in this way, you get all the benefits of server MVCs in the context of the web development.
After that, a new kind of application was built: SPA. In such an application, you use a client router which manages the transition between pages directly on the client-side, keeping all the states and reusing all the information the client already has, avoiding a data trip from the server to the client for each request.
Then, a new problem arose: too much complexity and spaghetti code to keep the client and server synchronized, using jQuery and AJAX.
So a large number of new client-side MVC frameworks were born, mainly done with JavaScript.
The client-side implementation of MVC is realized in this way:

In this implementation, the Models and the Controllers are JavaScript objects, and the Views are HTML.
The Models keep the data, the Views show the information to the user getting the data from the Models, and the Controllers manage the user interaction and the update of the Models.
The main drawbacks of this structure are:
The Views know about the Models; they listen to the Models to show the most updated data. This means we are tightly coupling Views and Controllers (so a change to one affects the other), and they are closely coupled to the Models (a change to the Model affects both the View and the Controller).
The Controllers have to register the interaction of the Views by themselves, so they are full of interaction code instead of having all the management logic.
Another consequence of the previous point; the Views are tightly coupled with the Controllers because the most commonly used way to reference the Views element is by ID with jQuery selectors, and any changes to the DOM structure will impact the relative Controller.
I'm not saying MVC is not a good pattern, but that maybe we can find something better for web development.
And then John Grossman from Microsoft built another architectural design pattern (as a specialization of Martin Fowler's Presentation Model design pattern): MVVM.
The main idea behind this pattern is that in the MVC the View knows too much about the Model, and someone should manage all the data transformation.
Think about this: in our database we keep the date of the creation of a product; when we load our model from the server we get this information, as a Date object. In the view, small.html, we want to show this date with a short format, and in the view big.html we want to show it in the long format; where do you put all this information?
With the MVC you can have a single Date object and the View can have a code-behind converter; or you can have all the three Dates pre-formatted inside the Model; or the Controller can set the format inside the View when it decides which View to show and initialize.
As you can see in this example, a problem with MVC is that all the View-related data not directly found inside the Model has no home.
The MVVM pattern works differently, as you can see in this picture:

Here, the Model keeps the data from your business logic and works by itself.
The View Model knows the Model, and it can use it and expose it (and other property not Model-related like a date pre-formatted, or the color of the theme if you give the User a way to change it) to whatever View want to use it; and it doesn't need to know anything about the View.
The View ignores the Model, and uses the View Model to get the information to render and to manage the user interaction.
So, briefly, the Views and the Models send events to the View Model, and the View Model updates the Views and the Models directly.
Let's review all the components of this pattern.
The models are the domain objects that we are going to use in the web application.
In our project, we need to represent jewelry products with description, images, and so on; so our models will be Product (to describe the name, the description, the images, and all the other data related to our jewelry), Category (because all the products will have a category, and each category should have a name and other information), Cart (because it will be the container of the product the customer wants to buy).
In a more generic vision, the Models are all the objects you think about when you have to describe your product; in a web application you get them from the server, maybe in a database.
Another kind of model data is the information about the user. Let's think about a website with a registration form; in that case the user data will be part of the model, and probably you'll create a model class, User.
The interface to the customer is the View; it can be done with HTML and CSS, or it can be the user interface of a client application.
When you use KnockoutJS, your Views will be done with HTML and you'll put data-bind attributes to relate to the View Model.
The page, index.html, which we wrote in the previous section, is one of the Views we will make.
The View Model exposes to the View a subset of the data of the Model (but often it exposes the entire Model object) and all the specific data for the View.
Try to think about index view and product detail view.
We have the same Model for both the views, but in index view we show only a thumbnail of the product, and in product detail view we show only the big images.
In MVVM, the View doesn't need a reference to the View Model, nor the View Model should know there is a View, because the data binding library will keep both synchronized.
A really good consequence of this last point is that you can easily test the View Models and Models without having to mock any View.
When you use this pattern, you need a library to manage the data binding; it gives a way to loose couple View and View Model and to keep them synchronized.
Data binding is really useful and simplifies your code because of the separation of the concern; the main drawback of this functionality is that it generates a small overhead; let's understand why.
You have a View Model with an observable property, name.
Note
The data binding design pattern is deeply bound to the Observer pattern; KnockoutJS maps the observables using the data-bind attribute, and the observers are the View Model properties.
When you define this property, the data binding system must keep this information: List of observers
Now, use the data binding inside your View to use the name (data-bind="text:name"); the system, to manage this binding, must:
Create a context object (an object keeping references to the parent context, to the root context, and to the data)
Evaluate the expression inside the context (in this case, a property, but it can be a full expression)
Add itself to the list of observers for each referred observable found inside the expression
So, just for this binding, we are adding:
Memory occupation: A list with an item and an object with at least three properties (parent, root, and data)
CPU: The creation of the context and the evaluation of the binding
As you can see, when you build really big application you must start thinking about which object should be observable, to optimize the system.
Let's recap the pros and the cons of using MVVM:
Pros:
Separated concerns
Better testability of business and application code
Low coupling between components, which gives more freedom to the UI designer to redesign a webpage without the fear of breaking everything
Cons:
I hope now you understand this pattern better and how to use it in the best way.
We will see better what you should put inside each component during development.
After a long explanation without any code, before you get really bored, let's update our code to use a real data source for the product.
In a real web application, we probably should have a database and a server-side REST API, which can be used to retrieve the data.
In the future, we may give your friend a full web interface to update the product data, and maybe we will add a true database as the backend, but at the moment, we will simply use a JSON file with all the products.
Tip
Pay attention when you want to use the jQuery function, getJSON; many browsers (such as Chrome) won't permit you to load JSON from the local file system because they need a web server.
You can use any web server you like, but if you plan to read the fifth chapter, I suggest you to try to use NodeJS and the package, http-server.
Installing NodeJS is really simple (you can use the installer); then you can get the http-server package with the following command (in the command line):
npm install –g http-server
Then, go to the SimpleShowCase folder and execute:
http-server
And now, you have a working web server (you can see the port in the console output) serving your files (at http://localhost:port). You can now use getJSON without any problem.
You will find a file named products.json inside the folder, SimpleShowCase, with all the products we can show (with descriptions and images); check it to see the structure of the JSON.
Now, we can update our View Model to use these products; we will remove all the fake data we put inside the View Model, and fill it with the data from the external JSON:
var myViewModel = {
  categories: ko.observableArray([])
};

$.getJSON("products.json", function(data) {
  myViewModel.categories(data.categories);
});

ko.applyBindings(myViewModel);
We renamed the property from jewels to categories because now we are showing categories.
Here, we have loaded the data from the JSON into the View Model; now we have to update the View to show the new data.
Before modifying the code, open the page, index.html, with a web browser; you should see only the category, Necklaces.
This not a problem with the data, but with the data binding; you have no idea of the problem, because KnockoutJS simply stopped working, without any visual information. So, open the developer tool, firebug, or any console you have in your browser.
Tip
Chrome, Firefox, and the latest version of Internet Explorer give you the console using the F12 key, if you're using Windows. To get the console on the Mac OS X, use Alt+Cmd+I for Chrome and Alt+Cmd+K for Firefox.
You should have something like this (this screenshot was taken on the Mac OS X with Safari):

KnockoutJS is saying it tried to apply the binding, and it died trying to apply it to the data bind, attr: function() { return { src: src} }, because it cannot find the variable, src, inside the current context of the View Model.
We will discuss binding context in detail in the next section, when we will reveal how KnockoutJS works internally.
Tip
Remember to check the browser console when you see strange behaviors but think your code is right; KnockoutJS logs all errors with the console.error function, so you'll find them there.
We will modify the code we rendered for each item, because now we want to show the category, then the list of products; so, we will replace the following markup:
  <div data-bind="foreach: jewels">
    <div class="jewel">
      <span data-bind="text: name"></span>
      <img data-bind="attr: { src: src }">
    </div>
  </div>
With this markup:
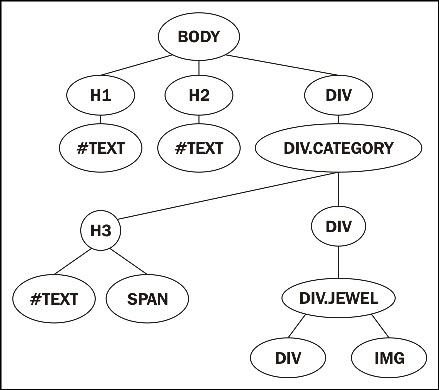
  <div data-bind="foreach: categories">
    <div class="category">
      <h3>Category: <span data-bind="text: name"></span></h3>
      <div data-bind="foreach: products">
        <div class="jewel">
          <div data-bind="text: title"></div>
          <img data-bind="attr: { src: 'images/' + thumb }">
        </div>
      </div>
    </div>
  </div>
Here, we have two foreach, two text, and an attr data binding. They are more in number than before, but, at the end, we are using the same kind of data binding, so there's nothing really special here.
Tip
Downloading the example code
You can download the example code files from your account at http://www.packtpub.com for all the Packt Publishing books you have purchased. If you purchased this book elsewhere, you can visit http://www.packtpub.com/support and register to have the files e-mailed directly to you.
The current results should be as in this image, right?

Your results can be different if you didn't download the SimpleShowCase/products.json file and the content of the SimpleShowCase/images folder from the website.
Now, we have a page with all the products listed under the categories.
We could improve this page by adding filters, or maybe we could learn how KnockoutJS works internally. What do you prefer? Really? Perfect, let's start.
We saw that all the magic of KnockoutJS starts with the call to:
ko.applyBindings(myViewModel);
This function gets two parameters: a View Model and a DOM element. You can skip the second parameter and it will default to the document.body.
First of all, it takes the View Model, and makes a ko.bindingContext from the View Model.
BindingContext tracks all the following information:
$parent: This is the View Model of the parent context; for example, every binding inside a foreach binding will have the foreach view model as $parent$parents: This refers to an array with all the parents context; empty for the root View Model. You can use an indexer to traverse the hierarchy (for deep-nesting); for instance, $parents[1] will get you the 2nd ancestor and so on$root: This is the View Model of the highest parent; itself for the root view model.$rawData: This is the original View Model, before unwrapping (to understand "unwrapping" better, imagine that you have a property,x = ko.observable(12), and you executex(); you are unwrapping the observable to get the value12)
Then, it starts to apply the bindings to the node:
It stores the
bindingContextinside the node data (but only if the current context is different from the context inside the parent node)It checks if the current node contains the data-bind attribute, and applies the binding to each of them
For each binding, it executes the init function inside a call to ko.dependencyDetection.ignore, and then the update function inside a call to ko.dependentObservable; in this way, the update function of each binding handler works as a computed observable (more about computed observables a little later)
It executes these steps recursively for each descendant
Note
Binding to the same node more than once is not permitted; when you call
ko.applyBindingsit checks if the node is already bound and it will throw an exception.When you think you need to apply the binding again (maybe you changed the DOM structure without KnockoutJS) to the same node, the best idea is to rethink why you should do it; often you will see you can use the with binding handler to solve this problem in a KnockoutJS way.
Or, if you are absolutely sure this is the best solution, you can use
ko.cleanNodeto reset the element to its previously unbound state.
The change of the bindingContext is done inside a few binding handlers (with, foreach, and so on) because they create a child bindingContext; you can do the same inside your custom binding handler's init function (for more information visit this URL: http://knockoutjs.com/documentation/custom-bindings-controlling-descendant-bindings.html).
Note
Before looking at a practical example, let's understand what a computed observable is.
ko.computed is the third kind of Observable KnockoutJS supports; it's defined by a function, and each time it runs it registers itself as subscriber of any Observable found during the evaluation.
This is the same method KnockoutJS uses for the binding handler you find in the View.
In a few words, a computed observable is an observer of another observer; the easiest example is the full name computed observable, defined as the concatenation of the observable, name, and the observable, last name:
var firstName = ko.observable("Bob"),
    lastName = ko.observable("Smith");
var fullName = ko.computed(function() {
    return firstName() + " " + lastName();
});
The property fullName here gets evaluated each time one of its internal observables changes.
Let's understand step by step what happens when you execute ko.bindingHandler(viewModel) in the current document.
We start with the following DOM structure:
As the first step, it takes the document.body node to work on, as you can see in the following picture:

It creates and adds to the data of the node, body, a new BindingContext like this:
ko.bindingContext: {
   $root: obj,
   $rawData: obj,
   $parents: [],
   $data: obj
}
Here obj is the parameter, viewModel.
Then it walks inside the descendants searching for the data-bind attribute; the next node to work on is the following one:

Here it finds a foreach binding, so it executes the binding handler; the init function returns
controlsDescendantBindings, so it stops descending.
The function init of foreach saves the descendants and clears the DOM structure, so now we have this structure:

After this step it ends, because all the descendants of document.body are bound to our view model.
When the code updates viewModel.jewels with the content of the category list, the flow continues.
Now that you know how KnockoutJS works, we can continue working on the website.
The next step in the requirements is to add a way to filter the products by the category or by the name.
At the moment, we are showing all the products; to show only filtered products we have to:
Save the data from the server in a new variable called
allCategoriesAdd a new observable to keep the selected category, and a new array to keep the list of the names of categories; we will add the "All" value using the optionsCaption binding handler (a binding handler dependent on the selected binding handler).
Add a new observable to keep the selected name
Create a computed observable to return the array of categories based on the selected category and the list of all categories
Before we start to write the code, I want to point out that there are two different ways to manage the last point in the preceding list. You can:
Use an observable array and, with an external computed observable, update that array
Use a computed observable which will do the job of filtering and then return an array
If you look at the documentation of KnockoutJS you will find:
Assuming your array is an observable array, whenever you later add, remove, or re-order array entries, the binding will efficiently update the UI to match - inserting or removing more copies of the markup, or re-ordering existing DOM elements, without affecting any other DOM elements. This is far faster than regenerating the entire foreach output after each array change.
The first observation after reading this is that the foreach binding handler uses the notification from the observable array to discover what changed.
But if you check the code of the binding, you will be astonished, because you will find an algorithm to check the difference between the current array and the previous one, ignoring all the notifications from the observable array.
For this reason, the previously pointed solutions work in the same way.
Let's update the View Model (js/index.js) with all the changes we need for the filters:
var myViewModel = {
  allCategories: ko.observableArray([]),
  selectedCategory: ko.observable(),
  selectedName: ko.observable("")
};
We will rename the old observable array, categories, as allCategories, and also add two observables to keep the new filter variable: selectedCategory and selectedName.
Note
ko.observable is another kind of Observable KnockoutJS gives us; when you declare an observable it keeps a list of observers, subscribed to any change of that value.
Other than using (getting and setting) the value in the observable, you can subscribe (using the method subscribe) to execute a callback each time the value changes. The result is like the computed observable, but you are responsible for deciding when to dispose the subscription.
To find more information you can look at the excellent documentation of this functionality.
Then, we will create our computed observable to return the filtered array. We cannot insert this code directly in the object creation because KnockoutJS will execute the code to pre-assign the value, so we need to define the other properties before this one:
myViewModel.categories = ko.computed(function() {
  var results = myViewModel.allCategories(),
      filterByCategory = myViewModel.selectedCategory();
  if (filterByCategory) {
    results = ko.utils.arrayFilter(results, function(category) {
      return category.name === filterByCategory;
    });
  }
  return results;
});
Tip
A good, easy way to improve the code, solving also this last point, is the use of the JavaScript Module Pattern. We are not using it here because this project is really simple, but if you don't know it, now is a good time to study it; it will help you to understand the next chapter better.
This code takes the list of categories (allCategories) and the selected filter (selectedCategory).
If a filter was selected, we assume that the first item in the list having a name equal to the selected category which we return.
Here, you can see we are using the function, ko.utils.arrayFilter. This is just one of the many helper functions you can find in the namespace, ko.utils. It is unlikely that they are not documented at all, so you can:
Search information on the web
Look at the non-minified source file (but pay attention, a few functions you find there are not accessible when you use the minified version)
With this function, we get a filtered array with any item having a name the same as our selected category.
Add the following property after the myViewModel.categories definition:
myViewModel.categoryName = ko.computed(function() {
  var results = ko.utils.arrayMap(myViewModel.allCategories(), function(category) {
    return category.name;
  });
  return results;
});
We will now add a list of the names of all the categories using the mapping function (ko.utils.arrayMap is good for "flattening" an array or extracting a subset of data into an array).
Then, we will put back the code to take the products from the server, but this time we will save them in the allCategories property.
$.getJSON("products.json", function(data) {
  myViewModel.allCategories(data.categories);
});

ko.applyBindings(myViewModel);
Now, we will use all these new properties in our View (index.html). We will add these rows after the first tag H2, to keep the filter on the top of the page:
  <div class="filter">
    <h2>Filter by</h2>
    <div class="category">
      Category:
      <select data-bind="options: categoryName,
                         optionsCaption: 'All',
                         value: selectedCategory"></select>
    </div>
    <div class="name">
      Name:
      <input type="text" data-bind="textInput: selectedName" />
    </div>
  </div>
We are binding three handlers to the select:
options: categories: A new option tag will be created for each item inside the arrayoptionsCaption: 'All': Another option with the selected text andundefinedvalue will be added as first child of the select tagvalue: selectedCategory: The value of the selected option will be bound to that property
We also bound the input with textInput: selectedName; this binding handler is a new introduction, added in version 3.2. In the previous version, you used a combination of value and updateValue:'input' but in the current version, as you can read in the documentation, this is the best way to get a two-way binding into the input field.
Tip
When you use the options binding handler, you can use two additional useful binding handlers: optionsText and optionsValue; they are useful when the items inside the array used with the options binding handler are JavaScript objects and you want to choose what to use as value (optionsValue) and as text (optionsText) of the option tag.
To complete the filtering code, we will change the following row:
<div class="jewel">
By adding this data binding:
data-bind="visible: title.indexOf($root.selectedName()) !== -1"
Now, it will hide all the items not containing the text of the selected item inside the name.
The reason we are using $root is because here we are inside the foreach context, so we have to move to the parent context to find the property, selectedName.
Everything is done, so we can continue with the product details, right?
Wrong!
Look again at the last data bind: visible: title.indexOf($root.selectedName()) !== -1.
What's the problem with this code? I'm sure you have seen it many times in the past; so, why am I telling you it is wrong?
Do you remember when I suggested to you to avoid putting JavaScript code inside the HTML? It's the same reason.
KnockoutJS will take the code you put inside the binding and will evaluate it, so that code will work; but now it will become hard to test.
A good practice with data binding is to keep the logic inside the View Model (the main reason we have it) and to keep the View as dumb as you can.
We don't want to modify all the products to keep the information, and our models are simply objects, so we cannot modify the prototype. The easiest way to solve the problem is with a new function inside the View Model, referring the current object; we use it inside a data-bind context, so it will automatically become a computed one.
Let's change the data-bind we added earlier with this code:
data-bind="visible: $root.shouldShow($data)"Then, we add this function in the object, myViewModel:
shouldShow: function(item) {
  return item.title.indexOf(myViewModel.selectedName()) !== -1;
}
Now, everything should work again, and our View is dumb again and your browser should show something like this:

If everything is working, you can change the selected category and the category sections should change.
We used the indexOf method to check for the text; if you want to make it case un-sensitive you can replace the following code:
return item.title.indexOf(myViewModel.selectedName()) !== -1;
With this code:
return new RegExp(myViewModel.selectedName(),"gi").test(item.title);
Now, we can add the page for product details. To keep this chapter simple, we will add a box with all the details, and we will show it when the customer hovers or clicks on the image of a product.
In this box, we will show all the details we decided earlier: the description, one or more big images, the price, and a button to add it to the cart.
First of all, we have to add a new property to keep the selected products. Add the following row to the View Model (js/index.js), after the allProducts definition:
selectedProduct: ko.observable(),
Then, add the code of the box to the View (index.html); put these lines before the first script tag:
<div class="selectedProduct" data-bind="with: selectedProduct">
  Prodotto selezionato:
  <div class="jewel">
    <div data-bind="text: title"></div>
    <!-- ko foreach: images -->
      <img data-bind="attr: { src: 'images/' + $data }">
    <!-- /ko -->
    <div data-bind="text: description"></div>
    <div data-bind="text: price"></div>
    <button>Add to cart</button>
  </div>
</div>
Here, we are using the with binding handler. This binding handler checks for the parameter, and creates a new child context with the parameter, only if the parameter is not null. In this way, we can be sure it will show the selected product only if we select one, and we avoid binding errors if the object does not exist.
In the block, we show the title, all the images, the description, and the price of the product.
With this code we can render the selected product, but we didn't put any way to select it. To do that we will add a new function in the View Model to select the item, another two to show/remove the item under the cursor, a click binding, a mouseout event binding, and a mouseover event binding to the preview tag to call these functions.
Let's add all these functions to the myViewModel object:
selectProduct: function(product) {
  myViewModel.selectedProduct.current = product;
},
showProduct: function(product) {
  myViewModel.selectedProduct.current =
    myViewModel.selectedProduct();
  myViewModel.selectedProduct(product);
},
hideProduct: function() {
  myViewModel.selectedProduct(
    myViewModel.selectedProduct.current);
}
Here, we are adding a property (named current) to the observable property, selectedProduct, to track which item the customer clicked on. In this way, each time the customer clicks on a preview, we will record it, and we will show it in the detail box; when the customer moves the cursor over a preview she/he will see the new detail, but it will go back to the selected one when the mouse exits from the preview.
Now, add the three binding handlers to the preview. Replace the following row:
<div class="jewel" data-bind="visible: $root.shouldShow($data)">
With these rows:
<div class="jewel"
     data-bind="visible: $root.shouldShow($data),
                click: $root.selectProduct,
                event: {
                    mouseover: $root.showProduct,
                    mouseout: $root.hideProduct
                }">
The click binding handler registers a click event handler and when the event is fired you will get the View Model and the event as parameters. This is really useful when we are working in a child context, because we get the current item.
We should add here the click handler to the button, Add to Cart, but we will do this in the next section.
Now, when you move the mouse over a preview, or you click it, your browser should show something like this:

When you realize a web application, you can follow two different flows:
Classic web application
Single Page Application
If you realize an SPA, you'll probably need something like a library to manage the routing client-side, a way to load an external page with a View Model, and so on.
The best library you can find at the moment to create an SPA with KnockoutJS is DurandalJS. We will see this in another chapter.
If you go to the classic web application, you'll have many different pages, and you will have to apply the binding of KnockoutJS in each page needing it.
In this project, we will follow the classic web application flow, so we will add two new pages to manage the Cart and the Contact form.
The modifications we make in the index page include:
Showing the links to the other pages
Creating a basket
Adding a handler to the
Add to cartbutton
Adding a link to the other pages is easy to do, so we will start with this.
Add the following rows as the first child of the body (in index.html):
<div class="topbar">
  <a href="index.html">Home page</a>
  <a href="cart.html">Cart</a>
  <a href="contact_us.html">Contact us</a>
</div>
Then, to have a cleaner interface, move the whole following block before the H1 tag:
<div class="filter">…</div>
Now, we have a navigation bar at the top with the link to the three pages of our application.
To keep this application simple, we will save the basket in the local storage. We are building a really simple application, but this is not a good reason to use a bad pattern, so we will not mix the model of the basket and the storage.
For this reason, we will create two new files:
js/basket.jsjs/basket-localStorage.js
We do this because the best practice with Model is that it shouldn't have knowledge of its storage.
We can start with the model of the basket (js/basket.js), because at this time it is really simple:
function Basket() {
  this.products = ko.observableArray([]);
}

Basket.prototype.addToCart = function(product) {
  this.products.push(product);
};

Basket.prototype.removeFromCart = function(product) {
  this.products.remove(product);
};
Here, we are just enclosing an observable array to hide the implementation from outside.
Now, we will create the local storage file (js/basket-localStorage.js):
var basketLocalStorage = (function() {
  return {
    fetch: function(basket) {
      var json = localStorage.getItem("SimpleShowCase"),
          savedData = JSON.parse(json || "[]");

      ko.utils.arrayForEach(savedData, function(product) {
        basket.addToCart(product);
      });
    },
    save: function(basket) {
      var data = ko.toJSON(basket.products);
      localStorage.setItem("SimpleShowCase", data);
    }
  };
}());
This object now exposes two functions:
fetch: This takes from the local storage the array of products and adds it to the product listsave: This puts into the local storage the product list using the JSON format
A few notes about this last source code:
We are using
localStorage; it's an easy way to save data locally, but it works only in modern browsers (so it's good for a simple project, but think twice about using it when you want to support IE6/IE7)We are calling
pushon an observable array inside a loop; a better solution should put all the data in one call, because each call topushnotifies all the observers, resulting in poor performance.
Now, in our main page (index.html) we can add a reference to these two new scripts; add these two rows just before the tag with the import of js/index.js:
<script type="text/javascript" src="js/basket-localStorage.js"></script>
<script type="text/javascript" src="js/basket.js"></script>
As the last step on this page, we have to bind the click on the button, Add to cart, to the function. Add the following data bind to the button Add to cart:
data-bind="click: $root.addToCart"We have to make two modifications to the View Model, js/index.js. Add these two rows into the myViewModel object:
basket: new Basket(),
addToCart: function(product) {
  myViewModel.basket.addToCart(product);
  basketLocalStorage.save(myViewModel.basket);
}
In this way, we keep a basket ready and when the user adds an item to the cart we add it to the basket and then save changes in the storage.
We should also load the data from the basket, so add this row at the end of the file:
basketLocalStorage.fetch(myViewModel.basket);
Here, we ask the storage to load all the data into the basket.
With this last modification our main View is completed, managing all the requirements we had for it.
The cart page will be simpler than the index page. We will show all the elements we have inside the basket, and a button will give the user the option to remove elements from the cart.
Let's start with the Cart View (cart.html):
<!DOCTYPE html>
<html>
<head>
  <title>Jewelry Show Case - Cart</title>
  <link rel="stylesheet" href="css/styles.css" />
</head>
<body>
<div class="topbar">
  <a href="index.html">Home page</a>
  <a href="cart.html">Cart</a>
  <a href="contact_us.html">Contact us</a>
</div>
This is the standard boilerplate code for the View.
Let's continue with the container for the products:
<h1>Here you can find all the items in the cart.</h1>
<div data-bind="foreach: products">
  <div class="jewel"
    <div data-bind="text: title"></div>
    <img data-bind="attr: { src: "images/" + thumb }">
    <div data-bind="text: description"></div>
    <div data-bind="text: price"></div>
    <button data-bind="click: $root.removeFromCart">
      Remove from the cart</button>
  </div>
</div>
Here, we are showing a list of products with their details, and a button to remove the jewelry from the cart.
<script type="text/javascript" src="js/jquery.js"></script>
<script type="text/javascript" src="js/knockout.js"></script>
<script type="text/javascript" src="js/basket-localStorage.js"></script>
<script type="text/javascript" src="js/basket.js"></script>
<script type="text/javascript" src="js/cart.js"></script>
</body>
</html>
Then, we will add all the scripts we need (it's really similar to the index page, isn't it?).
Now, let's see the View Model, js/cart.js. Here, you can find a few similarities to the other one, but not enough to justify a refactoring of the common code into a parent class:
var myViewModel = {
  basket: new Basket(),
  removeFromCart: function(product) {
    myViewModel.basket.removeFromCart(product);
    basketLocalStorage.save(myViewModel.basket);

    if (myViewModel.products().length === 0) {
      window.location.href = 'index.html';
    }
  }
};
myViewModel.products = myViewModel.basket.products;

basketLocalStorage.fetch(myViewModel.basket);

ko.applyBindings(myViewModel);
Our View Model references a Basket and exposes a removeFromCart function.
In this function, we are asking the basket to remove the product, and then saving the modification in the local storage. As the last step, when we empty the cart, we are redirecting the user to the home page.
We are exposing the products property of basket inside myViewModel because we want a dumb View; so, we should not ask the View to know the internal structure of the basket Model.
With this, we finally get the product list from the basket storage, with the call to basketLocalStorage.fetch.
Now we have a page to add the products to the basket, a page to look at and remove them from the basket. We are only missing a page to send a request to our friends to buy them.
Our friends asked us if we could add a way to pay from the website. We can do it for sure, but it involves code in the backend.
For this first project, we are not going to write any code for the backend, so we will not implement this functionality; we will try to keep the flow simple, so we will open the default mail program with pre-configured text.
If you are thinking, why do I need a backend code to manage all of this? I have seen on the PayPal website that I can send a payment request using only JavaScript, let's wait a moment and read this hint:
Never use a Javascript-only solution to manage money.
Have you heard about XSS, CSRF, and the other threats you can face with website programming?
You can find many good resources about these threats, and I suggest you research them (any good web developer should know about security).
I'll just explain the simpler reason here. JavaScript is a client-side language; it runs within the browser, so any one can hack it easily.
Let's try to imagine this scenario:
A customer puts in his cart three products that are worth £60. Then, he (he's smart, isn't he?) opens the developer console and updates the localStorage, setting all the prices to negative value. Next, he navigates to the contact page, and we ask him to use PayPal to pay -£60.
What happens here? It depends on PayPal, or on the payment system you are trying to implement.
In the best case, it stops the transaction (but what if the customer puts £0?). In the worst case, it could grab the money from your account to give it to the customer.
If the system blocks a negative transaction, it can change all the prices to £0 (or £0.01 if it wants to be sure that everything works). The system will accept the transaction, and your friends will get a notification that they have to send a few products to someone without being paid.
So, try to remember that client-side validation is helpful to improve performance and give the user a better experience. But at the end of the day, any data you have to save on a database has to be checked on the server side.
We are going to realize a small contact form to send to our friends a mail with the list of products the customer wants to buy.
We cannot send email using only JavaScript, so for this first chapter, we will build the mail body inside our page, and then use the mailTo: URL to ask the system to open the preferred mail application with the data we collected.
The customers can fill their email address and the body of the mail, and we will add to the mail the list of the products he wants to buy.
This page will be similar to the cart page, because we will show a list of all selected products. But here, we will not give the user a way to remove the item; we will give him a way to send the email with the items.
This time we will start with the HTML of the Cart View, and then modify it; copy cart.html into contact_us.html.
Tip
Best practices with programming tell us that copying and pasting code is never a good thing; maybe it's an easy way to solve a problem, but then you can make the maintenance hell.
For this reason, when you see you have to put the same code in more than one place, with only small modifications, try to change the structure, use the inheritance or the composition, and avoid copy and paste!
The only time you cannot do this easily is with HTML, because if you load the markup from an external template with jQuery, you face problems with binding and so on.
In the next chapter, we will use the template and the component binding handler, and we will find how to solve the copy-paste problem in HTML.
Then:
Remove the H1:
<h1>Here you can find all the items in the cart.</h1>Add the form to get the email address and a message; wrap the entire block
<div data-bind="foreach: products">in this way:<form data-bind="submit: buy"> <div class="field"> My mail address: <input type="text" data-bind="textInput: email"/> </div> <div class="field"> Additional details: <textarea data-bind="value: message"></textarea> </div> <h1>List of items I would like to buy</h1> <div data-bind="foreach: products"></div> <div class="clear-float"></div> <input type="submit" value="Send the buying message" data-bind="enable: canBuy"/> </form>
We don't want to give the user a way to remove a product here, so remove from the product box the button,
<button data-bind="click: $root.removeFromCart">Remove from the cart</button>Update the script tag
<script type="text/javascript" src="js/cart.js"></script>with the new script name<script type="text/javascript" src="js/contact_us.js"></script>
Let's better analyze the important markup (where we put binding) here:
<form data-bind="submit: buy">In this way, we are putting all the data inside a form, and we will execute the buy function when the user submits the form (either by clicking on the submit button or using the enter key).
<input type="text" data-bind="textInput: email" />We are using again the textInput binding handler because we want to react immediately to the field changes.
<textarea data-bind="value: message"></textarea>We are using the value binding handler here for the message because we are not putting any additional logic based on the value of that field.
<input type="submit" value="Send the buying message"
                     data-bind="enable: canBuy"/>
We are adding the enable binding handler to enable/disable the submit button, to be sure that the user has to fill the required email field before trying to send the email.
Note
In this case, the only difference between the submit binding handler and the click binding handler attached to this button is that you can press enter when you are in the email field and the form will be submitted.
Obviously, is important to understand when it is better to use one and when the other, depending on the specific context you are working on.
Now, we can work on the Cart View Model (js/cart.js).
This View Model will begin similarly to the Cart View Model because we need to fetch the product list and show the products we have in the basket.
Then, we will add the specific code: two observables, a computed observable, and a function:
var myViewModel = {
  basket: new Basket(),
  email: ko.observable(""),
  message: ko.observable(""),
  buy: function() { /* CODE TO SEND THE EMAIL */ }
};
myViewModel.products = myViewModel.basket.products;
myViewModel.canBuy = ko.computed(function() {
  return myViewModel.email() &&
         myViewModel.products().length;
});
basketLocalStorage.fetch(myViewModel.basket);
ko.applyBindings(myViewModel);
The canBuy computed observable checks that the email is not empty and that the cart contains at least one item.
Let's check the code of the buy function:
buy: function() {
  var productList =
    ko.utils.arrayMap(myViewModel.products(),function(p) {
      return p.title;
    });
  var additionalMessage = myViewModel.message() && (
      "This is an additional message I want to send you: \n\t" +
       myViewModel.message()
  );
  var body = "Hi, I'm " + myViewModel.email() +
             " and I want to buy these products from you.\n" +
             productList + "\n" +
             additionalMessage;
  var mail = "mailto:postmaster@example.com?" +
             "subject=" + encodeURIComponent("I want to buy these items") +
             "&body=" + encodeURIComponent(body);
  window.location.href = mail;
}
Here, we are taking the name of each product we have in the cart, the message, and the email, and putting it into an encoded string. We must encode it because otherwise we cannot use it inside a URL.
Then, we will use this string with the protocol, mailto, and update the current URL with this new one.
When we do this, the browser will try to open the default mail program to send this email.
Now, the Contact Us page is complete and you can use it to create the email with the messages and the products you want to buy.
If you have done everything like I have suggested, this is what you should get when you put three products in the cart and you are ready to send the mail:

And this is what we get after we click on the button (having Gmail registered as the default mail system, with Chrome in Windows):

Here, it opens Gmail with the information we entered in the form, as we expected.
In this chapter, we have seen what the MVVM pattern is about and how KnockoutJS implements this pattern to provide you with data-binding capabilities. We realized the application was really simple, but we saw many features of KnockoutJS regardless.
We used three different types of observables (observable, observableArray, and computed). We also saw many different binding handlers and utility functions.
Best of all, we learned how to create a full-featured application using View Model and data binding. There are a few binding handlers we haven't seen, like template or component, but we will see them in the next chapter, and there we will create new custom binding handlers too.