


Brief Repository Overview and Usage of the Issue Tracker
Almost everything that happens on GitHub happens in the context of the repository. A repository is like a folder that contains all the files of your project.
The landing page of a repository on GitHub depicts the content of a person's local Git repository. Apart from the tree-like structure of the files, GitHub also provides some additional features that bring the most well-known and frequently used Git commands to your browser. Among others, these include the branches, commits, and tags of your repository.
In addition to these features, GitHub also provides an issue tracker for each repository. This is where the discussions take place, bugs are tracked and reported, features are requested, and pretty much anything else that is relevant to the project is discussed.
GitHub has also implemented many other features that sit on top of the issue tracker, such as labels and milestones that provide the better visualization and categorization of issues. We will explore all the features extensively, so don't worry if you aren't familiar with these terms yet. Here's what we'll cover in this chapter:
-
Exploring the repository's main page
-
Learning how to use the powerful benefits of the issue tracker
The terms project and repository, although not the same thing, will be considered to have equal meaning, and will be used interchangeably throughout this book.
Exploring the repository's main page
The main page of a repository is the place where people spend most of their time when visiting a project. In this section, you will learn how to create a repository, and then we will explore the vast features of GitHub that bring Git's command line to your browser.
Creating a new repository
Assuming you have already signed up to GitHub through https://github.com/join, we will now explore the main repository's page and learn how to create a new repository that will host your code.
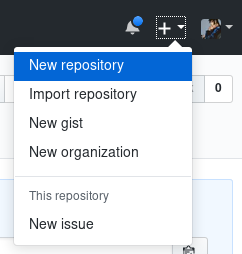
Navigate to the top-right of the page, click on the little cross beside your username, and choose New repository, as shown in the following screenshot:
You will then be taken to a page where you need to provide some information about your new repository:
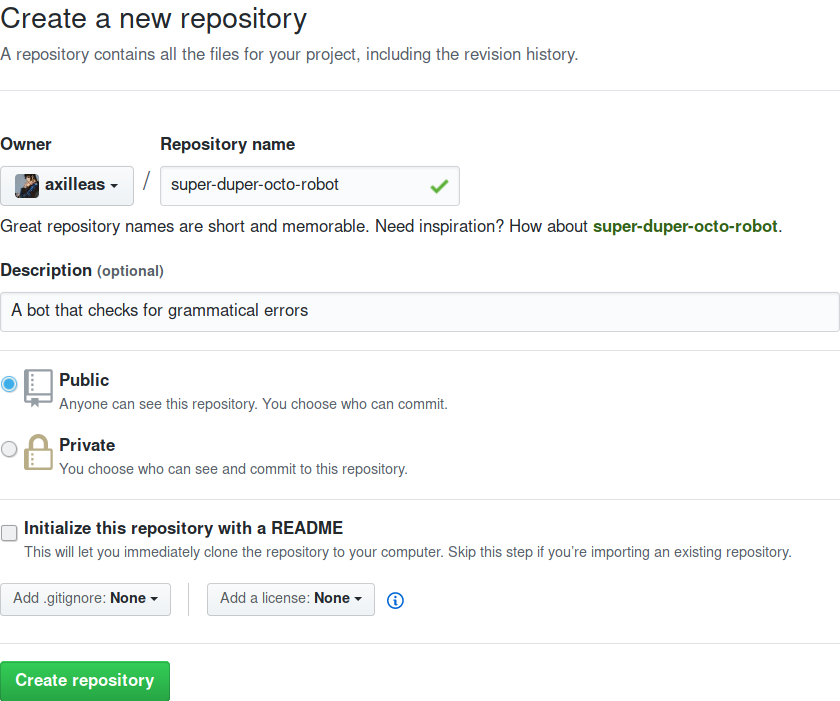
Fill in a name under Repository name, which will ultimately form the URL under which your repository will be registered. This is the minimum action you need to perform in order to create a repository.
All the repositories on GitHub have the following URL scheme: https://github.com/<username>/<repository_name>
It is optional, but recommended, for you to provide a description for your repository. That way, other users can tell at a glance what your project is all about.
The next setting to choose is whether your repository will be Public or Private. Generally, you go with public, unless you do not want your files to be seen by everybody. However, the private repositories come with a price.
The very next thing GitHub provides is the ability to create the repository with a README file. Readme files usually include comprehensive information about the project you are hosting under your repository, such as installation guides, and build and usage instructions, as well as guidelines on how you can contribute. You can always add a README file later, so leave this option unchecked for the time being.
Another nice feature is the ability to choose and include a gitignore file upon creation. You can choose from a collection of the useful .gitignore templates taken from https://github.com/github/gitignore.
Ultimately, the code that you will host on GitHub will be able to be forked and reused by third parties. If you are starting a fresh, new repository, you can choose a license to include upon creation. Again, this is optional, and you can always manually add a license file later.
Let's hit the Create repository button and finish the repository creation. Here's what it looks like so far:
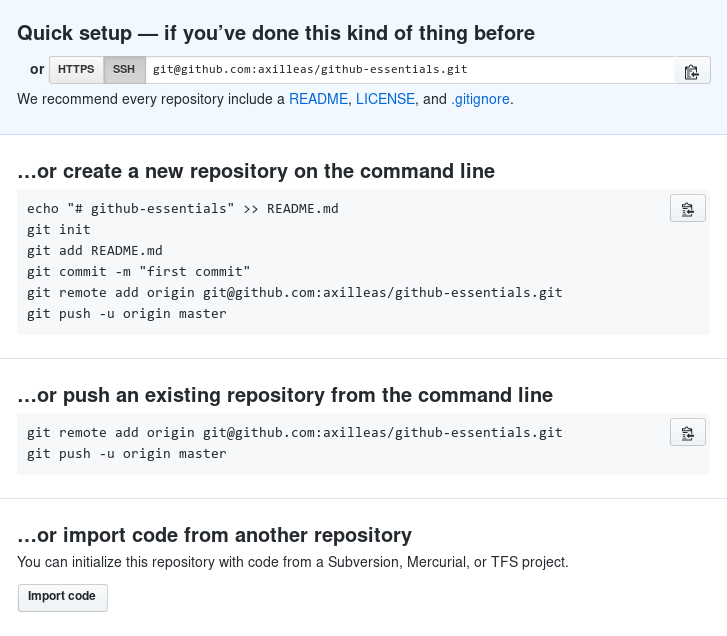
You can see that GitHub provides useful information on what to do next. If you already have an existing Git repository locally on your computer, you can push its code to GitHub or start fresh by following the on-screen instructions.
Since we will be working from the command line later, it is highly recommended that you generate an SSH key to use with your GitHub account. Follow the guide at https://help.github.com/articles/generating-ssh-keys/. Also, make sure that you properly configure your Git username and email settings. For more information, see https://help.github.com/articles/setting-your-username-in-git/ and https://help.github.com/articles/setting-your-email-in-git/.
Congratulations on creating your first repository!
The next goal is to explore the repository's main page. This is the page you see when you navigate to https://github.com/<username>/<repository>, where you should see the following:
- <username>: This is the username you registered with (found in the top-right corner)
- <repository>: This is the Repository name you entered in the previous steps
The commits page and a comparison with the git log command
GitHub has a nice web UI that many common git commands can be entered in.
Let's first create a README.md file and push it to GitHub in order to explore the commits page:
- Create the directory that will hold your code and cd into it:
      mkdir -p ~/github-essentials
      cd $_
- Then, follow GitHub's instructions on creating a new project:
      echo "# github-essentials-v2" >> README.md
      git init
      git add README.md
      git commit -m "first commit"
      git remote add origin git@github.com:<username>/<repository>.git
      git push -u origin master
Note that I use the Git protocol (https://github.com/) that uses SSH underneath, so I don't have to type my username and password each time (see the previous note on how to achieve this).
The directory name (in our example, github-essentials) could be totally different from the repository name you entered upon creation. It is the remote URL you set with git remote add that must match with the repository URL GitHub provides.
Every time you add more commits, their total number will also appear on the project's main page. In the preceding steps, we did our first commit, so the count is set to one, hence the 1 commit option shown in the following screenshot:

Click on the 1 commit link as shown in the preceding screenshot to enter the commits page.
From here, you can browse the list of commits (so far, we only have one) and visualize the output of git log. Let's compare those two commits. Type git log in your local repository; the output should be similar to the following:
commit b77a7ff22653ca74b10e99efdbc45f6f54ef10f4
Author: Achilleas Pipinellis <mail@example.com>
Date:   Sun Apr 15 23:26:32 2018 +0200

    first commit
Now, head over to the commits page on GitHub. Here, you can see the same information depicted in a nice interface:

We can see the commit message and the date and time it was committed, as well as the SHA of the commit. Note that the SHA is stripped down to the first 7 characters out of 40. Clicking on either the SHA or the commit message will show the changes introduced by that specific commit. Let's do that and compare what GitHub shows for the git show <commit> command:
commit b77a7ff22653ca74b10e99efdbc45f6f54ef10f4
Author: Achilleas Pipinellis <mail@example.com>
Date:   Sun Apr 15 23:26:32 2018 +0200

    first commit

diff --git a/README.md b/README.md
new file mode 100644
index 0000000..54a8290
--- /dev/null
+++ b/README.md
@@ -0,0 +1 @@
+# github-essentials-v2
The result of the preceding code is shown in the following screenshot:
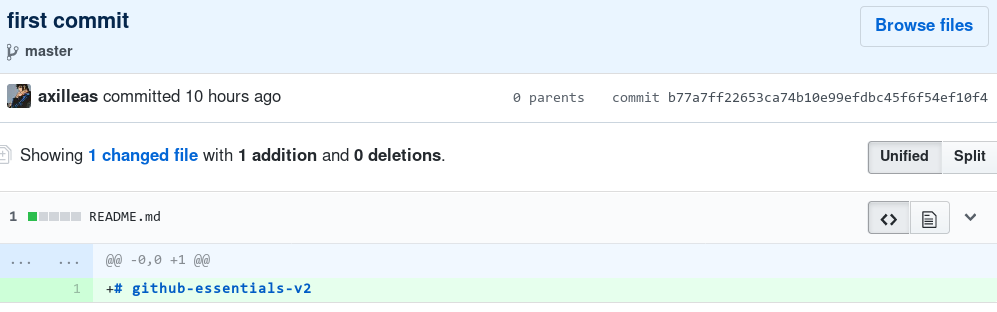
The commit message is shown in big bold letters, since it conveys an important message. Right under it, there are the branches where the commit is included (currently, it is only master).
You can see the commit SHA, the author name, and the date right under the blue area. GitHub also tells you how many files changed during the last commit and how many additions/deletions were made during that commit.
Lastly, we can see the added changes in green. If, instead, you remove something, it will be shown in a pinkish color, as we will see later on.
The branches page and a comparison with the git branch command
Let's create a branch named add_description and checkout into it:
git checkout -b add_description
Next, edit README.md, add some text, make a new commit, and push it to GitHub:
echo "\n## Description\n\nGitHub for dummies" >> README.md
git add README.md
git commit -m "Add second level header to README file"
git push origin add_description
Now let's create a second branch named new_feature out of the master branch and just push it to GitHub:
git checkout master
git branch new_feature
git push origin new_feature
Now its time to switch to GitHub and see how all this information is presented.
In the main repository page, you can now see that there are three branches. Click on the branch link to get more information.
The Overview page is, as the title suggests, an overview of the other tabs you see next to it. It tells us what the default branch is, what branches you have pushed from your account (same as the Yours tab), and the most active branches in the last three months, sorted by date (same as the Active tab). The Stale tab represents the branches that haven't been updated for more than three months.
You can change the default branch that appears on your project's homepage in the project's settings. This is covered in detail in Chapter 6, Exploring the User and Repository Settings.
You may notice that although we pushed the new_feature branch after we pushed add_description, its update time appears to be before add_description. This is only natural, since new_feature has the same commit date as our master branch, which is dated before the add_description branch.
Now, if you look closely at the tab where the branches are shown, you can see, written in a small font, the number of commits that the branches are behind or ahead of the default branch by—in our case, the default branch is master.
From the branches page, you can delete all the branches, except for the one you have set as default. Let's try and delete the new_feature branch. Click on the red trash icon and watch what happens. GitHub gives you the chance to restore a recently deleted branch:

The New pull request button will be explored in a different chapter.
The Raw, Blame, and History buttons
Now that we have explored how GitHub sees branches, let's take a look at some other Git functionalities that GitHub provides.
The Raw, Blame, and History buttons appear when viewing a single file of a repository. For example, let's visit the README.md file by clicking on it:

The Raw button, like the name suggests, opens the file in a raw form, meaning that any HTML formatting disappears. This is particularly useful when you want to download a single file. You will notice that many guides on the internet use this raw file format when they tell you to download something using command-line tools, such as wget or curl. If you have ever tried to download a file from GitHub and all you got was an HTML file, remember the usage of raw.
The Blame button makes use of Git's blame function. Basically, for each line of a file, Git informs you about who modified that line and when that line was modified. If you want to know more, visit https://git-scm.com/docs/git-blame.
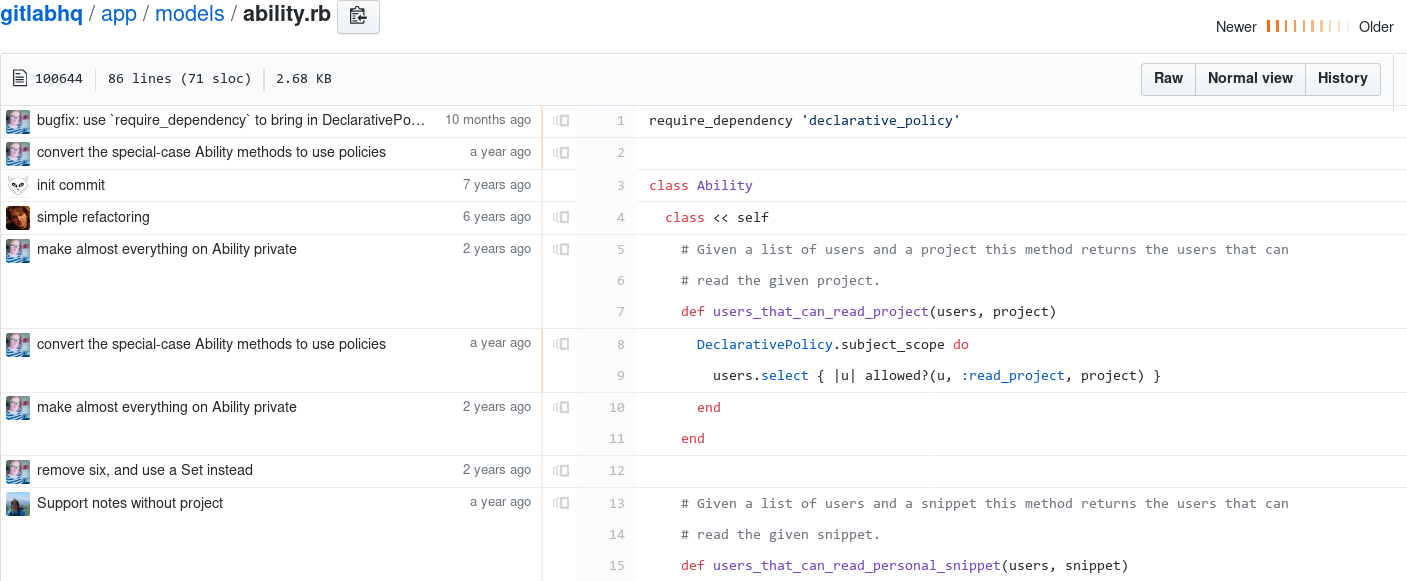
In order to properly see how that works, I will not use our previously created README.md file, since there is not much information there to see how GitHub uses this Git function. Instead, I will use a file from another repository with more commits. Take, for example, https://github.com/gitlabhq/gitlabhq/blame/master/app/models/ability.rb, as shown in the following screenshot:
Downloading the example code
You can download the example code files for all Packt books you have purchased from your account at http://www.packtpub.com. If you purchased this book elsewhere, you can visit http://www.packtpub.com/support and register to have the files emailed directly to you.
Compared to invoking git blame in the terminal, you can feel the superiority of GitHub's feature. Every line of code is annotated so you can see when and what commit changed a particular line of the file and who changed it. There is also the nice little feature of hotness: Older commits get a brown line whereas newer ones are colored yellow.
Finally, the History button is nothing more than what git log does for a particular file.
The Watch, Star, and Fork buttons
You've probably spotted the three buttons sitting at the top-right corner of your repository page. These appear for every public repository, not only your own.
The Watch button manages the level of subscription in a repository. GitHub notifies you with an email whenever an action takes place in a repository you follow and, at the same time, it lists them in the Notifications area (https://github.com/notifications) where you can later mark them as read, as shown in the following screenshot:
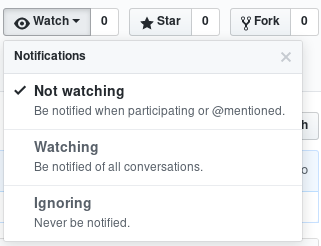
There are three levels of subscription, ranging from "never be notified" to "Big Brother". You can choose to be notified only if you explicitly take part in a conversation or if someone mentions you (Not watching). This is the mid level of notification you can get, and is the default behavior when you create a new repository. The next level is to always be notified, for example, whenever a conversation begins, or a new issue is created, or someone leaves a comment in a line of code, or someone mentions you (Watching). Finally, the third option is to never be notified (Ignoring).
You can mention someone by prefixing their username with the at sign (@). This is the special way in which GitHub can understand that you need someone's attention. Start typing the username and GitHub will be smart enough to autocomplete it.
The Star button is a way to show your appreciation to a repository and its creator. It depicts the popularity of a project. Whenever you star a repository, it gets added to your list of starred repositories. You can see all your starred repositories at https://github.com/stars.
A list with the most starred projects on GitHub can be found at https://github.com/search?utf8=%E2%9C%93&q=stars%3A%3E1&type=Repositories.
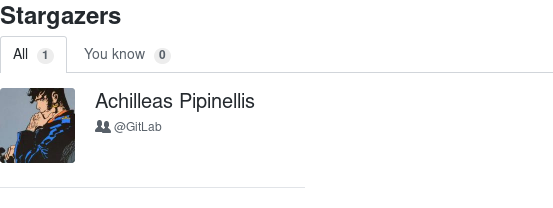
You can see the people who have starred a repository by clicking the number next to the Star/Unstar button. For the repository I just created, you can see that I am the only stargazer:
The Fork button and its purpose is what made GitHub excel in the first place. As we will see later in this book, its main use is when you wants to contribute to a project. When you fork a repository, it gets copied in your own namespace, and that way you have full ownership of that copy; thus, you are able to modify anything you want. Go ahead and try it. Go to https://github.com/axilleas/github-essentials and press the Fork button. After a short while (depending on the size of the repository), you will be redirected to your own copy of this repository that you fully own.
Changing the description and URL
Previously, we learned how to add a description to our project. This was optional when creating a new repository, so if you opted out of creating it, let's see how to add it now.
Head over to the main repository page. You will be presented with two blank forms. In the Description field, put a descriptive note of your project; in Website, put the website URL that your project might have. This could also be your GitHub repository's URL. Here's what it looks like:

After you hit Save, you will immediately see the changes.
Learning how to use the powerful benefits of the issue tracker
GitHub provides a fully featured issue tracker, tightly tied to each repository.
Its primary use is that of a bug tracker, since reporting and discussing bugs play a vital role in the growth of your project. It can also be used to make feature requests, serve as a discussion board of a blog or a project, and even be used as a notepad for repairing your house! For this, you can refer to the following links:
Creating a new issue
Go to https://github.com/<username>/<repository>/issues for an overview of all issue activity. If no one has ever opened an issue in your project, you will be presented with a blank page with GitHub prompting you to open a new issue. Let's go ahead and do this. Click on the big green button that says New issue.
An issue can be created when you provide the minimum of a title. Look at the following screenshot carefully where the Submit new issue button is grayed out and cannot be clicked. The title should be as descriptive as possible of the message you are trying to pass when creating an issue.
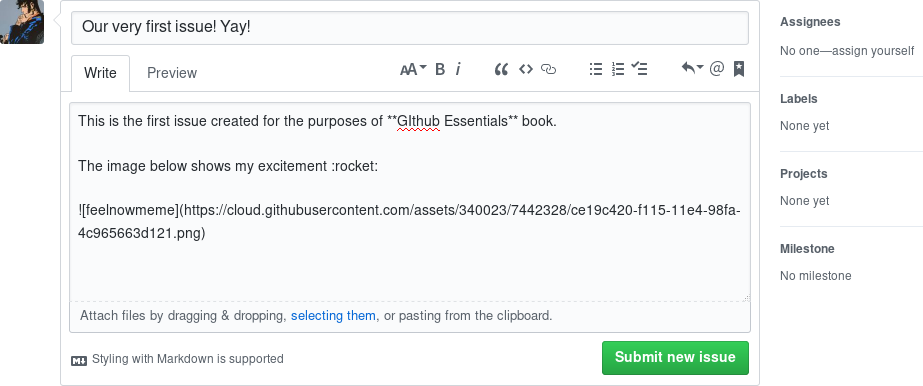
Below, under the Write tab, you can provide the details and essentially start a discussion with everyone who wants to participate (if the repository is public, that is). That's why GitHub cleverly suggests to Leave a comment.
Besides writing, you can also attach images by simply dragging and dropping, or by selecting them using folder navigation. Here's what the very first issue of this repository looks like:
Next to the Write tab is the Preview tab. In order to understand its purpose, you must first learn about Markdown.
In brief, Markdown is a text-to-HTML conversion tool so that you can write text that contains structural information and then automatically convert it to valid HTML. Written by John Gruber and adopted by GitHub (among many others), Markdown is the most well-known text-to-HTML conversion tool because of its ease of use.
You can read all about how GitHub extends Markdown's functionality in the guide available at https://guides.github.com/features/mastering-markdown/.
Now, back to our new issue. As the name suggests, Preview shows what the result will be when you submit the issue. It will style the regular text of the Write tab into a meaningful text accordingly, with URLs properly formatted, images shown, emojis displayed, and so on.
As we will see later in this book, GitHub-flavored Markdown has many little gems that leverage the usage of the issue tracker. What you have seen here is just the tip of the iceberg.
Feeling ready to submit it? Hit Submit new issue at the bottom of the page. Congratulations on making your first issue! The result will look as follows:

Each created issue is assigned a unique number that we can later use in other issues for reference. In our example, since this was the very first issue, it was assigned the number #1. Some useful information is provided in the title area. You can see that the issue is marked as Open, the username of the person who created it, the time it was created, and how many comments there are.
If you later realize that you made a mistake, don't panic—you can always edit the issue you created. The Edit button allows you to edit the title, and the pencil icon is used for editing the description. Close the issues using the Close issue button.
You can comment and close the issue at the same time if, for example, you also want to leave a note as to why the issue got closed. Start typing a comment and the button will change from Close issue to Close and comment.
Assigning issues to users
A repository can have more than one collaborator. A collaborator is a person who has push access to the repository and, in our case, can also edit and close issues.
User assignment works well in repositories with large traffic where a team is involved and is responsible for bug fixes, enhancements, and so on.
There are two ways to assign an issue to someone. First, as you have seen in the previous images, there is an Assignee section inside each issue, as shown in the following screenshot:
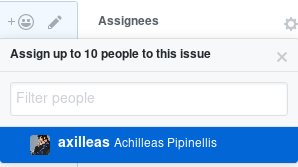
At this particular stage, there is only one collaborator—me—so only my name appears in the list. Okay, we learned how to assign an issue to a collaborator from inside the issue, but what happens if you have dozens of issues that you want to assign to someone? Assigning each of them one by one is a bit tedious and time consuming. You'll be happy to know that you can mass-assign issues to a person.
For this purpose, let's create two more issues. Head over to the Issues page, select the boxes of the issues that you want to assign, and select an assignee, as shown in the following screenshot:
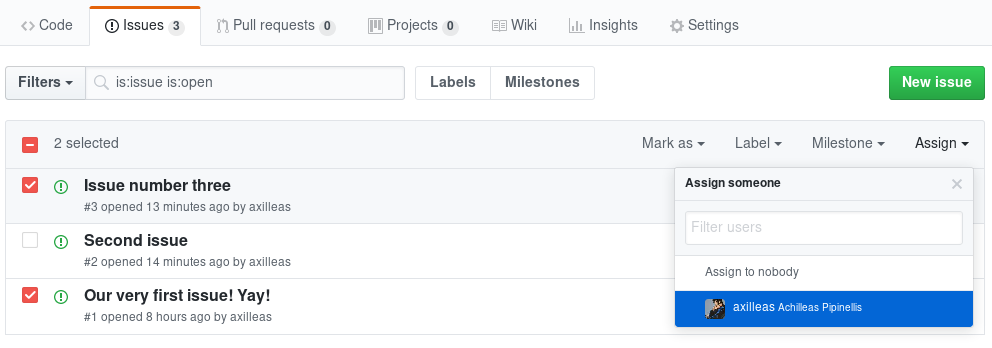
After selecting the assignee, the issues will immediately get updated with the new information. You can see that the avatar of the assignee appears on each issue that is assigned to them:

You can select and add up to 10 assignees to an issue.
Labels
If you have worked with WordPress, labels are like tags. This is not to be confused with Git tags, though. We will now explore how to create labels and use them effectively to easily categorize batches of issues.
Why labels are a great asset to UX
Labels provide an easy way to categorize the issues based on descriptive titles, such as bug, feature, and any other words you feel like using. They are colored, and are visible throughout the issue tracker or inside each issue individually.
With labels, you can navigate to the issue tracker and filter any bloated information to visualize only the issues you are interested in. Let's see how that works.
Creating new label names and setting different colors
Head over to the issue tracker and navigate to the label page by clicking on Labels. As you can see, GitHub sets up some predefined labels that are ready to use. The name, color, and description are fully customizable for new and existing labels.
Creating a new label is as easy as pressing the New label button, filling in the name, choosing a color, and optionally entering a description. In fact, a random color is already picked, so the only prerequisite is the name. I have created a new yellow label named needs testing, as shown in the following screenshot:

After clicking the Create label button, the label will be created and appear in the list. Back to the issues—let's go inside the first one and give it the label we just created. Click on the gear icon for the dropdown to appear. Start typing to narrow down the search. Now, we only have 9 labels, but imagine having more than 42. You'd have to scroll and scroll until you found the label you were looking for.
As you might have guessed, you can choose more than one label in an issue. After you choose them, just click anywhere outside of the label window to save the action. You will see the changes immediately:

Note how GitHub makes note of any change made to the issue. This way, you will know who took a specific action and when the action was taken. Nothing escapes GitHub's eye! Try to remove the enhancement label to see what happens.
As with the assignees, you can also mass-assign labels to issues. Let's try this by going to the main issues page and selecting some issues, and then choosing the bug label:

The issue tracker will be updated, and now you can have an overview of the issues with the labels assigned to them:

Using labels to group issues
Suppose you have 100 opened issues, many labeled as bugs. Wouldn't it be cool if somehow, only those issues appeared in the Issues main page? Well guess what—when you click on the bug label, GitHub basically makes a query and, as a result, only the bug issues appear. Grouping to the rescue!
Going back to the Labels page, you can see that you can have an overview of the number of issues assigned to each label.
Milestones
Milestones, much like labels, are primarily used to group issues, but for different purposes. Consider a milestone such as a special label that has a title, a description, and an optional due date.
Why milestones are a great help when working with code versioning
It is common knowledge that applications are released in versions. From the BIOS of your laptop to the web browser you use to explore the internet, all applications use versioning.
Many companies, or even community-driven, open source projects, tend to have a road map that dictates the time when the new product will be released to the public.
GitHub integrates this feature with the issue tracker. Let's dive in and learn how to create a new milestone, attach some issues to it, and use the overview to see what issues remain resolved or unresolved.
Creating a new milestone
While at the main page of the issue tracker, click on the Milestones link, next to the Labels link. If no milestone has been created yet, you have two buttons that can create a milestone. Generally, the New milestone button will be the main one to use.
Now, let's create our first milestone. The only requirement is the title; the Description and Due Date fields are optional. However, just to see what it looks like, let's add all the information:

Hit Create milestone and it will appear in the Milestones page with all the information we previously entered:

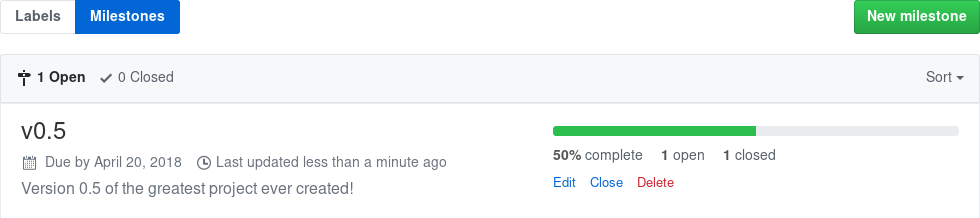
On the left-hand side, there is the name, the due date, the description, and a note of the time the milestone was last updated. On the right-hand side, you can see the percentage of completion and the number of open and closed issues. Of course, you can edit, close, or delete it completely.
Adding issues to milestones
Now that we have at least one milestone, let's set it to an issue.
Again, there are two ways to add a milestone to an issue. Much like assignees and labels, you can do this inside each issue or mass-add it when in the Issues main page. Here, I will try the second approach; you can try the first one on your own:

After selecting the milestone, the page will be refreshed and the issue will now be added to the selected milestone. If you watch carefully, you can see a small icon and the name of the milestone next to it:

Using milestones to see which issues are resolved or are yet to be resolved
When dealing with hundreds of issues, bug reports, and enhancements, it is nice to have an overview of what is resolved and what is not.
Let's add another issue to the milestone and then immediately close it, as we learned in the Creating an issue section. In the context of the milestone, this will be considered as complete. Head over to the milestones page. You will see that the bar is now half full (at 50%):
Tips and tricks
The README files are essential for your project as they add useful information to the start page. Let's briefly explore this feature and then learn about keyboard shortcuts.
Learning about the README file
The README file is used to provide information about your project. Its content is automatically shown on the front page of your repository, so it is always a good idea to provide one file.
GitHub checks whether the README file comes with an extension; if it is supported for rendering, it automatically gets formatted according to its implementation.
For example, a README file can have a .md extension that stands for markdown, a .rst extension that stands for restructured text, and a .adoc extension that stands for AsciiDoc.
If the extension is not supported, then GitHub treats it like a regular text file and no formatting is done.
For a list of supported markups, go to https://github.com/github/markup#markups.
Navigating easily with keyboard shortcuts
GitHub has the nice feature of supporting keyboard shortcuts. You can see which shortcuts are supported by hitting ? on any page. A dialog box will pop up with all the supported shortcuts for that particular page. To see all the shortcuts, click on the Show All link.
Summary
In this chapter, you learned how to create your first repository and explored its main page. You also learned how to effectively use the issue tracker in order to track your project's bugs, feature requests, and so on. Moreover, you learned how to use labels and milestones to better group the issues.
In the next chapter, we will learn about wikis, as well as GitHub's feature concerning code release.